Table of Contents
Advertisement
WARNING
Read these instructions carefully before use!
FOR OUTDOOR USE ONLY
DO NOT PLACE ARTICLES ON OR AGAINST THIS APPLIANCE
DO NOT OPERATE THIS APPLIANCE BEFORE READING THE INSTRUCTION BOOKLET
DO NOT STORE CHEMICALS, FLAMMABLE MATERIALS OR SPRAY AEROSOLS NEAR THIS APPLIANCE
DO NOT OPERATE THIS APPLIANCE INDOORS
DO NOT OPERATE THIS APPLIANCE IN AN ENCLOSED AREA
DO NOT LIGHT OR OPERATE WITH A COVER ON
RAPID COAL
Charcoal BBQ with Electric Ignition
Instruction Manual
Model: HS-17CE01
1
Advertisement
Table of Contents

Summary of Contents for FIAMETTA RAPID COAL HS-17CE01
- Page 1 RAPID COAL Charcoal BBQ with Electric Ignition Instruction Manual Model: HS-17CE01 WARNING Read these instructions carefully before use! FOR OUTDOOR USE ONLY DO NOT PLACE ARTICLES ON OR AGAINST THIS APPLIANCE DO NOT OPERATE THIS APPLIANCE BEFORE READING THE INSTRUCTION BOOKLET DO NOT STORE CHEMICALS, FLAMMABLE MATERIALS OR SPRAY AEROSOLS NEAR THIS APPLIANCE DO NOT OPERATE THIS APPLIANCE INDOORS DO NOT OPERATE THIS APPLIANCE IN AN ENCLOSED AREA...
-
Page 2: Table Of Contents
TABLE OF CONTENTS SAFETY INSTRUCTIONS …………………………………………………………………………………..….… 3 ASSEMBLY STEPS………………………………………………………………………………………………… 4 HOW TO USE THE BBQ…………………………………………………………………………………………. 14 HOW TO USE THE ROTISSERIE………………………………………………………………………………. 15 BUILT IN STORAGE……………………………………………………………………………………………… 15 COOKING FOR THE FIRST TIME……………………………………………………………………………… 15 COOKING TIPS ……………………………………………………………………………………… …………..16 PERIODIC CLEANING……………………………………………………………………………………… ……16 STORAGE WHEN NOT IN USE………………………………………………………………………………… 16 TROUBLESHOOTING ……………………………………………………………………………………………... -
Page 3: Safety Instructions
SAFETY INSTRUCTIONS IMPORTANT: Read the assembly instructions of this booklet before removing the contents of the carton. This BBQ is an OUTDOOR APPLIANCE ONLY. It must NOT be used indoors. 2. READ ALL OPERATING INSTRUCTIONS BEFORE USE. 3. Do not perform any servicing on the BBQ yourself. Servicing can only be carried out by authorized technicians. -
Page 4: Assembly Steps
ASSEMBLY STEPS... - Page 5 Parts list 1 Charcoal BBQ body 2 Feet with casters 3 Ash tray handle / Door 4 Hood handle x 2 handle 5 Ash tray 6 Body handle x 2 7 Cover of square hole x 2 8 Motor 9 Bamboo table 10 Charcoal tray 11 Ignition charcoal tray 12 Cooking grill x 2...
- Page 6 Hardware Pack Bolt:M6*55 Bolt:M6*12 6PCS 16PCS Always wear gloves during assembly of this BBQ. STEP 1 Assemble the charcoal BBQ body (1) and feet with casters (2) use bolt (A) 6pcs as shown.
- Page 7 STEP 2 Assemble the ash tray handle (3) and ash tray (5) use bolt (B) 2pcs as shown. STEP 3 Insert the complete ash tray into the charcoal BBQ body.
- Page 8 STEP 4 Open the charcoal tray door, assemble the door handle (3) on the charcoal tray door use bolt (B) 2pcs as shown. STEP 5 According photo (A1), assemble the body handle (6) on the left side panel use bolt (B) 4pcs as shown. According photo (A2), assemble the body handle (6) on the right-side panel use bolt (B) 4pcs as shown.
- Page 9 STEP 6 Assemble the handle of lifting bar (16) as shown. STEP 7 Insert the cover of square hole (7) and bamboo table (9) as shown.
- Page 10 STEP 8 Insert charcoal tray (10) and ignition charcoal tray (11) and cooking grills (12) on the charcoal BBQ as shown. STEP 9 Remove the cover of square hole (7) then insert the left rotisserie post (13) and the right rotisserie post (14) on the charcoal BBQ as shown.
- Page 11 STEP 10 Assemble the (A),(B), (C), (D), (E), (E)as below photo shown. Note: If no use part (A) and (B), we can put the parts into the positions as photo (F) and (G) as shown. Assemble the motor (8) on the right rotisserie post (14) and put the rotisserie bar into motor as second photo shown.
- Page 12 STEP 11 Assemble hood handle (4) on the hood (15) use bolt (B) 4pcs as shown. Assemble the thermometer (17) on the hood (15) as shown. 4 17...
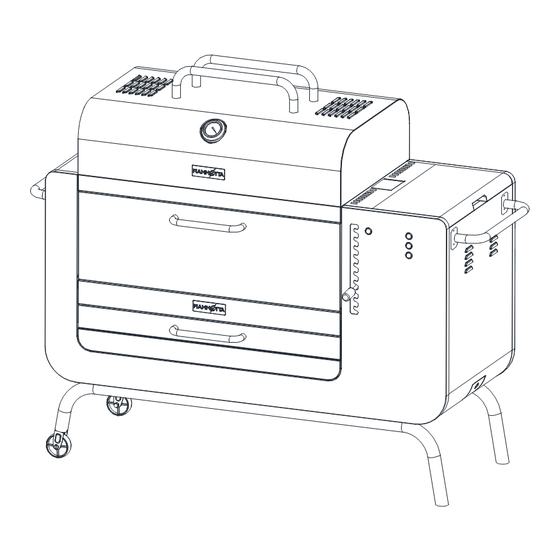
- Page 13 Fully assembled...
-
Page 14: How To Use The Bbq
HOW TO USE THE BBQ • Remove the power lead from the compartment at the back of the BBQ and connect it to a power outlet. • Lower the charcoal tray to the lowest level. • Open the front door and load the charcoal tray with the desired amount of charcoal. •... -
Page 15: How To Use The Rotisserie
HOW TO USE THE ROTISSERIE • Install the meat to be cooked on the rotisserie shaft and secure the meat with the prongs. • The maximum load is 12kg evenly distributed on the shaft. • Install the solid fuel and start the BBQ as described above. •... -
Page 16: Cooking Tips
COOKING TIPS • Strong winds can affect the cooking performance of your BBQ so factor in this element when positioning your BBQ outdoors for cooking. • Avoid continually turning the meat over. When cooking internal juices rise to the surface of the meat and then settle. -
Page 17: Troubleshooting
TROUBLESHOOTING Problem Solution Use a stoker to locate solid fuel over the ignition charcoal tray. The Solid fuel is not igniting. fuel will light over the ignition charcoal tray first, then spread to the remainder of the fuel on the charcoal tray. Use a stoker to move solid fuel close together to promote cross lighting of the fuel load. -
Page 18: Wiring Diagram
WIRING DIAGRAM... -
Page 19: Notes
NOTES ________________________________________________________________________________________ ________________________________________________________________________________________ ________________________________________________________________________________________ ________________________________________________________________________________________ ________________________________________________________________________________________ ________________________________________________________________________________________ ________________________________________________________________________________________ ________________________________________________________________________________________ ________________________________________________________________________________________... - Page 20 ________________________________________________________________________________________ ________________________________________________________________________________________ ________________________________________________________________________________________ ________________________________________________________________________________________ ________________________________________________________________________________________ ________________________________________________________________________________________...
- Page 21 PRODUCT WARRANTY Thank you for purchasing one of our quality FIAMETTA products. Your FIAMETTA product is covered against defects for a period of 12 months for parts and labour, repair or replacement. This warranty excludes surface rust and damage caused by abuse or neglect.
-
Page 22: Warranty
WHAT IS NOT COVERED IN THE For Australian customers WARRANTY If you experience any technical issues with your FIAMETTA product, in the first instance review the instruction manual or call the warranty • Removal or re-installation costs. This service agent below.
Need help?
Do you have a question about the RAPID COAL HS-17CE01 and is the answer not in the manual?
Questions and answers