
Related Manuals for BIGREP ONE.2


Summary of Contents for BIGREP ONE.2
- Page 1 BigRep ONE.2 Full Scale 3D Printer OPERATING INSTRUCTIONS Translation of the original operating instructions. 1.02.02 2015/04/09...
-
Page 3: Table Of Contents
Assembly and function ............9 3.1. Short description ............. 9 3.2. Included in the delivery ........... 9 3.3. Overview ................ 10 3.4. The BigRep ONE.2 in detail ........... 11 3.5. Software ................. 12 3.6. Interface ................. 12 Installation and commissioning .........13 4.1. -
Page 4: Introduction
Please carefully read this manual before use. Save this manual in an accessible location for future reference. If you have any further questions please contact Customer Care at support@bigrep.com 1.1. Information Copyright/Masthead © BigRep GmbH, 2015, Berlin BigRep GmbH Gneisenaustraße 66 10961 Berlin Germany Managing Directors: Lukas Oehmigen, René Gurka Contact: support@bigrep.com... -
Page 5: Technical Specifications
BigRep ONE.2 1. Introduction 1.2. Technical specifications Manufacturer Model BigRep GmbH BigRep ONE.2 Berlin / Germany Version 1.02.02 Dimensions [mm] 1800 x 1850 x 2000 Weight control unit appx. 70 kg Weight printer appx. 410 kg Layer thickness ≥ 300 µm... -
Page 6: Safety
(damages could result if relevant precautions are not taken) 2.2. Safety Compliant Use The BigRep ONE.2 is used to create 3D-printed objects from suitable fila- ment. The instruction for the machine is created in a computer and then transferred to the machine via an USB-port. - Page 7 BigRep ONE.2 2. Safety Hazards Hazard from electrical current HAZARD – HIGH VOLTAGE In case of contact with live parts, an immediate danger of death by electrocution is possible. If the insulation of live parts is damaged, immediately unplug the machine from electrical power and carry out repairs by qualified personnel.
- Page 8 A helmet should be worn during operation on the machine. Protective equipment The BigRep ONE.2 is equipped with an emergency stop switch (f): All moving parts are stopped by pressing on the emergency stop switch; the table heat is switched off, and the printing process is interrupted! The emergency stop switch does not shut off the power.
-
Page 9: Assembly And Function
BigRep ONE.2 3. Assembly and function Assembly and function 3.1. Short description The BigRep ONE.2 is a full-scale FFF 3D-Printer for studio and professional with an working volume. A printing 980 mm x 1050 mm x 1100 mm (ca. 1.3m... -
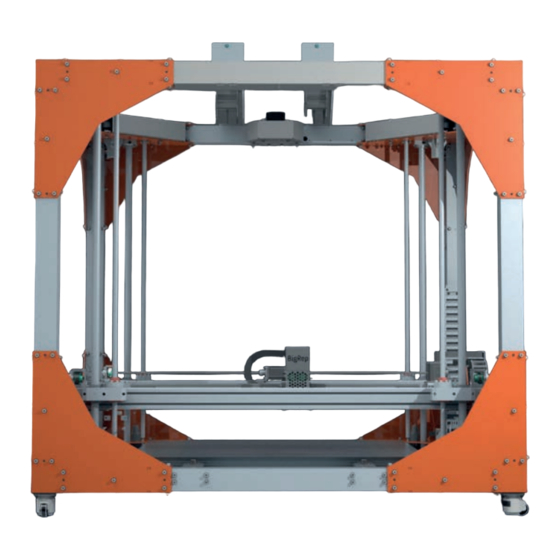
Page 10: Overview
3.3. Overview BigRep ONE.2 A Control panel unit B Extruder head C Print table D Filament roll holder Fig. 3-1: BigRep ONE.2 with control panel E Z-guide sha s F Z-lead spindles G X-guide rails H Y-guide rails a Display... -
Page 11: The Bigrep One.2 In Detail
(G) X-guide rails (2 pieces, one above the other) (H) Y-guide rails (2 pieces, opposite sides) Control panel (A) (Fig. 3.2) Display with touchscreen Operation of BigRep ONE.2 (Graphic User Interface) USB port For loading the print instructions (G-code) from USB media Display switch... -
Page 12: Software
Note: Set the correct print table size when using slicing software different to KISSlicer. The Z-Offset must be set to zero. Wrong settings can lead to damages. 3.6. Interface The BigRep ONE.2 is operated via the touchscreen interface (a) on the control panel. Note the separate manual for the interface. -
Page 13: Installation And Commissioning
(A) and the equipment must be pulled out. The BigRep ONE.2 can be moved by utilising the four transport wheels mounted under the frame. Immediately after transport, the transport wheels must be locked again to prevent accidental rolling of the machi- nery. -
Page 14: First Use, Connecting The Printer
BigRep ONE.2 4.3. First use, connecting the printer If you have chosen to purchase the BigRep ONE.2 without a service setup, you will receive a separate manual for first use. Connect the unit only to the mains after you have aligned frames and table. - Page 15 Interface-Manual | Homing & › Switch off the BigRep ONE.2 using the main switch (e)! › Move the extruder head (B) manually by hand to P1 area (Fig. 4-5). Never move the extruder head manually by hand while machine is connected to power source! Induced voltage leads to damage.
-
Page 16: Disassembly
4. Installation and commissioning BigRep ONE.2 › Then run through all four points P1-P4 again. Double check all 4 points until the correct distance between the table and the nozzle at all four points is the thickness of the gauge blade. -
Page 17: Service And Operations
5.2. Using the BigRep ONE.2 Note in the following steps the separate Interface Manual as well as the on-screen assistance of the interface. The current corresponding interface manual for your specific firmware can be found on our website [www.bigrep.com]. Print a component Preparation ›... - Page 18 5. Service and operations BigRep ONE.2 › Control the hot end. If necessary, clean the nozzle (Fig. 6-1, (iv)). Mount the correct nozzle if there is a new hot end filament diame- Chap. 6.2. Change the hot end & Preheat device ›...
-
Page 19: Changeover
BigRep ONE.2 6. Changeover / Retooling Changover / Retooling Read the following instructions completely before you begin replacing any components. 6.1. Changing the filament The filament change can be done before or during printing process. Please note the different procedure. - Page 20 The filament is heated in the hot end (8) and gui- ded through the nozzle (iv) with pressure. The extruder head of BigRep ONE.2 is equipped with two separate hot ends that can be replaced indi- vidually, for example, to use other nozzle diame- ters.
- Page 21 BigRep ONE.2 6. Changeover / Retooling Should you need a new hot end, ask Customer Care: support@bigrep.com The hot end mechanics may only be replaced as a whole. Opening the hot end leads to damage/loss of warranty. In particular, the nozz- les found on the hot end may not be replaced individually.
- Page 22 2. Tighten the clamp screw (7) 3. Reinstall the hot end electronics 4. Install the front extrusion head cover Before you start printing, always move the extruder head to the home position. Complete hot end exchange Please contact to Customer Care at support@bigrep.com...
-
Page 23: Maintenance And Care
Ensure that there always is a light film of lubricant. Tighten the belts If you have problems with tension of the belts please turn to Customer Care: support@bigrep.com Change of the protection film Please contact Customer Care at support@bigrep.com Firmware update Please contact Customer Care at support@bigrep.com... -
Page 24: Appendix
8. Appendix BigRep ONE.2 Appendix 8.1. FAQ / Troubleshooting You can find the current FAQ list at our home page [www.bigrep.com] 8.2. Glossary Term Explanation Extrusion Curable materials pressed from a nozzle. Filament Fiber string rolled up on a roll. Available in different mate- rials and sizes. - Page 25 BigRep ONE.2 8. Appendix Notes...
-
Page 26: Drawings
A. Drawings BigRep ONE.2 Front cover Rear cover filament guide Screws Fig. A-1: Extruder head with front cover Abb. X-Xa: Extruderkopf ohne Frontabdeckung... - Page 27 BigRep ONE.2 A. Drawings Rear Cover Screws Releasable cable tie (black) 7 Clamp screw 8 Hot end Fig. A-2: Extruder head without front cover...
- Page 28 BigRep GmbH • Gneisenaustraße 66 • 10961 Berlin • Germany support@bigrep.com...
Need help?
Do you have a question about the ONE.2 and is the answer not in the manual?
Questions and answers