Advertisement
Quick Links
Advertisement

Related Manuals for BIGREP ONE GENERATION 3


Summary of Contents for BIGREP ONE GENERATION 3
- Page 1 TECHNICAL HANDBOOK BIGREP ONE LARGE SCALE 3D PRINTER – GENERATION 3 (01/2016) 2016/05/23...
-
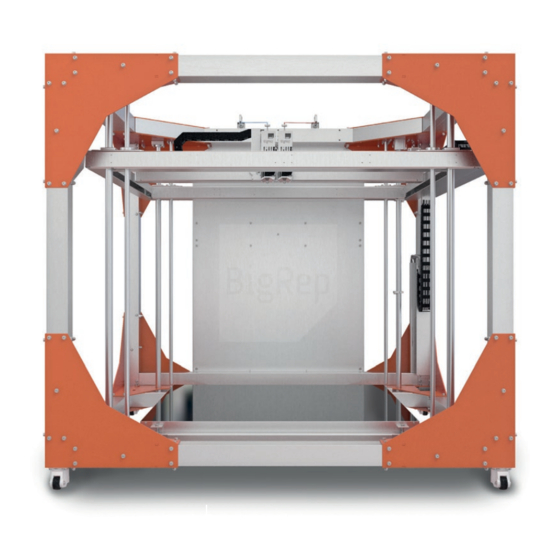
Page 2: General Infos
0. General Infos / Updates BigRep General Infos Whenever an update in the technical manual appears you can download this updated subchapter in the reseller portal. Recent changes will be listed in the changelog. Please replace updated subchapters in the printed manual. - Page 3 0. General Infos / Updates BigRep Chapter Overview / Versiontracker Chapter Topic Last Update I Mechanics Overview 2016-04-07 Table / Bed 2016-04-07 End stops 2016-04-07 Portal 2016-04-07 Extruder 2016-04-07 Spool cabinet 2016-04-07 Machine base with brakes 2016-04-07 II Electric II-A...
- Page 4 0. General Infos / Updates BigRep Changelog / update history for technical manual 2016-05-23 New chapter structure all versions VI-D New Subchapter ‘Starting Guide Simplify3D’ all versions 2016-04-20 II-B New jumper settings in config for ONE.3b only ONE.3b VI-C Maintenance Config Overview: new config all versions VI-C New stepper values in config for ONE.3b...
- Page 5 I. Mechanics BigRep Mechanics Overview * 2016-04-07 Portal Frame Red marked screws must be provided with toothed washer to guarantee proper grounding I-A 1/3...
- Page 6 I. Mechanics BigRep Control panel (Fig. 3-2) incl. touch screen B Z-guide shaft s (4 pcs) C Z-lead spindels (4 pcs) D Filament guide E Print Bed G Mobile machine base (4 pcs) I Extruder (2 pcs) I-A 2/3...
- Page 7 I. Mechanics BigRep Filament spool holder Control cabinet Main switch with door lock Emergency stop button Touchscreen Reset USB port I-A 3/3...
- Page 8 Table / Bed * 2016-04-07 Overview › BigRep ONE comes with a heated (aluminum) printing bed, incl. polyamide printing tape which can be replaced. › The heated bed and polyimide tape ensures that the first layers stick to the bed.
- Page 9 BigRep end stops (see figure next page) BigRep ONE comes with 6 optical end stops, two for each axis. The three addi- tional end stops make sure that the printer always knows the maximum position of each axis, even when the operator used the wrong build volume during slicing.
- Page 10 I. Mechanics BigRep Homeposition X-axis 2a X End position X-axis 2b Y Homeposition Y-axis Homeposition Z-axis adjustable End position Z-axis I-C 2/2...
- Page 11 Portal * 2016-04-07 Overview BigRep has three moving Axis, X, Y and Z. If you are standing in front of the printer the movement of the axis is as following: › X-Axis: moves the extruder in X direction from left to right.
- Page 12 Access hole for screw to remove hot end h Electrical connectors The extruders are the main unit for 3D printing with the BigRep ONE. The extruder contains the hot end (n) where the filament is heated and then squeezed through the nozzle (o).
- Page 13 I. Mechanics BigRep I-E 2/6...
- Page 14 I. Mechanics BigRep I-E 3/6...
- Page 15 I. Mechanics BigRep I-E 4/6...
- Page 16 I. Mechanics BigRep I-E 5/6...
- Page 17 I. Mechanics BigRep Auto Leveling BigRep ONE comes with an auto leveling X-Axis to Bed The laser sensor is mounted to the X-Axis left from the extruder The sensor measures the distance between X-Axis and Bed Before you start a print, the sensor measures (with 3 points) the distance be-...
- Page 18 I. Mechanics BigRep Spool cabinet * 2016-04-07 adjustable roller adjustable sponge I-F 1/1...
- Page 19 I. Mechanics BigRep Machine base with brakes * 2016-04-07 To change the height and for horizontal alignment adjust the idler wheel at the machine base as shown and check the frame’s horizontal alignment with a spirit level. I-G 1/1...
- Page 20 II. Electric BigRep Electric II-A Overview * 2016-04-07 Printer configuration: 200-240V, needed: at least 200V & 16 Amp Preassembled Schuko Plug can be replaced II-A 1/1...
- Page 21 Due to security reasons the machine cannot be switched on when the control unit is open. In case maintenance is needed, BigRep Service Staff is allowed to open the con- trol unit and switch the machine on. In order to do so you have to tape the securi- ty switch at the top of the control unit.
-
Page 22: Overview Of Components
II. Electric BigRep Overview of components 1. UPS 12. USB panel jack 2. Time relay 13. Inductor box 3. Door position switch 14. Boogieboard 4. Power supply 24V 15. Optocoupler filament sensor 5. Mainswitch incl lock 16. Relay bed 6. Power supply 48V 17. - Page 23 II. Electric BigRep Doors thermostat (35°) case documents grounding door lock main switch fuse panel air filter grounding Fuse panel II-B 3/7...
- Page 24 II. Electric BigRep Boogieboard Boogieboard is the electronic control center of the printer, which operates all of the electronic elements of the printer. The boogieboard also contains a SD-card with firmware and config. The LEDs at the boogieboard tell us if something is not working proper.
- Page 25 II. Electric BigRep LEDs 1. BED: Led´s on when heating 2. End stops: LED´s 1 on when end stops are not triggered 3. Filament out sensor T0 and T1: LED´s on when filament in 4. Emergency-Stop: LED´s on when not hit 5.
- Page 26 II. Electric BigRep UPS onboard UPS ensures that the PC will have power for a short time in case of a current pow- er interruption. Due to security reasons the fuse of the UPS is plugged out during transportation and has to be plugged in before the setup.
- Page 27 II. Electric BigRep Jumper Settings Output Motors Output of each motor has to have correct jumper settings (white switches on blue panel) Each output comes with green and red LED´s which display issues in case the motors are not working proper: ›...
- Page 28 II. Electric BigRep II-C Security stops * 2016-04-07 In order to bring all moving parts to a stop in an emergency: › Press the emergency stop button (P) on the control panel (A) or › Activate the safety edge at the top and bottom of the frame (J) by applying gentle pressure Emergency stop activation does not turn off the power supply.
- Page 29 II. Electric BigRep II-D Extruder Wiring * 2016-04-07 Important: Plug out the main connectors to the printer at the back only when the machine is switched off! Faulty wiring means replacement of extruder. Only wiring which can be replaced by service staff is thermocouples and heating elements.
- Page 30 BigRep II-E PC * 2016-04-07 Overview › Linux PC › Pronterface and BigRep GUI preinstalled › Operator can switch between Pronterface and GUI during the machine is running. › Pronterface recommended for maintenance › Hard drive on-board – data/printing files can be saved at the machine.
- Page 31 Linux System incl. Pronterface preinstalled › Printer is based on smoothieware [http://smoothieware.org/] › Config File is part of the firmware and defines all settings of the BigRep ONE › Pronterface and BigRep GUI preinstalled › With Pronterface the user can operate the printer ›...
- Page 32 CAM software), and executes them, for example by moving stepper motors in a coordinated fashion, and operating tools. › Firmware is written by BigRep and based on the open source smoothie project, like many other FDM 3D Printer and/or CNC milling machines. ›...
- Page 33 III. Software BigRep III-C Config * 2016-04-07 › Config file defines all operational settings of the printer › Example: Acceleration of axis, buffer smoothieboard, offset, stepper values › Most of the values are not allowed to change › Small amount of values are allowed to change and have to be changed in case hardware is replaced (for example new extruder): ›...
- Page 34 III. Software BigRep III-D GUI * 2016-04-07 › GUI (Graphic User Interface) is made by BigRep, based on Pronterface and allows the user to operate the machine customer-friendly › GUI will start automatically after switching on the printer › It is possible to switch between Pronterface and GUI at any time ›...
- Page 35 III. Software BigRep Menu Structure Start Screen Main Reset Printer Connect / Disconnect Turn O Prepare Print Prepare Print Advanced Mode Print Advanced Mode Home & Level Feedrate override, Load / Change Object, Feedrate override, Temperature & Material Extrusion override,...
- Page 36 BigRep III-E Pronterface * 2016-04-07 Pronterface is a free, open source software Access to Pronterface: hitting “exit UI” In case the BigRep GUI is not working due to any software bugs the operator can always switch to pronterface III-E 1/1...
- Page 37 For example when you hit the button “reset”, M-Code m999 will be used › Not every M-Code can be used with the Graphic User Interface › If needed the operator can directly use M-Codes in Pronterface and BigRep Most important G-/M-Codes › M190 SXX° wait till bed temperature is reached ›...
- Page 38 III. Software BigRep › G90 XXX XXX XXX XXXXX drive to position › Autoleveling › resets position › homing › activate left extruder T0 › activate right extruder T1 Full List of G- / M-Codes G-Code Description Example G0 X10 Y-5 F100 Move to the given coordinates.
- Page 39 III. Software BigRep Inch mode : passed coordinates will be considered as Inches, so internally transla- ted to millimeters (command is modal) Millimeter mode ( default ) : passed coor- dinates will be considered as millimeters (command is modal) G30 - G30 F100 Simple Z probe at current XY, reports distance moved down until probe triggers.
- Page 40 III. Software BigRep Stops the spindle Only if spindle module is enabled. Enable stepper motors Disable stepper motors List SD card files Initialize the SD card. This does nothing in Smoothie but is kept for compatibility M23 file.gcode Select a file...
- Page 41 III. Software BigRep M117 hello world M117 Display message on LCD, blank message or M117 will clear it M119 Show limit switch status M119 M120 M120 "Push" the current feed-rate and seek-rate so that another one can be temporarily used, then the current one can be restored M121 "Pop"...
- Page 42 III. Software BigRep M301 S0 P30 I10 M301 Edit temperature control PID parameters D10 X255.0000 X<i_max> Y<max_pwm> Y255 M303 E0 S185 - M303 Begin PID auto-tune cycle E<hotendid> Tune extruder S<temperature> - M303 E1 S100 - Tune printbed - M304...
- Page 43 III. Software BigRep M374 S123 M374 Z grid strategy: save calibration grid. opti- onal S parameter saves a custom file with numerical extention M375 Z grid strategy: load calibration grid. M375 S123 optional S Parameter loads a pre saved custom grid...
- Page 44 III. Software BigRep M909 A16 B64 M909 Set microsteps (1/n), ONLY for advanced drivers handled by motordriver module, M909.1 will also set the steps/mm accor- dingly M910.x setup advanced driver chips that support M910 SPI setup, parameters are specific to each...
- Page 45 Dimensions: [Length x Width x Height] 225 x 200 x 200 cm Printer runs through longterm QS testing before it leaves BigRep facility. Power supply has to be changed if needed. Printer comes with preassembled Schucko Plug, which can easily be changed.
- Page 46 IV. Setup BigRep IV-B Operating Environment / Requirements * 2016-04-07 Make sure the ground is leveled and has sufficient load-bearing capacity! Make sure there is enough free space between the machine and the ceiling (at least 1m to the device)! Take particular care to ensure that there is enough free space behind the control cabinet at the back of the printer.
- Page 47 IV. Setup BigRep IV-C Unpacking * 2016-04-07 There are two possibilities to get the printer out of the box: 1. Use a forklift and belts and lift the printer out of the box 2. Use the front side of the box as a ramp and pull out the printer by hand. The...
- Page 48 IV. Setup BigRep 4. Take away the security foam under the table 5. Loose the brackets at each of the four wheels of the printer. 6. Now the printer is ready to be pulled out of the box. We have two options...
- Page 49 IV. Setup BigRep c. Use a lift truck and lift the printer from the upper side: d. Done Option 2 Use the front side of the box as a ramp and pull out the printer by hand. The front side comes with preassembled angle brackets.
- Page 50 IV. Setup BigRep 7. After the printer is pulled out and at its final location, you can take away all of the transit support 8. At the end loose the accessories box and spool holder from the printing table. Please note: The printing table already comes with orange kapton tape assembled.
- Page 51 IV. Setup BigRep IV-C 5/5...
- Page 52 IV. Setup BigRep IV-D Visual inspection * 2016-04-07 See separate Visual Inspection List on reseller portal IV-D 1/1...
- Page 53 IV. Setup BigRep IV-E Photo Documentation * 2016-04-07 Take pictures from: S/N Numbers, Axis, Printer from each side, Bed, Control Unit, Spool holder IV-E 1/1...
- Page 54 IV. Setup BigRep IV-F Electric Setup * 2016-04-07 If there is no standardized power network a local electrician should always do the electric setup! › Printer configuration: 200-240V, needed: at least 200V & 16 Amp › Preassembled Schuko Plug can be replaced ›...
- Page 55 IV. Setup BigRep IV-G Assembling * 2016-04-07 Spooler cabinet Note: If there is no standardized power network a local electrician should always do the electric setup (see 4.5). Steps: 1. Take the spool cabinet from the printing bed. 2. Use the eight screws you will find in the accessories box .
- Page 56 3. This will give you ‚Terminal (text command line) control of the machine sudo apt-get update 4. To VIEW the current version, type (checks availabili- apt-cache policy bigrep-one ty, password required) and You should see info like: Installed: 0.5.X Candidate: 0.5.X 5.
- Page 57 IV. Setup BigRep Basic Test Retraction/Extrusion Test if extruder feeding wheel is moving: 1. Extrude T0 2. Retract T0 3. Extrude T1 4. Retract T1 Use 50mm length without having filament between feeding wheels IV-H 2/2...
- Page 58 IV. Setup BigRep IV-I Pre Autoleveling * 2016-04-07 Leveling/Calibration: Setting up Lasersensor 1. Check table mounting Angled ==> Z-Min sensor bottom edge = 10m Straight ==> Z-Min sensor bottom edge = 65mm 2. Home Z 3. Start PRO-Mode by pressing „Down“ for 3 Seconds at lasersensor 4.
- Page 59 IV. Setup BigRep 3. Press „Teach“ on the lasersensor AWLS 4. Drive printer 9.9/9.8mm up in Z from current position (--> G91 [relative mode] enter & G1 Z9.8 F5000) 5. If „error41“ is displayed, go 0.1mm down 6. Press „Teach“ ==> „GooD“ should be displayed...
- Page 60 IV. Setup BigRep IV-J Auto Leveling * 2016-04-07 Preform „Height_Profile_measurement_withG32_G4dwell.gcode“ and type in height profile in the appended Matrix table. Tolerance: min./max. Point +-0,2mm IV-J 1/1...
- Page 61 IV. Setup BigRep IV-K Extruder * 2016-04-07 Extruder extrusion test/calibration flow rate 1. Heat up both ext. sides to 220° and change the extrusion length to 300mm and speed to100 mm/min. 2. Make sure you have filament inside extruder tubes and they both reach the end of the nozzle 3.
- Page 62 IV. Setup BigRep IV-L Test Prints * 2016-04-07 Flow Consistency Print G-Code Constant_flow_test_both_extruders.gcode ! Hold the result against light and check uniformity of the Layer Dual Extrusion Accuracy Print Winkel_dual_extr_accuracy.gcode : both angle have to be placed exact on above the other When test failed: 1.
-
Page 63: Maintenance
Lubricate Axis › Lubricate Belts › Check security stops › Check tension of belts Expendable items/Replacements › Printbed tape › Nozzle › Extruder All items + BigRep Filament can be ordered at www.bigrep.com/shop with a re- seller discount V-A 1/1... - Page 64 V. Maintenance BigRep V-B Replacing Print Bed Tape * 2016-04-07 Note Both layers are bigger than necessary. So no need to be super accurate. At the end you will cut away the overlapping tape. You can order new printbed tape at bigrep.com/shop...
- Page 65 V. Maintenance BigRep c. One person is standing in the back, holding up the tape at both ends (no pressure, just hold it up to avoid that it sticks on the bed to early) d. The second person starts to push the tape onto the bed with using the...
- Page 66 V. Maintenance BigRep 3. Second Layer a. Start with the second layer, overlapping the first layer for at least 1cm and go on similar to the first layer 4. Cut off the overlapping part of the second tape a. Use some straight metal part to make it more easy to have a straight cut...
- Page 67 V. Maintenance BigRep c. Cut off one straight line of the second tape, choose a gap between both tapes of 1-2mm (high pressure needed) d. Pull off the overlapping line 5. Last steps: a. Use the roller for all edges and borders again b.
- Page 68 V. Maintenance BigRep d. Switch off bed heating V-B 5/5...
- Page 69 V. Maintenance BigRep V-C Replacing Nozzle * 2016-04-07 Overview Please also have a look at the manual V-D Replacing Extruder as you have first to dismount the extruder IMPORTANT: ONLY CHANGE THE EXTRUDER WHEN THE MACHINE IS SWITCHED OFF 1. Prepare a.
- Page 70 V. Maintenance BigRep 4. Pull out the loosen hot end 5. Assemble new hot end V-C 2/3...
- Page 71 V. Maintenance BigRep a. Take a new hot end (yellow tube 0.5mm, blue tape 1mm) and push it into the extruder --▷ there is one adjust pin (marked red) which defines the directions b. Push the hot-end flush mounted into the extruder c.
- Page 72 V. Maintenance BigRep V-D Replacing Extruder * 2016-04-07 Overview No tools needed. Also have a look at manual chapter 7.2. IMPORTANT – Only change the extruder when machine is switched off Procedure 1. Switch off the machine 2. Make sure that there is no Filament left in the extruder. If so please have a look at manual.
- Page 73 V. Maintenance BigRep 5. Loose the clamping bold at the extruders front side (no tools needed), turn anticlockwise and make sure that you hold the extruder with the other hand 6. Take the new extruder and attach it to the plate with using the dowel pins (marked red) 7.
- Page 74 V. Maintenance BigRep V-E Check stepper value axis * 2016-05-07 In case there is an issue with correct measurements of the prints, the stepper values of each motor have to be checked. The stepper values tell the printer how many steps per mm have to be done for each axis. Example for X-Axis.
- Page 75 V. Maintenance BigRep V-F Lubricate * 2016-04-07 Axis Regularly clean and lubricate the X-guide rail (H), Y-guide rail (F), Z-lead spindles (C), and Z-guide shafts (B). Please only use approved industrial lubricants. We recommend mineral oil-based lubricants for rolling or plain bearings.
- Page 76 V. Maintenance BigRep V-G Belts * 2016-04-07 Maintenance All belts have to have a certain tension, measured in Hz. In order to measure the tension you have to open the covers of the axis, manually hit the belt like a guitar and measure the tension with a trumeter.
- Page 77 V. Maintenance BigRep V-H Leveling * 2016-04-07 1. Check table mounting a. Angled ==> Z-Min sensor bottom edge = 10m b. Straight ==> Z-Min sensor bottom edge = 65mm 2. Home Z 3. Start PRO-Mode by pressing „Down“ for 3 Seconds 4. Look for option „SenS2 and confirm by pressing „Teach“...
- Page 78 This will give you ‚Terminal (text command line) control of the machine sudo apt-get update 4. To VIEW the current version, type (checks availabili- apt-cache policy bigrep-one ty, password required) and You should see info like: Installed: 0.5.X Candidate: 0.5.X 5.
- Page 79 Which materials can I use for my clients? › Official User Manual › Posterguide › Simplify3d.com › Customer Portal at bigrep.com ▷ each customer will get a login to a perso- nal customer portal, incl. guides, FAQ and a ticketing system VI-A 1/1...
- Page 80 VI. Appendix BigRep Bigrep – Shipping/requirements/Unpacking page 1/2 VI-B Shipping/requirements/Unpacking * 2016-04-07 Shipping a. Shipping: Do you like to handle the shipping? b. Unloading: Do you have a forklift/lifttruck? (loading-forks at least 71inch/180cm long) If not: please let us know as soon as possible, we will provide you a quote from our freight forwarder and handle the shipping - also door to door if preferred.
- Page 81 It is not recommended to do the unpacking by your own – our team is more than happy to support you during the entire setup ! In case you have to do the unpacking by your own please contact BigRep Customer Experience! Additional Information Filament and Spare Parts: www.bigrep.com/shop...
- Page 82 VI. Appendix BigRep Visual Inspection BigRep THEONE S/N Printer: ______________________________________________ S/N Control Unit: ______________________________________________ S/N Extruder 1: ______________________________________________ S/N Extruder 2: ______________________________________________ GUI Version: ______________________________________________ 1 General Visual Inspection Frame o Anodized? o No: scratches, cracks etc? Frame Cover ...
- Page 83 VI. Appendix BigRep Abnahme Protokoll V1.3 final acceptions test-protocol V1.3 Informationen Seriennummern informations serial number Kunde Drucker customer printer Adresse Schaltschrank customer adress control cabinet Postleitzahl Extruder 1 postal code extruder 1 Auftragsnummer Extruder 2 order number extruder 2 Software Version...
- Page 84 VI. Appendix BigRep VI-C Maintenance Config Overview * 2016-04-20 Only for One.3b: Config/Stepper changes Changing the Stepper Value Since the transmission of the new system is 3.33 compared to the old one, the new value for beta_steps_per_mm would be 53.3 x 3.3 = 177.7. However, high values seem to influence the firmware, so the number of microsteps for the step- per motors is changed, too.
- Page 85 VI. Appendix BigRep The dipswitches 5- have to be changed as shown in the table below: Old Value for Y-axis New Value for Y-axis Microsteps 1600 Steps per revolution 6400 Switch positions Switch Switch number number Changing the hysteresis of the heater control for the bed The controller for the temperature of the bed is controlled with a bang-bang-lo- gic, which means turning off at max value and turning back on a min value.
-
Page 86: Config File
VI. Appendix BigRep Config file CX – Manuals Gen3 Categorie Title Tools Overview config – Version 04 2016 Maintenance #Version: 1.32 # NOTE Lines must not exceed 132 characters # Robot module configurations : general handling of movement G-codes and slicing into moves... - Page 87 VI. Appendix BigRep CX – Manuals Gen3 z_axis_max_speed # mm/min # Stepper module pins ( ports, and pin numbers, appending "!" to the number will invert a pin ) alpha_step_pin # Pin for alpha stepper step signal alpha_dir_pin Pin for alpha stepper direction alpha_en_pin 0.15...
- Page 88 VI. Appendix BigRep CX – Manuals Gen3 extruder.T0.mv_pin 0.4! Pin for extruder moving signal, for multi extruder usage extruder.T0.fan_en_pin Pin for associated fan to cool the filament # extruder offset Offset (distance) of both extruders/nozzles to each extruder.T0.x_offset 86.75 # x offset from origin in ### mm 80.75 mm distance nozzle + other in X direction.
- Page 89 VI. Appendix BigRep CX – Manuals Gen3 filament_detector_strategy.binary.enable true # binary strategy module should be loaded # the mapping of a filament detector to the appropriate extruder is 1:1 according the order within this config file filament_detector.T0.enable true # set to trueif filament detection should be used filament_detector.T0.pin...
- Page 90 VI. Appendix BigRep CX – Manuals Gen3 #temperature_control.T0.beta 4066 # or set the beta value All configuration is ignored if false. #temperature_control.T0.bang_bang true temperature_control.T0.p_factor 31.5 permanently set the PID values after an auto pid temperature_control.T0.i_factor 3.978 temperature_control.T0.d_factor temperature_control.T0.K1_factor 0.95 factor used for smoother PID temperature control mechanism temperature_control.T0.heater_power...
- Page 91 VI. Appendix BigRep CX – Manuals Gen3 temperature_control.bed.heater_pin Pin that controls the heater #temperature_control.bed.beta 4066 or set the beta value All configuration is ignored if false. #temperature_control.bed.p_factor 13.7 permanently set the PID values after an auto pid #temperature_control.bed.i_factor 0.097 #temperature_control.bed.d_factor #temperature_control.T0.K1_factor...
- Page 92 VI. Appendix BigRep CX – Manuals Gen3 #switch.spindle.enable false # Endstops endstops_enable true # the endstop module is enabled by default and can be disabled here #corexy_homing false # set to true if homing on a hbit or corexy alpha_min_endstop 1.18v!
- Page 93 VI. Appendix BigRep CX – Manuals Gen3 # optional Z probe zprobe.enable true set to true to enable a zprobe zprobe.probe_pin 1.28v pin probe is attached to if NC remove the ! zprobe.slow_feedrate mm/sec probe feed rate zprobe.return_feedrate mm/sec probe return feed rate #zprobe.debounce_count...
- Page 94 VI. Appendix BigRep CX – Manuals Gen3 #panel.encoder_b_pin 3.26!^ # encoder pin ; GLCD EXP2 Pin 5 #panel.click_button_pin 1.30!^ # click button ; GLCD EXP1 Pin 2 #panel.buzz_pin 1.31 # pin for buzzer ; GLCD EXP1 Pin 1 #panel.button_pause_pin 2.11^ # kill/pause ;...
- Page 95 NOTE: This is a quick start guide, especially made for using simplify3d with your BigRep. You will find the most important settings and descriptions to get started. For in depth knowledge about the software and each single setting, we recommend to visit www.simplify3d.com/support.
- Page 96 VI. Appendix BigRep Slicing – model settings + place surface on bed Most important: • Avoid support • Use correct size/measurements • Place the model directly to the bed In detail: • Import Model: click at File / Import Model and load a new .stl file...
- Page 97 VI. Appendix BigRep Slicing – most important settings: Extruder Most important: • Choose the correct extruder (T0, T1) • Choose the correct nozzle diameter you have installed at the machine (.5 or 1mm) In detail: • Extrusion Multiplier = Flowrate, choose 1 as standard •...
- Page 98 VI. Appendix BigRep Slicing – most important settings: Additions Most important: • Always choose at least a skirt with one outline to avoid imperfections within the first line of your print In detail: • Skirt = One outline with offset •...
- Page 99 VI. Appendix BigRep Slicing – most important settings: Support Most important: • Activate / Deactivate Support • Choose Extruder – whether you want to use same material or special support material. In detail: • Support Infill Percentage = how solid your support will be.
- Page 100 VI. Appendix BigRep Advanced Advanced – Customized Support Most important: • Check automatic support • Remove/add single structures In detail: • Activate = click at Tools/Custimze Support Structure • Support Pillar Resolution = determines the resolution of each support pillar. 1.5mm is recommended for small parts.
- Page 101 VI. Appendix BigRep Advanced – Sequential Printing – Printing Part by Part Most important: • When you do not want to print several models at once layer by layer, you can also print them part by part • Be aware of max height clearance between...
Need help?
Do you have a question about the ONE GENERATION 3 and is the answer not in the manual?
Questions and answers