Advertisement
Available languages
Available languages
Quick Links
65R-C & 65R-TC Manual
Pipe Threader Instructions
RIDGID 65R-C and 65R-TC Threaders are designed to
thread 1" to 2" pipe and conduit using a manually oper-
ated internal ratchet.
Read these instructions carefully before
WARNING
using this tool. Failure to follow all instructions may
result in property damage and/or serious injury.
Thread Size Adjustment
1. Place threader with workholder up (Figures 1 and 2)
and unscrew workholder by turning counter-clockwise
until change plate is clear of posts.
2. Move post to desired pipe size. Screw workholder
clockwise until change plate slides over post.
3. Adjust change plate to desired thread size.
Standard Size Thread: Set change plate between the
two "Standard" marks.
Oversize Thread: For oversize (shallow) thread, set
change plate slightly below the "Standard" marks.
Undersize Thread: For undersize (deep) thread, set
change plate slightly above the "Standard" marks.
Gauge Ring
Release Cam
Lever
Standard
Marks
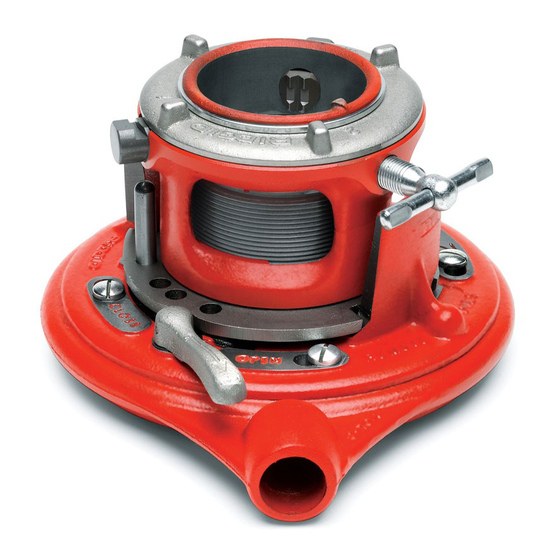
Figure 1 – 65R-C Threader
Workholder
Jaw
Pipe
Handle
Workholder
Change
Plate
Post
Figure 2 – 65R-TC Threader
Printed in U.S.A.
Workholder Jaw
Clamp Screw
Change Plate
Post
Gauge
Ring
Lugs
Clamp
Screw
Ridge Tool Co., Elyria, Ohio, U.S.A.
9/05
Threading:
1. Inspect the threader before use. Replace dies or any
other pat that shows damage or wear. To insure high
thread quality, only use RIDGID replacement dies.
WARNING
Worn dies can result in poor thread quality
and high handle forces.
2. Mount the pipe firmly in a pipe vise. When threading
an existing pipe, make sure it is secure and will no
move. Cut the end of the pipe cleanly and squarely
using a pipe cutter (Figure 3).
To prevent tipping, long lengths of pipe
WARNING
should also be supported with a pipe stand. Vise and
stands should be on level ground.
When working on a scaffold or lift, the oper-
WARNING
ator should be properly secured to prevent injury in the
event of a fall.
Figure 3 – Cutting End Of Pipe
3. Ream the end of the pipe to remove any burrs that
may have been produced during the cutting of the
pipe (Figure 4).
Figure 4 – Reaming End Of Pipe
999-998-280.10
Rev. A
Advertisement

Related Manuals for RIDGID 65R-C


Summary of Contents for RIDGID 65R-C
- Page 1 65R-C & 65R-TC Manual Pipe Threader Instructions RIDGID 65R-C and 65R-TC Threaders are designed to Threading: thread 1″ to 2″ pipe and conduit using a manually oper- 1. Inspect the threader before use. Replace dies or any ated internal ratchet.
-
Page 2: Changing Dies
(refer to previous instructions for thread size adjust- ment). 5. Adjust workholder: 65R-C: Turn gage ring until desired pipe size corre- sponds with mark on top of workholder (Figure 1). 65R-TC: Turn gage ring until desired pipe size is aligned with locking cam (Figure 2). -
Page 3: Service And Repair
65R-C & 65R-TC Manual Pipe Threader Instructions 4. Turn threader over and set post to desired pipe size. Mâchoire d’anneau de serrage Screw workholder down so change plate is between Bague de calibrage the “Standard” size marks and you are ready to Vis de blocage resume threading. - Page 4 (reportez-vous aux consignes de réglage précédentes). 5. Réglez l’anneau de serrage : 65R-C : Tournez la bague de calibrage jusqu’à ce que le repère de section approprié s’aligne sur le repère en tête de l’anneau de serrage (Figure 1).
- Page 5 Ceci Instrucciones de uso évite d’avoir à ramener la fileteuse à la position Las Roscadoras Manuales 65R-C y 65R-TC de RIDGID «STANDARD». han sido fabricadas para roscar tubos y conductos de NOTA ! Eliminez toutes traces d’huile laissée au sol. En una y hasta 2 pulgadas empleando un trinquete interior fin de chantier, nettoyez systématiquement la...
- Page 6 1. Revise la Roscadora antes de usarla. Reemplace las 5. Ajuste del portapiezas: terrajas o cualquier otra pieza que muestre daño o 65R-C: Gire el calibrador anular hasta que el tamaño del desgaste. Para labrar roscas de alta calidad, sólo tubo concuerde con la marca encima del portapiezas emplee terrajas de recambio RIDGID.
-
Page 7: Servicio Y Reparaciones
65R-C & 65R-TC Manual Pipe Threader Instructions ¡ NOTA! Limpie todo derrame o salpicaduras de aceite El mango debe estar limpio y libre de a- ADVERTENCIA ceite y grasa. Así se tiene mejor control de la herramienta. que hayan caído al suelo. Al término de cada tra- bajo, siempre limpie la Roscadora. - Page 8 Nos. 65R-C & 65R-TC Pipe & Conduit Threaders Nos. 65R-C & 65R-TC Capacity: 1″, 1 ″, 1 ″ and 2″ 31 18 Note: No. 65R-C Workholder Assembly (C-81-X) can be used for replace- ment on No. 65R-P Threader Die Set (High Speed, Special...