Table of Contents
Advertisement
Available languages
Available languages
Quick Links
Advertisement
Chapters
Table of Contents

Related Manuals for KitchenAid 5KSMC895


Summary of Contents for KitchenAid 5KSMC895
- Page 1 5KSMC895 KEF97A Instructions Instruções...
-
Page 2: Table Of Contents
Assembling your Stand Mixer ................6 Adjusting your beater to bowl clearance ............8 USING YOUR STAND MIXER Using your KitchenAid accessories ..............8 Speed control guide - 10 speed Stand Mixers ............ 9 TIPS FOR GREAT RESULTS Planetary mixing action ..................10 Mixing time... -
Page 3: Stand Mixer Safety
STAND MIXER SAFETY IMPORTANT SAFEGUARDS When using electrical appliances, basic safety precautions should always be followed, including the following: 1. Read all instructions. Misuse of appliance may result in personal injury. 2. To protect against risk of electrical shock, do not put Stand Mixer in water or other liquid. -
Page 4: Electrical Requirements
The acoustic pressure level measured in conformity with the prEN 454-test code is less than 70 dBA. A * in the model number indicates additional characters that designate machine color and engineering digits for the actual model (eg. 5KSMC895*). -
Page 5: Parts And Features
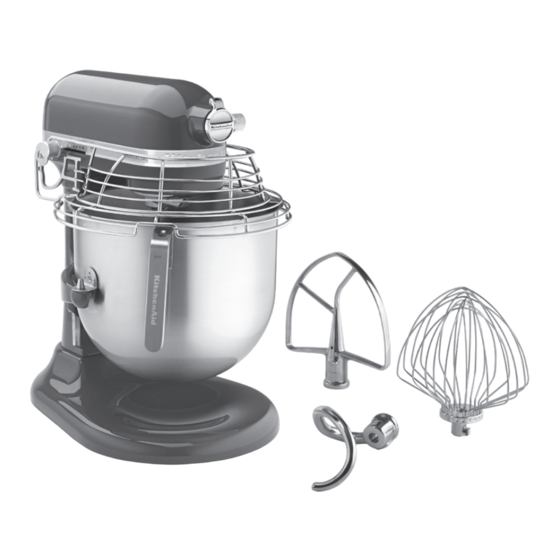
PARTS AND FEATURES Motor head Attachment Speed control lever Bowl lift lever (not shown) Guard Stop switch Beater shaft Locating pins Bowl support 7.6 L (8 qt.) Stainless steel bowl Bowl handle Stainless steel flat beater Stainless steel spiral dough hook 11-wire Stainless steel elliptical whip Removable... -
Page 6: Setting Up Your Stand Mixer
SETTING UP YOUR STAND MIXER Assembling your Stand Mixer To attach bowl To remove bowl 1. Turn speed control lever to “0” (OFF). 1. Turn speed control lever to “0” (OFF). 2. Unplug Stand Mixer or disconnect power. 2. Unplug Stand Mixer or disconnect power. 3. - Page 7 SETTING UP YOUR STAND MIXER INSTALLATION: The Stand Mixer shall be installed on a level and stable surface such as a countertop or work table. To lower bowl 1. Rotate lever back and down. To attach flat beater, wire whip, or dough hook 1.
-
Page 8: Adjusting Your Beater To Bowl Clearance
The Stand Mixer must be stopped to scrape bowl or damage to the Stand Mixer may occur. USING YOUR STAND MIXER Using your KitchenAid accessories Flat Beater for normal to heavy mixtures (Recommended operating time is 1-10 minutes, depending upon recipe):... -
Page 9: Speed Control Guide - 10 Speed Stand Mixers
USING YOUR STAND MIXER Speed control guide — 10 speed Stand Mixers All speeds have the Soft Start feature that automatically starts the Stand Mixer at a lower speed to help avoid ingredient splash-out and “flour puff” at start-up, then quickly increases to the selected speed for optimal performance. -
Page 10: Tips For Great Results
The diagram shows the complete coverage of the bowl made by the path of the Beater. Mixing time Your KitchenAid Mixer will mix faster To help determine the ideal mixing time, and more thoroughly than most other observe the batter or dough and mix only electric mixers. -
Page 11: Care And Cleaning
CARE AND CLEANING The stainless steel bowl, flat beater, wire whip, spiral dough hook, and pouring chute may be washed in an automatic dishwasher. Do not use cleaners with a pH lower ELECTRICAL SHOCK HAZARD than 5. Or, clean them thoroughly in hot ALWAYS BE SURE TO UNPLUG sudsy water and rinse completely before MIXER BEFORE CLEANING TO... - Page 12 Anexando a tigela ..................... 17 Ajustando a distância entre o batedor e a tigela ..........19 USANDO A BATEDEIRA PROFISSIONAL Usando os acessórios KitchenAid ..............19 Guia de controle de velocidade – 10 velocidades de mistura ......20 DICAS PARA BONS RESULTADOS Misturador planetário ..................
-
Page 13: Avisos De Segurança
AVISOS DE SEGURANÇA A sua segurança e a de terceiros é muito importante. Este manual e o seu produto contém muitas mensagens importantes de segurança. Sempre leia e siga as mensagens de segurança. Este é o símbolo de alerta de segurança. Este símbolo alerta sobre situações que podem trazer risco a sua vida, ferimentos a você... - Page 14 8. O uso de acessórios não recomendados ou não vendidos pela KitchenAid pode causar incêndio, choque elétrico ou ferimentos. 9. Não use o produto em ambientes externos.
-
Page 15: Por Onde Começo
POR ONDE COMEÇO? Antes de ligar sua ADVERTÊNCIA Batedeira Profissional, verifique se a tensão da rede elétrica no local de instalação é a mesma indicada na etiqueta de dados técnicos do produto. Esta mesma informação está indicada na etiqueta fixada próxima Risco de Choque Elétrico ao plugue do cabo de alimentação da sua Batedeira Profissional. -
Page 16: Peças E Características
PEÇAS E CARACTERÍSTICAS Motor (cabeçote) Encaixe do eixo Controle de velocidade Alavanca de elevação da tigela (não mostrada) Protetor Botão de parada Eixo do batedor Pinos de fixação Suporte da tigela Tigela em aço inox (7,6 litros) Alça da tigela Batedor plano inox Batedor em gancho... -
Page 17: Montando A Batedeira Profissional Anexando A Tigela
MONTANDO A BATEDEIRA PROFISSIONAL Anexando a tigela Para remover a tigela 1. Desligue a batedeira mudando o controle de velocidade para “0” (Desligar). 1. Desligue a batedeira mudando o controle de velocidade para “0” (Desligar). 2. Retire o plugue da tomada. 2. - Page 18 MONTANDO A BATEDEIRA PROFISSIONAL INSTALAÇÃO: A batedeira deve ser instalada em uma superfície nivelada e estável, como bancadas e mesas de trabalho. Para abaixar a tigela 1. Gire a alavanca de elevação da tigela para trás e para baixo. Anexando os Batedores 1.
-
Page 19: Ajustando A Distância Entre O Batedor E A Tigela
“0” (Desligar), para evitar acidentes e danos à batedeira. USANDO A BATEDEIRA PROFISSIONAL Usando os acessórios KitchenAid Batedor plano para misturas normais e pesadas. (Tempo de funcionamento recomendado é de 1h10min, dependendo da receita):... -
Page 20: Guia De Controle De Velocidade - 10 Velocidades De Mistura
USANDO A BATEDEIRA PROFISSIONAL Guia de controle de velocidade – 10 velocidades de mistura Todas as velocidades possuem um recurso de partida suave, que automaticamente inicia o ciclo em velocidade baixa, a fim de evitar respingos dos ingredientes e que a farinha seja espalhada para fora da tigela. -
Page 21: Dicas Para Bons Resultados
Tempo de Mistura A sua batedeira KitchenAid vai misturar mais Para determinar o tempo ideal de mistura, rápido e com mais homogeneidade que observe a massa e misture apenas até que a maioria das outras batedeiras elétricas. -
Page 22: Dicas De Mistura
DICAS PARA BONS RESULTADOS Dicas de mistura Adicionando ingredientes o fundo da assadeira durante o cozimento. As frutas pegajosas devem ser polvilhadas Sempre adicione ingredientes o mais com farinha, para uma melhor distribuição próximo possível da lateral da tigela e na massa. -
Page 23: Soluções De Problemas
30 minutos antes de ligá-la novamente. choque elétrico. Se o problema persistir entre em contato com a Central de Relacionamento KitchenAid. Não retorne a batedeira ao Antes de ligar para a Assistência revendedor. Técnica verifique o seguinte: Os revendedores não oferecem estes 1. - Page 24 © 2016. All rights reserved. Specifications subject to change without notice. W10878937A 05/16...
Need help?
Do you have a question about the 5KSMC895 and is the answer not in the manual?
Questions and answers