Advertisement
Quick Links
A
Getting Started
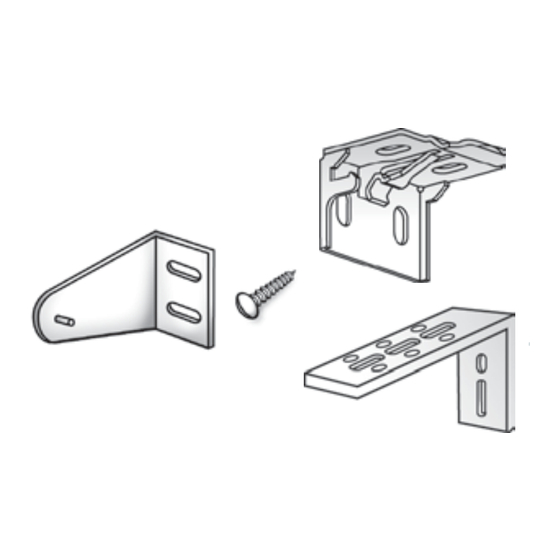
The Parts: Before starting, identify whether your product has a decorative cassette or no cassette–your parts will vary based on this.
Remove and identify the parts required for the installation of your shades:
With Cassette:
Hex Head Screws (1 1/4")
Mounting Brackets
Hold Down Bracket & Screw (optional)
B
The Tools
To install your Next Day Blinds Roller Shades, you will need a few basic tools:
Phillips Head Screwdriver*, or 1/4" nut driver*
•
Measuring tape
•
Pencil
•
* Power screwdriver or power drill with #2 Phillips attachment or 1/4" nut attachment may be used.
C
Sorting Your Shades
On top of the headrail of your Next Day Blinds Roller Shade, there is a sorting label. On this label, you will recognize:
1. Order size of the shade
2. Room location (If not present, info not given at time of order)
3. Whether the shade was ordered for inside mount (IB), outside mount (OB), or side mount (EM)
D
Bracket Spacing
The brackets should be installed where the centerlines are noted in the illustration.
Depending on the width of the roller shade, necessary additional brackets may be
evenly spaced between the two end brackets.
E
Bracket Installation
Inside Mount (IB)
With Cassette: Refer to Figure 1 for bracket
installation details.
No Cassette: Make sure that the screw head
is fully recessed inside the clear plastic part of the
mounting bracket (Fig. 2).
Installation Instructions |
Lift Systems: for Premium Cordless
Pan Head Screws
Universal Extension Brackets (optional)
With Cassette: Smooth or Fabric Insert
Roller Shades
No Cassette:
Mounting Brackets
Bolts and Nuts (optional)
Important Note: Screws provided are for installation into wooden frames only. For
metal surfaces, use suitable sheet metal screws and pre-drill holes. For concrete,
stone, brick, or tile, use a carbide drill and appropriate anchors and screws. For
wallboard or plaster, use hollow wall anchors and/or longer screws to reach framing or
stud. In all cases, follow the fastener manufacturer's recommendations.
Shade
Number of
Width
Brackets
To 40"
2
40" To 72"
3
72" To 84"
4
84" To 96"
5
Figure 1
Handle
End Cap Covers (optional)
2. Room Location
Work Order Number
1. Order Size of Shade
3. Type of Mount
Installation Bracket Spacing on Headrail
2 1/4"
Space evenly
Space evenly
Installation
Centerline
Bracket
Figure 2
No Cassette
2 1/4"
Advertisement

Related Manuals for Next Day Blinds Premium Cordless

Summary of Contents for Next Day Blinds Premium Cordless
-
Page 1: Getting Started
2. Room Location Work Order Number On top of the headrail of your Next Day Blinds Roller Shade, there is a sorting label. On this label, you will recognize: 1. Order size of the shade 2. Room location (If not present, info not given at time of order) 3. - Page 2 Plastic tab should be face up 3/8” minimum 3/4” min. surface Outside Mount (OB) Important Note: Make sure your mounting surface is level. If the headrail does not sit level, the fabric will not roll up evenly which could damage the edges of the fabric. Figure 3 Figure 4 With Cassette: Smooth or Fabric Insert...
-
Page 3: Tension Adjustment
Child Safety Next Day Blinds is committed to incorporating the latest and most effective child-safe technologies in our products. Without any exposed cording this product offers the assurance you need for window coverings in rooms accessed by young children.
Need help?
Do you have a question about the Premium Cordless and is the answer not in the manual?
Questions and answers