Table of Contents
Advertisement
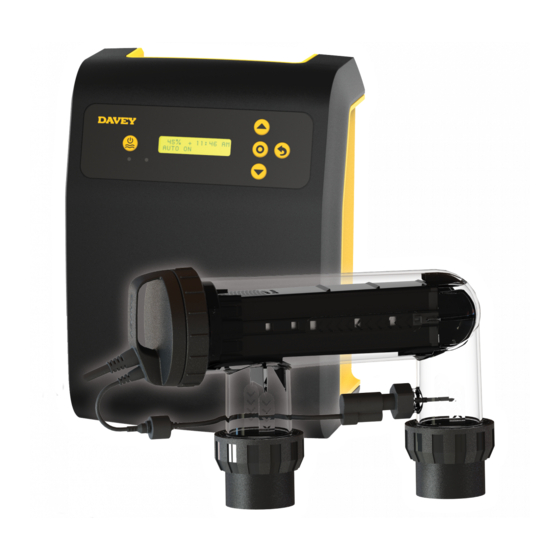
Salt Pool Chlorination System
Models: DNP15C, DNP25C, DNP35C,
Installation and Operating
WARNING: Failure to follow these instructions and comply with all applicable
codes may cause serious bodily injury and/or property damage.
The installation of this product should be carried out by a person knowledgeable
in swimming pool plumbing requirements following the installation instructions
provided in this manual.
Please pass these instructions on to the operator of this equipment.
ChloroMatic
Nipper
DNP15CLS & DNP25CLS
Instructions
™
Advertisement
Table of Contents

Subscribe to Our Youtube Channel
Related Manuals for Davey Nipper DNP15C


Summary of Contents for Davey Nipper DNP15C
- Page 1 ChloroMatic Nipper ™ Salt Pool Chlorination System Models: DNP15C, DNP25C, DNP35C, DNP15CLS & DNP25CLS Installation and Operating Instructions WARNING: Failure to follow these instructions and comply with all applicable codes may cause serious bodily injury and/or property damage. The installation of this product should be carried out by a person knowledgeable in swimming pool plumbing requirements following the installation instructions provided in this manual.
-
Page 2: Table Of Contents
ChloroMatic Nipper ™ Congratulations! You are now the proud owner of a new ChloroMatic Nipper. Please read all information in this manual carefully before installing or operating your ChloroMatic Nipper. Contents: PACKING LIST ..............................3 IMPORTANT SAFETY INSTRUCTIONS ......................4 COMMON TERMS ............................6 INSTALLING THE ChloroMatic Nipper ......................6 CONNECTING THE ELECTROLYTIC CELL TO THE POWER SUPPLY ............7 CONNECTING THE FLOW SWITCH TO THE CELL HOUSING ..............7... -
Page 3: Packing List
1. PACKING LIST Included with your ChloroMatic Nipper are the following items, please check the contents of the box carefully prior to attempting to install the system: a. 1 x Power supply with cell lead; e. 2 x Reducing bushes; b. -
Page 4: Important Safety Instructions
2. IMPORTANT SAFETY INSTRUCTIONS • To minimise the risk of gas build-up in the cell housing, you must ensure there is sufficient water flow through the cell when the unit is on and producing chlorine. • It is essential that your pool pump circulates sufficient water through the cell housing to completely fill the cell housing with water during the chlorination process. - Page 5 IMPORTANT INFORMATION ABOUT YOUR Nipper FACTORS THAT WILL IMPROVE THE PERFORMANCE & LIFE OF YOUR ChloroMatic Nipper. PLEASE READ THIS BEFORE OPERATING YOUR CHLORINATOR POOL BUILDERS: Please cover this information with your customer during the new pool “Handover Session”. Chlorinators are a valuable piece of pool equipment and must be cared for to get the best performance and life span.
-
Page 6: Common Terms
Select a convenient well-ventilated location within one metre of filter equipment and mount the power supply vertically onto a wall, or post at least as wide as the ChloroMatic Nipper power supply itself. Davey recommends that the power supply shall not be located within 3 meters of the pool water. Plug pump and chlorinator power supply into a suitable weatherproof power outlet/controller. -
Page 7: Connecting The Electrolytic Cell To The Power Supply
4.2 INSTALLING THE CELL The ChloroMatic Nipper cell should always by the last appliance in your system. Ensure the cell is installed after pumps, filters and any heating appliances. To achieve best efficiency, the ChloroMatic Nipper cell should be installed such that turbulent water is limited as much as possible. When installing a 90° elbow before the cell’s inlet barrel union, ensure there’s equivalent to 5 x pipe diameter of straight pipe between the elbow and the union. -
Page 8: Pre-Start Up Procedure
7. PRE-START UP PROCEDURE Before operating your ChloroMatic Nipper salt pool chlorination system, please ensure the following quantity of pool salt has been added to your pool. • POOL SALT: To raise salt Salt required concentration by 30,000L 40,000L 50,000L 60,000L 70,000L 80,000L 90,000L 100,000L... -
Page 9: Control Panel
Note: Once the unit starts there is a short time delay until the cell operates to ensure the filtration system is primed with water. • The first time the ChloroMatic Nipper is turned on, the following screen is shown on start-up: DAVEY V1.2.3 AU 15 Figure 10.1 >... - Page 10 3. LANGUAGE 3. LANGUAGE ENGLISH ENGLISH Figure 10.2 > This screen shows the language menu and the current language setting (ie English shown); > The language setting can be changed by pressing the menu up/down buttons to scroll through available languages; >...
- Page 11 > The clock hours can be changed by pressing the menu up/down buttons to scroll to your chosen time; > Press menu/setting select once your preferred clock hour is displayed; > If a mistake is made, the setting can be changed later. >...
- Page 12 TIMER 1 06:00 AM Figure 10.6 > The screen shows the ON-TIME of TIMER 1: ■ current ON-TIME of TIMER 1 is 6:00am. > Initially the clock hours will be flashing; menu up/down buttons to scroll to your chosed time; >...
- Page 13 > Press menu/setting select once your preferred clock hour is displayed; > If a mistake is made, the setting can be changed later; > Next, the clock minutes will be flashing; > The clock minutes can be changed by pressing the menu up/down buttons to scroll to your chosen time;...
- Page 14 TIMER 2 10:00 PM Figure 10.9 > The screen shows the OFF-TIME of TIMER 2: ■ current OFF-TIME of TIMER 2 is 10:00pm. > Initially the clock hours will be flashing; menu up/down buttons to scroll to your chosen time; >...
-
Page 15: Typical (Everyday) Start-Up
Note: Once the unit starts there is a short time delay until the cell operates to ensure the filtration system is primed with water. • Every time the ChloroMatic Nipper is turned on, the following screen is shown on start-up: DAVEY V1.2.1 EU 15L Figure 11.1 •... -
Page 16: Nipper Features
12. ChloroMatic Nipper FEATURES 12.1 CONTROLLING CHLORINE OUTPUT 65% – 09:35 AM AUTO 0N Figure 12.1 The CHLORINE OUTPUT controls the time that the cell is producing chlorine, as a percentage of total time that the ChloroMatic Nipper is on. If the ChloroMatic Nipper cell is producing, it is producing at 100%, unless otherwise altered (see sections WINTER MODE, or SPA MODE). - Page 17 12.2 AUTOMATED TIMERS The ChloroMatic Nipper has two separate timers available for automated operation. This is ideal if looking to run the pool a few hours in the morning, then a few hours in the afternoon. It is important to ensure that the timers do not overlap as this may create confusion when the timer turns on and off.
- Page 18 > If a mistake is made, the setting can be changed later; > Next, the clock minutes will be flashing; > The clock minutes can be changed by pressing the menu up/down buttons to scroll to your chosed time; > Press menu/setting select once your preferred clock minutes is displayed;...
- Page 19 TIMER 1 06:00 AM Figure 12.8 menu up/down buttons scroll to the OFF-TIME of TIMER 1. > Using the TIMER 1 09:00 AM Figure 12.9 > The screen shows the OFF-TIME of TIMER 1: ■ current OFF-TIME of TIMER 1 is 9:00am. >...
- Page 20 To adjust both ON-TIME and OFF-TIME of TIMER 2: 70% – 09:35 AM CHLORINE OUTPUT Figure 12.10 > From the HOME screen, press menu/setting select; > The display will show this screen: MODE 1. TIMER 1 Figure 12.11 > Using the menu up/down buttons scroll to the TIMER 2 menu.
- Page 21 • If the ChloroMatic Nipper is on for 8 hours per day, the CHLORINE OUTPUT is set to 25%, but the COVER MODE is on: the ChloroMatic Nipper cell duty cycle is only 24 minutes, of that day. To turn on COVER MODE: 70% –...
- Page 22 3. COVER Figure 12.16 menu up/down buttons to toggle between COVER MODE on and off; > Press > Press menu/setting select once your preferred COVER MODE is displayed; > This will then take you back to the first setting menu; menu/setting cancel (go back) >...
- Page 23 12.4 ACTIVATING BOOST MODE Should the pool experience a heavy bather load, debris/contamination, or extreme warm weather, there may be a need to super-chlorinate the pool. Turning on the BOOST MODE increases the cell duty cycle to 100% and overrides the cell current (output) to 100% for a period of 24 hours. To turn on BOOST MODE: 70% –...
- Page 24 > Press menu/setting select; 4. BOOST Figure 12.21 > The display will show the current BOOST MODE setting (ie BOOST MODE off shown); menu up/down buttons to toggle between BOOST MODE on and off; > Press the 4. BOOST Figure 12.22 menu/setting select once your preferred BOOST MODE is displayed;...
- Page 25 12.5 ACTIVATING SPA MODE The ChloroMatic Nipper system is compatible with large swimming pool applications as well as much smaller spa applications. Turning on the SPA MODE reduces the cell duty cycle by 80% of its current setting. For example: •...
- Page 26 5. SPA Figure 12.27 menu up/down buttons to toggle between SPA MODE on and off; > Press > Press menu/setting select once your preferred SPA MODE is displayed; > This will then take you back to the first setting menu; menu/setting cancel (go back) >...
- Page 27 MODE 1. TIMER 1 Figure 12.29 menu up/down buttons to scroll to WINTER MODE; > Press the MODE 6. WINTER Figure 12.30 > From this screen, press menu/setting select to enter WINTER MODE menu; > The display will show the current WINTER MODE setting (ie WINTER MODE off shown): 6.
- Page 28 12.8 LOW FLOW ALARM Should the ChloroMatic Nipper flow switch register a flow rate below 3.6m3/h (60L/min), the ChloroMatic Nipper will enter LOW FLOW ALARM: ALARM LOW FLOW Figure 12.32 In LOW FLOW ALARM, the ChloroMatic Nipper will not produce chlorine. Once the flow switch registers flow above 3.6m /h (60L/min), the ChloroMatic Nipper will return to normal operation.
- Page 29 ALARM LOW SALT CUT-OUT Figure 12.34 Once the salt concentration is corrected, the LOW SALT CUT-OUT ALARM must be reset by pushing the manual ON/OFF button. Alternatively, the ChloroMatic Nipper will conduct a system check automatically when powered up the next time (if operating via a separate power supply). Upon start-up if the ChloroMatic Nipper registers a salt concentration within range (refer to recommended salt range section in the manual), the ChloroMatic Nipper will return to normal operation.
- Page 30 SETTINGS 1. CLOCK Figure 12.36 > Press menu/setting select; > The display will show this screen. 1. CLOCK 1 1:21 AM Figure 12.37 > This screen shows the clock’s current time (ie 11:21AM shown); > Initially the clock hours will be flashing; menu up/down buttons to scroll to your chosen time;...
- Page 31 12.13 OVERRIDING DATE SETTING 70% – 09:35 AM CHLORINE OUTPUT Figure 12.38 > From the HOME screen, press and hold menu/setting select for 3 seconds. SETTINGS 1. CLOCK Figure 12.39 menu up/down buttons to scroll down to DATE menu; > Press the SETTINGS 2.
- Page 32 > This screen shows the date format menu and the current date (ie 27 FEB 2019 sown); > Initially the date day will be flashing; > The date day can be changed by pressing the menu up/down buttons to scroll to your chosen date day;...
- Page 33 SETTINGS 3. LANGUAGE Figure 12.44 > Press menu/setting select; > The current LANGUAGE chosen will flash; > Use the menu up/down buttons to scroll to your preferred LANGUAGE; 3. LANGUAGE 3. LANGUAGE ENGLISH ENGLISH Figure 12.45 > Press menu/setting select once your preferred LANGUAGE is displayed; >...
- Page 34 SETTINGS 1. CLOCK Figure 12.47 menu up/down buttons to scroll down to TIME FORMAT menu; > Press the SETTINGS 4. TIME FORMAT Figure 12.48 > Press menu/setting select; > The current TIME FORMAT chosen will flash; > Use the menu up/down buttons to scroll to your preferred TIME FORMAT, either 12HR, or 24HR; >...
- Page 35 > From the HOME screen, press and hold menu/setting select for 3 seconds. SETTINGS 1. CLOCK Figure 12.50 > Press the menu up/down buttons to scroll down to ALARM HISTORY menu; SETTINGS 5. ALARM HISTORY Figure 12.51 > Press menu/setting select; CELL RUN TIME Figure 12.52 menu up/down buttons to toggle between cell run time and low salt time.
-
Page 36: Maintenance Of The Electrolytic Cell
Please ensure that when cell replacement is necessary you use the correct genuine ChloroMatic Nipper replacement cell to match your system. The correct ChloroMatic Nipper replacement cells to use are shown in the table below: ALWAYS INSIST ON GENUINE DAVEY REPLACEMENT PARTS. Model Replacement Cell Code... -
Page 37: Day To Day Operation
Method one: Add 1 part HYDROCHLORIC ACID to 10 parts WATER in a suitable container and immerse the cell in this solution. It should not take longer than a few minutes to clean, if it does the cell should be cleaned more frequently. - Page 38 It is important that the correct model ChloroMatic Nipper has been installed on your pool. Many models are available from Davey to cope with small courtyard pools up to commercial size pools. (Consult your local Nipper Dealer for more information).
-
Page 39: Chlorine Production
Please note that the ChloroMatic Nipper cell life can be increased with shorter running times during winter and lower output settings. Davey recommends the ChloroMatic Nipper be run for between 6 - 8 hours a day during summer, and 4 hours during winter. -
Page 40: General Information
17. GENERAL INFORMATION 17.1 POOL WATER CHEMISTRY INSTRUCTIONS POOL Total Calcium Stabiliser - Recommended Free Chlorine WATER Alkalinity TA Hardness Cyanuric Acid salt Levels (ppm) BALANCE (ppm) (ppm) (ppm) (ppm) 25-50ppm Concrete & Concrete & (15-25ppm if Ideal tiled pools tiled pools used with an Depends on... -
Page 41: Spare Parts
18. SPARE PARTS 18.1 SPARE PARTS EXPLODED DIAGRAM ChloroMatic Nipper Chlorinator DNP15C DNP25C DNP35C ChloroMatic Nipper Chlorinator Low Salt DNP15CLS DNP25CLS ITEM NOTES DESCRIPTION REQ’D PART NO. Cell Connection Plug Assy 33021 Cell Locking Ring 16058 O-ring - Cell Head 403377 Paddle Switch 16102-1... - Page 42 NOTES...
- Page 44 36 months from the date of purchase (warranty period). If a defect appears in the product before the end of the warranty period and Davey finds the product to be defective in materials or workmanship, Davey will, in its sole discretion, either: 1.
Need help?
Do you have a question about the Nipper DNP15C and is the answer not in the manual?
Questions and answers
The language I can’t understand
The document does not list specific language options available for the Davey Nipper DNP15C. It only states that the language setting can be changed by scrolling through available languages using the menu up/down buttons. Therefore, the exact languages available cannot be determined.
This answer is automatically generated
how to set start and finish timer
I cant find ant instructions to remove water from my pool as it is nearly ready to overflow
Hi Im having trouble setting the timer on the Davey ChloroMatic Nipper
To set the timer (clock) on the Davey ChloroMatic Nipper (DNP15C):
1. From the HOME screen, press and hold the menu/setting select button for 3 seconds.
2. The SETTINGS menu will appear. Select "CLOCK."
3. The current clock time will be displayed. The hours will flash first.
4. Use the menu up/down buttons to adjust the hour.
5. Press the menu/setting select button to confirm the hour.
6. The minutes will then flash. Use the up/down buttons to adjust the minutes.
7. Press the menu/setting select button to confirm the minutes.
You can change the clock settings later if needed.
This answer is automatically generated