Advertisement
Quick Links
S
TERLI G
P
Pro
Combi S+
Pure Sine Wave Inverter / Charger MANUAL
This Manual applies to these models:
230V / 50Hz model
PCSP121600
PCSP241600
110V / 60Hz model
PCSPA121600
PCSPA241600
Auxiliary Charge Module (optional) Part no.
12V/24V Combi charger to 12V battery ~5A = ACM12
12V Combi charger to 24V battery ~3A
24V Combi charger to 24V battery ~3A
Contact Sterling Power or a Sterling dealer to purchase
For the latest instructions, refer to the website
www.sterling-power.com
www.sterling-power-usa.com
This Combi, when on inverter mode, is neutral
earth bonded for use with RCD and other types
of earth fault detectors.
DO NOT OPEN UNIT | HIGH INTERNAL VOLTAGE | PLEASE READ AND UNDERSTAND THE INSTRUCTIONS PRIOR
TO INSTALLING OR OPERATING THIS PRODUCT | SHOULD ONLY BE INSTALLED BY A QUALIFIED PERSON
Copyright © 2017
Sterling Power
V 4.0 July 2017
OWER
= ACM1224
= ACM2424
www.sterling-power-usa.com
RoHS
compliant
Operation with a small generator ( Genset ).
The majority of none digital (non pure sine wave) generators from 1-10
KW have poor regulators and produce erratic wave forms when
presented with a inductive load. The wave form is simply not good
enough to run the Combi in battery charger mode. However, over the
years we have found that running an old style 50W light bulb in
conjunction with the generator output can settle the regulator on the
genset and the Combi will then, most likely work. Please note you still
need to ensure that your generator is powerful enough (continuous real
wattage, not VA).
WARNING:
www.sterling-power.com
Warranty (2 years return to factory)
Languages:
Advertisement

Related Manuals for Sterling Power Pro Combi S+ 1600 Series


Summary of Contents for Sterling Power Pro Combi S+ 1600 Series
- Page 1 = ACM1224 24V Combi charger to 24V battery ~3A = ACM2424 Contact Sterling Power or a Sterling dealer to purchase Operation with a small generator ( Genset ). For the latest instructions, refer to the website The majority of none digital (non pure sine wave) generators from 1-10 www.sterling-power.com...
- Page 2 Do not lose these instructions - keep them safe. Place as close to the house / domestic batteries as possible. Ÿ The most up to date instructions can be found on the Sterling Power Ensure Combi is off when installing. Ÿ...
- Page 3 When the Combi is in inverter mode the Quick Installation ‘through the box’ earth line is automatically disconnected from the input earth and joined to the output neutral. This complies with neutral earth inverter requirements. If you wish to maintain a through earth simply connect the input earth and output earth.
- Page 4 If batteries are left undercharged or under used for a period of time, sulphate crystals build up on the battery’s plates. This inhibits or slows the electrolysis Installation Installation reaction thwarting the performance of the battery. To help combat this, a high voltage (15.5V (x2 for 24V)) is applied.
- Page 5 Additional Installation After having installed the Combi - with the AC input still disconnected, Battery Charger Power Reduction. using the front panel, turn the unit on. The LEDs shall turn on and go through their test routine. The unit shall go to inverter mode and 230V / To facilitate small portable generator charging or low input shore power.
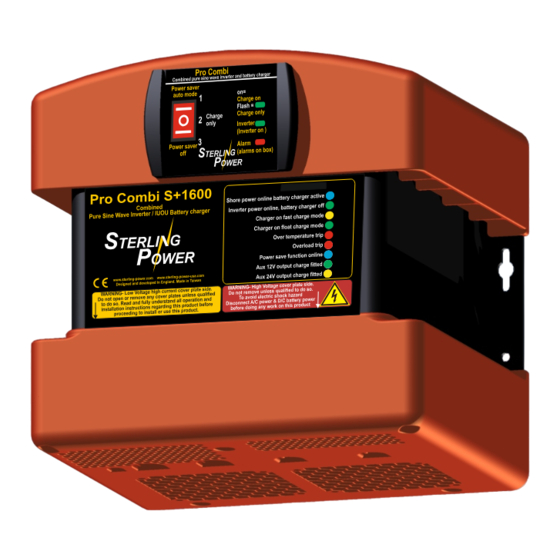
- Page 6 LED Information + Specification Pro Combi S+1600 AC Input online, battery charger active Power save OFF, inverter ON, charger OFF Charger ON, fast charge mode (Flashing) Charger ON, float charge mode Unit over temperature trip Inverter overload trip Power save ON, inverter ON, charger OFF Aux 12V output charger active www.sterling-power.com www.sterling-power-usa.com Aux 24V output charger active...
- Page 7 Remote Control - Installation Once removed, insert the blank Remove the DC cover plate to expose the remote Slide off the 2 small curved panels to reveal cover plate into the hole in front control socket, remove the plug already inserted ( 4 x screws.
- Page 8 There is a 2 year return to factory warranty with Sterling Power USA If you do NOT have a Sterling Power USA receipt the warranty length is 2 years. USA warranties must be returned to Sterling Power USA Contact Sterling in Europe or USA. www.sterling-power.com www.sterling-power-usa.com...
- Page 9 ÖFFNEN SIE DAS GERÄT NICHT | HOHE SPANNUNG | LESEN SIE DIE ANLEITUNG VOR DER INSTALLATION UND VOR DEM BETRIEB | NUR VON PERSONEN MIT FACHKENNTNIS DÜRFEN DAS GERÄT INSTALLIEREN www.sterling-power.com Copyright © 2016 www.sterling-power-usa.com RoHS Sterling Power compliant V 2.5 April 2016 2-Jahres-Werks-Garantie...
- Page 10 Inhalt Seite 2 Rechtliche Hinweise und Warnungen Bitte vor der Installation lesen Seite 3 Schnellinstallation Anschluss-Schema Sicherungen und Kab el Seite 4 Installation Installationsroutine Batterieprofile Desulfatierungs Modus Zusätzlicher, optionaler Ladeausgang ACHTUNG EXPLOSIONS- Komb i - Betrieb WARNUNG GEFAHR Seite 5 Installation Grafik Seite 6...
- Page 11 Schnell-Installation Arbeitet das Gerät im Wechselrichter- Modus, dann wird der Neutral-Leiter mit dem Schutzleiter verbunden, um die Funktion des FI-Schalters zu gewährleisten. FI ( Fehlerstrom- Schutzschalter) AC max. Schaltstrom Schalter (Durchgang): 230V/50-60Hz Max 16A AC (1600W) 110V/50-60Hz Optionaler Max 32A AC (1600W) Ladeausgang bis max.
- Page 12 Installationanleitung ( under DC plate ) DC Abdeckkappe AC Abdeckkappe Zum Öffnen der Anschlüsse müssen die Abdeckkappen entfernt werden. Für den DC Anschluss schrauben Sie zuerst die Schrauben a + b heraus und schieben Sie die Kappe nach unten. Für den 230V AC Anschluss schrauben Sie die Schraube c + d heraus.
- Page 13 Zusätzliche Informationen Specification Table ALLGEMEIN WECHSELRICHTER 1600 Fernbedienung ja, Frontpanel Spannungsverlauf Reiner Sinus Leistung der Spannungsumschaltung Benötigter Eingangs-Spannungsverlauf Reiner Sinus Unterspannung +/- 4% (110V | 230V) <90V | <190V Nominale Eingangsspannung 110VAC | 230VAC Minimale Spannung +/- 4% (110V | 230V) >95V | >194V Eingangsspannungsbereich 95-130V | 196-245V...
- Page 14 LED Information + Spezifikation Pro Combi S+1600 AC Input online, battery charger active Power save OFF, inverter ON, charger OFF Charger ON, fast charge mode (Flashing) Charger ON, float charge mode Unit over temperature trip Inverter overload trip Power save ON, inverter ON, charger OFF Aux 12V output charger active www.sterling-power.com www.sterling-power-usa.com Aux 24V output charger active...
- Page 15 Installation der Fernbedienung Schieben Sie die 2 Seitenteile zur Seite und entfernen Sie die 4 Schrauben. Anschließend können Sie das Fernbedienpanel vorsichtig herausnehmen. Achten Sie auf das Kabel an dem Panel. Abdeckung Pro Combi S Plus Combined pure sine wave inverter and battery charger Power saver auto mode Bedienhinweis: Installieren Sie das Fernbedienpanel an der von Ihnen gewünschten...
- Page 16 Batterietemperatur während des Ladevorganges. Ÿ Diese darf nicht viel höher sein, als die Umgebungstemperatur. Unsere Adresse: Sterling Power Products Ltd. Fehlerbehebung und Reparatur 8 Wassage Way GB - Droitwich WR9 0NX Sollte es zu einer Fehler am Gerät kommen, sollte zuerst UK / England übeprüft werden, um welchen Fehler es sich handelt und...
Need help?
Do you have a question about the Pro Combi S+ 1600 Series and is the answer not in the manual?
Questions and answers