Table of Contents
Advertisement
Quick Links
Advertisement
Table of Contents

Related Manuals for Gourmia GEO3000


Summary of Contents for Gourmia GEO3000
- Page 1 MODEL# GEO3000 ROTISSERIE OVEN...
- Page 2 Meats, Poultry & More! © 2016 Gourmia www.Gourmia.com With the purchase of the Gourmia® Rotisserie Oven, you’ve opened the door to amazingly flavor-packed meat, poultry, seafood and other savory entrées. The unique The Steelstone Group rotisserie system inside this oven creates self-basting cuts of beef, pork, and poultry Brooklyn, NY that bathe the food in flavor while the fat drips away.
-
Page 3: Table Of Contents
SAFETY INFORMATION p. 6 FEATURES & FUNCTIONS p. 8 QUICK & EASY CONTROL PANEL p. 10 BEFORE FIRST USE & ASSEMBLY p. 12 QUICK & EASY ROTISSERIE GUIDE p. 16 CLASSIC ROTISSERIE SPIT DUAL ROD ROTISSERIE SPIT SEAFOOD & VEGETABLE FLAT BASKET EXTRA LARGE ROTISSERIE TUMBLER MAINTENANCE &... - Page 4 IMPORTANT SAFEGUARDS DO NOT add unauthorized accessory attachments. Such use may result in electric shock, injury or fire. When operating this electric appliance, basic safety instructions should Use only factory cord supplied; NEVER add extension cords. When done always be followed. Refer to the following for these instructions. using, switch control to OFF then pull plug from outlet.
-
Page 5: Features & Functions
FEATURES & FUNCTIONS A. Rotisserie Oven: The Rotisserie Oven includes the housing for the rotisserie motor, a Handle Port for the rotisserie Spit handles, a Drive Port for the square end tip of the Spit, the crumb and drip tray, dual heat shields, EasyLift Glass Door, and easy-to-use control dials and light indicators. -
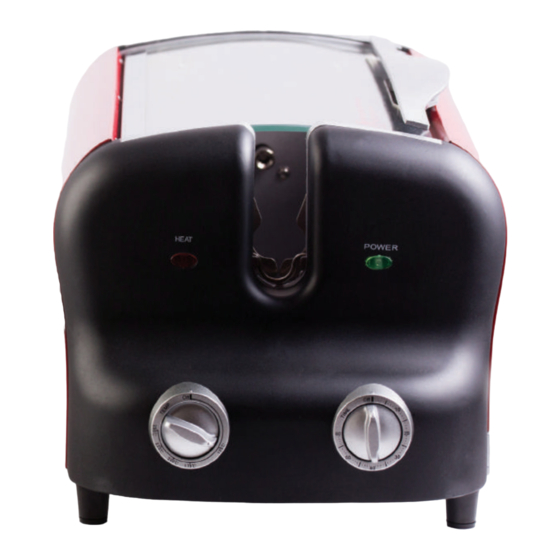
Page 6: Quick & Easy Control Panel
QUICK & EASY CONTROL PANEL The Control Panel houses the Control Dials and the indicator lights. The Temperature Control Dial sets the Temperature; the Timer Control Dial sets the Timer. The indicator lights have different functions, as outlined in the following information. -
Page 7: Before First Use & Assembly
BEFORE FIRST USE Install the Glass Door • If the Glass Door is not attached when unpacked, hold the Door handle with one hand. (fi g 1) fi g. 1 fi g. 2 • Place the LEFT door hinge into position at the LEFT corner of the Oven chamber. •... - Page 8 ASSEMBLY Place the Rotisserie Oven on a level surface. Open the Crumb & Drip Tray and add 2-3 tablespoons water to the Tray. Slide the Tray back into place. The added water helps prevent smoking oil or fat as it drips onto the Tray. If not already in place, install the heat shields and Glass Door.
-
Page 9: Quick & Easy Rotisserie Guide
Rotisserie Oven works. Inserting the Rotisserie Spit & Accessories Your Gourmia Rotisserie Oven chamber has two Ports for insertion of the Classic Rotisserie Spit, the Dual Rod Rotisserie Spit, Seafood & Flat Basket, and the Extra Large Rotisserie Tumbler. -
Page 10: Dual Rod Rotisserie Spit
Dual Rod Rotisserie Spit Extra Large Rotisserie Tumbler The extended Dual Rods make this the perfect tool for rotisserie chicken and • • Using the Classic Rotisserie Spit, insert the square end tip into the Tumbler and boneless turkey breasts. through to the other side as far as it will go. -
Page 11: Maintenance & Service
MAINTENANCE & SERVICE ALWAYS allow the Rotisserie Oven to cool completely before cleaning. Unplug the Rotisserie Oven before cleaning. After each use, clean and dry the Rotisserie Oven. Use a damp cloth to clean the exterior and Glass Door. DO NOT immerse the Oven in water. Use non-abrasive soap only. -
Page 12: Warranty
The manufacturing company is not liable for any incidental or consequential damages incurred by such circumstances. For Customer Service or Questions, Please call: 888-552-0033 www.gourmia.com... - Page 13 www.gourmia.com...
Need help?
Do you have a question about the GEO3000 and is the answer not in the manual?
Questions and answers