
Related Manuals for Oregon Scientific BAR609HGA


Summary of Contents for Oregon Scientific BAR609HGA
- Page 1 All manuals and user guides at all-guides.com Deluxe Weather Forecaster with Wireless UV Sensor Model: BAR609HGA USER MANUAL...
-
Page 2: Table Of Contents
All manuals and user guides at all-guides.com Deluxe Weather Forecaster with Set Clock ..............10 Wireless UV Sensor Switch Clock Display ..........10 BAR609HGA Alarm ................ 10 View Alarm Settings ..........11 USER MANUAL Set Alarm ..............11 CONTENTS Activate Alarm ............11 Introduction .............. -
Page 3: Introduction
All manuals and user guides at all-guides.com Warnings ..............16 INTRODUCTION Troubleshooting ............17 Thank you for selecting the Oregon Scientific Deluxe Specifications ............17 Weather Forecaster with Wireless UV Sensor Main Unit Dimensions ..........17 (BAR609HGA). This device bundles precise time keeping, UV measurement, weather forecast, barometric Thermo-Hygro Sensor Dimensions ...... -
Page 4: Product Overview
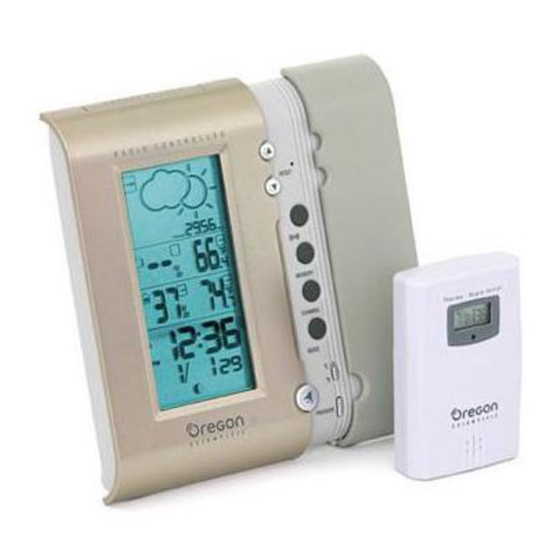
All manuals and user guides at all-guides.com PRODUCT OVERVIEW FRONT VIEW 1. SNOOZE / LIGHT button 2. Weather Forecast & Barometric Area 3. Indoor / Outdoor Temperature & Humidity Area 4. UV Index (UVI) Area 5. Moon Phase 6 Clock / Alarm Area : increase or decrease setting / activate or deactivate Atomic Clock 8. -
Page 5: Back View
All manuals and user guides at all-guides.com BACK VIEW 1. Wall mount 2. Battery compartment 3. Table stand 05/1/18, 7:11 PM BAR609HGAmanual-ENG... -
Page 6: Thermo-Hygro Sensor (Thgr122Nx)
All manuals and user guides at all-guides.com THERMO-HYGRO SENSOR (THGR122NX) 1. LCD display 1. Wall mount hole 2. LED status indicator 2. RESET 3. Channel number (1 - 3) 4. Battery compartment (Battery compartment cover not shown) 05/1/18, 7:11 PM BAR609HGAmanual-ENG... -
Page 7: Front View (Uvn128)
All manuals and user guides at all-guides.com FRONT VIEW (UVN128) BACK VIEW (UVN128) 1. Sensor 1. RESET hole 2. LED indicator 2. Connector for stake apparatus 05/1/18, 7:11 PM BAR609HGAmanual-ENG... -
Page 8: Getting Started
All manuals and user guides at all-guides.com CHANGE SETTINGS GETTING STARTED 1. Press and hold MODE for 2 seconds to enter setting BATTERIES mode. Batteries are not supplied with this product. You will need 2. Press to change settings. to purchase the following alkaline batteries: 3. -
Page 9: Setup Sensor
All manuals and user guides at all-guides.com For best results: SETUP SENSOR • Insert the batteries and select the channel before you 1. Open the sensor battery compartment with a small mount the sensor. Phillips screwdriver. • Place the sensor out of direct sunlight and moisture. 2. -
Page 10: Data Transmission
All manuals and user guides at all-guides.com Wireless ranges can be impacted by a variety of factors SEARCH FOR SENSOR such as extremely cold temperatures. Extreme cold may temporarily reduce the effective range between the To search for a sensor, press and hold MEMORY and sensor and the base station. -
Page 11: Turn Atomic Clock On / Off
All manuals and user guides at all-guides.com SET CLOCK STRONG SIGNAL WEAK SIGNAL NO SIGNAL You only need to do this if you cannot receive the Atomic Clock signal, or you wish to adjust the appropriate time zone. 1. Press and hold MODE for 2 seconds. The Clock Area To force a manual search for Atomic Clock signals, press will blink. -
Page 12: View Alarm Settings
All manuals and user guides at all-guides.com VIEW ALARM SETTINGS BAROMETER Press . The alarm time and status will show in the This product tracks barometric pressure changes over Clock Area. the past 24 hours to provide the weather forecast and a trend line showing the direction of barometric change. -
Page 13: Weather Forecast
All manuals and user guides at all-guides.com 1. Press PRESSURE to select the unit of measurement: SELECT TEMPERATURE UNIT mb or inHg. ° ° Slide the F switch into the desired location. The 2. Press and hold PRESSURE for 2 seconds. switch is located on the front button panel. -
Page 14: Minimum / Maximum Records
To view temperature, humidity or UV Index current, makes you feel. maximum (MAX) and minimum (MIN) records: The BAR609HGA’s heat index feature advises 4 levels 1. Press CHANNEL to select channel 1-3 or indoor. of warning if the temperature is high. -
Page 15: Uv Sensor (Uvn128)
All manuals and user guides at all-guides.com 4. You can place the sensor in the ground. To do this, fix UV SENSOR (UVN128) the stake into the base of the sensor. The UV sensor measures the UV Index. It transmits data to the main unit every 73 seconds and has a maximum transmission range of 328 feet (100 meters). -
Page 16: Uv Index Readings
All manuals and user guides at all-guides.com NOTE To get the most accurate readings, place the MOON PHASE sensor in a position that has minimum obstructions (i.e. walls and doors) between it and the main unit. The The Calendar must be set for this feature to work. sensor should be placed in an upright position, away see set clock section: from any shade or shadows that may affect how accurate... -
Page 17: Safety And Care
All manuals and user guides at all-guides.com as expected (for example, unable to establish radio Do not make any changes or modifications to this frequency link with sensor or Atomic Clock). product. Unauthorized changes may void your right to use the product. The technical specification of this NOTE When you press RESET, all settings will return product and contents of this user guide are subject to to default value, and you will lose all stored information. -
Page 18: Troubleshooting
All manuals and user guides at all-guides.com TROUBLESHOOTING SPECIFICATIONS MAIN UNIT DIMENSIONS Check here before contacting our customer service department. L x W x H 5.5 x 2.5 x 6.2 inches (142 x 63 x 158 mm) Weight 12.96 ounces (366 g) Problem Symptom Remedy... -
Page 19: Relative Humidity
All manuals and user guides at all-guides.com RELATIVE HUMIDITY CLOCK Atomic Clock Auto or manual (disabled) Range 25% to 95% Resolution Clock display HH:MM:SS Hour format 12hr AM/PM Memory Minimum / maximum Time zone PA (Pacific), MO (Mountain), CE (Central) BAROMETER or EA (Eastern) Unit... -
Page 20: About Oregon Scientific
FCC STATEMENT Visit our website (www.oregonscientific.com) to learn This device complies with Part 15 of the FCC Rules. more about Oregon Scientific products such as digital Operation is subject to the following two conditions: (1) cameras; MP3 players; children's electronic learning This device may not cause harmful interference, and products and games;... -
Page 21: Declaration Of Conformity
Name: Oregon Scientific, Inc. Address: 19861 SW 95th Place, Tualatin, Oregon 97062 USA Telephone No.: 1-800-853-8883 Fax No.:... - Page 22 All manuals and user guides at all-guides.com © 2005 Oregon Scientific. All rights reserved. 086-003767-011...
Need help?
Do you have a question about the BAR609HGA and is the answer not in the manual?
Questions and answers