
Subscribe to Our Youtube Channel
Related Manuals for Memorex MVUC821


Summary of Contents for Memorex MVUC821
- Page 1 All manuals and user guides at all-guides.com MVUC821 User’s Guide 8” TFT DVD Player with AM/FM Radio Before operating this product, please read these instructions completely.
-
Page 2: Table Of Contents
All manuals and user guides at all-guides.com CONTENTS Contents..............1 • Language Setup Menu .........37 Important Safety Instructions ........2 • Video Setup Menu ..........38 Precautions..............5 • Speaker Setup Menu..........38 Power Source .............5 • TVG (TV Guardian)..........39 Installation ..............6 Basic Operation............42 Location of Controls ..........7 •... -
Page 3: Important Safety Instructions
IMPORTANT SAFETY INSTRUCTIONS All manuals and user guides at all-guides.com The lightning flash with arrowhead symbol CAUTION within an equilateral triangle is intended to alert the user to the presence of uninsulated RISK OF ELECTRIC SHOCK dangerous voltage within the product’s DO NOT OPEN enclosure that may be of sufficient magnitude to constitute a risk of electric shock to persons. - Page 4 IMPORTANT SAFETY INSTRUCTIONS All manuals and user guides at all-guides.com Before using the unit, be sure to read all operating instructions carefully. Please note that these are general precautions and may not pertain to your unit. For example, this unit may not have the capability to be connected to an outdoor antenna.
- Page 5 IMPORTANT SAFETY INSTRUCTIONS All manuals and user guides at all-guides.com 16. OBJECT AND LIQUID ENTRY Never push objects of any kind into this product through openings as they may touch dangerous voltage points or short out parts that could result in fire or electric shock. Never spill or spray any type of liquid on the product. 17.
-
Page 6: Precautions
All manuals and user guides at all-guides.com PRECAUTIONS NOTES ON HANDLING: TO OBTAIN A CLEAR PICTURE: The DVD player is a high technology, precision device. If • When shipping this unit, always use the original the optical pick-up lens and disc drive parts are dirty or shipping carton and packing materials. -
Page 7: Installation
All manuals and user guides at all-guides.com INSTALLATION INSTALLING THE UNIT UNDER A CABINET The suggested mounting position of the unit is under a wall cabinet, but it can be installed under many areas. There should be at least 2-1/2” distance between the unit and the wall to allow for connections and ventilation. IMPORTANT NOTES: •... -
Page 8: Location Of Controls
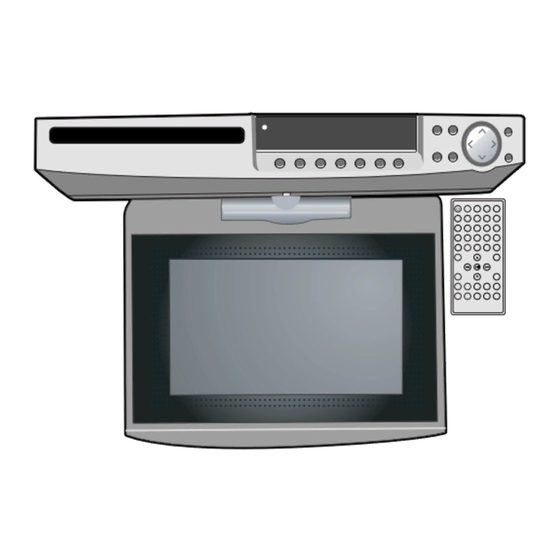
All manuals and user guides at all-guides.com LOCATION OF CONTROLS FRONT 1718 1. Disc Compartment 12. Play/Pause (®p) Button 2. Screen 13. Stop (X) Button 3. STANDBY Indicator 14. Navigation √/Skip o Button 4. SOURCE Button 15. Navigation π Button 5. -
Page 9: Rear
All manuals and user guides at all-guides.com LOCATION OF CONTROLS (CONTINUED) REAR 1. Speakers (Sides of Unit) 2. DC 12V Input Jack z (AC ADAPTER PART NO. 0251-207200-90005*) 3. VIDEO Input Jack 4. ANT INPUT Jack 5. AUDIO Left/Right Input Jack 6. -
Page 10: Remote
All manuals and user guides at all-guides.com LOCATION OF CONTROLS (CONTINUED) REMOTE The remote has magnet at the back. It can placed on the refrigerate or other metal surface so it will not get misplaced. 1. AUX Button 21. PROGRAM Button 2. -
Page 11: Remote Control
All manuals and user guides at all-guides.com REMOTE CONTROL BATTERY INSTALLATION 1. Remove the Battery Compartment by pressing in on the tab and pushing out. 2. Install a CR2025 battery, paying attention to the polarity diagram in the Battery Compartment. 3. -
Page 12: Antenna Connections
All manuals and user guides at all-guides.com ANTENNA CONNECTIONS AM ANTENNA: Connect the black AM Loop Antenna wire to the black AM Antenna terminal and the white AM Loop Antenna wire to the white AM Antenna terminal. Extend the AM Loop Antenna Connect AM Loop A t t h e b o t t o m o f t h e A M... -
Page 13: Connection
All manuals and user guides at all-guides.com CONNECTIONS CONNECTION USING AUDIO/VIDEO CABLES: Follow the instructions below to connect an external unit, such as a VCR or second DVD player, to your unit using Audio/Video cables. (CABLES NOT INCLUDED.) VCR (or second DVD) INCOMING CATV CABLE (VCR) From VCR OUT jacks... -
Page 14: About Discs
All manuals and user guides at all-guides.com ABOUT DISCS The region number for this DVD Player is: See the following page for information regarding region numbers. PLAYABLE DISCS: The following discs can be played back on this DVD player: DISC TYPES: Data on most DVDs is divided into sections called “titles”... - Page 15 All manuals and user guides at all-guides.com ABOUT DISCS (CONTINUED) Notes on Copyright: It is forbidden by law to copy, broadcast, show, broadcast on cable, play in public and rent copyrighted material without permission. DVD video discs are copy protected, and any recordings made from these discs will be distorted.
-
Page 16: Setting The Time
All manuals and user guides at all-guides.com SETTING THE TIME SETTING THE TIME With the power on, press and hold the CLOCK button; the Within five seconds, press the Navigation π 1 and/or † 2 hours digits will blink in the display. button to set the current hour. -
Page 17: Setting The Timer
All manuals and user guides at all-guides.com SETTING THE TIMER SETTING THE TIMER This unit has a convenient countdown timer, set as shown below. With the power on, press and hold the TIMER button; the Within three seconds, press the Navigation π 1 and/or † 000 MIN will blink in the display. -
Page 18: Radio Operation
All manuals and user guides at all-guides.com RADIO OPERATION TUNING RADIO STATIONS Press the Power button to turn the unit on; the STANDBY Press the TUNER/BAND button on the remote control to indicator will turn off. select the Radio mode. Note: You can also press the SOURCE button on the main unit until the display shows an AM or FM reception. -
Page 19: Setting And Recalling Radio Presets
All manuals and user guides at all-guides.com RADIO OPERATION (CONTINUED) SETTING AND RECALLING RADIO PRESETS Press the TUNER/BAND button on the remote control to select the Radio mode. Select a radio station as described Press the Power button to turn the unit on; the STANDBY on the previous page. -
Page 20: Closed Captions
All manuals and user guides at all-guides.com CLOSED CAPTIONS WHAT IS CLOSED CAPTIONING? DIGITAL CAPTIONS This unit has the capability to decode and display Closed Please see the next page for setting the Digital Caption. Captioned television programs. Closed Captioning will SERVICE 1-6 : These Closed Caption modes will display text display text on the screen for hearing-impaired viewers or it on the screen in English or another language. -
Page 21: Setting The Dtv Menus
All manuals and user guides at all-guides.com SETTING THE DTV MENUS SETTING THE CLOSED CAPTIONS (ATSC) Daylight saving With the power on and the DTV mode selected (see page Press the ENTER/Play/Pause (®p) button 1 to enter the 32), press the SETUP button 1; the menu will appear. Press Setup menu. -
Page 22: Setting The Language
All manuals and user guides at all-guides.com SETTING THE DTV MENUS (CONTINUED) SETTING THE LANGUAGE Daylight saving With the power on and the DTV mode selected, press the Press the ENTER/Play/Pause (®p) button 1 to enter the SETUP button 1; the menu will appear. Press the Setup menu. -
Page 23: Setting The Time Zone And The Daylight Savings Time
All manuals and user guides at all-guides.com SETTING THE DTV MENUS (CONTINUED) SETTING THE TIME ZONE AND THE (DST) DAYLIGHT SAVING TIME Daylight saving Daylight saving With the power on and the DTV mode selected, press the Press the ENTER/Play/Pause (®p) button 1 to enter the SETUP button 1;... -
Page 24: Setting Channels Into Memory
All manuals and user guides at all-guides.com SETTING THE DTV MENUS (CONTINUED) SETTING CHANNELS INTO MEMORY This unit is equipped with a channel memory feature which allows channels to skip up or down to the next channels set into memory, skipping over unwanted channels. Before selecting channels, they must be programmed into the unit’s memory. With the power on and the DTV mode selected, press the Press the ENTER/Play/Pause (®p) button 1 to enter the SETUP button 1;... -
Page 25: Manual Program
All manuals and user guides at all-guides.com SETTING THE DTV MENUS (CONTINUED) MANUAL PROGRAM With the power on and the DTV mode selected, press the Press the ENTER/Play/Pause (®p) button 1 to enter the SETUP button 1; the menu will appear. Press the Channel menu. -
Page 26: Setting The Dtv Channel List
All manuals and user guides at all-guides.com SETTING THE DTV MENUS (CONTINUED) SELECTING THE DTV CHANNEL LIST Press the ENTER/Play/Pause (®p) button 1 to enter the Channel menu. Press the Navigation π 2 and/or † 3 button With the power on and the DTV mode selected, press the to select the CHANNEL LIST option, then press the SETUP button 1;... -
Page 27: Setting The Favorite Channel List
All manuals and user guides at all-guides.com SETTING THE DTV MENUS (CONTINUED) SELECTING THE FAVORITE CHANNEL LIST Press the ENTER/Play/Pause (®p) button 1 to enter the Channel menu. Press the Navigation π 2 and/or † 3 With the power on and the DTV mode selected, press the button to select the FAVORITE LIST option, then press the SETUP button 1;... -
Page 28: Tv Parental Control
All manuals and user guides at all-guides.com TV PARENTAL CONTROL V-Chip enables parents to prevent their children from watching inappropriate material on TV. V-Chip reads the ratings for programming (except for news, sports, unedited movies on premium cable and Emergency System signals), then denies access to programming if the program’s rating meets the limitations you select. -
Page 29: Tv Parental Guide Set-Up
All manuals and user guides at all-guides.com TV PARENTAL CONTROL (CONTINUED) TV PARENTAL GUIDE SET-UP With the power on and the DTV mode selected, press the Press the Navigation π 2 and/or † 3 button to select the SETUP button; the menu will appear. Please refer to the PARENTAL GUIDE option,... -
Page 30: Mpaa Set-Up
All manuals and user guides at all-guides.com TV PARENTAL CONTROL (CONTINUED) MPAA SET-UP With the power on and the DTV mode selected, press the Press the Navigation π 2 and/or † 3 button to select the SETUP button; the menu will appear. Please refer to page MPAA option, then press the ENTER/Play/Pause (®p) 27 to enter the Parental Control menu. -
Page 31: Canadian English/French Set-Up
All manuals and user guides at all-guides.com TV PARENTAL CONTROL (CONTINUED) CANADIAN ENGLISH/FRENCH RATING SET-UP With the power on and the DTV mode selected, press the Press the Navigation π 2 and/or † 3 button to select the SETUP button; the menu will appear. Please refer to page CANADIAN ENGLISH RATING or CANADIAN FRENCH 27 to enter the Parental Control menu. -
Page 32: Changing The Password
All manuals and user guides at all-guides.com TV PARENTAL CONTROL (CONTINUED) CHANGING THE PASSWORD With the power on and the DTV mode selected, press the Press the Navigation π 1 and/or † 2 button to select the PIN SETUP button; the menu will appear. Please refer to page option, then press the ENTER/Play/Pause (®p) button 3. -
Page 33: Dtv Operation
All manuals and user guides at all-guides.com DTV OPERATION Press the Power button to turn the unit on; the STANDBY Press the DTV button on the remote to select the DTV indicator will turn off. option. Make sure the channels have been set into memory, see page 23. -
Page 34: Osd/Info
All manuals and user guides at all-guides.com DTV OPERATION (CONTINUED) VOLUME OSD/INFO Press the VOLUME Up 1/Down 2 buttons to adjust the Press OSD/INFO key on remote, a sub menu will display on sound level. the top left coner of the screen showing the status of existing signal (e.g. -
Page 35: Guide
All manuals and user guides at all-guides.com DTV OPERATION (CONTINUED) GUIDE AUDIO Press the MENU/GUIDE button; the existing signal will be While using DTV, press the AUDIO button repeatedly to reduced to a small size and move to the top left coner. The scroll through all available language programs. -
Page 36: Dvd Setup Menu
All manuals and user guides at all-guides.com SETTING THE DVD MENUS The Setup menu lets you customize the DVD player by allowing you to select various language preferences, set-up a parental level, turn screen saver on and off, adjust what type of television screen you have and more. Pages 36 to 41 describe the individual menus in detail. -
Page 37: General Setup Menu
All manuals and user guides at all-guides.com DVD SETUP MENU (CONTINUED) GENERAL SETUP MENU (Must be in the DVD mode): elect GENERAL SETUP using the Navigation (√,®) buttons, then select/change the setup option as described on page 35. SCREEN SAVER TV TYPE When this option is set to ON, the screen saver will come 4:3 PS, Pan Scan: Video material formatted in the Pan... -
Page 38: Language Setup Menu
All manuals and user guides at all-guides.com DVD SETUP MENU (CONTINUED) POWER RESUME DEFAULT Select this option to reset all the preferences (except When this option is set to ON, during playback of a DVD or CD, if you open the disc compartment without pressing the STOP (I) password) to their original factory settings. -
Page 39: Video Setup Menu
All manuals and user guides at all-guides.com DVD SETUP MENU (CONTINUED) SUBTITLE LANGUAGE MENU LANGUAGE Select the language the subtitles will be in (ENGLISH, Select the language the disc menu will be in (ENGLISH, SPANISH OR FRENCH). The DVD must be recorded in the SPANISH OR FRENCH). -
Page 40: Tvg (Tv Guardian)
All manuals and user guides at all-guides.com DVD SETUP MENU (CONTINUED) TVG (TV GUARDIAN) ® TVGuardian Feature This product supports TVGuardian ® Foul Language Filtering Technology, offering your family the very best control of objectionable language in your home. HOW IT WORKS TVGuardian ®... - Page 41 All manuals and user guides at all-guides.com DVD SETUP MENU (CONTINUED) TVGuardian ® Setup Menu Word Subset Filtering In addition to the main TVG ® modes listed above, you TVG ® Modes can turn certain word subsets on or off according to your preferences.
- Page 42 All manuals and user guides at all-guides.com DVD SETUP MENU (CONTINUED) TVG HELP While the TVG MODE is set to Off, you can press the Navigation (π,†) buttons 1 to select TVG HELP. Press the ENTER/Play/Pause (®p) button 2 and a TVG Help screen will appear.
-
Page 43: Basic Operation
All manuals and user guides at all-guides.com BASIC OPERATION (GENERAL) IMPORTANT: When “Invalid Key” appears while pressing a button, this means that the corresponding function cannot be performed either on the disc inserted, or in the selected mode. VOLUME RESUME Press the VOLUME Up 1/Down 2 buttons to adjust the To stop playback, press the Stop (X) button 1;... -
Page 44: Playback Of A Dvd
All manuals and user guides at all-guides.com DVD OPERATION IMPORTANT NOTES: • “INVALID KEY” will appear on the TV screen during operation if you try to access a function that is not available on the disc. • Some discs may take a few seconds to load. •... -
Page 45: Skip
All manuals and user guides at all-guides.com DVD OPERATION (CONTINUED) SKIP FAST SEARCH Press the Channel Up/Skip (n) Button 1 to advance the During playback, press either the Navigation ®/Search l 1 DVD to the beginning of the next chapter. or Navigation √/Search m 2 button to move the DVD forward or backward at double (x2) speed to locate a specific section. -
Page 46: Title/Chapter/Time Search
All manuals and user guides at all-guides.com DVD OPERATION (CONTINUED) TITLE/CHAPTER/TIME SEARCH Use this feature to directly go to a specific title, chapter and/or time. Press the GOTO button 1 once. Press the Navigation (√,®) buttons 2 to select TITLE (TT), then use the Number (0-9) buttons 3 to select the desired title number. -
Page 47: Title Menu
All manuals and user guides at all-guides.com DVD OPERATION (CONTINUED) TITLE MENU SUBTITLE MENU Press the SUBTITLE MENU button repeatedly to select a Press the TITLE button 1, and the Title Menu of the disc subtitle language, and to turn the subtitle menu on/off. This will appear. -
Page 48: Programmed Playback
All manuals and user guides at all-guides.com DVD OPERATION (CONTINUED) PROGRAMMED PLAYBACK The DVD player in this unit has a 16 chapter programmable memory that allows you to program up to 16 chapters on any disc for playback in any desired order. You may program 16 different chapters or you may also program certain chapters to play more than once. -
Page 49: Cd Operation
All manuals and user guides at all-guides.com CD OPERATION PLAYBACK OF A CD Press the CLOCK button to show the time in the display and press again to show the CD playback time. Press the OPEN/CLOSE button to open the compartment. Press the Power button 1 to turn on the unit;... -
Page 50: Forward/Reverse Search
All manuals and user guides at all-guides.com CD OPERATION (CONTINUED) REPEAT ONE/ALL PLAY FORWARD®®/REVERSE √√ Press the REPEAT button to cycle through the following During playback, press either the Navigation ®/Search l 1 options: REP 1 (will repeat the selected track continuously or Navigation √/Search m 2 button to move the disc forward until the STOP button is pressed), REP ALL (will repeat the or backward at double (x2) speed to locate a specific... -
Page 51: Mp3 Operation
All manuals and user guides at all-guides.com MP3 OPERATION PLAYBACK OF AN MP3 DISC Press the CLOCK button to show the time in the display and press again to show the Disc playback time. Press the OPEN/CLOSE button to make sure there is not a Press the Power button 1 to turn on the unit;... -
Page 52: Prev Buttons
All manuals and user guides at all-guides.com MP3 OPERATION (CONTINUED) SELECTING TRACKS USING THE NEXT/PREV FORWARD®®/REVERSE √√ BUTTONS During playback, press either the Navigation ®/Search l 1 or Navigation √/Search m 2 button to move the disc forward or backward at double (x2) speed to locate a specific section. -
Page 53: Adjusting The Picture
All manuals and user guides at all-guides.com PICTURE CD OPERATION Press the OPEN/CLOSE button to open the compartment. Press the Power button 1 to turn on the unit; the STANDBY Insert an picture CD with the label side facing up into the indicator will go out. -
Page 54: Av Function
All manuals and user guides at all-guides.com AV FUNCTION PLAYBACK OF A UNIT CONNECTED TO THE AV JACKS Press the POWER button 1 to turn on the unit. Press the AUX button 2 to select the AV mode and then start playback of the AV unit. -
Page 55: Troubleshooting Guide
All manuals and user guides at all-guides.com TROUBLESHOOTING GUIDE Check the following before requesting service: SYMPTOM POSSIBLE CAUSE POSSIBLE SOLUTION GENERAL No power. AC cord unplugged. Plug in the AC cord to an AC outlet. Power on, but unit not functioning Condensation has formed. - Page 56 All manuals and user guides at all-guides.com TROUBLESHOOTING GUIDE (CONTINUED) SYMPTOM POSSIBLE CAUSE POSSIBLE SOLUTION The unit does not start playback. Rating level set to block the DVD. Enter your password, and/or change the rating level. DVD not inserted, or inserted upside-down. Insert DVD correctly.
-
Page 57: Care And Maintenance
All manuals and user guides at all-guides.com CARE AND MAINTENANCE Caring for Discs • Treat the disc carefully. Handle the disc only by its edges. Never allow your fingers to come in contact with the shiny, unprinted side of the disc. •... -
Page 58: Specifications
All manuals and user guides at all-guides.com SPECIFICATIONS Power Requirements..................DC IN 12V/2000mA (Center Positive z) Power Consumption ...............................<25W Weight ..................................5.75Lbs Dimensions ...........................4 (H) x 10 (L) x 14.5 (W) inches Operating Temperature............................32° to 104°F Operating Humidity Range ......................< 95% (no condensation) Accessories ......AC Adapter, Remote Control, Remote Battery, AM Loop Antenna, Spacers(4), Screws (4) Screen.................................8”/TFT Panel LCD TV... - Page 59 All manuals and user guides at all-guides.com Imation Electronics Products, A Division of Imation Enterprises Corp. Weston, FL Printed in Hong Kong www.memorexelectronics.com 0521-001000-00000...
Need help?
Do you have a question about the MVUC821 and is the answer not in the manual?
Questions and answers