Table of Contents
Advertisement
Available languages
Available languages
Quick Links
Advertisement
Table of Contents

Related Manuals for auna 10031933


Summary of Contents for auna 10031933
-
Page 3: Technische Daten
Ihnen zum Erwerb Ihres Geräts. Lesen Sie die folgenden Hinweise sorgfältig durch und befolgen Sie diese, um möglichen Schäden vorzubeugen. Für Schäden, die durch Missachtung der Hinweise und unsachgemäßen Gebrauch entstehen, übernehmen wir keine Haftung. TECHNISCHE DATEN Artikelnummer 10031933 Stromversorgung Netzteil 220-240 V ~ 50/60 Hz... - Page 4 SICHERHEITSHINWEISE • Lesen Sie alle Hinweise genau durch. Machen Sie sich mit den Nutzungshinweisen vertraut, bevor Sie das Gerät in Gebrauch nehmen. • Bitte heben Sie diese Bedienungsanleitung für den zukünftigen Gebrauch auf. • Nutzungs- und Sicherheitshinweise müssen unbedingt eingehalten werden.
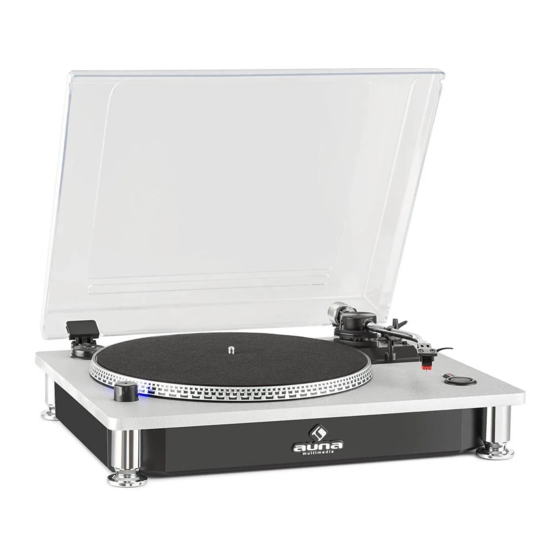
- Page 5 GERÄTEÜBERSICHT Ausrichtungsschraube mit Gummiabdeckung Gegengewicht Pitchregler (Tonhöhenregler) Geschwindigkeitsregler Lifthebel Sperre für Tonarm LED-Betriebsanzeige Einschalthebel Achsadapter 10 Strobebeleuchtung Line Out/ Phono Ausgangsschalter 12 Line Out Anschluss (L/R) 13 Wechselstromkabel...
- Page 6 AUFSTELLUNG Vorsichtmaßnahmen bei der Benutzung • Packen Sie alle Teile aus und entfernen Sie das Schutzmaterial. • Schließen Sie das Gerät nur an den Strom an, wenn Sie vorher die Stromspannung überprüft und alles angeschlossen haben. • Decken Sie die Luftabzüge des Geräts nicht ab und achten Sie darauf, dass das Gerät frei steht und mehrere Zentimeter zur Belüftung gewährleistet sind.
- Page 7 INEBETRIEBNAHME Vor der Inbetriebnahme bitte lesen • Entfernen Sie den Nadelschutz. • Vergewissern Sie sich, dass der Kartusche Tonarm entsichert ist und sich bei der Nutzung frei bewegen kann. Sichern Sie den Tonarm wieder, wenn das Nadelschutz Gerät nicht benutzt wird. 1.
- Page 8 möglich, dass der Tonarm nach der Wiedergabe nicht automatisch in die Ruheposition zurückkehren kann. Bitte passen Sie die Tonarm-Halteposition wie unten dargestellt an. Dieser Plattenspieler macht sich ein magnetisches Kartuschensystem zu Eigen. Um Fehlfunktionen zu vermeiden, sollten Sie bei einem Wechsel des Kartuschensystems darauf achten, dass Sie es durch ein Kartuschensystem der gleichen Sorte ersetzen.
- Page 9 a) Wenn das System die Wiedergabe nicht beendet und früher in die Ruheposition zurückkehrt, nutzen Sie einen Kreuzschraubenzieher und drehen Sie die Ausrichtungsschraube (1) im Uhrzeigersinn in das Loch. Die Halte- und Auswerfposition des Tonarms werden dann, zum Beenden der Wiedergabe, weiter in die Mitte der Schallplatte bewegt.
-
Page 10: Hinweise Zur Entsorgung
HINWEISE ZUR ENTSORGUNG Befindet sich die linke Abbildung (durchgestrichene Mülltonne auf Rädern) auf dem Produkt, gilt die Europäische Richtlinie 2012/19/EU. Diese Produkte dürfen nicht mit dem normalen Hausmüll entsorgt werden. Informieren Sie sich über die örtlichen Regelungen zur getrennten Sammlung elektrischer und elektronischer Gerätschaften. -
Page 11: Technical Data
Any failure caused by ignoring the items and cautions mentioned in the operation and installation instructions are not covered by our warranty and any liability. TECHNICAL DATA Item number 10031933 Power supply adaptor 220-240 V ~ 50/60 Hz... -
Page 12: Safety Instructions
SAFETY INSTRUCTIONS • Read the instructions. All uses guidelines must be read before start device. • Keep the instructions for future use. • Attention, use and security guidelines must be respected. • The device must not be used near water or be put in contact with moisture. - Page 13 DEVICE DESCIPTION Alignment screw with rubber cover Counter weight Pitch adjust Turntable speed selector Cueing lever Tone-arm lock Power LED indicator Power switch Spindle adaptor 10 Strobe illuminator Line out/Phono output selection switch 12 Line out socket (L/R) 13 AC power cord...
- Page 14 SETUP Precautions for installation • Unpack all parts and remove protective material. • Do not connect the unit to the mains before checking the mains voltage and before all other connections have been made. • Do not cover any vents and make sure that there is a space of several centimeters around the unit for ventilation.
-
Page 15: Operation
OPERATION Please note before use • - Remove the stylus protector. • - Make sure that the tone arm is unlocked and free to move from the tone arm rest prior to operating. Lock the tone arm again when not in use. 1. - Page 16 replace the same type of cartridge to avoid malfunction of the unit Speed alignment using the Pitch adjustment The pitch adjust control (3) is made adjust the turntable speed lightly. To check if the speed of a record that is playing is correct, and if it needs to be adjusted, do the following: During playback of for instance a 45rpm record, look at the appropriate strip of strobe calibration dots on the edge of the turntable platter,...
- Page 17 Remark:- • The stopping position is very subjective among difference customers, please select the most suitable position based on your own record collection. The ex-factory setting is based on the most common template. • Please check the stopping position time by time during adjustment and avoid over turning of the screw inside Line out connection You can connect the system to your own hi-fi system by connecting the line...
-
Page 18: Disposal Considerations
DISPOSAL CONSIDERATIONS According to the European waste regulation 2012/19/EU this symbol on the product or on its packaging indicates that this product may not be treated as household waste. Instead it should be taken to the appropriate collection point for the recycling of electrical and electronic equipment.
Need help?
Do you have a question about the 10031933 and is the answer not in the manual?
Questions and answers