
Related Manuals for Klarstein Standventilator


Summary of Contents for Klarstein Standventilator
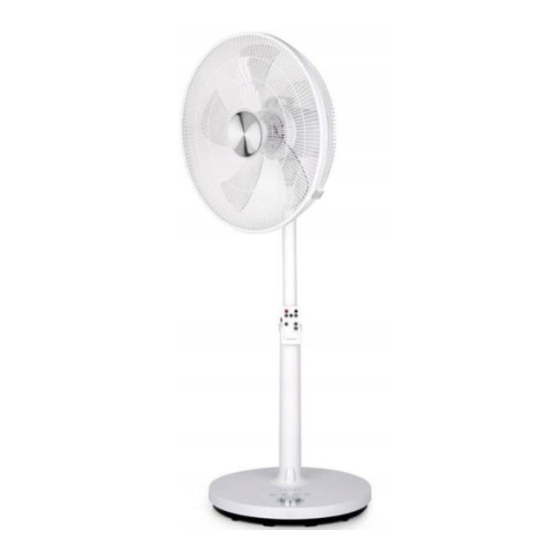
- Page 1 Standventilator Floor Fan Ventilador de pie Ventilateur sur pied Ventola con supporto 10032345...
-
Page 3: Table Of Contents
Sehr geehrter Kunde, wir gratulieren Ihnen zum Erwerb Ihres Gerätes. Lesen Sie die folgenden Hinweise sorgfältig durch und befolgen Sie diese, um möglichen Schäden vorzubeugen. Für Schäden, die durch Missachtung der Hinweise und unsachgemäßen Gebrauch entstehen, übernehmen wir keine Haftung. INHALTSVERZEICHNIS Technische Daten 3 English 8... -
Page 4: Sicherheitshinweise
SICHERHEITSHINWEISE • Achten Sie darauf, dass alle elektrischen Anschlüsse trocken und sauber sind. • Prüfen Sie vor der Benutzung die Spannung auf der Geräteplakette. Schließen Sie das Gerät nur an Steckdosen an, die der Spannung des Geräts entsprechen. • Stelle Sie das Gerät nicht in die Nähe von offenem Feuer, Wasser oder leicht entzündlichen Gegenständen oder Stoffen. -
Page 5: Geräteübersicht
GERÄTEÜBERSICHT 1 Vorderes Schutzgitter 9 Motorgehäuse 2 Befestigungsring 10 Ständerkappe 3 Mutter 1 1 Fernbedienung 4 Ventilatorblätter 12 Licht 5 Mutter 13 Taste 6 Hinteres Schutzgitter 14 Basis 7 Motorschaft 15 Bedienfeld 8 Griff 16 Kabelaufbewahrung Hinweis: Sie können das Gerät entweder über das Bedienfeld an der Basis oder mit der Fernbedienung bedienen. -
Page 6: Zusammenbau
ZUSAMMENBAU Stellen Sie sicher, dass das Produkt ausgeschaltet und vom Stromnetz getrennt ist. Befestigen Sie den Motor auf den Ständer. Benutzen Sie dazu die Muttern des Motors. Platzieren Sie das hintere Schutzgitter auf dem Motor. Richten Sie dazu die Nasen am Motor an den Rillen am hinteren Schutzgitter aus. -
Page 7: Bedienung
BEDIENUNG Hinweise zur Fernbedienung • Optimale Entfernung zum Gerät: 3-5 Meter. • Licht einschalten: Drücken Sie auf die Lichttaste. • Stummschaltung: Drücken Sie die MUTE-Taste, um die Stummschaltung zu aktivieren. Geschwindigkeitsregler Drehen Sie den Regler im Uhrzeigersinn, um eine der 12 Geschwindigkeitsstufen von niedrig nach hoch einzustellen. - Page 8 Dear Customer, Congratulations on purchasing this equipment. Please read this manual carefully and take care of the following hints to avoid damages. Any failure caused by ignoring the mentioned items and cautions mentioned in the instruction manual are not covered by our warranty and any liability.
-
Page 9: Safety Instructions
SAFETY INSTRUCTIONS • All users of this appliance must read and understand this instruction manual before operating. • Make sure that all electrical connections are kept clean. Ensure that they are kept dry. • Before using, check that the voltage power corresponds to the one shown on the appliance rating label. -
Page 10: Product Description
PRODUCT DESCRIPTION 1 Front guard 9 Rear housing of motor 2 guard ring 10 Stand cap 3 Spinner 1 1 Remote control 4 Blades 12 Light 5 guard nut 13 Button 6 Back guard 14 Base 7 Motor shaft 15 Control panel 8 Handle 16 Wire box Note: You can choice remote control or control panel of fan to operate. -
Page 11: Assembly 1
ASSEMBLY Ensure that the product is switched off and disconnected from the power supply. Place the main unit onto the stand. Secure the main unit with the main unit’s nut. Place the back guard onto the main unit. Make sure to align the insets of the main unit with the grooves on the back guard . -
Page 12: Operation
OPERATION Remote Control • Control distance have 3.5~5 meter. • Light mode: Press the button will close the light. • Please refer to the below other functions. • Mute mode: Starting up default is close, Press the button will open mute function. Speed Knob Clockwise the rotary knob will control wind speed from low to high. - Page 13 Estimado cliente: Le felicitamos por la adquisición de este producto. Lea atentamente el siguiente manual y siga cuidadosamente las instrucciones de uso con el fin de evitar posibles daños. La empresa no se responsabiliza de los daños ocasionados por un uso indebido del producto o por haber desatendido las indicaciones de seguridad.
-
Page 14: Indicaciones De Seguridad
INDICACIONES DE SEGURIDAD • Asegúrese de que todas las conexiones eléctricas están secas y limpias. • Antes de utilizar el aparato, compruebe la tensión en la placa técnica del mismo. Conecte el aparato a tomas de corriente que se adecuen a la tensión del mismo. •... -
Page 15: Vista General Del Aparato
VISTA GENERAL DEL APARATO 1 Rejilla de protección frontal 9 Carcasa de motor 2 Anilla de fijación 10 Tapa del pie 3 Tuerca 1 1 Mando a distancia 4 Aspa 12 Luz 5 Tuerca 13 Botón 6 Rejilla de protección posterior 14 Base 7 Eje de transmisión 15 Panel de control... -
Page 16: Montaje
MONTAJE Asegúrese de que el ventilador está apagado y desconectado de la toma de corriente. Monte el motor en el soporte. Utilice para ello las tuercas del motor. Monte la rejilla de protección posterior en el motor. Asegúrese de alinear las muescas del motor a las ranuras de la rejilla de protección posterior. -
Page 17: Funcionamiento
FUNCIONAMIENTO Indicaciones sobre el mando a distancia • El mando a distancia puede utilizarse en un radio de 3-5 metros. • Encender la luz: pulse el botón de luz. • Función Silencio: pulse el botón MUTE para activar la función Silencio. Regulador de velocidad Gire el regulador en el sentido de las agujas del reloj para aumentar la velocidad en 12 intensidades,... - Page 18 Cher client, Toutes nos félicitations pour l’acquisition de ce nouvel appareil. Veuillez lire attentivement les instructions suivantes de branchement et d’utilisation afin d’éviter d’éventuels dommages. Le fabricant ne saurait être tenu pour responsable des dommages dus au non- respect des consignes de sécurité et à la mauvaise utilisation de l’appareil. SOMMAIRE Fiche technique 18 Déclaration de conformité 18...
-
Page 19: Consignes De Sécurité
CONSIGNES DE SÉCURITÉ • Veillez à ce que tous les branchements électriques soient propres et secs. • Avant l’utilisation, vérifiez la tension sur la plaque signalétique de l’appareil. Ne branchez l’appareil que sur des prises de la tension correspondante. • Ne placez pas l‘appareil à proximité de flammes libres, d‘eau ou d‘objets et de tissus inflammables. -
Page 20: Aperçu De L'appareil
APERÇU DE L‘APPAREIL 1 Grille de protection avant 9 Carter moteur 2 Bague de fixation 10 Cache du support 3 Ecrou 1 1 Télécommande 4 Pales du ventilateur 12 Éclairage 5 Ecrou 13 Touche 6 Grille de protection arrière 14 Base 7 Axe du moteur 15 Panneau de commande 8 Poignée... -
Page 21: Assemblage
ASSEMBLAGE Assurez-vous que le produit est éteint et débranché du secteur. fixez le moteur sur le support. Utilisez pour cela les écrous du moteur. Placez la grille de protection arrière sur le moteur. Alignez pour cela les dents du moteur avec les rainures de la grille de protection arrière. Fixez la grille de protection arrière avec l‘écrou. -
Page 22: Utilisation
UTILISATION Conseils pour la télécommande • Distance idéale de l‘appareil : 3-5 mètres. • Allumer l‘éclairage : appuyez sur la touche de l‘éclairage. • Fonction muet : appuyez sur la touche MUTE pour activer la fonction muet. Réglage de la vitesse Tournez le bouton de réglage en sens horaire pour régler l‘une des 12 vitesses de la plus lente à... - Page 23 Gentile cliente, La ringraziamo per aver acquistato il nostro prodotto. La preghiamo di leggere attentamente le seguenti istruzioni e di seguirle per evitare eventuali danni. Si declina ogni responsabilità per danni derivati da una mancata osservazione delle avvertenze di sicurezza e da un uso improprio del dispositivo. INDICE Dati tecnici 23 Dichiarazione di conformità 23...
-
Page 24: Avvertenze Di Sicurezza
AVVERTENZE DI SICUREZZA • Assicurarsi che tutti i collegamenti elettrici siano puliti e asciutti. • Prima dell’utilizzo, controllare la tensione sulla targhetta del dispositivo. Collegare il dispositivo solamente a prese di corrente con tensione corrispondente a quella del dispositivo. • Non posizionare il dispositivo nelle vicinanze di fiamme libere, acqua o oggetti e materiali facilmente infiammabili. -
Page 25: Descrizione Del Prodotto
DESCRIZIONE DEL PRODOTTO 1 Griglia protettiva frontale 9 Alloggiamento del motore 2 Anello di fissaggio 10 Tappo del supporto 3 Dado 1 1 Telecomando 4 Pale del ventilatore 12 Luce 5 Dado 13 Tasto 6 Griglia protettiva posteriore 14 Base 7 Albero motore 15 Pannello di controllo 8 Impugnatura... -
Page 26: Montaggio
MONTAGGIO Assicurarsi che il prodotto sia spento e scollegato dalla rete elettrica. Fissare il motore allo stativo utilizzando i dadi del motore. Posizionare la griglia protettiva sul motore, direzionando le sporgenze sul motore sulle scanalature della griglia protettiva posteriore. Fissare la griglia protettiva posteriore con il dado. Inserire le pale del ventilatore sull’albero motore. -
Page 27: Utilizzo
UTILIZZO Indicazioni sul telecomando: • Distanza ottimale dal dispositivo: 3-5 metri. • Accendere la luce: premere il tasto della luce. • Muto: premere il tasto MUTE per attivare questa funzione. Regolazione della velocità Ruotare la manopola in senso orario per impostare dal basso verso l’alto uno dei 12 livelli di velocità.
Need help?
Do you have a question about the Standventilator and is the answer not in the manual?
Questions and answers