Table of Contents
Advertisement
Available languages
Available languages
Quick Links
Advertisement
Chapters
Table of Contents

Related Manuals for Pelgrim PF6264


Summary of Contents for Pelgrim PF6264
- Page 1 PF6264 Gebruiksaanwijzing Fornuis Instructions for use Cooker...
- Page 2 Nederlands ............1 - 18 English.
-
Page 3: Table Of Contents
Introductie Inhoud Als u deze gebruiksaanwijzing doorleest, bent Introductie ......3 u snel op de hoogte van alle mogelijkheden Toestelinformatie . -
Page 4: Toestelinformatie
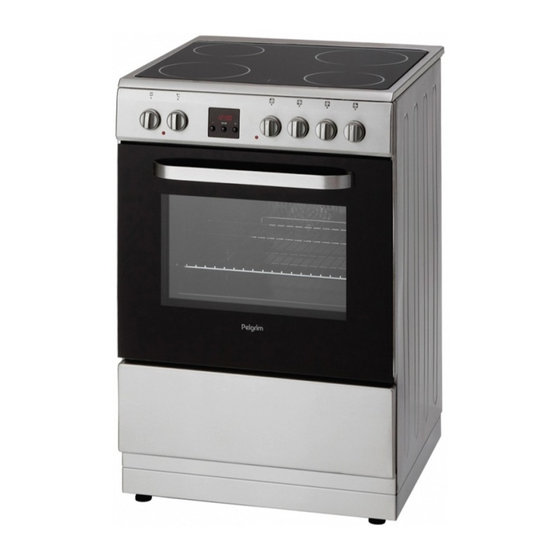
Toestelinformatie kookgedeelte bedieningspaneel 1 – kookzone linksvoor – functieknop oven 2 – kookzone linksachter – indicatielamp oven 3 – kookzone rechtsachter (dubbele zone) – thermostaatknop oven 4 – kookzone rechtsvoor – digitale klok – indicatielamp keramische kookplaat 10 – bedieningsknop kookzone linksachter 11 –... - Page 5 Toestelinformatie fornuis 14 – bedieningspaneel 15 – oven 16 – opberglade 17 – stelvoeten Waarschuwing: Plaats het ovenrooster in de rail en schuif het volledig naar achter in de oven.
-
Page 6: Ingebruikname
Lees de separate Klok veiligheidsvoorschriften voordat u het toestel in gebruik neemt! Oven Gebruiksklaar maken van de oven Verwijder de sticker van de ovenruit. Verwijder bij roestvrijstalen deuren de Als u geen dagtijd hebt ingesteld, knippert blauwe beschermfolie. het “A”... -
Page 7: Bediening
Keramische kookplaat Kookwekker U mag de bedieningsknop zowel links- als rechtsom draaien. De kookzones zijn in De kookwekker geeft alleen een signaal na 6 standen instelbaar. De dubbele kookzone het verstrijken van de tijd. De kookwekker heeft twee verwarmstanden. Draai de schakelt de oven niet uit. -
Page 8: Inschakelen Van De Oven
Inschakelen van de oven Thermostaatknop Functieknop Met de thermostaatknop stelt u de temperatuur in. De temperatuur is traploos instelbaar. Symbool Functie-omschrijving ovenverlichting ontdooistand Inschakelen van de oven zonder hetelucht schakelklokfunctie conventioneel Zet de functieknop op de door u gewenste conventioneel + ventilator functie. - Page 9 Ontdooistand voor het bakken van pizza’s. Het beste U kunt ontdooien met de ventilator van de resultaat wordt bereikt bij het bakken van hetelucht oven. Haal de diepvriesprodukten vochtig of zwaar gebak, vruchtentaarten van uit de verpakking en leg ze in een schaal. gistdeeg of zandtaartdeeg en kwarktaarten.
-
Page 10: Inschakelen Van De Oven
Inschakelen van de oven met Schakel daarna de oven definitief uit door schakelklokfunctie de functieknop en thermostaatknop op nul te draaien. Automatisch uitschakelen met eindtijdfunctie De eindtijd is de tijd wanneer het gerecht klaar moet zijn. Met deze functie kunt u door middel van het instellen van een eindtijd de oven automatisch, na het bereiken van de ingestelde eindtijd, laten uitschakelen. - Page 11 Automatisch in- en uitschakelen met baktijd- Schakel daarna de oven definitief uit door en eindtijdfunctie de functieknop en thermostaatknop op nul te De baktijd is de tijd die nodig is om het draaien. gerecht te bereiden. De eindtijd is de tijd Kinderslot wanneer het gerecht klaar moet zijn.
-
Page 12: Toepassing
Bak-, braad- en grilltips De taart wordt aan de bovenkant te donker De taart op een lagere richel in de oven Inzethoogten plaatsen, de temperatuur lager instellen, de Afhankelijk van de hoogte van gebak of koekjes taart iets langer laten bakken en eventueel plaatst u de bakplaat op de tweede of derde richel zwarte bakvormen gebruiken. -
Page 13: Grilltijdentabel
Grilltijdentabel Gerecht Temp. Richel Grilltijd in °C hoogte* min. Vlakke grillgerechten Steak 180 - 200 10 - 12 Schnitzel/Kotelet 180 - 200 12 - 16 Gehaktbal 180 - 200 14 - 18 Braadworst 180 - 200 16 - 20 Visfilet 180 - 200 14 - 16 Toast... -
Page 14: Baktijdentabel
Baktijdentabel Conventioneel Gerecht Temp Richel Tijd in in °C hoogte* Min. Roerdeeg Cake 160 - 180 65 - 70 Kruidkoek 160 - 180 70 - 80 Notentaart 160 - 180 60 - 70 Vruchtentaart bakblik 170 - 180 2, 3 35 - 45 Vruchtentaart bakvorm 160 - 180... -
Page 15: Onderhoud
Kookgedeelte reinigen Oven reinigen Dagelijks Let op: Reinig de glasplaat steeds na gebruik. U Maak het toestel spanningsloos voordat met kunt hiervoor bijvoorbeeld een sopje van een reparatie of schoonmaken wordt gestart. afwasmiddel gebruiken. Bij voorkeur door de stekker uit het stopcontact te halen of de schakelaar in de Hardnekkige vlekken meterkast op nul te zetten. -
Page 16: Installatie
Installatie Algemeen Het toestel moet altijd geaard zijn. Dit toestel mag alleen door een erkend installateur aangesloten worden. Het toestel Gebruik voor het aansluiten een kabel met wordt niet aangesloten op een rookgas- type H05V V-F. afvoerkanaal. Wilt u een vaste aansluiting maken, zorg er Let op: dan voor dat er een omnipolaire schakelaar Op het gegevensplaatje staan de... - Page 17 Let op: Waterpas stellen Wanneer het fornuis wordt geplaatst naast een hoge kast of een andere wand van brandbaar materiaal, houd dan minimaal 50 mm afstand tussen het fornuis en deze wanden. Houd ook een afstand van minimaal 650 mm aan tussen de kookplaat en een eventueel boven de kookplaat geplaatste afzuigkap.
-
Page 18: Afvoeren Verpakking En Toestel
Afvoe ren ver pak king en toe stel Bij de vervaardiging van dit toestel is gebruik Het apart verwerken van huishoudelijke gemaakt van duurzame materialen. Dit toestel apparaten voorkomt mogelijk negatieve moet aan het eind van zijn levenscyclus gevolgen voor het milieu en de gezondheid die op verantwoorde wijze worden afgevoerd. -
Page 19: Introduction
Introduction Table of contents When you have read these instructions for Introduction ..... . . 19 use, you will quickly be aware of all the Appliance description . -
Page 20: Appliance Description
Appliance description ceramic hob control panel 1 – front left cooking zone – control knob for oven functions 2 – rear left cooking zone – indicator light oven 3 – rear right cooking zone (double zone) – control knob for oven temperature 4 –... - Page 21 Appliance description cooker 14 – control panel 15 – oven 16 – drawer 17 – adjustable feet Warning: Fit the grid correctly into any corresponding rack in the oven cavity an push it to the end.
-
Page 22: Preparations
Read the separate safety Clock instructions before using the device! Oven Prepare for use Remove the sticker from the glass panel in the oven door. The “A” symbol flickers if you have not yet set the time of day. Remove the protective foil from stainless ... -
Page 23: Use
Ceramic hob Kitchen timer You may turn the switch either to the left or the right. The switch has 6 settings. The dual The kitchen timer goes off after a pre-set time cooking zone can heat in two different positions. has elapsed. -
Page 24: Switching On The Oven
Switching on the oven Thermostat control knob Function knob You use the thermostat control knob to set the temperature. The temperature range is continuous. Symbol Discription oven light Switching on the oven without timer thawing clock function hot air Choose an oven function by turning the knob conventional to the desired symbol. - Page 25 Thawing Grill You can thaw food using the hot air fan. Remove The dishes are heated by the radiation heat the wrapping and put the frozen food in a dish. of the combined grillelement. Flat pieces of Put the dish on ridge 1. Set the function knob of meat, chicken or other poultry may be grilled the hot air oven to (the fan will now blow...
- Page 26 Switching on the oven with timer The oven automatically switches off. Turn the signal off by pressing one of the 3 keys. Turn the oven off fully by turning the function knob and thermostat knob to zero. Turn off automatically with end time function The end time is the time when the dish must be ready.
- Page 27 Turn off automatically with end time and Turn the oven off fully by turning the function cooking time function knob and thermostat knob to zero. The cooking time is the time that is required Child lock to prepare the dish. The end time is the time when the dish must be ready.
-
Page 28: Application
Baking-, roasting- and grilling tips Oven levels The cake is too dark on the top Depending on the height of the pastry or Put the cake on a lower ridge in the oven, set cookies, place the baking sheet on the second a lower temperature, bake the cake for a little or third level from the bottom. - Page 29 Table for grilling Grill meat Temp. Ridge Time in °C level* min. Thin items Steak 180 - 200 10 - 12 Schnitzel/chops 180 - 200 12 - 16 Meatballs 180 - 200 14 - 18 Bratwurst 180 - 200 16 - 20 Fillet of fish 180 - 200 14 - 16...
- Page 30 Table for baking Conventional Dish Temp Ridge* Time in in °C level Min. Stir dough Shortbread 160 - 180 50 - 60 Fruit-cake 160 - 180 70 - 80 Cake with nuts 160 - 180 60 - 70 Fruit pie baking tin 180 - 200 2, 3 35 - 45...
-
Page 31: Maintenance
Cleaning the cooker Cleaning the oven Daily Please note: Clean the ceramic hob after use. You can Disconnect the appliance before starting with use, for example, a little washing-up liquid in cleaning or reparation. Preferably by taking water. the plug out of the socket or by turning off the mains switch. -
Page 32: Installation
Installation General The appliance should always be earthed. The fitting of the appliance should only be carried out by a registered fitter. Use a good quality cable for connecting, type The appliance is not connected to the flue gas H05V V-F. outlet channel. - Page 33 Attention: Levelling When the oven is placed next to a high cupboard or another wall made of flammable material the minimum distance between the cooker and walls should be at least 50 mm. The minimum distance between the hotplate and a cooker hood installed above it should be at least 650 mm.
-
Page 34: Disposal Of Appliance And Packaging
Disposal of appliance and packaging By ensuring this product is disposed of Segregated processing of household correctly, you will help prevent potential appliances avoids any negative effects on negative consequences for the environment the environment and public health that might and human health, which could otherwise be otherwise occur.
Need help?
Do you have a question about the PF6264 and is the answer not in the manual?
Questions and answers