Table of Contents
Advertisement
Quick Links
Advertisement
Table of Contents

Related Manuals for emitor Satlook Digital NIT


Summary of Contents for emitor Satlook Digital NIT
- Page 1 Satlook Digital NIT English manual...
- Page 2 All information in this publication is based on the latest product information available at the time of printing. Emitor AB reserves the right to make changes at any time without notice and without incurring any obligation. No part of this publication may be reproduced without written permission.
-
Page 3: Table Of Contents
Table of contents 1. DESCRIPTION 2. OPERATION 2.1. U NPACKING 2.2. C ONNECTION 2.3. K NOB AND CONTROL BUTTON 2.4. I NFORMATION 3. FUNCTIONS 3.1. P (TV- ICTURE MODE 3.1.1 O THER FUNCTIONS IN ICTURE MODE 3.2. D IGITAL MODE 3.2.1. -
Page 4: Description
TV-satellites transmit. The NIT contain information about the Satellite and TV/Radio-channels. SATLOOK Digital NIT can very easily identify a Satellite as it can readout the NIT information. Switching between TV, Spectrum, and Digital-modes is achieved with a push of a button on the side of the instrument. -
Page 5: Operation
The DiSEqC-function controls all DiSEqC-accessories (like switches and LNB´s). The function is easily implemented and very flexible to use. Note that the SATLOOK Digital NIT can also run DiSEqC-actuators. It can be set-up for running DiSEqC 1.2 (normal DiSEqC-actuators), SatScan (Nokia) and SatSelect (Triax). -
Page 6: Connection
The functions of the control-button in the different modes. Spectrum: Picture-mode: Digital-mode: Frequency Frequency Frequency Bandwidth(span) Memory Memory When the SATLOOK Digital NIT is in Frequency-mode, the cursor is controlled by the tuning knob. Move the cursor up/down by turning the knob left or right. -
Page 7: Information
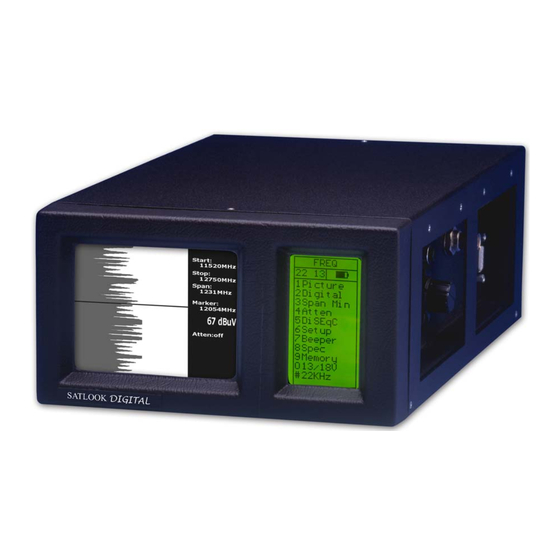
2.4. Information The cursors position (frequency), the spectrums start frequency (920 MHz), the spectrums stopfrequency (2150 MHz) and bandwidth (1231 MHz) can be read out on the monitor -screen. The most important measured data , the dB-value, is shown in the middle of the monitor. -
Page 8: Other Functions In Picture-Mode
3.1.1 Other functions in Picture-mode 1. Invert Switch between normal video (KU-band) and inverterad Video (C-band). Selected position is displayed in the LCD- display. 2. Sound For listening to analog audio. Audio volume and frequency (5.5 – 8.5 MHz) are adjusted with the two small knobs just under the main-knob. -
Page 9: Digital Mode
4. Atten: Attenuation. Manuel attenuation 15dB on/off. Selected position is displayed in the LCD-display. 0. 13/18V Selection of 13V alt. 18V. Chosen position is displayed at the top of the LCD-display. #. 22kHz 22 kHz on/off. Chosen position is displayed at the top of the LCD-display. -
Page 10: Nit - Network Information Table
A locked frequency can look like this: The window also displays the following Digital readout: Freq: The tuned in frequency. AFC: Automatic frequency control -the instrument automatically adjust the frequency and tells the offset frequency from center of carrier. Symbol rate. The instrument readout, automatically, the correct symbol rate of the transmission. -
Page 11: Other Functions In Digital Mode
When performing Digital installations, please notice: • The constellationdiagramme is like ”a shower of hail”. No signal will spread out the noise over the window. The better signal, the more concentrated and focused ”hailstorms” in the windows. • SNR. The signal/noise ratio should be as high as possible. A good signal should have at least 8.0 dB S/N-ratio. -
Page 12: Full Spectrum - "Max Zoom In" - Span Min /Span Max
Text-editor: When the channel (frequency) is saved, the Text-editor appears on the monitor which makes it possible to enter a name for that memory-position (ex. Digital). Use the knob to select the first letter (ex. D) and save it with the control-button. -
Page 13: X-Pol
• Move the cursor to any desired frequency (peak). Push the nr 3 button (span Min) on the keyboard. The instrument will ”zoom in” max. at that selected frequency (250 MHz bandwidth). Rotate the LNB so that either the Horisontal or Vertical polarisation will be in its max-position –adjusting the cross-polarisation. -
Page 14: Setup
3.6. Setup Basic-operation setup: 1. LNB L.O. Select the LNBs L.O. for showing the correct LNB frequency. Default setting is button nr 9 (IF). 2. Analog. Chose between Normal (KU-band) or Inverted (C-band) video. 3. Motor. Chose the type of actuator to be used; standard DiSEqC 1.2, SatSelect or SATSCAN. -
Page 15: Reference Cursor And Signal To Noise Ratio
Measured data can be stored. Read more about the Memory-function under section 3.9, Memory. 3.8.2. Reference cursor and signal to noise ratio (2) SATLOOK Digital NIT has the capability to perform measuring of the signal/noise alt. Picture-carrier/audio-carrier ratio. The function is relatively difficult to implement fully automatic and a more simple, manual, tool is used in this instrument. -
Page 16: Memory
Notice that 13/18V and 22 kHz on/off can be adjusted in this mode witht the ”0” resp. ”#” buttons. 3.8.3. Span Min – Span Max (3) This function is described under section 3, Functions. Push button nr 3 (span Min) on the keypad. The instrument ”zoom in” max. at the chosen frequency (250 MHz bandwidth). -
Page 17: Atten
actuator-control (DiSEqC 1.2). Even 13/18V and 22 kHz can be adjusted under the DiSEqC- menu. Memory A multichannel measuring can be stored. Chose button nr 6 (Memory). Select the memory-position where to store the data with the main-knob (pos: 00-99) and push button nr 2 (save). The data is stored. -
Page 18: Memory (Storing Spectrum-Pictures)
3.9. Memory (storing spectrum-pictures) All spectrum-pictures can be stored in the SATLOOK-Digital NIT. This is very useful for documentation and to use later on for recognizing/identifying of that satellites characteristic spectrum . The Mix-function helps to identify and “find the way back” to already known (and previously stored) satellites. -
Page 19: Maintenance
Remember that a cold battery has much lower capacity than a warm one. SATLOOK Digital NIT is designed for outside use in rough conditions but it should not be exposed for rain or snow as this can damage or shorten the lifetime of the instrument. -
Page 20: Technical Specification
Recharging from fully discharged battery to about 98% capacity takes aprox.30 hours. When the battery been recharged, SATLOOK Digtal NIT is ready to be used. 5. Technical specification Input frequency: 920-2150MHz, easily reduced to 250 MHz (max zoom in). Frequency display: Yes, IF default. - Page 21 SatSelect. Battery: Rechargable 12v, 3.5 amp/hour. Operational: About 1.5 hour on a fully charged battery. Weight: About 5 kg incl.battery. Accessories: Nylon carrying-case. Power-supply of 220v/13.5v, 1.7amp. Car-charger. BNC-male/F-female adapter. ________________________________________________________ Emitor AB Sjöviksbacken 14 117 43 Stockholm Sweden www.emitor.se...
Need help?
Do you have a question about the Satlook Digital NIT and is the answer not in the manual?
Questions and answers