
Related Manuals for emitor Satlook Micro HD


Summary of Contents for emitor Satlook Micro HD
- Page 1 Satlook Micro G2 / HD User Manual ______________________________________ ______________________________________...
-
Page 2: Table Of Contents
Contents page 3 Overview page 4 Quick Start page 6 EasyFind Mode page 7 Digital Mode page 13 Spectrum Mode page 15 Analog Mode page 19 Setup Functions page 24 Loading New Firmware page 25 Using PC to Transfer Transponder Data page 26 Appendix A - Saved Parameters Appendix B - Universal LNB Primer... -
Page 3: Overview
Overview The Satlook G2 and Satlook HD are Satellite Test Equipment for the professional made in Sweden. The Satlook G2 can receive DVB-S satellite signals and the Satlook HD can receive both DVB-S and DVB-S2 satellite signals. Both use advanced demodulators and can “lock”... -
Page 4: Quick Start
Quick Start Power On/Off Button Menu Knob and Button LNB-A connector LNB-B connector Power Input for charging RS232 Port Reset Button Power On The Satlook G2 / HD is turned on by pressing and holding the power on button for one second. Power on tones indicate that firmware loading has started. - Page 5 The Menu Knob is used for Frequency adjustment when in the Digital mode or the Spectrum mode. When the Menu Knob is turned slowly, the frequency is changed by 1MHz, but if rotated rapidly, the frequency step is increased allowing for quick movement to the correct frequency.
-
Page 6: Easyfind Mode
EasyFind Mode The EasyFind Mode is an easy way to point the dish at installation. When the EasyFind Mode is entered, the Profile defined in the Setup EasyFind Configuration is used. The five satellite transponders (or in the case of All Sats, all of the memory positions) which are in the Profile can be selected with the knob. -
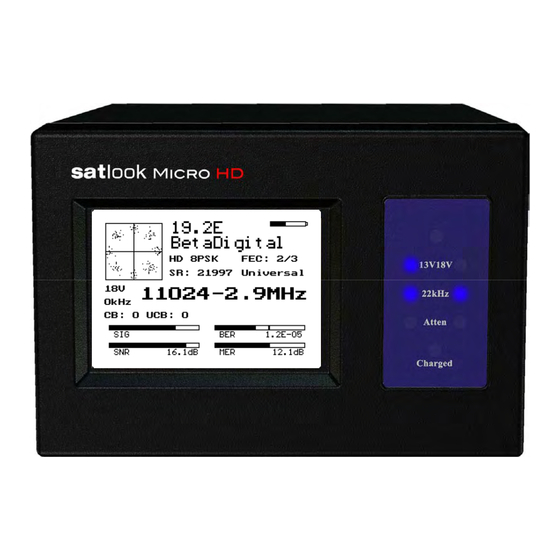
Page 7: Digital Mode
Digital Mode Locked Not Locked About Digital Mode When the user enters Digital Mode, the Satlook G2 will attempt to receive a DVB-S signal at the current frequency and the Satlook HD will also try to receive a DVB-S2 signal. The current frequency is displayed in the centre of the screen and can be changed by the knob (within the limits of the current LNB type and the 22 kHz setting). - Page 8 Setup Modulations. On both instruments, for symbol rates below 7000 MSymbols/sec, the signal identification may take several seconds. A constellation pattern is shown which is formed from a small subset of the IQ decision points received by the demodulator. Occasionally, during an attempt to lock, a calibration pattern can be observed momentarily.
- Page 9 Accessing the Digital Menu When in the Digital Mode, turning the knob will change the current frequency. The Menu button will activate the Digital Menu. Frequency / Search Frequency / Search Frequency / Search Frequency / Search This function enters Digital Mode with the Search function disabled. Tuning can be performed manually using the knob.
- Page 10 Channels Channels Channels Channels This shows the services available on the current transponder. The type of service is shown in the first column. RA is a radio service, TV is a standard definition service and HD is a High Definition service. Other service types are listed by number. The Service ID number, Service Name and Service Provider are shown.
- Page 11 X Polarity X Polarity X Polarity X Polarity This function can provide a visual reference of the signal level of the vertical and horizontal polarisations at a frequency. This can be used to adjust the LNB skew for maximum isolation. Many satellite transponders (like Astra 28.2 for most frequencies) operate so that the vertical and horizontal polarisation signals are not usually at the same frequency, but others (like Hotbird) have some transponders that operate with vertical and horizontal polarisations at the same frequency.
- Page 12 Save Memory Save Memory Save Memory Save Memory The Save Memory function saves the current Frequency, Polarity (13V/18V), Band (22kHz signal state), and LNB Type in the selected location. The knob can be turned to select the desired memory position to change. If a new name is needed for the memory position, then it can be entered on the next screen when the menu button is pressed to select the memory position number.
-
Page 13: Spectrum Mode
Spectrum Mode G2 Spectrum HD Spectrum About Spectrum Mode The Spectrum Mode shows the signal power versus frequency around the current frequency. On entry to the Spectrum Mode, the spectrum cursor is in the centre of the display and the centre frequency is set to the last used frequency. Turning the knob changes the cursor frequency, and the flag shows the current cursor frequency and for a Universal LNB also shows the Polarity. - Page 14 Sweep Sweep Sweep Sweep The Spectrum Sweep can be changed from 1 MHz per increment to 10 MHz per increment. The user setting for the Spectrum Sweep increment is then saved and restored on power up. 13V/18V and 2 13V/18V and 22kHz 13V/18V and 2 13V/18V and 2 2kHz...
-
Page 15: Analog Mode
Analog Mode About Analog Mode The screen in Analog mode shows the relative RF level for the two LNB inputs on a thermometer bar. This is the RF level for the IF band from 920 MHz to 2150 MHz. For a Universal LNB, the Satellite band will be selected from one of the four quadrants by the 13V/18V and the 22 kHz signal. - Page 16 Analog Menu Functions 13V/18V /18V /18V /18V This function toggles the LNB voltage. If the voltage is 13V, it is changed to 18V and vice versa. The LNB voltage is used to select the Polarity for a Universal LNB. 13V selects Vertical Polarity and 18V selects Horizontal Polarity.
- Page 17 DiSEqC Cmd DiSEqC Cmd DiSEqC Cmd DiSEqC Cmd This function sends a DiSEqC command. Turning the knob shows the DiSEqC command selected and pressing the knob button sends this command. The thermometer bar shows the RF Level for LNB A. This is RF level for the IF band from 920 MHz to 2150 MHz. The Exit position returns the user to Analog mode.
- Page 18 SetWest SetWest SetWest SetWest: Set the West “soft” limit for the positioner at the current position. Goto Pos Goto Pos: This sends the DiSEqC command to the positioner to move to a stored position Goto Pos Goto Pos from 1 to 31. The knob selects the position number to move to and pressing the knob button sends the command.
-
Page 19: Setup Functions
Setup Functions Contrast The Contrast function shows a black and white grid and allows the adjustment of the display contrast for best viewing using the knob. Pressing the knob button exits the contrast adjustment and saves the current contrast settings. Invert Knob Pressing the Knob button for the Invert Knob function changes the way the knob rotation is interpreted. - Page 20 This function sets the AutoOff timeout if required. If the knob button or knob is not used for the timeout period, then the Satlook will display “AutoOff” and power down. This setting is then saved as a power on parameter. Backlight Configuration The backlight can be set so that it will turn off after a delay.
- Page 21 command is also used to test the four User Bands. The User Bands are assumed to be 100 MHz wide. (Using the Spectrum mode will show how wide the User Band is and whether it is symmetrically about the tuning frequency.) In the Digital mode, retuning is performed every time the frequency is changed using the knob or the Band/Polarisation is changed.
-
Page 22: Menu Timeout
Menu Timeout The menu timeout can be set so that if no action is performed, then the display of the current mode will resume automatically. If “No Time Out” is chosen, the menu will remain active until the button is used to select a function. EasyFind Setup The EasyFind Setup function allows the EasyFind to be configured for the user situation. - Page 23 Language The menu language can be set to other languages than English. Supported are Swedish, French, German, Polish, Dutch, Spanish, Italian and Turkish. Version Satlook HD Satlook G2 The Version menu shows the software and hardware versions and related information.
-
Page 24: Loading New Firmware
Loading New Firmware A new firmware version can be loaded to correct issues that are reported in the firmware release notes. The firmware for the Satlook HD is identified as “smHD60-EU.hex” with the number “60” being the version number. Newer firmware designed to be common with the Satlook G2 is identified as smG2HD106-EU.hex This firmware can be used on either the G2 or the HD.
Need help?
Do you have a question about the Satlook Micro HD and is the answer not in the manual?
Questions and answers