Table of Contents
Advertisement
Quick Links
Underwater Housing for Sony Cyber-shot DSC-
RX100 Mark VI, VII Digital Cameras
Product Number 6116.18
Product Registration
Please register your product within 15 days of purchase. Our product
registration database is the quickest way for us to contact you in the
event of a product update.
To register, send a photo of the above registration label to us via
ikelite@ikelite.com along with your name, address, and phone
number.
Advertisement
Table of Contents

Subscribe to Our Youtube Channel
Related Manuals for Ikelite 6116.18


Summary of Contents for Ikelite 6116.18
-
Page 1: Product Registration
To register, send a photo of the above registration label to us via ikelite@ikelite.com along with your name, address, and phone number. -
Page 2: About This Product
About this Product Thank you for your purchase of Ikelite equipment. Please read this instruction manual completely before attempting to operate or dive with this product. Included in the Box • Housing • Port cover # 0200.08 • Silicone lubricant 1cc tube •... -
Page 3: Important Notices
Important Notices To prevent salt build-up and sticking controls, submerge the » empty housing in clean, freshwater. Operate the controls several times each while underwater to flush out any residue. Never leave a housing in a rinse tank, even if it is the only »... -
Page 4: Table Of Contents
Contents Product Registration About this Product Included in the Box Specifications Important Notices Getting to Know Your Housing Accessory Port Lanyard Mount Setting Up Your Camera Pre-Installation Checklist & Initial Camera Settings Exposure Settings Setting Up Your Housing Opening the Housing Inserting the Camera Closing the Housing Final Check... -
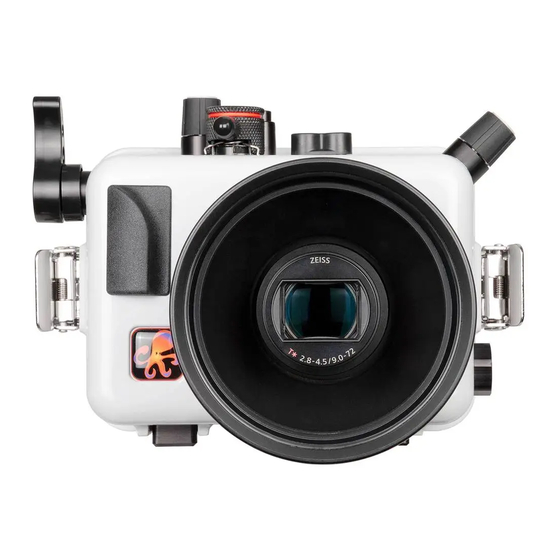
Page 5: Getting To Know Your Housing
Getting to Know Your Housing Fiber Optic Ports Mode Dial Zoom Lever Shutter Control Ring Lid Snap Lens Port Accessory Port Hole Plug Tray Mounts... - Page 6 O-Ring On/off Control Wheel MOVIE MENU Lid Hook Lanyard MOVIE MENU DISP / UP Cursor MENU / SET Button / DOWN Cursor...
-
Page 7: Accessory Port
Your housing features one 1/2-20 threaded Accessory Port which may be used for attachment of factory optional or aftermarket housing accessories. DO NOT remove the Accessory Hole Plug unless you are installing a compatible accessory. Visit ikelite.com for an updated list of compatible accessories. Lanyard Mount The included lanyard is a break-away safety lanyard which is designed to break of stress is placed on it. -
Page 8: Exposure Settings
Photo School section of our website for recommendations on exposure settings for a wide variety of shooting situations: https://www.ikelite.com/blogs/cheat-sheets Setting Up Your Housing Opening the Housing 1. Push the lid snap lock forward and start to lift the curved end away from the housing. - Page 9 3. Pull the bottom of the rear LCD screen away from the camera body slightly to allow for proper mounting plate alignment . 4. Line up the Mounting Screw with the Camera Tripod Socket. Use a flat head screwdriver to tighten the mounting plate to the camera. Camera Tripod Socket Mounting Screw...
-
Page 10: Closing The Housing
Closing the Housing 1. Make sure the o-ring is clean and in its proper location on the back of the housing. The main o-ring does not require lubricant to make a seal. 2. Place the back onto the housing front. 3. -
Page 11: Entering The Water
Entering the Water 1. If possible, we recommend entering the water without your housing to ensure that you are comfortable and your life-saving equipment is in working order. Once you are stable, have someone pass your camera housing to you. 2. -
Page 12: Attaching A Fiber Optic Cord
Attaching a Fiber Optic Cord 1. Check the end of the fiber optic cord to ensure that it is clean and smooth. 2. Ensure that the fiber optic cord o-ring is in place. This o-ring does not provide waterproofing, however it does keep the fiber optic cord in place. -
Page 13: Maintenance
• Silicone lubricant # 5020 Maintenance Post-Dive 1. Rinse the housing in fresh water. Rotate the housing controls and press each button while submerged in fresh water to flush out any salt or debris to ensure smooth operation on future dives. 2. -
Page 14: Troubleshooting
7. Store in a cool, dry place. 8. Like regulators and other pressure-sensitive equipment, we recommend careful care and cleaning along with annual replacement of the factory seals. Troubleshooting Water enters the housing • Clean and re-install the main o-ring. •... - Page 15 • Check that the camera flash is opened and pointed toward the fiber optic ports. • Check that the fiber optic cord is properly attached. Buttons are stuck • Soak the housing in lukewarm fresh water. Depress each button several times while the housing is submerged. •...
-
Page 16: Limited Warranty
Except as mentioned above, no other warranty expressed or implied applies to this Ikelite product. Service and Repairs Ikelite is most interested in performing any service to ensure that all products perform as intended. Evidence of purchase date must be provided to obtain warranty service.
Need help?
Do you have a question about the 6116.18 and is the answer not in the manual?
Questions and answers