Table of Contents
Advertisement
Quick Links
D igi tal Ho u s i n g
I n s t r u c t i o n M a n u a l
6116.11 Sony RX100 II (DSC-RX100M2/B)
Thank you for your purchase of Ikelite equipment. Please read this
instruction manual completely before attempting to operate or dive
with this product. Please refer to the back page of this manual to
register your Ikelite product.
Advertisement
Table of Contents

Subscribe to Our Youtube Channel
Related Manuals for Ikelite 6116.11


Summary of Contents for Ikelite 6116.11
- Page 1 I n s t r u c t i o n M a n u a l 6116.11 Sony RX100 II (DSC-RX100M2/B) Thank you for your purchase of Ikelite equipment. Please read this instruction manual completely before attempting to operate or dive with this product.
-
Page 2: Table Of Contents
Deflector Removal/Installation ........P. 10 Diffuser Purpose..............P. 10 Diffuser Installation/Removal ..........P. 10 Attach External Tray and Handle to Housing ....P. 11 Attach Ikelite Strobe Arm to Housing ......P. 11 Turn Camera On..............P. 12 Entering the Water ............P. 12 Maintenance ..............P. 12 Lens Port ................P. -
Page 3: Specifications
Depth ......5.4 in (140 mm) including controls and lens port Weight ....2.6 lb (1179 g) above water Buoyancy ....Slightly negative in freshwater Package Contents - Ikelite Digital Housing - Diffuser and Deflector - Silicone Lubricant - Lanyard (attached to housing) -
Page 4: Preparation
Preparation This product has been water pressure tested at the factory and is depth rated to 200 ft. (60m). Thoroughly inspect and immerse the empty housing completely in water before installing a camera. If any fogging occurs or droplets of water enter the housing, do not install a camera. Clean the housing main o-ring and retest to make sure that it is watertight. -
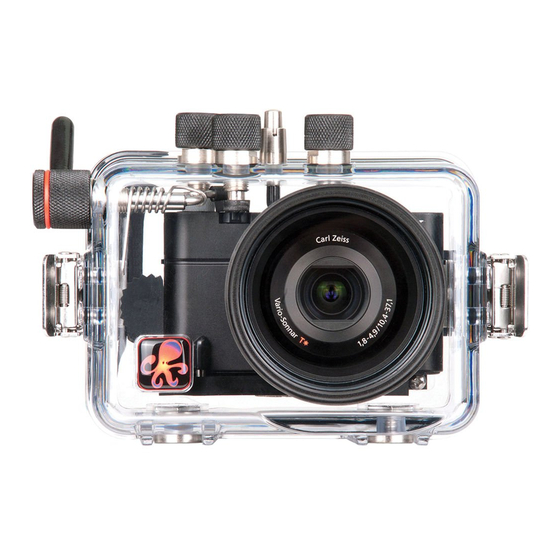
Page 5: Parts Of The Housing - Front View
Parts of the Housing - Front View Zoom Lever Shutter ON/OFF (Power) Button Mode Dial Release Control Ring Fiber Optic Ports Lens Port Lid Snap External Tray Mount Control Ring: To properly engage the Control Ring on the surface or in shallow water, apply slight downward pressure as you rotate the knob. -
Page 6: Parts Of The Housing - Back View
Parts of the Housing - Back View Housing Controls Set / Tracking Focus MOVIE Button Flash Mode / Right Button 2. Fn Function Button Exp. Comp. / Down Button 3. MENU Button Playback Button DISP Display / UP Button 5. * Control Wheel Guide / Delete Button Drive Mode / Left Button * Control Wheel Note: A small section is “cut away”... -
Page 7: Opening The Housing
Opening the Housing Push Forward Lid Snaps have a Lock. To open housing, push Lid Snap Lid Snap Lock Lock forward and lift as shown. Keep pressure on the Lid Snap so it does not fly open quickly. Some lid snaps have a lot of Lift spring tension once they go over center, so keep a firm grip on the lid snap. -
Page 8: Using The Built-In Camera Flash
Deflector and install the Diffuser (included), see page 10. The camera’s built-in flash CANNOT be used with optional Wide-Angle or Accessory lenses. For the best results, we recommend using an external Ikelite Strobe with the removable housing Deflector installed. Closing the Housing 1. -
Page 9: Usage
Usage Final Check The clear housing permits instant visual inspection of the camera and sealing surfaces as well as complete monitoring of controls and camera LCD screens. This housing has been factory water pressure tested to 200 ft (60 m). Once the housing is closed, check the o-ring seal. -
Page 10: Deflector Removal/Installation
Deflector Removal/Installation The factory installed flash Deflector should be Fiber removed when using ONLY the built-in camera Optic flash and no external strobes. Pull the Holes Deflector away from the inside of the housing Velcro front to remove. To install, line up the Deflector corresponding Velcro dots on the housing front and press the Deflector back into its factory installed position next to the... -
Page 11: Attach External Tray And Handle To Housing
Ikelite Strobe Arm will easily attach to the Handle by depressing the spring-loaded Handle Push Button until it stops. Gently slide the pronged end of the Ikelite Arm into the hole in the top of the Handle as shown. Housing Handle... -
Page 12: Turn Camera On
Lubricant Ikelite provides silicone lubricant with the housing. We recommend you use only Ikelite lubricant on Ikelite products. Other brands may cause the main housing o-ring to swell and not seal properly. Use only enough lubricant to lightly cover the main housing o-ring or lubricate a sticky control. -
Page 13: Housing Maintenance
Housing Maintenance Your Ikelite Digital Housing should be given the same care and attention as your other photographic equipment. In addition to normal maintenance, we recommend that the housing be returned to Ikelite periodically to be checked and pressure tested. -
Page 14: Control Maintenance
After a few minutes, operate the push button. If this does not correct the problem, return the housing to Ikelite for maintenance. If you are on a trip and unable to return the housing immediately, a push button may be lubricated by pressing and holding the push button all the way in. - Page 15 Control Maintenance - continued Slide the shaft back into the control gland and gently slide it back and forth a few times without fully removing the shaft from the gland. Replace the knob noting the flat area on the shaft. The set screw in the knob should tighten down against the flat area on the control so the knob does not turn on the shaft.
-
Page 16: Photo Tips
Photo Tips The number one rule in underwater photography is to eliminate as much water between the camera and subject as possible. Get as close as you can to the subject, then use the zoom. If you are using flash for still photos, subjects beyond 6 feet (1.8m) will not have much color regardless of strobe power. -
Page 17: Troubleshooting
- If a control is sticky, grab the control knob, pull it out, and then push back in. If still sticky, see the Control Maintenance section - pages 14 &15. - Return housing to Ikelite for routine maintenance. Image is - Check that the camera flash or strobe is firing over/underexposed, when taking a picture. - Page 18 Place one or two packs in your housing before each day of diving. - If moisture or water droplets are present around the controls or sealing areas, return the housing to Ikelite for evaluation. - Clean the main housing o-ring and sealing surface of the housing.
- Page 19 - Look for hair, dirt, or foreign debris crossing the o-ring seal. - Reassemble the housing without a camera installed and pressure test or take diving. - Return housing to Ikelite for evaluation. Pictures are too blue - Use custom (manual) white balance if available. or too green Reset for each working depth or when attaching a color correcting filter.
-
Page 20: Spare Parts
Spare Parts Main Housing O-ring 0109 Control Ring “Rubber Sleeve” 0367.39 Vinyl Port Cover 0200 Ikelite Lube 5020 (4 - 1cc tubes) For light lubrication of the main housing o-ring. Recommended Accessories Tray and Handle(s) Add stability and gripping point(s) for comfortable use of the housing above and below water. - Page 21 The housing port is threaded into the housing front. Do not overtighten threaded accessory lenses into the housing port or accidental removal of the housing port could occur when removing the accessory lens. No vignetting will be present underwater with the Ikelite W-30 lens attached.
-
Page 22: Customer Support
Recommended Accessories - continued A full range of accessories is available to support your housing. Please visit www.ikelite.com to see the most current information about recommended accessories for your housing. Customer Support Please read the troubleshooting section of this instruction manual before contacting Ikelite Customer Support. -
Page 23: Limited Warranty
This Ikelite product is warranted against any manufacturing defects for a period of one (1) year from the original date of purchase. Defective products should be returned to Ikelite postage paid. Ikelite will, at its sole discretion, repair or replace such products, and will return to customer postage paid. -
Page 24: Product Registration
Product Registration Please go to www.ikelite.com to register your Ikelite housing within 15 days of purchase. Ikelite Underwater Systems 50 West 33rd Street Indianapolis, IN 46208 USA www.ikelite.com © 2014 Ikelite Underwater Systems 6116.11_Sony_RX100II_02-0214...
Need help?
Do you have a question about the 6116.11 and is the answer not in the manual?
Questions and answers