
Related Manuals for Audiotec Fischer HELIX DSP MINI


Summary of Contents for Audiotec Fischer HELIX DSP MINI
- Page 1 DSP MINI Digitaler High-Res 6-Kanal Signalprozessor mit 96 kHz / 24 Bit Signalweg Digital High-Res 6-channel signal processor with 96 kHz / 24 Bit signal path...
-
Page 2: Herzlichen Glückwunsch
Verarbeitung und eine tigen HELIX-Signalprozessors. überzeugende Anwendung ausgereifter Technolo- gien aus. Audiotec Fischer setzt mit dem HELIX DSP MINI neue Maßstäbe im Bereich der Signalprozessor- Viel Freude an diesem Produkt wünscht Ihnen das technik. Dabei profitieren Sie als Kunde direkt von Team von unserer nahezu 30-jährigen Erfahrung in der For-... -
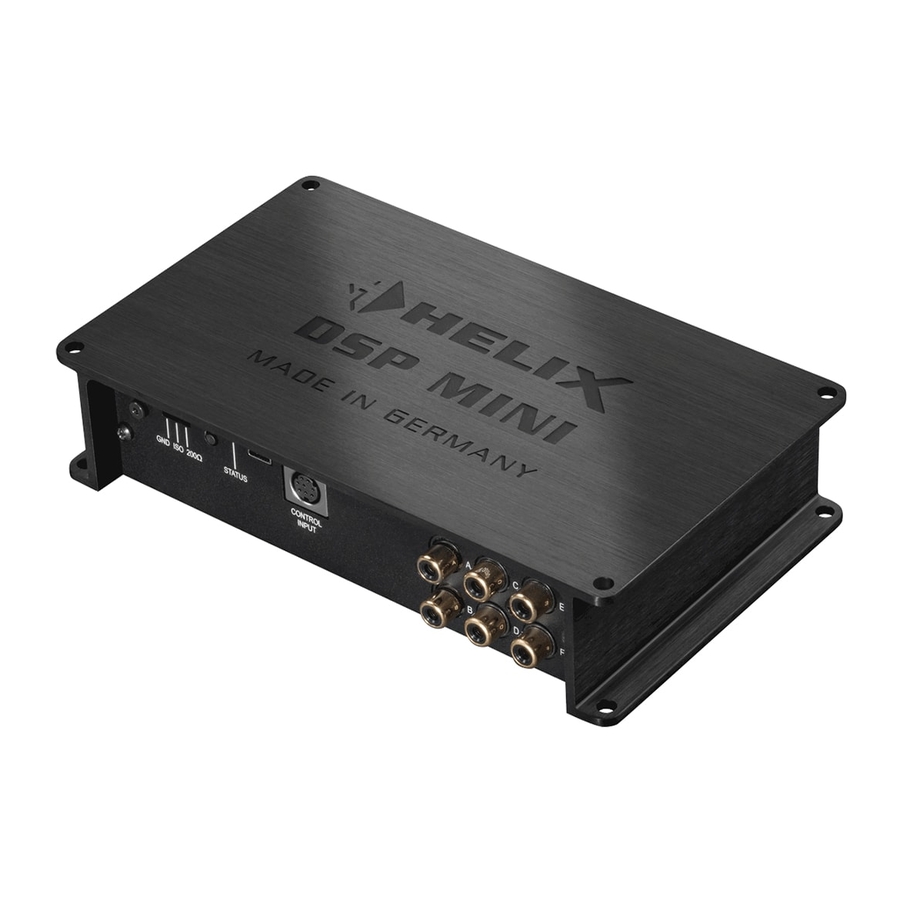
Page 3: Anschluss- Und Bedienelemente
Anschluss- und Bedienelemente Line Input Optical Input Cinch-Eingänge Anschluss eines Optischer Eingang im SPDIF-Format für Vorverstärkersignals. digitale Stereosignale. Clipping LED Auto Remote Diese LED leuchtet rot, wenn einer der Dient zum Aktivieren bzw. Deaktivieren Analogeingänge übersteuert wird. automatischen Einschaltung Signalprozessors. Highlevel Input Hochpegel-Lautsprechereingang Power Input... - Page 4 Inbetriebnahme und Funktionen 1 Line Input Achtung: Es ist zwingend notwendig, die Eingangs- 4-Kanal Vorverstärkereingang zum Anschluss von empfindlichkeit des DSP MINI an die Signalquelle Signalquellen, z.B. Radios. Die Eingangsempfind- anzupassen, um Schäden am Signalprozessor zu lichkeit ist für alle Kanäle ab Werk auf 4 Volt ein- vermeiden.
-
Page 5: Power Input
Fall alle Anschlüsse auf Fehler, wie z.B. 8 Masseschalter Kurzschlüsse oder fehlerhafte Verbindungen. Ist die Beim HELIX DSP MINI ist die Masse der Signalein- Sicherheitsschaltung der Temperaturüberwachung gänge galvanisch von der Masse der Signalaus- aktiv, wird der Remote-Ausgang sowie die Signal- gänge getrennt. -
Page 6: Line Output
„Power Save Mode“ sowie bei einem Software-Update ab. Die Ausgänge können in der DSP PC-Tool Software den Eingängen beliebig zu- geordnet werden. Einbau und Installation Der HELIX DSP MINI wird wie nachfolgend be- 2. Anschluss der Highlevel-Lautsprecherein- gänge schrieben an das Autoradio angeschlossen. Hochpegel-Lautsprechereingänge kön-... - Page 7 Batterie verbunden ist. Die Stromaufnahme des Um die Eingangsempfindlichkeit zu verändern, verwenden Sie den Drehregler 4 (Punkt 4, HELIX DSP MINI ist mit ca. 400 mA zwar sehr Seite 4; Input Sensitivity). Werkseitig ist die gering, trotzdem sollten Kabel mit min. 1 mm²...
- Page 8 Verstärker / der Lautspre- cher führen. Informationen zum Anschluss des 7. Konfiguration des Remote-Eingangs Signalprozessors an einen PC finden Sie auf Die Einschaltung des HELIX DSP MINI erfolgt Seite 9. automatisch bei Ansteuerung über die Hoch- 9. Anschluss des Remote-Ausgangs pegel-Lautsprechereingänge (High level Input)
-
Page 9: Anschluss An Den Computer
USB-Kabel an den Computer an. sechs DSP Kanäle separat eingestellt werden. Wenn Sie längere Distanzen zu überbrücken Bevor Sie den HELIX DSP MINI das erste Mal an haben, verwenden Sie bitte eine aktive USB- Verlängerung mit integriertem Repeater und einen Computer anschließen, gehen Sie auf unsere... - Page 10 Konfigurationshinweise für die DSP-Soundeffekte Der HELIX DSP MINI bietet einzigartige DSP- Hinweis: Das Center Processing wird ausschließ- Sound effekte wie das „Augmented Bass Proces- lich auf den Ausgangskanal E angewendet. sing“, den „StageXpander“, den „RealCenter“ und Hinweise für StageXpander- noch mehr.
- Page 11 Einbau einer HELIX Extension Card Der HELIX DSP MINI kann durch die Montage einer 6. Achten Sie auf den richtigen Sitz des HEC Mo- HELIX Extension Card (HEC) um weitere Schnitt- duls und darauf, dass alle Kontaktstifte vollstän- stellen wie beispielsweise einem Bluetooth Audio dig im Sockel stecken.
- Page 12 96 kHz Abtastrate Start-Stopfähigkeit Der HELIX DSP MINI bietet eine Signalverarbeitung Das Netzteil im HELIX DSP MINI stellt die interne Spannungsversorgung auch bei kurzfristigen Ein- mit einer doppelten Abtastrate von 96 kHz. Dadurch brüchen bis hinab zu 6 Volt sicher.
-
Page 13: Technische Daten
Europäischen Union (EU) zertifiziert. Kaufbeleg erfolgen. Hinweis: „Die Bluetooth Wortmarke und die Logos sind eingetragene Warenzeichen der Bluetooth SIG, Inc. und jegliche Nutzung dieser Marken ® durch die Audiotec Fischer GmbH geschieht unter Lizenz. Andere Handelsmarken und Handelsnamen gehören den jeweiligen Inhabern.“... -
Page 14: General Instructions
HELIX dealer. Use only the provided connectors for connec- tion of the HELIX DSP MINI. The use of other Install your HELIX DSP MINI in a dry location with connectors or cables can result in damage of... - Page 15 Line and Highlevel Inputs. Ground lift switch USB input Can be used to define the connection Connects the HELIX DSP MINI to your PC. between the grounding of the inputs and outputs. Control Input Multifunction interface for e.g. an optional Control pushbutton remote control or other HELIX accessory.
- Page 16 Line Outputs of the control, it´s only for adjusting the signal processors HELIX DSP MINI. Connect this remote output to the gain. Adjustments with this control do not affect remote inputs of your amplifier/s. This is essential to the optical input! The control range of the lowlevel avoid any interfering signals.
-
Page 17: Ground Lift Switch
If the DSP is overheated the internal temperature 8 Ground lift switch protection switches off the remote and signal output The ground of the HELIX DSP MINI signal in- until it reaches a safe temperature level again. puts is galvanically decoupled from the ground of Red / green slow flashing: No operating software installed. -
Page 18: Installation
Installation Connection of HELIX DSP MINI to the head processor. If this input is used the remote input unit / car radio: does not need to be connected as the signal processor will automatically turn on once a Caution: Carrying out the following steps will re- loudspeaker signal is received. - Page 19 Information about connecting the DSP MINI to a computer can be found on page 20. Solely use the included screw-type terminal to connect the HELIX DSP MINI to a power sup- 9. Connecting the remote output ply. Make sure of correct polarity. The ground...
- Page 20 Connection to a PC It is possible to freely configure the HELIX DSP MINI 2. Connect the signal processor to your computer with our DSP PC-Tool software. using the USB cable that is included in delivery. The user interface is designed for easy handling...
- Page 21 Configuration notes for the DSP sound effects The HELIX DSP MINI offers unique DSP sound Notes for StageXpander and ClarityXpander effects like “Augmented Bass Processing”, function “ StageXpander”, “RealCenter” and many more. In Normally, the settings of the StageXpander and...
- Page 22 HELIX Extension Card slot (HEC slot) It is possible to extend the functionality of the HELIX DSP MINI by adding further interfaces like a Bluetooth Audio Streaming module, a High Reso- ® lution Audio USB soundcard etc. To install a HELIX Extension Card it is necessary to...
- Page 23 Unique Features of the HELIX DSP MINI 96 kHz sampling rate Power Save Mode The HELIX DSP MINI allows to handle all signals The Power Save Mode is incorporated in the basic with the doubled sampling rate of 96 kHz. Thus the setup.
-
Page 24: Technical Data
Bluetooth SIG, Inc. and any use of such marks by ® Audiotec Fischer GmbH is under license. Other trademarks and trade names are those of their respective owners.” Audiotec Fischer GmbH Hünegräben 26 ·...
Need help?
Do you have a question about the HELIX DSP MINI and is the answer not in the manual?
Questions and answers