Table of Contents
Advertisement
Quick Links
Advertisement
Table of Contents

Related Manuals for AGP EC021


Summary of Contents for AGP EC021
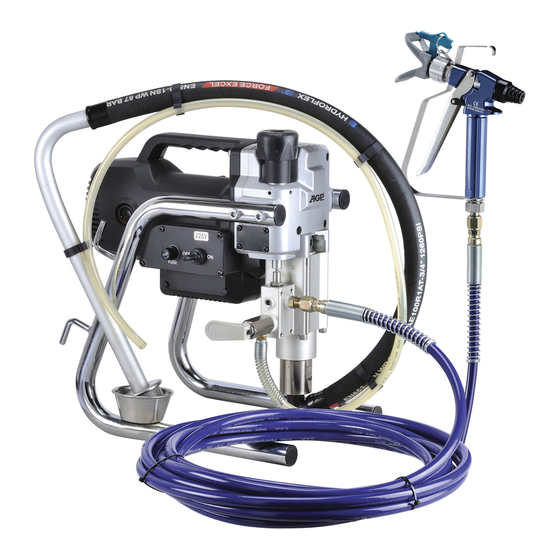
- Page 1 Original Instructions...
- Page 2 Model 700W Mechanical Model Motor Type DC, fan-cooled Power input 700W Voltage See machine nameplate Max Tip Size 0.021in. Max Flow 1.9 l/min (0.50 gpm) Max Pressure 207 bar (3,000 psi) Dimensions (LxWxH) 36 x 25 x 40 cm Net Weight 11.4 kg Material Applications Wood interior...
-
Page 3: General Safety Rules
GENERAL SAFETY RULES surfaces such as pipes, radiators, ranges and refrigerators. There is an increased risk WARNING! Read and understand all of electric shock if your body is earthed or instructions. Failure to follow all instructions grounded. Do not expose power tools to rain or wet listed below may result in electric shock, fire conditions. -
Page 4: Symbols Used In This Manual
into account the working conditions and situations. the work to be performed. Use of the power Dress properly. Do not wear loose clothing or jewellery. Keep your hair, clothing and tool for operations different from intended gloves away from moving parts. Loose could result in a hazardous situation. -
Page 5: Specific Safety Rules
SPECIFIC SAFETY RULES FOR AIRLESS which he has access that the plug remains SPRAYERS removed. HANDLE THIS UNIT AS YOU WOULD A LOADED WA R N I N G : H I G H P R E S S U R E. N e ve r l e ave WEAPON! pressurized system unattended. - Page 6 EXPLOSION RISK FROM HALOGENATED hand or body. HYDROCARBON SOLVENTS • ALWAYS have the tip guard in place when spraying. • ALWAYS lock the gun trigger when you stop Never use halogenated hydrocarbon solvents in this machine. spraying. • ALWAYS remove tip from the gun to clean it. Contact with aluminum par ts may cause an •...
- Page 7 SPRAY GUN SAFETY clothing and respirator as recommended by fluid manufacturer. • ALWAYS set gun safety lock in the "LOCKED" HOSES position when not in use & before servicing or cleaning. • NEVER remove or modify any part of the gun. •...
-
Page 8: Electrical Connection
Always Ground All of These Components: pressure during flushing. Never use high pressure in the cleaning Sprayer: plug the power supply cord, or process. USE MINIMUM PRESSURE. extension cord, each equipped with an Do not smoke in spraying/cleaning area. NEVER use cleaning solvents with flash points undamaged three-prong plug, into a properly grounded outlet. -
Page 9: Operation
accordance with all local codes and ordinances. The gun safety latch should always be set. The only time the trigger should be unlocked is when the WA R N I N G - I m p ro p e r i n s t a l l at i o n o f t h e gun is actually being triggered. -
Page 10: How To Flush
or explosion Hold the metal part of the based materials. First flush with clear water, gun firmly to the side of a metal pail. All then flush with mineral spirits. solvent pails must be conductive metal W h e n c h a n g i n g c o l o r s . F l u s h w i t h a material and properly grounded. -
Page 11: Spray Tip Assembly
fluid to discharge until pure material is coming orientation and tighten the lock nut firmly by out. hand only. Point the gun into the waste bucket, unlock the trigger and hold the trigger open. Then close the priming valve. Keep the trigger held open and allow the pump to run and watch the fluid discharging from the gun. - Page 12 necessary. Operating the sprayer at a higher than necessary pressure wastes material, causes early tip wear, and shortens sprayer life. Excessive pressure can also result in bounce-back of the material and a rough finish. (Running with the pressure at the absolute maximum setting will also make the pump run on and off in an irregular way.) NOTE: Use proper pressure settings.
- Page 13 corners, point the gun parallel to the corner. Cut in Reversed position Forward position edges and corners first. Then paint flat areas. (for clearing clogs) (for spraying) Do not allow the material to run out. Remember to follow the PRESSURE RELIEF PROCEDURE before refilling material.
- Page 14 SPRAY TIP SELECTION (See chart 1) Spray tip selection is based on paint viscosity, paint type, and job needs. There are two variables to identify the tip: orifice size and fan pattern width. The main variable is tip orifice size. Generally, use a smaller orifice tip For light viscosities (thin materials, like varnish), and use a larger orifice tip for heavier Worn-out tip...
- Page 15 fluid to recirculate for 2-3 minutes to make component materials or epoxies, etc. To reclaim the material in the pump, place sure that all traces of the material are cleaned out. the drain tube in the original material bucket. 14. Turn off the machine and unplug. Open the With the priming valve still in the priming valve to relieve residual pressure.
-
Page 16: Long Term Storage
HOURLY MAINTENANCE housing. Place the filter in the spray gun and reassemble the unit by tightening the nut with the wrench. We recommend after every hour of spraying, stop, 19. Clean the exterior of the sprayer with a rag follow the Pressure Relief Procedure and perform soaked in the appropriate solvent. -
Page 17: Pump Packings
To clean: PACKINGS REPLACEMENT Remove the suction tube (73) by releasing the Loosen the packing nut with the tommy bar hose clip (71) and pulling the hose free. Use a supplied and remove. wrench to loosen the gland nut. Pull out the piston. Remove the check ball and ball guide and Remove all par ts and clean. -
Page 18: Motor Maintenance
MOTOR MAINTENANCE manufacturer or their agent in order to avoid a safety hazard. Every 50 hours of operation blow compressed air WARNING: All repairs must be entrusted to an through the motor while running at no load to clean authorized service center. Incorrectly performed out accumulated dust. - Page 19 Hopper & Hose Set Installation Instructions Remove the drain tube from the priming valve body using a wrench Thread in the union fitting into the priming valve body. The square side with the Teflon will thread into the valve. The other side with the male flare should be facing out. Tighten with an appropriate wrench.
-
Page 20: Troubleshooting
Troubleshooting Problem: Motor will not run Check Solution Electrical supply- must match voltage Use correct outlet on machine nameplate Extension cord-check continuity Replace extension Power supply cable-check continuity Replace cable Carbon brushes Replace brushes Bad switch Replace switch Motor damage Replace or repair motor Problem: Pump loses prime or will not prime Check... - Page 21 WIRING...
-
Page 22: Exploded View
EXPLODED VIEW... -
Page 23: Parts List
PARTS LIST NO. Parts Name Q'TY NO. Parts Name Q'TY SOCKET CAP SCREW M5 x 50 SEAL SEAT SOCKET CAP SCREW M5 x 25 O-RING S-31.5 SOCKET SET SCREW M5 x 6 O-RING Ø31.2 x Ø35.1 x 1.8 GEAR HOUSING (SILVER) CHECK BALL &...
Need help?
Do you have a question about the EC021 and is the answer not in the manual?
Questions and answers