Table of Contents
Advertisement
Advertisement
Table of Contents

Related Manuals for FitDesk 4020


Summary of Contents for FitDesk 4020
- Page 1 Model: 4020 Standing Bike Desk Owner’s Manual VISIT OUR WEBSITE: WWW.THEFITDESK.COM OR CALL US AT 1-855-713-8887 MONDAY - FRIDAY 9 A.M. - 5 P.M. EST DISTRIBUTED BY FD PRODUCTS LLC. 1161 SOUTH PARK DRIVE, KERNERSVILLE NC 27284 IMPORTANT: READ THE OWNER’S MANUAL BEFORE ASSEMBLING...
-
Page 2: Table Of Contents
Cushion you good health and increased wellness as Back Support you use the FitDesk® to infuse activity into parts of your day. Before you start assembling your new Handle FitDesk® please take a moment to read this Bars manual carefully. -
Page 3: Safety Warnings
The frame must be in the closed and locked position prior to transport. ® 6. Read and follow all warning stickers on the FitDesk 7. Warm-up stretching is recommended before exercise. 8. Mount and dismount carefully. - Extreme movements CAN TIP MACHINE - INJURY AND EQUIPMENT DAMAGE CAN OCCUR. -
Page 4: Customer Support
MONDAY - FRIDAY 9 A.M. - 5 P.M. EST EASY TO USE CUSTOMER TICKETING Step 1: www.thefitdesk.com Step 2: “Support” Step 3: “Submit A Support Ticket” customerservice@thefitdesk.com FOR FASTEST POSSIBLE SERVICE PLEASE HAVE AVAILABLE Model # (4020) - Serial # (located on tubular base safety sticker) WWW.THEFITDESK.COM... -
Page 5: Tools / Hardware / Knobs / Bracket
(Pre-Assembled on Frame) NOTE: If Parts or hardware are missing contact customer service immediately. Please do not discard your packaging until your entire FitDesk is fully assembled. Some parts are ® purposely packaged in cardboard or Styrofoam and can mistakenly be thrown away with the packaging. -
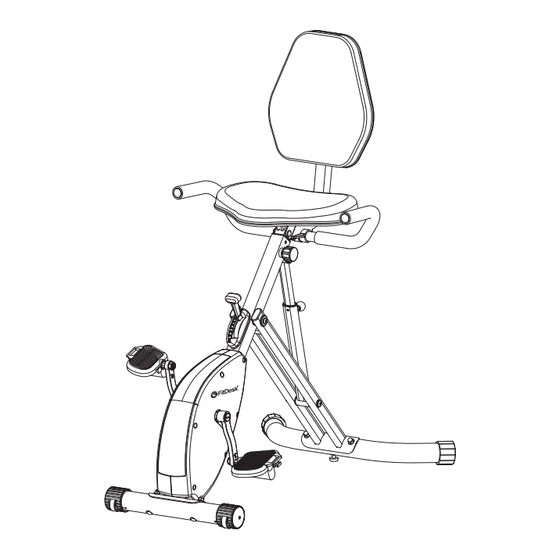
Page 6: Parts / Components
PARTS / COMPONENTS A1 / A2. Left and Right Pedals Handle Bars Back H. Seat Support G.Front Stabilizer Tube I. Rear Stabilizer... -
Page 7: Assembly
We take great care to deliver quality products that will last for years. However, even with years of manufacturing experience and high levels of quality control, problems still occur from time to time. If you experience a problem with any part of your new FitDesk , please contact us before returning ®... - Page 8 ASSEMBLY Step 5: Assemble the Seat (D) to the Seat Support Tube (H). Using attached Wrench tighted the (AA1) three Oval Head Screws (M8 x 16mm) , Figure 5 (II) Step 4: Adjust the knob on the bottom of the Rear Stabilizer (I) from the floor around 2 to 3 mm or until bike is level.
- Page 9 ASSEMBLY FIGURE 10 Step 10: Install the Seat Back Cushion (B) to the Saddle Back Post (E) using two Oval Head Allen Screws M8 x 42mm (KK), Lock Washers (CC) tighten using the supplied Allen Wrench . Be sure the Allen Bolts (KK) and Lock (BB1) Washers (CC) sit flush in the holes.
-
Page 10: Warnings And Labels
WARNINGS AND LABELS NOTE: Read all warning stickers before operating this product. 25OLBS/113 KG 4020 OPERATIONAL INSTRUCTIONS NOTE: Before operating please read carefully RESISTANCE KNOB Push down knob from 1-8 to change resistance. To increase the load, push the the knob located on the main frame down. -
Page 11: Operational Instructions
Loosen the Knob and pull, then retighten when the desired height is reached. SET UP / STORAGE This model 4020 FitDesk uses a quick release frame unlock design. ® As a safety precaution please use the technique shown here when opening and closing frame. -
Page 12: Warming Up
Before you use the FitDesk , it is advisable to warm up and stretch your muscles. Simple warm up ® exercises and stretches can help you be more efficient and safer during your time on the FitDesk ® STRETCHING Hold each stretch 10 to 30 seconds. If you feel you need more, stretch the other side and return for another set of stretching. -
Page 13: Maintenance And Troubleshooting
MAINTENANCE AND TROUBLESHOOTING The integrity of the FitDesk ® bike can only be maintained when it is regularly maintained for damage and wear. Special attention should be given to the following: HARDWARE Verify that all bolts are present and properly tightened. -
Page 14: Warranty
This limited warranty is applicable to each original end-customer (hereinafter “Customer”) purchasing the Model: 4020 Standing Bike Desk consisting of the structural metal frame (hereinafter the “Structural Frame”) and various other non-frame components (hereinafter the “Non-Frame Parts”) sold by FD Products, LLC (hereinafter “Company”) for Customer’s own use and not for resale. - Page 15 4. DISPUTE RESOLUTION: This FitDesk Limited Warranty shall be governed by and construed in accordance with the laws of the State of North Carolina, without regard to its principles of conflicts of law. The parties acknowledge the exclusive jurisdiction of the federal and state courts of the State of North Carolina.
-
Page 16: Parts List
COMPLETE PARTS LIST QTY: DESCRIPTION: 1. Seat 2. Seat Support Tube 3. Oval Head Screw (M8 x 16 mm) W/Washer 4. Seat Adjustment Knob 5. Main Frame 6. Allen Bolt (M8 x 42 mm) 7. Lock Washer 8. Saddle Back Post 9. -
Page 17: Exploded View
COMPLETE PARTS LIST 19 R 18 R 18 L 19 L For Questions or Replacement Parts Contact: 1-855-713-8887 MONDAY - FRIDAY 9 A.M. - 5 P.M. EST... -
Page 18: Optional Products
OPTIONAL PRODUCTS THE ORIGINAL FitDesk Model: 3.0 ® Weight of Bike: 48 lbs. Recommended User Height Range 4’10” to 6’5” (147 cm to 199 cm) Recommended Max User Weight 300lbs (136 kgs) Foot Print in OPEN position 16” wide x 26” long x 45” high... - Page 19 Model: 4020 METER / ASSEMBLY Completed Meter and Holder See the back side of this sheet for Meter Operation For desktop Instructions. or counter use. Slide the Meter Holder (E) onto the back slot of the Meter. (F) Plug Meter Wire Port (D)
- Page 20 Speed - MPH c. Distance - Miles or KM d. Calories burned ® e. Total distance on FitDesk - ODO in Miles or KM. INSTALLING AND REPLACING 2. Reset button allows for Meter to be reset for time. FitDesk METER BATTERIES: ®...
- Page 21 / Fitdesk ® FitDesk is a registered trademark of FD Products LLC. - All Rights Reserved 2017 Updated 9/11/2017...
Need help?
Do you have a question about the 4020 and is the answer not in the manual?
Questions and answers