
Related Manuals for EAGO DZ972-1F8


Summary of Contents for EAGO DZ972-1F8
-
Page 2: Radio Volume
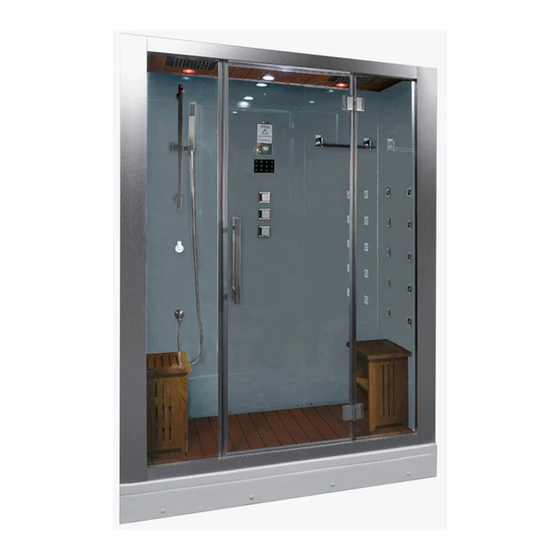
1. Please read and follow these instructions carefully 2 Power supply should be in accordance with local standard of ground-fault protection (GFCI) Please test Ground-fault before using product. 3. Ground wire of product should be connected to permanently fixed ground 4. - Page 4 3. Rain Showerhead 2. Exhaust Fan 6. Hand Shower 8. Steamer Cleaning Port 5. Hand Shower Pole 9. Steam Outlet Port 12. Body Spray Jet 15. Wood Duck Boards 22. Faucet and Diverter 21. Shelf...
-
Page 5: Door Hinge
4x20mm Screws 16pcs 26. Door Hinge 4x25mm Screws 36pcs 4x20mm Screws 16pcs 27. Rubber Seals for Door 29. Door Handle 30. Glass Door Caulking (Black) 1pc Plastic Screw inserts 36pcs 31. Magnetic Door Seals 32. Acrylic Base Roof Bracket clamps 10pc... - Page 6 1. Put shower tray in place and adjust legs on tray until tray is level in both directions -Method: Put spirit level on the flat surface on edge of shower tray to check if the shower tray is horizontal or not. If it is not horizontal, please adjust the height of adjustable leg.
- Page 7 Follow illustrations A and B to screw all 8 corners tightly with 4x20mm flat self locking screws. Check to make sure that the gap between the mating aluminum pieces is less than .5mm as in Illustration C 4x20mm screws Back of Steam Room Stand off Legs Front of Steam Room...
- Page 8 Put the side glass panels between side corner profiles. Insert plastic plugs into the holes with 4x25mm flat self locking screws and fasten securely as in illustration A to fasten the side glass panels in place. After panels are secured, use fingers to push water feed hoses from side massage jets into white plastic brackets on back frame.
- Page 9 Insert aluminum Frame with Computer controls and Steam generator into the corresponding locking brackets on the shower frame. Make sure that the insert frame has a gap of no more than 1mm when fully seated into the locking brackets.
- Page 10 Fasten metal frame of shower to base using metal brackets and 6x30mm Bolts. See Illustration for Details 6x30mm bolt Metal Bracket 6mm Lock washer 12mm Flat washer Rubber Grommet 6mm Washer Acrylic Tray 6mm Nut Frame Securing Illustration...
- Page 11 1. Put left Side and center back panels in place and secure with 4x25mm screws as in illustration A. 2. Install glass shelves On Right side panel and hand shower pole on Left side panel as in illustration B, C and D. 3 Connect Hand shower hose to the wall connecter as in illustration E.
- Page 12 1. Put the roof on the top as in illustration A 2. Connect the fan, lights, and speakers with corresponding plugs from wiring harness on back of computer. Match plug connectors and check with Illustration on each wire for correct match. 3.
- Page 13 Install front clear glass panels using the same method as used to secure other panels: See illustration A NOTE: that one of the solid glass panels has holes for the door hinges...
- Page 14 1. Connect all hoses to the diverter valve located behind the center panel and check connections to showerheads on the roof 2. Double check all water and electrical connections to check for water leaks or electrical problems. 3. If possible apply power and water to unit to test before continuing...
- Page 15 Assemble floor wood duck boards as in Illustration A. Apply caulking to all joints of glass panels and around base of shower frame Details as in Illustration B. to the acrylic tray. Let caulking cure for 24hrs before using shower.
- Page 16 1. Assemble moveable door A and Fixed panel with hinge. (If Door can not Put wood floor in corresponding position as illustration A. close properly then adjust the door as in illustration B. by loosening screws on hinge and lifting or tilting door to the proper alignment and re-tighten screws on hinge.
- Page 17 Install all hoses and steam tubes, drain tube, and hot and cold water lines. Check all fittings are tight and all electrical connections are correct before applying water or power to the unit. Exhaust Fan Ceiling Shower head Ceiling Shower head Massage Jets Massage Jets...
- Page 18 ¹¼¼°° Press to switch on the steam room, press again to switch it off . The steam room will shut down in 60 minutes automatically. As picture1...
- Page 19 This Key has 2 functions. When the radio is turned on, This key shows the frequency function. Press the key again and it will switch from the frequency function to the volume function. Press the key, and the display will show like (pic 10) for frequency mode or (Pic 9) for volume mode.
- Page 20 Instructions For Cleaning The Steam Generator Procedure: Turn off power to the shower, Then open the cap on the Cleaning port on the wall of the shower. Put approx ½ cup of Vinegar in the cleaning port and put the cap back on the cleaning port and let vinegar sit for 10-15min in steamer.
- Page 21 Model Number Model Number Purchase Date Purchase Location Purchase Date...
- Page 22 Model Number 1. Low inlet water pressure 1. Check the inlet water Pressure 2. Blockage in water inlet 2. Clean the filter at water inlet Water Diverter 1. Replace Diverter Valve Valve can’t divert Water 1. There is no power to the unit 1.
Need help?
Do you have a question about the DZ972-1F8 and is the answer not in the manual?
Questions and answers