Table of Contents
Advertisement
Advertisement
Table of Contents

Summary of Contents for SpaBerry SpaBerry
-
Page 2: Table Of Contents
Table of Contents IMPORTANT SAFETY INSTRUCTIONS………………………………………….….. READ AND FOLLOW ALL INSTRUCTIONS CAREFULLY………………….… HYPERTHERMIA……………………………………………………………………………..……. DO’S AND DON’TS……………………………………………………………………...………… WARNING SIGNS…………………………………………………………………………..…….… FEATURES OF THE SPABERRY……………………………...………………………. INSTALLATION…………………………………………………………...…………….. LOCATION AND SETUP……………………………………………………...…….. SPA COVER INSTALLATION INSTRUCTIONS…………………………………. SPABERRY DOOR…………………………………………………………………… ELECTRICAL CONNECTIONS AND FILLING………………………...…….. … INITIAL START-UP………………………………...……………………………….. …. -
Page 3: Important Safety Instructions
Risk of Electric Shock. Install at least 5 FEET (1.5 m), from all metal surfaces. As an alternative, a SpaBerry may be installed within 5 feet of metal surfaces if each metal surface is permanently connected by a minimum No. 8 AWG (8.4 mm... -
Page 4: Read And Follow All Instructions Carefully
Use the SpaBerry straps and clip tie downs to secure the cover when not in use. This will help to discourage unsupervised children from entering the SpaBerry and keep the SpaBerry cover secure in high wind conditions. -
Page 5: Hyperthermia
DO test water temperature with your hand before entering to be sure that it’s comfortable. DO keep the SpaBerry cover closed when the SpaBerry is not in use. This is important for safety and for economical spa operation. ... -
Page 6: Warning Signs
Owner’s Manual Warning Signs Each SpaBerry has been provided with a Warning Sign, Important Notice label and a Freezing Warning. Always Attach Spa Cover and lock cover clips after each use. This label outlines safety precautions. This sign should be permanently placed in a location that is visible to the SpaBerry user. -
Page 7: Features Of The Spaberry
SpaBerry, which is not covered by warranty. Wherever you plan to install your SpaBerry, be sure the surface is flat and solid. Locate your SpaBerry so that the equipment is above grade and not subject to flooding. Water should always drain away from the SpaBerry. If you are placing your SpaBerry next to an obstacle, such as a fence or wall, be sure that you place the SpaBerry with the equipment compartment facing forward for easy equipment access. -
Page 8: Spa Cover Installation Instructions
Owner’s Manual Spa Cover Installation Instructions Required Tools: 4.Position the latch with reference to the mark. Drilling Machine Drill bit, 3/32” Phillips screwdriver Marking Pen Masking Tape 5.Mark the position of the holes for screw through the latch. Using masking tape, tape the drill bit about ½” from the tip. -
Page 9: Spaberry Door
Owner’s Manual SpaBerry Door... -
Page 10: Electrical Connections And Filling
The second filter cycle will begin 12 hours after the start of the first. To set a different start time for the filter cycles, you can turn the power to the SpaBerry off then back on using the GFCI breaker at the time of day you would like the cycle to run. -
Page 11: Initial Start-Up
GFCI, make sure the control panel display window is blank, to know the power is off. When the power is ready to turn back on, reset the GFCI by pressing the RESET button. Do not use your SpaBerry unless you understand the operation of the GFCI. SpaBerry owners should test gfci monthly to ensure protection. -
Page 12: 110 To 220Vac Conversion Guide
Owner’s Manual 120 to 220 VAC Conversion Guide ALL SPA INSTALLATION OR REPAIRS MUST BE DONE BY A CERTIFIED ELEC- TRICIAN IN ACCORDANCE WITH THE COUNTRY OR LOCAL ELECTRICAL CODES IN EFFECT AT THE TIME OF THE INSTALLATION. PLEASE NOTE, SOME JURISDICTION MAY REQUIRE THE HOME OWNER TO TAKE AN ELECTRICAL PERMIT OUT WITH LOCAL SAFETY AUTHORITY SO PLEASE MAKE SURE PROPER STEPS ARE FOLLOWED IN THIS REGARD. - Page 13 Owner’s Manual 120 to 220 VAC Conversion Guide….continued FIGURE 2— Jumper in Horizontal Position FIGURE 3—Remove Jumper from J28 and J57...
- Page 14 Owner’s Manual 120 to 220 VAC Conversion Guide….continued FIGURE 4—Power Wire Connections FIGURE 5—Dipswitch #A2 Dip switch 2 in “ON” position Heater can run while pump is in low and high speed (High amperage) shown in figure 5.
-
Page 15: Operation
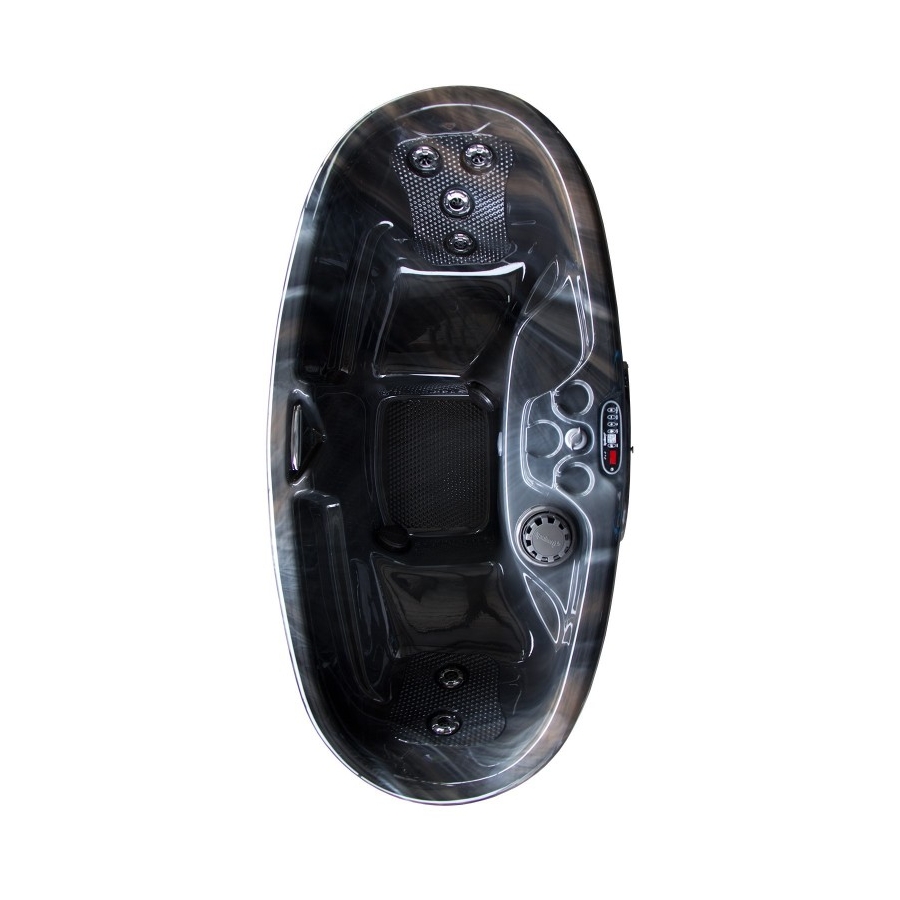
Location of SpaBerry Components The SpaBerry components consist of two seats, two Poly Rotator jets, two Poly Directional jets, two Poly Massage jets, one Front access light, water feature with on/off valve, two suction fittings, one Weir skimmer, and an equipment compartment. -
Page 16: Suction Fittings
Suction Fitting The Suction Fittings are located near the bottom of the SpaBerry and allow the water to be pulled from the SpaBerry and sent to the pump for re-circulation. -
Page 17: Control Panel Operation
LIGHT Button Your SpaBerry is equipped with an LED main light. Pushing the Light Button once turns the LED on. Pushing it a second time turns the LED off. For more information about the programming functions of your LED, please consult the LED section of this manual. -
Page 18: Programming Spaberry Functions
: Long and/or numerous filter cycles could cause overheating of the SpaBerry, especially in hot climates. Dynamic L.E.D Light SpaBerry is equipped with a main LED light that controls the colors by pushing the light button on the keypad. To Operate Light Functions: ... -
Page 19: Water Care
Test Your Water The procedures in this section must be followed anytime you drain or fill your SpaBerry, including when you first install your spa. Additionally, if your source water changes, you must test the new source in this manner before running the spa as the chemical makeup of the water may have changed. - Page 20 Owner’s Manual Water Refill Data Table Model Type: ___________________ Capacity: ___________ Ideal Your Water Necessary Adjustments Calcium 200-400 _________ Add ____________ of _________________ 300-2000 _________ Add ____________ of table salt Metals 0 ppm _________ Add ____________ of Sequestrant Check Your Water Total Alkalinity Total Alkalinity (TA) is a measurement of the water’s ability to resist changes in pH.
-
Page 21: Draining Your Spaberry
Draining Your SpaBerry The SpaBerry is gravity-drained, without the need for a pump. To drain the spa, locate the hose bib, which is located in the equipment compartment. Remove the cap from the hose bib and screw a garden hose onto the hose bib, put the other end of the hose in a safe place for water run-off, and then turn the valve on the side of the hose bib ninety degrees to release the flow of water. -
Page 22: Filter Cleaning
Owner’s Manual Filter Cleaning Always turn off the power to the SpaBerry before cleaning the filter elements. Your SpaBerry is equipped with one top access filter cartridges. We recommend that you clean the filter every month as preventative maintenance. Remember to power down the spa before removing the filter. To clean the skimmer filter cartridge, lift out center float of the skimmer assembly. - Page 23 Owner’s Manual Springtime Startup of a Winterized System If the SpaBerry has been winterized, it is highly recommended that you contact an authorized service provider to restart it. The following is an outline of the procedures involved. Make sure o-rings for pumps are in place and undamaged.
-
Page 24: Warranty Information
The SpaBerry cover is warranted for one year. No charge will be made for parts. All labor and service fees are the responsibility of the SpaBerry owner. -
Page 25: Troubleshooting Guide
11. Have a certified electrician check the power from the outlet wall. 12. No -Have a qualified electrician/technician properly connect all the wires to the circuit board. ** The standard SpaBerry warranty is on parts only for one (1) year from the original date of purchase. - Page 26 28 , “Tripping GFCI- Section Two-Control Panel” and follow the provided steps. ** The standard SpaBerry warranty is on parts only for one (1) year from the original date of purchase.
- Page 27 7. Set the DIP switches properly. Reconnect the power again. Did the breaker trip? Yes-Follow step 4. No –The circuit board is good. Follow the instruction on Tripping GFCI-Section Two-Control Panel. ** The standard SpaBerry warranty is on parts only for one (1) year from the original date of purchase.
- Page 28 No -Follow step 9 11. Replace the circuit board.** 12. The control panel is good. Follow the instructions on Tripping GFCI– Section Three -light. ** The standard SpaBerry warranty is on parts only for one (1) year from the original date of purchase.
- Page 29 8. The main light bulb/controller is not the cause of the breaker to trip. Follow the instructions on Tripping GFCI-Section Four-Pump. ** The standard SpaBerry warranty is on parts only for one (1) year from the original date of purchase.
- Page 30 Yes/No-Follow step 15 13. Is the pump working in low speed? Yes-Follow step 16 No -Follow step 17 ...continued on next page… ** The standard SpaBerry warranty is on parts only for one (1) year from the original date of purchase.
- Page 31 21. Replace the union gasket/O-ring.** 22. There is no problem with the pump motor assembly. Follow the instruction on Tripping GFCI -Section Five-Heater. ** The standard SpaBerry warranty is on parts only for one (1) year from the original date of purchase.
- Page 32 15. Have a technician test the heater for amperage. Follow step 14. 16. Is there a leak from the heater nuts? Yes/No-Follow step 13 ** The standard SpaBerry warranty is on parts only for one (1) year from the original date of purchase.
-
Page 33: Pump Diagnostics
Owner’s Manual Troubleshooting Guide PUMP DIAGNOSTICS Symptom Corrective Action Pump is running The most common cause is water level that is too low. but jets are just pulsating (due to Fill with water up to 5" from the top of the spa. low water level Pump is running Has the filter been cleaned and free from debris? -
Page 34: Control Panel Messages
Did the error message disappear? Yes-Follow step 6 No -Follow step 2 6. Problem is resolved. ** The standard SpaBerry warranty is on parts only for one (1) year from the original date of purchase. - Page 35 Not a problem temperature will be displayed. unknown) STD, ECN, SE or SLP Refer "Programming the SpaBerry Functions" section of this manual and Not a problem (Heat mode control panel diagnostic section of the troubleshooting guide. message) DR or DRY low water level, Adjust the water level in spa to 5"...
-
Page 36: Jets
Did the volume at speaker increase? loose speaker Yes-Problem is resolved. wire connections No -Replace the speaker.** ** The standard SpaBerry warranty is on parts only for one (1) year from the original date of purchase. -
Page 37: Spa Cover
WATER CHEMISTRY Symptom Corrective Action 1. Water is cloudy Follow the instructions in the "Water Care for your SpaBerry" section of this Owner's manual 2. Smelly water to adjust and balance the water chemistry of the spa. 3. Excessive bubbles 4. -
Page 38: Waterfall Diagnostics
Go to www.thespaberry.com and complete a service request form with the following: 1. Customer name 2. Brief description of the problem 3. Photos showing the rusted area ** The standard SpaBerry warranty is on parts only for one (1) year from the original date of purchase. - Page 39 Owner’s Manual MIL-idock The idock weatherproof enclosure is designed for use with audio devices with a 3.5mm audio jack. Setting up the Audio Device Slowly pull out the idock tray to open the enclosure. When extended the tray swing hinge will be exposed on top of the enclosure. Open the enclosure door.
- Page 40 Owner’s Manual...
Need help?
Do you have a question about the SpaBerry and is the answer not in the manual?
Questions and answers