Table of Contents
Advertisement
Advertisement
Table of Contents

Related Manuals for ESIT Smart-2

Summary of Contents for ESIT Smart-2
- Page 1 Smart-2 Multi Functional Wireless Weighing Indicator Indicator User Manual...
- Page 2 Smart-2 Multi Functional Wireless Weighing Indicator User Manual...
-
Page 3: Table Of Contents
SMART-2 Multi Functional Wireless Weighing Indicator User Manual ________________________________________________________________________________________________ TABLE OF CONTENTS LEGAL WARNING ..........................4 GENERAL DETAILS ..........................5 MOUNTING METHODS ........................6 INDICATORS ............................7 INDICATOR CONNECTIONS ......................... 7 MENU SYSTEM ........................... 8 DEVICE IDENTITY INFORMATION ..................... 10 DISPLAYING THE SERIAL NUMBER .................... - Page 4 SMART-2 Multi Functional Wireless Weighing Indicator User Manual ________________________________________________________________________________________________ DAC HIGHEST OUTPUT VALUE (HVAL) SETTING ................32 DAC MAXIMUM OUTPUT (DMAX) VALUE SETTING ..............33 COMMUNICATION SETTINGS ......................34 COMMUNICATION MODE SETTING ..................... 34 INDICATOR ADDRESS (SCALE IDENTITY NO) SETTING ..............
- Page 5 SMART-2 Multi Functional Wireless Weighing Indicator User Manual ________________________________________________________________________________________________ Analog Output (DAC) Settings ....................58 Communication Settings ......................59 Wifi Connection Setting ......................59 Calibration Setting ........................61 Temp Calibration Setting ......................63 ERROR CODES ........................... 64 Page 3...
-
Page 6: Legal Warning
Esit's simplest weight indicators which are specially designed in line with your weight measurement needs. SMART-2 is an ideal device with its features for the weighing sector with its unique durable construction and the unusually small dimensions Like the ESIT's other indicators, SMART-2 is manufactured to provide the most advanced quality standards. -
Page 7: General Details
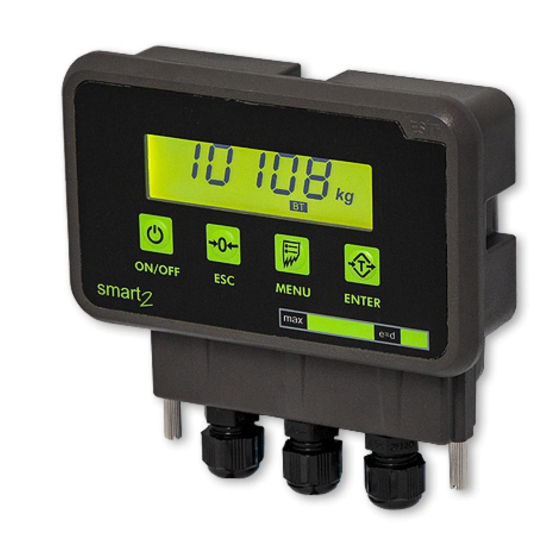
SMART-2 Multi Functional Wireless Weighing Indicator User Manual ________________________________________________________________________________________________ GENERAL DETAILS Loadcell Cable Input Power, Communication, Relay, DAC Cables key Function Switch on / off the device Going one level up in the menu and resetting while in the weight display... -
Page 8: Mounting Methods
SMART-2 Multi Functional Wireless Weighing Indicator User Manual ________________________________________________________________________________________________ MOUNTING METHODS • Rail Mounting Apparatus (inside cabinet or wall mounting) • Panel Mounting Apparatus (Front panel mounting) Page 6... -
Page 9: Indicators
SMART-2 Multi Functional Wireless Weighing Indicator User Manual ________________________________________________________________________________________________ INDICATORS Inactivity: The display value indicates that inactivity has been detected within ±2e range for 2 seconds and kg segment is highlighted on the display. (e: increment step on the display) -
Page 10: Menu System
SMART-2 Multi Functional Wireless Weighing Indicator User Manual ________________________________________________________________________________________________ MENU SYSTEM To access the menu system and navigate menus, press the button IDENTITY MENU: This is the menu for displaying the serial number and version information of the indicator. DISPLAY SETTINGS MENU: This is the menu... - Page 11 SMART-2 Multi Functional Wireless Weighing Indicator User Manual ________________________________________________________________________________________________ BLUETOOTH MENU: This is the menu for making the name setting and on/off setting of the Bluetooth Low Energy module. The module becomes active when it is connected to the device.
-
Page 12: Device Identity Information
SMART-2 Multi Functional Wireless Weighing Indicator User Manual ________________________________________________________________________________________________ DEVICE IDENTITY INFORMATION It is possible to display the serial number and version information of the indicator with this menu. DISPLAYING THE SERIAL NUMBER 1. Press key until you reach the 'Device identity information' menu 2. -
Page 13: Display Settings
SMART-2 Multi Functional Wireless Weighing Indicator User Manual ________________________________________________________________________________________________ DISPLAY SETTINGS: WARNING: In order for these menu functions to be active, the P2 connection inside the indicator must be open circuit; otherwise only recorded information will be displayed and they are not allowed to be changed. In this case, a special error code (Error50) will also be displayed on the indicator's screen. -
Page 14: Increment Step Setting
SMART-2 Multi Functional Wireless Weighing Indicator User Manual ________________________________________________________________________________________________ INCREMENT STEP SETTING Press key until you reach the 'Display Settings' menu Press the key to confirm the menu Press key until you reach the 'Increment Step' menu Press the key to confirm the menu Set the increment step as you desire with menu key. -
Page 15: Weighing Capacity Setting
SMART-2 Multi Functional Wireless Weighing Indicator User Manual ________________________________________________________________________________________________ WEIGHING CAPACITY SETTING This value is the maximum measurement value allowed to be displayed on the screen. The indicator displays an error code if there is a load that exceeds MAX (9e) value on the platform. -
Page 16: Unit Of Measurement Setting
SMART-2 Multi Functional Wireless Weighing Indicator User Manual ________________________________________________________________________________________________ UNIT OF MEASUREMENT SETTING This value allows you to select the unit of measurement made. Kg, g, lb, ° C, degrees, mV / V, mV and V units can be selected. -
Page 17: Configuration Settings
SMART-2 Multi Functional Wireless Weighing Indicator User Manual ________________________________________________________________________________________________ CONFIGURATION SETTINGS DISPLAY LIGHT SETTING You can adjust the display light in this menu. In addition to the continuous on and off options, you can also set the auto light on when the weight value changes by ±5e. -
Page 18: Average Setting
SMART-2 Multi Functional Wireless Weighing Indicator User Manual ________________________________________________________________________________________________ AVERAGE SETTING With this value, the number of measurements to be averaged when the measurement value is displayed on the screen is set. The high average value increases the measurement quality while the response to small changes is reduced. -
Page 19: Weight Change Speed
SMART-2 Multi Functional Wireless Weighing Indicator User Manual ________________________________________________________________________________________________ WEIGHT CHANGE SPEED With this menu (SPEED), the speed of change when new weight is added, is adjusted It is 0.2 sec when FAST, 0.5 sec with MED, 1.0 sec with SLOW. The measurements in the SLOW mode are more stable. -
Page 20: Eco Mode Setting
SMART-2 Multi Functional Wireless Weighing Indicator User Manual ________________________________________________________________________________________________ ECO MODE SETTING With this menu you can turn eco mode on or off. If the measurement value is within ± 10e range around 0 for 10 minutes while Eco mode is on, the indicator goes into eco mode and automatically switches off the display, backlight, wifi and relays. -
Page 21: Gain Setting
SMART-2 Multi Functional Wireless Weighing Indicator User Manual ________________________________________________________________________________________________ GAIN SETTING With this value, you can choose the internal upgrade value of the ADC. This value can be 128 or 64. 128 must be selected for load cells up to 3mV/V and 64 must be selected... -
Page 22: Display Brightness Setting
SMART-2 Multi Functional Wireless Weighing Indicator User Manual ________________________________________________________________________________________________ DISPLAY BRIGHTNESS SETTING With this value you can change the backlight brightness. Higher values consume more energy. (1) Press key until you reach the 'Configuration Settings' menu (2) Press the key to confirm the menu (3) Press key until you reach the "Display... -
Page 23: Measurement Stability
SMART-2 Multi Functional Wireless Weighing Indicator User Manual ________________________________________________________________________________________________ MEASUREMENT STABILITY When this menu option is on, any change that is les than 2e for 2 sec after the measurement is stabile, is not displayed (1) Press key until you reach the 'Average'... -
Page 24: Weight Calibration
SMART-2 Multi Functional Wireless Weighing Indicator User Manual ________________________________________________________________________________________________ WEIGHT CALIBRATION WARNING: In order for these menu functions to be active, the P2 connection inside the indicator must be open circuit; otherwise an error code special for this situation is displayed on the indicator's screen. -
Page 25: Load Calibration
SMART-2 Multi Functional Wireless Weighing Indicator User Manual ________________________________________________________________________________________________ LOAD CALIBRATION Press key until you reach the 'Calibration' menu Press the key to confirm the menu The 'Load Calibration (Load)' menu flashes for a short time and the internal count value information starts to be displayed on the screen. -
Page 26: Relay Settings
SMART-2 Multi Functional Wireless Weighing Indicator User Manual ________________________________________________________________________________________________ RELAY SETTINGS When the relay contacts are closed, the warning segments (R1 and R2) of that relay are lit on the display. The relays are active in '-' direction just like they are in '+' positive one. -
Page 27: Relay 1 Settings
SMART-2 Multi Functional Wireless Weighing Indicator User Manual ________________________________________________________________________________________________ RELAY 1 SETTINGS RELAY 1 SET VALUE SETTING Press key until you reach the 'Relay 1' menu Press the key to confirm the menu The first option is the ' relay 1 set value' menu. -
Page 28: Relay 1 Set Direction Setting
SMART-2 Multi Functional Wireless Weighing Indicator User Manual ________________________________________________________________________________________________ RELAY 1 SET DIRECTION SETTING Press key until you reach the 'Relay 1' menu Press the key to confirm the menu Press key until you reach the 'Relay 1 set direction' menu... -
Page 29: Relay 1 Set Hysteresis Setting
SMART-2 Multi Functional Wireless Weighing Indicator User Manual ________________________________________________________________________________________________ RELAY 1 SET HYSTERESIS SETTING Hysteresis can be expressed as the difference between the opening and closing values of the relay or the amount return loss. Press key until you reach the 'Relay 1'... -
Page 30: Relay 1 Delay Time Setting
SMART-2 Multi Functional Wireless Weighing Indicator User Manual ________________________________________________________________________________________________ RELAY 1 DELAY TIME SETTING A delay of up to 5 seconds can be given to set the relay. This delay period is made with the 'delay time' menu at intervals of 0.2 seconds between 0 to 1 second and intervals of 1 second between 1 to 5 seconds. -
Page 31: Relay 2 Settings
SMART-2 Multi Functional Wireless Weighing Indicator User Manual ________________________________________________________________________________________________ RELAY 2 SETTINGS Press key until you reach the 'Relay 2' menu Press the key to confirm the menu The necessary settings for 'Relay 2' are made by following the settings for 'Relay 1' (see pages 25-28). -
Page 32: Analog Output (Dac) Settings
________________________________________________________________________________________________ ANALOG OUTPUT (DAC) SETTINGS ANALOG OUTPUT CALIBRATION In order for the weight information on the SMART-2 display to be used in voltage or current controlled automation devices, the analogue output must have been calibrated correctly. Calibration must be performed after selecting the voltage (0-5V) or current (4-20mA) mode. -
Page 33: Dac Lowest Output Value (Lval) Setting
SMART-2 Multi Functional Wireless Weighing Indicator User Manual ________________________________________________________________________________________________ DAC LOWEST OUTPUT VALUE (LVAL) SETTING It is used to determine the value to be obtained from the analogue output for the zero value on the screen. Press key until you reach the 'DAC' menu... -
Page 34: Dac Highest Output Value (Hval) Setting
SMART-2 Multi Functional Wireless Weighing Indicator User Manual ________________________________________________________________________________________________ DAC HIGHEST OUTPUT VALUE (HVAL) SETTING It is used to determine the value to be obtained from the analogue output for the DAC maximum value (dmax) to be determined on the screen. -
Page 35: Dac Maximum Output (Dmax) Value Setting
SMART-2 Multi Functional Wireless Weighing Indicator User Manual ________________________________________________________________________________________________ DAC MAXIMUM OUTPUT (DMAX) VALUE SETTING This value is used to set the display value corresponding to the HVAL value. Press key until you reach the 'DAC' menu Press the key to confirm the menu... -
Page 36: Communication Settings
SMART-2 Multi Functional Wireless Weighing Indicator User Manual ________________________________________________________________________________________________ COMMUNICATION SETTINGS COMMUNICATION MODE SETTING Press until reach 'Communication' menu Press the key to confirm the menu The first option is the 'Communication mode' menu. Press the key to confirm the menu Set the communication mode of your choice with menu key. -
Page 37: Indicator Address (Scale Identity No) Setting
SMART-2 Multi Functional Wireless Weighing Indicator User Manual ________________________________________________________________________________________________ MOD2 communication note: In this mode, the indicator sends the weight information after receiving the authorization signal from its counterpart. Thus, more than one device can be connected to the same communication line. The communication in this mode is the same as the communication form in MOD1. -
Page 38: Communication Parity Bit Setting
SMART-2 Multi Functional Wireless Weighing Indicator User Manual ________________________________________________________________________________________________ COMMUNICATION PARITY BIT SETTING Press until reach 'Communication' menu Press the key to confirm the menu Press until reach 'Communication parity bit' menu Press the key to confirm the menu Set the communication parity of your choice with menu key. -
Page 39: Communication Speed (Baud Rate) Setting
________________________________________________________________________________________________ COMMUNICATION SPEED (BAUD RATE) SETTING The number of data bits that can be sent in one second during communication is called the 'communication speed' (BAUD RATE). For Smart-2 indicators this speed can be set between 1200 and 28800. Press... -
Page 40: Communication Data Length Setting
SMART-2 Multi Functional Wireless Weighing Indicator User Manual ________________________________________________________________________________________________ COMMUNICATION DATA LENGTH SETTING The length of the data bits to be used for communication is set by this menu. With this parameter setting, 128 different characters can be defined in 7 bit communication. -
Page 41: Point-To-Point Communication Setting
SMART-2 Multi Functional Wireless Weighing Indicator User Manual ________________________________________________________________________________________________ POINT-TO-POINT COMMUNICATION SETTING Point transmission in communication occurs when 8 bit communication is selected. The point is transmitted by setting the most meaningful bit of the digit sent as 1. Press... - Page 42 It should be noted that the indicator address can be between 0 and 255. If more than one SMART-2 indicators are connected to the same communication line, RS485 type communication must be set and a different address must be assigned to each device.
-
Page 43: Bluetooth Settings
SMART-2 Multi Functional Wireless Weighing Indicator User Manual ________________________________________________________________________________________________ BLUETOOTH SETTINGS BLUETOOTH STATUS SETTING With this menu you can turn the device's Bluetooth feature on or off. The bluetooth module must be plugged in to the device in order to be active. -
Page 44: Bluetooth Id Setting
SMART-2 Multi Functional Wireless Weighing Indicator User Manual ________________________________________________________________________________________________ BLUETOOTH ID SETTING With this menu, you can change the Bluetooth ID of the device. BLE IDs of two devices in the same environment cannot be the same. BLE ID must be one of ASCII equivalents of 0-9, a-z, A-Z characters. -
Page 45: Wifi Settings
SMART-2 Multi Functional Wireless Weighing Indicator User Manual ________________________________________________________________________________________________ WIFI SETTINGS WIFI STATUS SETTING With this menu you can turn the device WiFi feature on or off. The wifi module must be plugged in to the device in order to be active. -
Page 46: Wifi Mode Setting
SMART-2 Multi Functional Wireless Weighing Indicator User Manual ________________________________________________________________________________________________ WIFI MODE SETTING With this menu, you can change WiFi mode of the device as Access Point or Station. One of the devices in the same environment must be in the Access Point, and the others must be in Station mode. -
Page 47: Wifi Access Point Id Setting
SMART-2 Multi Functional Wireless Weighing Indicator User Manual ________________________________________________________________________________________________ WIFI Access Point ID SETTING This menu is active only when device mode is AP. With this menu, you can change the WIFI Access Point ID of the device. WIFI AP ID must be one of ASCII equivalents of 0-9, a-z, A-Z characters. -
Page 48: Wifi Station Id Setting
SMART-2 Multi Functional Wireless Weighing Indicator User Manual ________________________________________________________________________________________________ WIFI Station ID SETTING This menu is active only when device mode is STA. With this menu, you can change the WIFI Station ID of the device. This ID must match with the APID of the WiFi device in AP mode in the same environment. -
Page 49: Wifi Name Setting
SMART-2 Multi Functional Wireless Weighing Indicator User Manual ________________________________________________________________________________________________ WIFI Name SETTING With this menu you can change WiFi Name of the device. Each device on the same network should be given a different name since the WiFi name will appear as a device name in the application. -
Page 50: Temperature Calibration Settings
SMART-2 Multi Functional Wireless Weighing Indicator User Manual ________________________________________________________________________________________________ TEMPERATURE CALIBRATION SETTINGS With this menu you can change temperature calibration of the device. The device has 5-point temperature compensation feature. When calibrating the temperature, the load cell must be empty. -
Page 51: Restoring Factory Settings
SMART-2 Multi Functional Wireless Weighing Indicator User Manual ________________________________________________________________________________________________ RESTORING FACTORY SETTINGS With this menu, you can restore the device to factory settings. The values that require the calibration jumper to be installed will not be changed. Press key until you reach the 'Reset'... -
Page 52: Performing Taring With Key
SMART-2 Multi Functional Wireless Weighing Indicator User Manual ________________________________________________________________________________________________ PERFORMING TARING WITH TARE key When inactivity is ensured manual taring is performed by pressing key. When taring is completed, the display is reset and net warning segment is lit. Upon loading, tare becomes visible. -
Page 53: Connections And Mode Selections
SMART-2 Multi Functional Wireless Weighing Indicator User Manual ________________________________________________________________________________________________ CONNECTIONS AND MODE SELECTIONS CALIBRATION SWITCH (P2) The calibration switch P2 must be switched on to change and calibrate the display settings of the device. The display settings can be accessed and saved values can be displayed while P2 is shorted but the changes made cannot be saved and the error code 'Err50' is displayed on the screen. -
Page 54: Analog Output Mode Selection
SMART-2 Multi Functional Wireless Weighing Indicator User Manual ________________________________________________________________________________________________ ANALOG OUTPUT mode selection 0-5V analog output connection In the printed circuit of the indicator, the connections are as follows provided that the leftmost terminal slot is number 1. 9 10 11 12 13 14 15 16 17 18 19 20 21... -
Page 55: Android Application Settings
SMART-2 Multi Functional Wireless Weighing Indicator User Manual ________________________________________________________________________________________________ ANDROID APPLICATION SETTINGS Settings that can be made via Smart can also be done via the android application. Device settings can be made via following application is wireless connection Bluetooth/WiFi is used. - Page 56 SMART-2 Multi Functional Wireless Weighing Indicator User Manual ________________________________________________________________________________________________ 1-Click on the "+" shown in the figure 2-The location service must be turned on after proceed with "Yes" to message displayed. 3-Select the smart you want to connect to in the opened page.
-
Page 57: Connection With Bluetooth Module
SMART-2 Multi Functional Wireless Weighing Indicator User Manual ________________________________________________________________________________________________ CONNECTION WITH BLUETOOTH MODULE (1) After turning on your Android device's Bluetooth, open the Smart2 application and click the BLUETOOTH button. (2) Click on the "Connect" button. (3) Select the Smart you want to communicate with. - Page 58 SMART-2 Multi Functional Wireless Weighing Indicator User Manual ________________________________________________________________________________________________ (4) The weight value can be obtained when the "GET" button is clicked on the pop-up screen. When the "Ref" button is clicked, the weight value is automatically updated. (5) More than one smarts can communicate simultaneously via Bluetooth. Click the "+"...
-
Page 59: Making Device Settings
SMART-2 Multi Functional Wireless Weighing Indicator User Manual ________________________________________________________________________________________________ (6) By clicking "SETTINGS" button, desired changes can be made. MAKING DEVICE SETTINGS Display Settings "Decimal Point", "Step", "Capacity" and "Unit" settings can be changed as desired. After changing, press "SAVE" button at the end of the page. -
Page 60: Configuration Settings
SMART-2 Multi Functional Wireless Weighing Indicator User Manual ________________________________________________________________________________________________ Configuration Settings Make the desired configuration settings and press "SAVE" button. Relay Settings Make the desired relay settings and press "SAVE" button. Analog Output (DAC) Settings Make the desired analog output settings and press "SAVE" button. -
Page 61: Communication Settings
SMART-2 Multi Functional Wireless Weighing Indicator User Manual ________________________________________________________________________________________________ Communication Settings Make the desired communication settings and press "SAVE" button. Wifi Connection Setting If Wifi connection modules are used and it is intended to read weight data from many smart devices through a local network, the following procedure should be followed for each smart device. - Page 62 SMART-2 Multi Functional Wireless Weighing Indicator User Manual ________________________________________________________________________________________________ (4) Change Smart "wifi mode setting" as "STA". (5) When the "WAIT" message disappears from the Smart screen, connection to the local network is done. (6) If you cannot connect to the local network, an error ERR.09 will be displayed on the smart screen.
-
Page 63: Calibration Setting
SMART-2 Multi Functional Wireless Weighing Indicator User Manual ________________________________________________________________________________________________ Calibration Setting It is possible to perform calibration through both Smart and application. (1) Press the "CALIBRATION" button (2) If there is no load on the system, press "GET" button. Page 61... - Page 64 SMART-2 Multi Functional Wireless Weighing Indicator User Manual ________________________________________________________________________________________________ (3) Press the "ZERO" button (4) Place the weight you want to calibrate in the system and press "Get" button. Repeat the process several times and press the "LOAD" button after seeing that the value is stable.
-
Page 65: Temp Calibration Setting
SMART-2 Multi Functional Wireless Weighing Indicator User Manual ________________________________________________________________________________________________ Temp Calibration Setting Settings made via Smart are visible. (1) Press the "CALIBRATION" button (2) Press the "GET" button (3) Press the "SAVE" button Page 63... -
Page 66: Error Codes
SMART-2 Multi Functional Wireless Weighing Indicator User Manual ________________________________________________________________________________________________ ERROR CODES The following error codes can be displayed on SMART-2 indicators during measurement and as a result of incorrect setting. These error codes and their causes are listed below These errors indicate that the device needs to be reset or repaired... - Page 67 Nisantepe Mh. Gelin Cicegi Sk. No:36 Cekmekoy 34794 İstanbul (216) 585 1818 (216) 585 1819 www.esit.com.tr Smart-2 User Manual - R00...
Need help?
Do you have a question about the Smart-2 and is the answer not in the manual?
Questions and answers