Table of Contents
Advertisement
Advertisement
Table of Contents

Related Manuals for Whistler MFU440


Summary of Contents for Whistler MFU440
- Page 1 MFU440 User Guide MULTI-FUNCTION RADAR DETECTOR W/FULLY INTEGRATED DASH CAM...
- Page 2 Help Center & FAQ page on our website www.whistlergroup.com Enjoy your Whistler detector and please drive safely. Sincerely, The Whistler Group, Inc.
-
Page 3: Table Of Contents
TABLE OF CONTENT Feature Description ..............5-7 Installation ................8-10 Mounting Guidelines Windshield Mounting Power Cord Connection Fuse Replacement Operation ................11-24 Power On Self-Test and Volume Audio Level Adjustment Integrated Real Voice ® Feature Engaged Confirmation Quiet Mode Auto Quiet Mode City/City 1/City 2 Modes Highway Mode Understanding the Display... - Page 4 TABLE OF CONTENT Updating the Database Wi-Fi App Installation DVR Operation ..............25-26 Resolution Exposure Loop Recording Gravity Sensor Date Stamp Date/Time Language Factory Reset............... 27-28 Option Select Mode ............29-30 Troubleshooting ..............31-32 Care and Maintenance Legal Notices / FCC ............33-34 Are Detectors Legal? FCC Information Radar/Laser Alerts ..............35...
-
Page 5: Feature Description
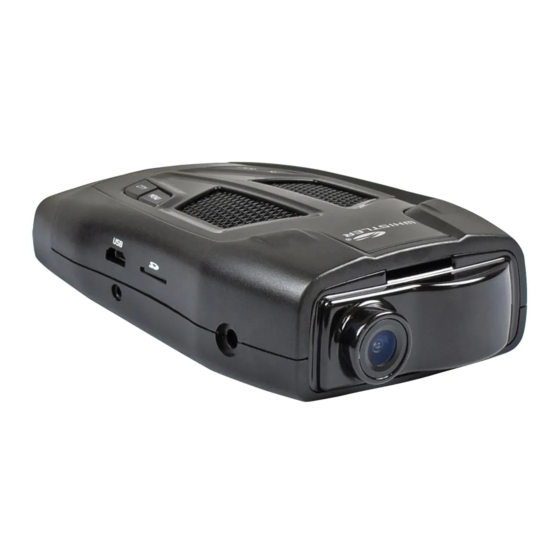
FEATURE DESCRIPTION... - Page 6 FEATURE DESCRIPTION 1. Bracket Release Button – provides quick and easy release of the mounting bracket. 2. Speaker – provides distinct audio warnings. 3. Mounting Bracket Location – slot holds mounting bracket firmly. 4. Radar Antenna – compact, high-efficiency antenna receives radar signals. 5.
- Page 7 FEATURE DESCRIPTION Dim / Dark – engages Dim/Dark modes. Press and hold 3 seconds to start or stop recording. 10. Menu Button – enters Option Select Mode. Press and hold 3 seconds to turn Wi-Fi On/Off. Engaging/disengaging Wi-Fi will pause the Recording.
-
Page 8: Installation
INSTALLATION Mounting Guidelines • Mount the unit as high as possible near the center of the windshield. • Do not mount unit behind wipers, ornaments, mirrored sunscreens, etc. These obstructions have metal surfaces which can affect radar and laser signals and reduce critical warning time. (Tinted glass will darken the DVR image.) •... -
Page 9: Windshield Mounting
INSTALLATION Windshield Mounting • Clean the selected area of the windshield for mounting using a quality glass cleaner. • Slide detector onto bracket until it locks in place. • Peel plastic cover off sticky portion of suction cup. • Press the suction cup onto the windshield. To secure, press the locking tab toward the windshield. -
Page 10: Power Cord Connection
INSTALLATION Power Cord Connection • Plug the small end of the power cord into the unit’s power port. • Plug the large end into the vehicle’s cigarette lighter/12V accessory socket. NOTE: Cord fits tightly into detector. When installing the cord, expect some resistance. The power plug USB port can be used to charge an ipad, iphone, smartphone, MP3 or tablet. -
Page 11: Operation
OPERATION Power On Self-Test and Volume Each time your Whistler detector is turned on, an automatic self-test sequence confirms that the speaker and visual displays are functional along with many of the saved settings. Audio Level Adjustment To change the audio level: •... -
Page 12: Quiet Mode
OPERATION Quiet Mode Quiet Mode cancels audio during an alert and any new alert within 20 seconds. After 20 seconds of no alerts, the audio is restored for any new alerts. • Press Quiet during an alert to cancel the audio. •... -
Page 13: City/City 1/City 2 Modes
OPERATION City/City 1/City 2 Modes Whistler’s City Modes are designed to reduce the annoyance of automatic door openers and other devices which share frequencies with police radar. • Press City to cancel Highway Mode and engage City Mode. In City Mode, weak radar signals give an initial alarm of two beeps, then remain quiet until the signal becomes very strong. -
Page 14: Understanding The Display
OPERATION Understanding the Display When not alerting, the units display can be used to indicate Heading, Mode of Operation (Highway and City modes), Clock, DVR and Wi-Fi status. Wi-Fi Micro SD Heading Clock Radar Mode Signal Strength Display When a radar signal is detected the audio alerts have a Geiger counter-like pattern to help you determine the strength of the radar source;... -
Page 15: Dim/Dark Modes
OPERATION Dim/Dark Modes Dim/Dark Mode reduces illumination of the display. • Briefly press and release the Dark button to reduce illumination to a Dim setting. • Briefly press and release the Dark button a second time to engage Dark Mode. In Dark Mode, the display appears a bit dimmer than Dim mode and will go completely dark for as long as a signal is being detected and for 20 seconds after, then the... -
Page 16: Vehicle Battery Saver Mode
OPERATION Vehicle Battery Saver Mode If selected the Vehicle Battery Saver Mode automatically shuts off the detector after 3 hours if the unit has constant power. The timer is reset when: 1. Each time the detector is turned off. 2. The power cord is disconnected or power is removed to the unit. -
Page 17: Filter Modes
OPERATION Traffic Flow Sensor Rejection (TFSR) Field Disturbance Sensor Rejection (FDSR) Recently many new products that operate on police radar frequencies have been causing nuisance alerts to radar detectors. These radar based sensors are installed alongside the Highway and more recently on vehicles used as lane change assist / blind spot detectors / collision avoidance systems. -
Page 18: Speed Selectable Auto Quiet
OPERATION Speed Selectable Auto Quiet Traveling below the speed selected in option mode will engage Auto Quiet mode. NOTE: Enter Option mode to set Speed Selective Auto Quiet. (0-40MPH / 0-65KMH) Speed Selectable Filter Mode Traveling below the speed selected in option mode will apply the maximum Filter. -
Page 19: Laser Signature Id (Lsid)
OPERATION Laser Signature ID (LSID) Identifies the Laser gun’s pulse rate or PPS (Pulses per Second) that is transmitted by the speed laser gun. LSID may also be used to identify other forms of laser sources such as LACC (Laser Assisted Cruise Control) systems found in some high-end vehicles. -
Page 20: Pop Mode Alerts
OPERATION Laser Area 1 covers the traditional laser guns used in North America. Laser Area 2 and 3 cover laser guns recently approved for use in North America. You can change the selection from yes to no individually in option mode. If a laser within a group is not used in your area, you may shut off that group (change the selection from Y to N while in Option Select Mode) by pressing the DARK or QUIET buttons. -
Page 21: Getting A Satellite Lock
OPERATION Getting a Satellite Lock Powering up, the unit will begin its search for satellites. During this time, the unit will flash the satellite icon on the display. Please allow several minutes for the unit to lock onto the satellites. Satellite lock Satellite no lock NOTE: Driving while initially searching for satellites... -
Page 22: Manual Entry (Waypoint)
OPERATION Manual Entry (Waypoint) Once GPS has a lock, you can save a special location (i.e., a new red light camera or even a “trap”). The unit will store 1000 user locations. NOTE: Manual entries must be approximately 330 feet apart to prevent overlapping locations. To manually enter a location, press and hold the Power button for 3 seconds and the unit will beep to confirm. -
Page 23: Updating The Database
OPERATION Updating the Database Follow the steps below to update the Laser-Radar Detector. Step 1: Remove the Laser-Radar Detector from the vehicle and bring it to your PC. Note: You do not need to power the Laser-Radar Detector to update it. Step 2: Download the update program and install it on your PC. -
Page 24: Wi-Fi App Installation
OPERATION Wi-Fi App Installation For iPhone, visit the app store, download and install RD-DashCam. For Android users, visit Play store, download and install: RD-DashCam Minimum OS requirement: Android 7.0 / iPhone 11.0 Press and hold the MENU button for 3 seconds on your MFU detector, the Wi-Fi icon appears on the display. -
Page 25: Dvr Operation
DVR OPERATION DVR Operation When power is applied to the MFU, unit will automatically start recording if it contains a properly formatted microSD card. DVR settings must be changed in the app. Settings Icon - takes you to the DVR menu. Files Icon - takes you to video files to be viewed or downloaded. -
Page 26: Exposure
DVR OPERATION Resolution You can choose the quality of the video 1080FHD 1920 x 1080 30fps 1080P 1440 x 1080 30fps 720P 1280 x 720 30fps WVGA 848 x 480 30fps VGA 640 x 480 30fps Exposure Lighten or darken video from +2 thru -2. Loop Recording Saves the recordings in separate files every few minutes. -
Page 27: Factory Reset
FACTORY RESET Reset Features All Radar/Laser features can be reset to factory settings. To reset, follow these steps: 1. Remove Power from the unit. 2. Press and hold the Power and Quiet button. 3. Restore Power to the unit. 4. FACTORY RESET will be displayed followed by 2 beeps. - Page 28 FACTORY RESET - GPS RELATED FEATURES - DST: NO GMT: -5 Clock: YES Auto Dim: ON Compass: YES Compass Voice: NO Speed: MPH Overspeed: CLEARED Auto Quiet: SPD 0 Auto Filter: SPD 0 Alarm Radius: 400 Delete Radius: 400...
-
Page 29: Option Select Mode
OPTION SELECT MODE Press the Menu button to enter Option Select Mode. Press the Menu button again will step thru in an ascending order while pressing the City button will step thru in a descending order. Press and release the power button to exit. Option mode will automatically exit if no buttons are pressed within 20 seconds. - Page 30 OPTION SELECT MODE D = ON Battery Saver = ON Battery Saver B SVR OFF Q = OFF Battery Saver = OFF (Default) Filter 1 (default) X/K filter XK FLTR 1 D or Q to select Filter 2, Filter 3, Filter 0 Filter 1 (default) Ka filter Ka FLTR 1...
-
Page 31: Troubleshooting
TROUBLESHOOTING Your Whistler detector is expertly engineered and designed to exacting quality standards to provide you with reliable, trouble-free operation. If your unit has been correctly installed following the guidelines in this guide, but is not operating optimally, please refer to the troubleshooting guide below. -
Page 32: Care And Maintenance
If difficulties occur which cannot be solved by information in this Troubleshooting section, please call Whistler Customer Service at 1-800-531-0004 or visit our Help Center & FAQ page at www.whistlergroup.com, before returning your unit for service. -
Page 33: Legal Notices / Fcc
LEGAL NOTICES ARE DETECTORS LEGAL? In Most States YES. Laser-Radar detectors are legal in every state (except Virginia and Washington, D.C., which have local regulations restricting the use of radar receivers in any vehicle) when used in automobiles or light trucks (under 10,000 lbs.). -
Page 34: Fcc Information
IMPORTANT: FCC requirements state that changes or modifications not expressly approved by Whistler could void the user’s authority to operate the equipment. NOTE: This equipment has been tested and found to comply with the limits for a Class B digital device, pursuant to part 15 of the FCC Rules. -
Page 35: Radar/Laser Alerts
® Pulse (or instant-on) radar remains “off” until activated to measure the speed of a targeted vehicle. When a pulse type transmission is detected, your Whistler detector sounds an urgent 3-second audio warning. Display Shows: After the 3-second pulse alert, the standard alert pattern continues for as long as the signal is present. -
Page 36: Speed Monitoring
For best protection, keep these points in mind: • Because the vehicle’s license plate or headlights are the laser gun’s primary targets, mounting the Whistler detector on the dashboard can improve laser detection at short range. • Do not follow closely behind any vehicle you cannot see through. -
Page 37: Laser Tips
SPEED MONITORING Laser Tips If you are the targeted vehicle, a laser gun can often determine your speed within a few seconds after you receive an alert. In this situation, there is generally no time to safely adjust your speed. However, if you are traveling near or behind the targeted vehicle and receive an alert, response time should be sufficient. -
Page 38: Other Speed Detection Systems
SPEED MONITORING Other Speed Detection Systems Several techniques other than radar or laser are used to measure vehicle speeds. When these methods are being used, no detector can provide a warning. These techniques include: • Pacing - A patrol car drives behind you and matches your driving speed. -
Page 39: Speed Monitoring
SPEED MONITORING NOTE: The newest tool police have to detect radar detectors is called Spectre. Spectre can detect the majority of undetectable (VG-2) laser/radar detectors on the market. It is the responsibility of the individual radar detector user to know and understand the laws in your area regarding the legality of the use of radar detectors. -
Page 40: Warranty Information
All express or implied warranties for this product are limited to the above time. Whistler is not liable for damages arising from the use, misuse, or operation of this product. - Page 41 WARRANTY INFORMATION than Whistler. When returning a unit for service, please follow these instructions: Ship the unit in the original carton or in a suitablesturdy equivalent, fully insured, with return receipt requested to: Whistler Repair Dept. 1412 South 1st St.
- Page 42 • The unit has been abused, modified, installed improperly, or had its housing removed. The minimum out-of-warranty service fee for your Whistler detector is $75.00 USD. If you require out-of- warranty service, please return your unit as outlined in the section “Service Under Warranty” along with a certified check or money order.
- Page 43 WARRANTY INFORMATION technical service specialist who will outline options available to you. If you elect not to have your unit repaired, it will be returned to you along with your certified check or money order. IMPORTANT: When returning your unit for service, be certain to include a daytime telephone number and an email address (if applicable).
-
Page 44: Specifications
SPECIFICATION SPECIFICATIONS Radar Frequencies: 10.500 - 10.550 GHz (X Band) 24.050 - 24.250 GHz (K Band) 33.400 - 36.000 GHz (Ka Superwideband) 130° Optical Quality 4 Glass Lens Supports microSD card up to 32GB Max G-Sensor Setting 8G Max Built-in Microphone Wi-Fi 802.11 b/g Password 12345678 Operating Temperature Range:... - Page 48 CORPORATE HEADQUARTERS 1716 SW Commerce Dr. Ste. 8 Bentonville, AR 72712 Toll Free (800) 531-0004 TEL (479) 273-6012 www.whistlergroup.com CUSTOMER RETURN CENTER 1412 South 1st St. Rogers, AR 72756 Email: support@whistlergroup.com P/N 507033A 05B19 © 2019 The Whistler Group, Inc.
Need help?
Do you have a question about the MFU440 and is the answer not in the manual?
Questions and answers