Table of Contents
Advertisement
Advertisement
Table of Contents

Related Manuals for Hyundai Telecom HNT-4105


Summary of Contents for Hyundai Telecom HNT-4105
- Page 1 Instruction Manual HNT - 4105...
- Page 2 HAPPY TOGETHER, HAPPY TOMORROW...
- Page 3 Thank you for purchasing Home Network System of HYUNDAI TELECOM. Since this system is developed and produced by a R&D center of HYUNDAI TELECOM and has various convenient functions, please read this Instruction Manual carefully before use so you can fully understand the use of the equipment. The functions of this...
-
Page 4: Table Of Contents
Table of Contents Precautions Precautions on use External structure and description How to use Screen construction Calling option Control option Additional option Information option Security option About failure diagnosis and corrective measures Size and specification Specification Product warranty... - Page 5 HNT-4105 Precautions Precautions on use External structure and description If a power plug or an equipment connector applies as a blocking device, such device has to be in a location where it can be manipulated easily.
-
Page 6: Precautions On Use
Precautions on use This part contains matters that can result in a serious injury or even death. Please read and be fully aware of the contents for the correct use of the equipment. Any attempts of disassembly, repair, Do not have the product exposed to a remodeling are prohibited. - Page 7 Precautions on use This part contains matters that can result in an injury or a property damage. Please read and be fully aware of the contents for the correct use of the equipment. Do not place any equipments that generate Be careful not to have water get into a strong magnetism (a large TV or speaker) camera of a doorphone while cleaning the...
-
Page 8: External Structure And Description
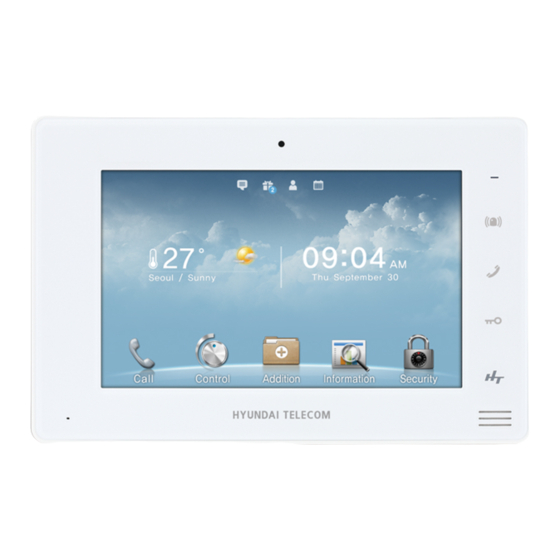
External structure and description Camera (Optional) LCD (GUI) Screen Power (LED) Emergency It is used in case of emergency. Emergency Call It starts and ends a call when answering a call. Call Open Door The button opens the door during door phone, Open Door lobby phone or phone calls. -
Page 9: Table Of Contents
HNT-4105 How to use Screen construction Calling option Control option Additional option Information option Security option About failure diagnosis and corrective measures... -
Page 10: Screen Construction
Screen construction 1. Initial screen Main menu The main screen consists of call, control, additional, information and security. Click the icon to move to that Main Menu consists of Call, Control, category. Additional, Information and Security. Pressing the icon moves to the corresponding category. - Page 11 Screen construction 1. Initial screen Time Information Displays current time. If the system is connected to a network, it will automatically maintain the latest time information. Instruction Manual...
-
Page 12: Calling Option
Calling option 1. Call through door phone If a call is made to a door phone Press the button as below to start the call. It is for making a call through a door phone If you do not receive the call for 30 seconds, it will automatically end. installed at the main entrance of housing. - Page 13 Calling option 1. Call through door phone Open Door function (optional) Press the button as below to end the call and open the door. It is for making a call through a door phone installed at the main entrance of housing. Open Open End Call...
- Page 14 Calling option 2. Call through the lobby When you receive a call from the lobby phone The screen displays an image of the lobby, the Call Button on the screen flashes and the phone rings. Press the button below to start the call, and if the call is not answered for 30 seconds, the call will end. It is for a call with the lobby phone and only receiving calls are available.
- Page 15 Calling option 2. Call through the lobby When you want to save visitor images phone When a call is made from the lobby, visitor image is automatically saved. Press the button below to save images of the visitor calling or in call. It is for a call with the lobby phone and only answering calls are available.
- Page 16 Calling option 3. Call through the guard When you receive a call from the guard phone (security) phone The Call Button on the screen flashes and the phone rings. Press the button below to start the call, and if the call is not answered for 30 seconds, the call will end. It is for making a call at the controller installed in the security office.
- Page 17 Calling option 4. Call to Neighbor When you receive a call from neighbor It is for making a call to neighbor. The Call Button on the screen flashes and the phone rings. Press the button below to start the call, and if the call is not answered for 30 seconds, the call will end. Call Call When want to make a call to neighbor...
- Page 18 Calling option When you receive a call from neighbor 5. Video Call (Optional) The Call Button on the screen flashes and the phone rings. It is the video call between neighbors. Press the button below to start the call, and if the call is not answered for 30 seconds, the call will end. * Optional features are available only when such features are installed during Call...
- Page 19 Calling option 6. Other information Volume control You can adjust the volume of the bell while making a call. It is a common feature for all kinds of calls. You can adjust the volume of the voice while speaking for the call. You can configure those settings in [Additional] –...
-
Page 20: Control Option
Control option 1. Before use Move to screens Press [Control] button on the main screen. Selecting a menu will move to the corresponding control screen. Optional features for device control are determined when initial contracts are made and therefore they cannot be installed or changed while using the product. - Page 21 Control option 2. Gas (optional) Close the gas valve You can control the gas valve. * Optional features are available only when such features are installed during construction. The feature may change or not be available depending on connection methods or if connection is not possible. Functions of each menu Menu Function...
- Page 22 Control option 3. Lighting (optional) Lighting control You can control the network lighting installed in your house. The number and names of lighting may differ by house. * Optional features are available only when such features are installed during construction. The feature may change or not be available depending on connection methods or if connection is not possible.
- Page 23 Control option Individual room power control 4. Heating (optional) You can control heaters. The number and names of rooms may differ by house. * Optional features are available only when such features are installed during construction. The feature may change or not be available depending on connection methods or if connection is not possible.
- Page 24 Control option 5. Cooling (optional) You can control Coolings. The number and names of rooms may differ by house. * Optional features are available only when such features are installed during construction. The feature may change or not be available depending on connection methods or if connection is not possible.
- Page 25 Control option 5. Call the elevator Call the elevator (optional) Press the button below to call an elevator. You can call the lifting up elevator by pressing the lifting up call button. * Multiple operation screens may appear depending on operational specification of elevators.
-
Page 26: Additional Option
Additional option 1. Complex Information Search Complex Information (optional) Select a category and press an item from the list to display details. *Complex information only displays information registered by the administrator. Consists of information about restaurants, education, finance, beauty/fashion, automobile, medical, interior, etc. * Optional features are available only when such features are installed during construction. - Page 27 Additional option 2. Video Memo (optional) When you want to save a Video Memo Press the button below to move to the Play/Save Video Memo screen. Makes a video memo which can be delivered to a neighbor as a message. Memo Image Register...
- Page 28 Additional option 2. Video Memo (optional) Play Video Memo Press the button below to play a Video Memo. Makes a video memo which can be delivered to a neighbor as a message. PLAY * Optional features are available only when such features are installed during construction.
- Page 29 Additional option 3. Voice Memo (optional) When you want to save a Voice Memo Press the button below to move to the Play/Save Voice Memo screen. You can make a voice memo to deliver your message to family members. Memo Voice Register Additional...
- Page 30 Additional option When you want to play a Voice Memo 3. Voice Memo (optional) Press the button below to play a Voice Memo. Makes a Voice Memo which can be delivered to a neighbor as a message. PLAY * Optional features are available only when such features are installed during construction.
-
Page 31: Screen Setting
Additional option 4. Screen Setting You can adjust screen functions. Additional Adjust Brightness You can adjust the screen brightness by pressing buttons. (Brightness range from 1-10 ) When you want to set Power Saving It is a screen protection function to protect the LCD by turning off the screen when there is no input for a certain amount of time. - Page 32 Additional option 4. Screen Setting Select Screen Press the button below to set the background of the Main Screen. You can adjust screen functions. Weather Background automatically changes the background according to the current weather with 4 backgrounds of Sunny / Cloudy / Rain / Snow. Apply Select Background...
- Page 33 Additional option 5. Volume/Bell Setting You can change the volume and bell sounds. Additional Change Volume Press the button below to adjust Volume/Bell. (Voice volume and Bell volume can be adjusted on a scale of 1-10 ) Apply Select Item Adjust Call Volume Adjust Bell Volume Change Bell Sound...
- Page 34 Additional option 6. Administrator Setting It is the screen for changing the Administrator Setting Changing the Administrator Setting may result in abnormal operation. Administrator Setting limits access by requesting an administrator password. Changing the Administrator Setting may result in abnormal operation. Instruction Manual...
-
Page 35: Information Option
Information option 1. Public notice(optional) Public notice If there are Public notices for the complex, 50 recent Public notices can be viewed. You can check the notice when the device is If there is a new Public notice, a message is generated. synced with the apartment server. - Page 36 Information option 3. Vehicle control(optional) Parking Control When a vehicle enters the complex, the last 50 entries can be checked. You can check parking control information when Only vehicle entry information can be checked. the device is synced with the parking control server.
- Page 37 Information option 5. CCTV (optional) When you want to check CCTV image Select a CCTV channel name to check the image of the corresponding camera. You can check the CCTV images when the (number and location cameras vary according to region and model) system is connected to the CCTV server.
- Page 38 Information option 6. Memo (optional) You can view images of visitors entering through the Door & Lobby. * If the option is a stop motion image, [Picture] icon is displayed. * Optional features are available only when such features are installed during construction. The feature may change or not be available depending on connection methods or if connection is not possible...
- Page 39 Information option 6. Memo (optional) You can view images of visitors entering through the Door & Lobby. * If the option is a stop motion image, [Picture] icon is displayed. * Optional features are available only when such features are installed during construction.
- Page 40 Information option 7. Energy Information (optional) You can check the current measurement value and usage amount when the system is connected to a remote measuring server. * Optional features are available only when such features are installed during construction. The feature may change or not be available depending on connection methods or if connection is not possible Selecting the measurement item from the bottom left of the screen, you can check the current usage of the selected item.
-
Page 41: Security Option
Security option 1. Before Use Away/Home/Sleeping and At Home Security Mode enable/disable, and disabling of Security/Emergency Alarm require a password. (default setting is ‘0000’ ). Terms Delay Time: It is the time you can return home or exit the space after setting Away. Home/Sleeping and At Home Security mode. - Page 42 Security option 3. Away Security Mode How to configure Away Mode Close all doors, press the button below, and then enter the password to generate a“beep”sound which indicates the When you go out, configure the system as delay time. Once the delay time expires, the voice message“Away mode has been activated”is generated, and Away Away Security to monitor trespassing.
- Page 43 Security option How to configure Home/Sleeping Mode 4. Home/Sleeping Security Close all doors within the security monitoring area, press the button below and enter the password in the password Mode window to generate a voice message“in house mode has been activated.” It is the security mode you can configure the system as Home Security Mode to monitor trespassing.
- Page 44 Security option How to configure At Home Mode 5. At Home Security Mode It is the security mode you can configure the Close all doors, press the button below, and then enter the password to generate a“beep”sound which indicates the system as At Home Security Mode to monitor delay time.
- Page 45 Security option 6. Enter/Exit Delay Time Entry Delay Time It is the time until the alarm is generated from the time the entrance door is opened to the time security is deactivated in It sets the time for users to set and deactivate Away, Home/Sleeping and At Home Security modes.
-
Page 46: Emergency Alarm
Security option 7. Emergency Alarm Generation of emergency alarm The device monitors abnormal situations Press the emergency button on the right for more than 2 seconds to generate the emergency alarm. regardless of the security mode and automatically notifies the security office of any abnormal situations. - Page 47 Security option 8. Fire/Gas alarm Generation of Fire/Gas alarm (optional) When fire or gas is detected, it generates alarm sounds. When the device is configured to the alarm mode, it automatically notifies the door phone and the security office of any abnormal situations.
- Page 48 Security option 9. Fire/Gas testing Fire/Gas You can test the operation of fire/gas detectors. You can test the operation of detectors. Press [Test] button to repeat fire and gas detection testing in order to generate alarm sounds. Press [Stop and Return] to cancel alarm sounds. Test Test Stop...
- Page 49 Security option 10. Setting – Change Password You can change passwords related to security. Initial user password is“0000.” * Initial lobby password is“1111”and setting is“Do not use.” Change User Password You can change the user password required for security settings and other setting screens. The password can be 4 digits long.
- Page 50 Security option 10. Setting – Change Opening Lobby Entrance with Lobby Password Password Press the button below to open the lobby entrance from the wall pad using the lobby password. The lobby entrance can be opened using a password. Lobby * Depending on the complex entry regulation, Building Password [Rm#] the password may not be able to enter...
- Page 51 Security option 11. Setting-Door Entrance Door Entrance Movement Detection Setting Movement Detection If movement detection is enabled, the system detects movement from 1M the door camera and saves 5 image cuts automatically. (optional) *Saved images can be viewed from the Save List screen. The system detects and records movement at *This function is available when sensor door phone is installed the Door entrance, and saves images.
-
Page 52: About Failure Diagnosis And Corrective Measures
About failure diagnosis and corrective measures When the call function is not activated If this product does not operate normally, check the - Call function will not be activated during the power outage. following points. If it still does not work normally even after a checkup, call the company’... - Page 53 HNT-4105 Size and specification Specification Product warranty...
-
Page 54: Specification
Specification Main unit of HNT-4105 Classification Specification Power Adaptor: Input AC220V, 60Hz / Output: depends on product specification Energy saving: 9.5W or lower, Normal: 20W or lower, Power consumption Maximum: 35W or lower Call Hands-Free 10" WIDE DIGITAL TFT-LCD, Color LCD data Top: 45°... - Page 55 Memo Instruction Manual...
- Page 56 Memo Instruction Manual...
- Page 57 Memo Instruction Manual...
- Page 58 Memo Instruction Manual...
-
Page 59: Product Warranty
Correct Disposal of This Product (Applicable in the European Union and other European countries with separate collection systems) HYUNDAI TELECOM Products are supplied with one(1) year return to base warranty from the date of purchase, We will repair or replace This marking shown on the product or its literature, indicates it should not be disposed with other household wastes at the end of its working life. - Page 60 HNT-4105 www.hyundaitel.com Hyundai Telecom Bldg.,107, Yeouidaebang-ro, Yeongdeungpo-gu, Seoul, 07433, KOREA 6320000258 REV.0 Tel +82.2.2240.9234/9271...
Need help?
Do you have a question about the HNT-4105 and is the answer not in the manual?
Questions and answers