
Subscribe to Our Youtube Channel
Related Manuals for Invitrogen Countless C10227


Summary of Contents for Invitrogen Countless C10227
- Page 1 ™ Countess Automated Cell Counter Catalog no. C10227 Rev. Date: 15 September 2009 MP10227 User Manual...
-
Page 3: Table Of Contents
Table of Contents Product Contents......................iv Safety Information ......................v Product Specifications ....................vii ™ Description of Countess Automated Cell Counter ........... viii Introduction..................1 Product Overview ......................1 Methods ....................3 Getting Started.......................3 General Guidelines .......................9 ™ Using the Countess Automated Cell Counter .............10 Cleaning and Maintenance..................19 ™... -
Page 4: Product Contents
Countess USB drive Quick reference card (QRC) The complete instruction manual is available on our website at www.invitrogen.com/countess. ™ See page vii for specifications and description of the Countess automated cell counter. Examine the instrument carefully for any damage incurred Upon during transit. -
Page 5: Safety Information
Safety Information Review and follow the safety instructions below. Safety Precautions Do not install the instrument in heavy humidity such as a greenhouse or an incubator to avoid a danger of electric shock. If water or other material enters the instrument, the adaptor, or power inlet, disconnect the power cord and contact a service person. - Page 6 The protection provided by the instrument may be impaired if the instrument is used in a manner not specified by Invitrogen. This product conforms to UL61010-1/CSA C22.2 No. 61010-1 “Safety Requirements for Electrical Equipment for Measurement, Control, and Laboratory Use, Part I: General Requirements.”...
-
Page 7: Product Specifications
<1 minute Cell Sample Range: 1 × 10 –1 × 10 ™ Software: Countess Software www.invitrogen.com/countess Instrument Dimensions: 27 cm (w) × 20 cm (d) × 19 cm (h) Weight: 2.1 kg (4.6 lbs) ™ The Countess automated cell counter is equipped with a camera (2.3X objective and 3.1 Mega pixel). -
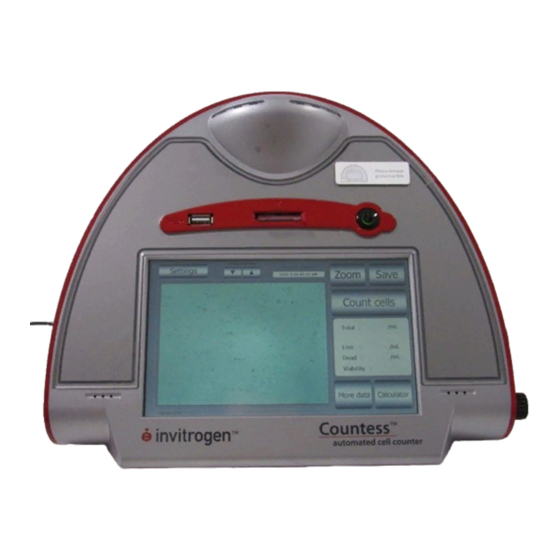
Page 8: Description Of Countess ™ Automated Cell Counter
™ Description of Countess Automated Cell Counter ™ The Countess automated cell counter is a benchtop automated Front View of cell counter that performs cell count and viability measurements ™ Countess using trypan blue stain. Automated ™ The front view showing various parts of the Countess Cell Counter automated cell counter is shown below. - Page 9 ™ Description of Countess Automated Cell Counter, Continued ™ The rear and side view showing various parts of the Countess Rear and Side automated cell counter. View of ™ Power Inlet Countess Automated Connect the counter to an electrical outlet using the supplied power cord and the appropriate plug, based on the electrical outlet Cell Counter configuration in your country.
- Page 10 ™ Description of Countess Automated Cell Counter, Continued ™ The touch screen user interface of the Countess automated cell User Interface counter is used to operate the instrument and consists of: The touch screen buttons to operate the instrument. ...
-
Page 11: Introduction
™ using the Countess software (download from www.invitrogen.com/countess) and USB drive supplied with the instrument or available separately. ™ The Countess automated cell counter is supplied with disposable ™... - Page 12 Product Overview, Continued ™ The Countess automated cell counter performs viability and cell System counting measurements using the trypan blue method of dead-cell Overview staining combined with advanced image analysis. ™ Cell sample is mixed with trypan blue and loaded into a Countess cell counting chamber slide.
-
Page 13: Methods
™ To register your Countess automated cell counter, visit www.invitrogen.com/countess. Enter the instrument serial number, your name, and your contact details. Registering your instrument ensures that you receive notifications of software upgrades and fast service. ™... - Page 14 Macintosh Operating systems) USB port (1.1 or later, 2.0 is recommended) Windows XP/2000/Vista Visit www.invitrogen.com/countess and follow instructions ™ on the page to install the Countess software. ™ When the software is installed, the Countess automated cell counting software icon appears on your desktop.
- Page 15 Getting Started, Continued Press Settings from the Start-Up screen to display Settings. Settings Screen The Settings menu allows you to set up the following: Parameters (see below and next page for details) Calibration to calibrate the instrument (page 20) ...
- Page 16 Getting Started, Continued The Cell Mode Parameters are described below: Cell Mode Parameters Sensitivity (refers to the contrast of the objects from the background). Adjusting the sensitivity higher makes the Screen, instrument more sensitive to objects; useful for cells that do not continued stain well with trypan blue while adjusting the sensitivity lower makes the instrument less sensitive and is useful if there...
- Page 17 Getting Started, Continued Cell Mode Parameters Screen, continued Note: Once a protocol is saved, it is available for use at any time. To access saved protocols, press Settings > Parameters > Load Protocol. Use the up and down arrows to find your saved protocol. Once the protocol is located, use the touch screen to highlight the protocol and press Apply.
- Page 18 Getting Started, Continued The date and time is already preset when you receive the Date and instrument. To reset the date and time, follow these steps: Time Setup ™ automated cell counter by pressing the Turn on the Countess Power button. The Start up screen is displayed after a few seconds.
-
Page 19: General Guidelines
™ ™ The Countess cell counting chamber slides supplied with the Countess counter or available separately from Invitrogen (page 25) are Cell Counting ™ specially designed for use exclusively with the Countess Chamber automated cell counter. Use of other slides result in inaccurate cell Slides ™... -
Page 20: Using The Countess Automated Cell Counter
™ count using the Countess counter. Visit www.invitrogen.com/countess for additional application notes, technical notes, and a list of validated cell lines including adherent, primary, and suspension cells that have ™ been tested using the Countess Automated Cell Counter. - Page 21 ™ Using the Countess Automated Cell Counter, Continued Cell Counting Procedure, continued Add 10 μL of your sample to 10 μL supplied trypan blue stain. Mix gently by pipetting up and down. Add 10 μL of the sample mixture to the chamber ports on one ™...
- Page 22 ™ Using the Countess Automated Cell Counter, Continued Adjust the image by pressing the Zoom button. Navigate by Cell Counting pressing the location you like to see on the grid. Procedure, continued While viewing cells in the Zoom mode, use the Focus knob to adjust the image.
- Page 23 ™ Using the Countess Automated Cell Counter, Continued Cell Counting Procedure, continued Correct Image Live Dead Incorrect Image Live Dead When you are satisfied with the image, press Count Cells. Continued on next page...
- Page 24 ™ Using the Countess Automated Cell Counter, Continued 10. The instrument takes approximately 30 seconds to count each Cell Counting sample, and the cell count for live, dead, and total cells, and Procedure, percentage viability is displayed on the screen. Record the cell continued count, or insert a USB drive and press Save (see page 16).
- Page 25 ™ Using the Countess Automated Cell Counter, Continued After reviewing the data, press the Close button to return to Cell Counting the main screen. Procedure, The Calculator button allows you to quickly calculate continued adjustments to the cell suspension to obtain a desired concentration.
- Page 26 ™ Using the Countess Automated Cell Counter, Continued To archive your data or generate a printed report, insert Optional: ™ Countess USB drive into the USB port. Transferring Data to a USB port Computer Save your data on the USB drive by pressing the Save button on the main screen.
- Page 27 ™ Using the Countess Automated Cell Counter, Continued ™ The Countess automated cell counter can also be used to count Using the beads using the Bead mode of the instrument. Beads Mode Push the Power button to start the instrument. The Start-up for Counting screen is displayed.
- Page 28 ™ Using the Countess Automated Cell Counter, Continued When you are satisfied with the image, press the Count Beads Using the button. Beads Mode for Counting Beads, continued The instrument takes approximately 30 seconds to count each sample and the bead count is displayed on the screen. Record the bead count.
-
Page 29: Cleaning And Maintenance
Cleaning and Maintenance ™ Clean the surface of the Countess instrument with a damp cloth. Cleaning and ™ To clean the LCD screen, turn off the Countess instrument, Maintenance disconnect the power cable, and clean the LCD screen with a soft cloth lightly moistened with LCD cleansing detergent. -
Page 30: Updating And Calibrating The Countess Automated Cell Counter
OK to erase previous data and start new .CSV file. ™ Visit the Countess website at www.invitrogen.com/countess to download the firmware which is supplied as a .zip file to your desktop. Unzip the .zip file and save the firmware to a USB drive supplied with the instrument. - Page 31 ™ Updating and Calibrating the Countess Automated Cell Counter, Continued Push the Power button to start the instrument. The Start-up Calibrating screen is displayed. the Counter Press Settings and then press Calibration. ™ To recalibrate the Countess Counter, mix 10 μL trypan blue solution with 10 μL of a standard buffer, such as phosphate buffered saline (PBS).
-
Page 32: Troubleshooting
Troubleshooting Problem Cause Solution Inaccurate cell Sample handling ™ Do not insert the Countess cell count counting chamber slide upside-down as this may introduce liquid into the instrument that could damage it. ™ Do not reuse the Countess cell counting chamber slides, as leftover dye from the previous reading may... - Page 33 Troubleshooting, Continued Problem Cause Solution Error codes See page 24 for a description of error codes. Saving and Incorrect USB Use the USB drive supplied with the printing drive counter or an USB 2.0 drive as some problems types of USB drive are not detected or recorded by the counter.
-
Page 34: Countess ™ Automated Cell Counter Error Codes
™ Countess Automated Cell Counter Error Codes This section describes the error codes displayed by the Introduction ™ Countess automated cell counter when it encounters a problem. Contact Technical Support (page 26) for details on error codes and if you need to send the instrument back for servicing. Position Reason Message... -
Page 35: Appendix
Appendix Accessory Products ™ The following products can be used with the Countess Additional automated cell counter and are available separately from Products Invitrogen. For more information, visit www.invitrogen.com or contact Technical Support (page 26). Product Quantity Catalog no. ™... -
Page 36: Technical Support
Technical Support Visit the Invitrogen Web site at www.invitrogen.com for: Resources Technical resources, including manuals, vector maps and sequences, application notes, MSDSs, FAQs, formulations, citations, handbooks, etc. Complete technical support contact information Access to the Invitrogen Online Catalog ... -
Page 37: Purchaser Notification
No. 5: buyer (whether the buyer is an academic or for-profit entity). Invitrogen The buyer cannot sell or otherwise transfer (a) this product (b) its Technology components or (c) materials made using this product or its... - Page 38 Warranty will be free from defects in materials and workmanship for a period of one (1) year from the date of delivery. Invitrogen agrees, as its sole responsibility under this limited warranty, and upon prompt notice of a defect, to repair, replace or credit the purchase price, at its discretion, any Instrument discovered to be defective within the warranty period.
- Page 40 Corporate Headquarters 5791 Van Allen Way Carlsbad, CA 92008 T: 1 760 603 7200 F: 1 760 602 6500 E: tech_support@invitrogen.com For country-specific contact information, visit our web site at www.invitrogen.com...
Need help?
Do you have a question about the Countless C10227 and is the answer not in the manual?
Questions and answers