Table of Contents
Advertisement
D
M E D I C A L
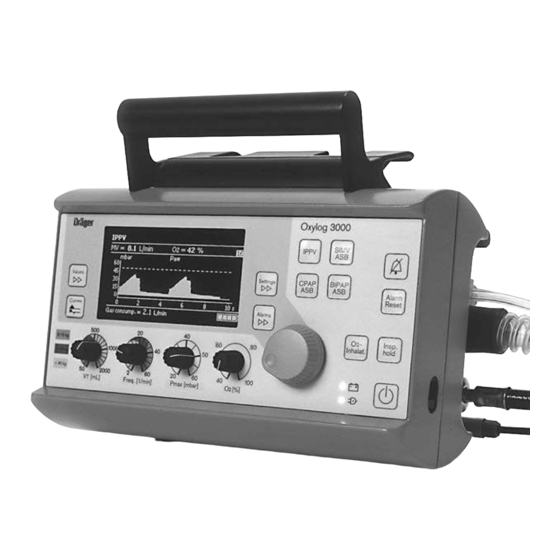
Oxylog 3000
Emergency and transport ventilator
Instructions for Use
Software 1.n
This "Instructions for Use" manual is published for public use and is only meant for your information.
We do not guarantee the accuracy of these instructions with respect to your specific device type or status.
Only the "Instructions for Use" manual delivered together with a device is officially published for the use of that specific device.
Advertisement
Chapters
Table of Contents

Related Manuals for Draeger Oxylog 3000

Summary of Contents for Draeger Oxylog 3000
- Page 1 M E D I C A L Oxylog 3000 Emergency and transport ventilator Instructions for Use Software 1.n This "Instructions for Use" manual is published for public use and is only meant for your information. We do not guarantee the accuracy of these instructions with respect to your specific device type or status.
- Page 2 « remain off while the ventilator is being operated from the internal battery. The left-hand column ... An Oxylog 3000 charging station connected to the mains supply can be used to charge the battery externally, see "Order contains the text List", page 102.
-
Page 3: Table Of Contents
Contents For Your Safety and that of Your Patients Intended Medical Use Operating concept Preparation Checking readiness for operation Operation Fault – Cause – Remedy Care What's what Accessories Service Mode Abbreviations and symbols Technical Data Description Order List Index This "Instructions for Use"... - Page 4 This "Instructions for Use" manual is published for public use and is only meant for your information. We do not guarantee the accuracy of these instructions with respect to your specific device type or status. Only the "Instructions for Use" manual delivered together with a device is officially published for the use of that specific device.
-
Page 5: For Your Safety And That Of Your Patients
For Your Safety and that of Your Patients For Your Safety and that of Your Patients For Your Safety and that of Your Patients ....... . 6 Precautions . - Page 6 Avoid pollutants in the ambient air! used in a manner not conforming to its intended use. Oxylog 3000 uses ambient air for ventilation when the Dräger cannot be held responsible for damage caused by concentration is less than 100 vol.%.
-
Page 7: Intended Medical Use
Intended Medical Use Intended Medical Use Intended Medical Use ........... 8 This "Instructions for Use"... - Page 8 — Expiratory minute volume MV These Instructions for Use describe the maximum equipment — Apnoea configuration for Oxylog 3000. Depending on the actual configuration used, the maximum — Rapid shallow breathing: High frequency alarm equipment may not include the following options: —...
-
Page 9: Operating Concept
Operating concept Operating concept Operating concept ........... . 10 Key for switching on/off . -
Page 10: Operating Concept
The operating concept takes into account the various purposes for which the ventilator is used. For primary care When configured accordingly, Oxylog 3000 starts in IPPV ventilation mode with user-configured starting values for I:E (1:1.5 as default setting) and PEEP (5 mbar as default setting). -
Page 11: Selecting The Ventilation Mode
« key for suppressing the audible alarm tone for 2 minutes. 5 »Alarm Reset« key for acknowledging or resetting messages. Oxylog 3000 6 »Insp. hold« key for manually activated inspiration and for extending the inspiration time. 7 »O -Inhalat.« key (optional) for O inhalation or »100% O... -
Page 12: Structure Of The Screen Windows
Operating concept Structure of the screen windows 1 Status and alarm messages window ➀ ➁ 2 Measured values display window 3 Curves and measured values window 4 Settings and alarms window 5 Information window ➃ ➄ ➂ "Values" screen window 6 Line displaying all the measured values in the current ➅... -
Page 13: Alarms" Screen Window
Operating concept Activate parameter for setting. ● The active parameter appears light on a dark background. Set parameter and confirm. ● To change to the next page: ∆∆ Press »Set. « key. ● The pages are displayed consecutively. "Alarms" screen window 1 Setting menu for setting alarm limits and alarm parameters. -
Page 14: Information Window On Screen
"Flow" and "T ". insp If the PEEP value is set to more than 10 mbar, Oxylog 3000 will display a screen prompt which must be confirmed by the operator: Confirm PEEP above 10 mbar ? Press rotary knob to confirm. -
Page 15: Preparation
Preparation Preparation Preparation ............16 Assemble reusable hose set . -
Page 16: Preparation
The Carrier System 3000 (optional) – see page 72 – is available for transport under operating conditions. The onboard equipment holder 3000 (optional) – see page 74 – is available for positioning the Oxylog 3000 in the vehicle. Assemble reusable hose set Parts must always be sterilised before use! ●... - Page 17 flow measurement, otherwise the internal sensor may be destroyed! 4 Connect ventilation hose to socket on Oxylog 3000. This "Instructions for Use" manual is published for public use and is only meant for your information. We do not guarantee the accuracy of these instructions with respect to your specific device type or status.
-
Page 18: Connect Disposable Hose Set
Ensure the flow measuring hoses are correctly ● orientated otherwise the volume will be measured incorrectly. 3 Connect ventilation hose to socket on Oxylog 3000. When using a bacterial filter or HME (Heat Moisture Exchanger) Connect bacterial filter or HME. -
Page 19: Connecting Power Supply
Preparation Connecting power supply Oxylog 3000 is designed to operate on power supplies with different voltages: Internal supply — with rechargeable battery (specified Smart Battery, see "Technical Data", page 88) Additional external power supply To recharge the battery and to extend the electrical operation time when using a rechargeable battery. - Page 20 « and » « remain off while the ventilator is being operated from the internal battery. An Oxylog 3000 charging station connected to the mains supply can be used to charge the battery externally, see "Order List", page 102. Refer to the manufacturer's technical specifications for ●...
-
Page 21: External Power Supply With Dc/Dc Converter
2 and the small connector into the DC socket of the Oxylog 3000 Oxylog 3000. 3 When the Oxylog 3000 is connected to an external supply, the indicator » « lights up and shows that the battery can be recharged. -
Page 22: Connecting Gas Supply
3 Turn cylinder valve slowly and open fully. Do not fit any flow control valves or flowmeters in the ● gas supply to Oxylog 3000 – the ventilator could malfunction! The Carrier System 3000 (optional) – see page 72 – is available for transporting the Oxylog 3000 under operating conditions. - Page 23 1 The amount of gas from the high-pressure supply which has currently been consumed is indicated by Oxylog 3000 in the bottom left-hand line of the information window in L/min (gas consumption of ventilator + MV of the patient).
-
Page 24: Before Using For The First Time
Before using for the first time Supply from a piped medical gas system 1 Screw O medical gas hose into Oxylog 3000 and 2 plug gas probe into O terminal unit until it has engaged twice and the supply of O is assured. -
Page 25: Checking Readiness For Operation
Checking readiness for operation Checking readiness for operation Checking readiness for operation ........26 Connecting test lung . - Page 26 — Alarm functions OK — Ventilation functions OK — Monitor functions OK. Oxylog 3000 interrupt the test if a fault is detected. The relative fault is indicated on the screen. The patient may be endangered if the above pre-use check is not carried out.
- Page 27 Checking readiness for operation Select »Device check« in main menu and confirm. ● The device check can be ended at any time by pressing the »Alarm Reset« key. Ensure that the gas supply has been connected. ● Ensure that the correct gas type (O or medical air) has ●...
- Page 28 Oxylog 3000 automatically checks whether a test lung has been connected. The device check is aborted if a test lung is not detected within one minute. The check is continued when Oxylog 3000 detects the test lung. Ensure that the configured hose system has been ●...
- Page 29 Confirm acoustic and visual alarm signals. ● The device check proceeds automatically. During the automatic test sequence, Oxylog 3000 checks the flow, pressure build-up and alarm signals. Corresponding sounds are heard. The bar graph shows the progress made by the check.
- Page 30 Checking readiness for operation Error messages during device check Message Cause Remedy No communication control- / Device defective. Call DrägerService. charge-board System leakage Leak in ventilation hose and/or test lung. Check hoses, breathing valve, flow sensor and test lung for leaks and replace if necessary.
-
Page 31: Operation
Operation Operation Operation ............32 Starting operation . -
Page 32: Operation
Starting operation Switching on 1 Briefly press the » « key. Oxylog 3000 carries out the self-test. Wait for the 5 second self-test to be completed. ● Upon expiry of the self-test, the ventilator automatically starts ventilation with the default settings. -
Page 33: Ippv (Cmv), Ippvassist (Cmvassist)
Operation IPPV (CMV), IPPV (CMV Assist Assist IPPV – Intermittent Positive Pressure Ventilation Volume-controlled ventilation with fixed mandatory minute Plateau time volume MV, set with tidal volume V and frequency Freq. Tplat For patients without spontaneous breathing, see details on page 96 onwards. - Page 34 ● confirm the value. Small value = high sensitivity The ventilation mode IPPV is displayed on the screen. Assist Oxylog 3000 Deactivate trigger: Set a value less than 3 L/min or greater than 15 L/min, ● display off confirm. ●...
- Page 35 Operation For heart-lung resuscitation The airway pressure Paw is limited to the set Pmax value by Oxylog 3000 without ending inspiration prematurely (pressure-limited, inconstant-volume ventilation when Pmax is reached). Pmax should be set to maximum in order to apply the maximum possible minute volume.
-
Page 36: Simv, Simv/Asb (Simv/Ps)
Operation SIMV, SIMV/ASB (SIMV/PS)* Synchronised Intermittent Mandatory Ventilation Pressure Assisted Spontaneous Breathing support ASB Fixed mandatory minute volume MV set with tidal volume V and ventilation frequency Freq. The patient can breathe Rapid Slow spontaneously between the mandatory ventilation strokes and rise time rise time thus contribute to the total minute volume. -
Page 37: Bipap (Pcv+), Bipap/Asb (Pcv+/Ps)
Operation BIPAP (PCV+)*, BIPAP/ASB (PCV+/PS)* Biphasic Positive Airway Pressure Assisted Spontaneous Breathing Without With spontaneous breathing spontaneous breathing Pressure-controlled ventilation combined with spontaneous Pressure breathing throughout the breathing cycle and variable support ASB Slow Rapid rise time pressure support at CPAP level. rise time Rapid Slow... -
Page 38: Cpap, Cpap/Asb (Cpap/Ps)
Operation CPAP, CPAP/ASB (CPAP/PS)* Continuous Positive Airway Pressure Assisted Spontaneous Breathing Spontaneous breathing with Start pressure support ASB For patients with adequate spontaneous breathing. apnoea ventilation Spontaneous breathing at an elevated pressure level to Slow Rapid increase the functional residual capacity FRC. rise time rise time Spontaneous breathing can be assisted with ASB. -
Page 39: Apnoea Ventilation
« to a value between 15 and 60 seconds. Apnoea ● The parameters f and VT , which are required for Apnoea Apnoea Oxylog 3000 setting apnoea ventilation, are now displayed: Set »f and »VT ● Apnoea« Apnoea« 2 The selected maximum airway pressure »Pmax« must be such as to allow pressure to build up for the volume- controlled ventilation stroke. - Page 40 Operation To end apnoea ventilation: Press the »Alarm Reset« key. ● The ventilator continues operation with the original ventilation mode and with the original ventilation parameters set (CPAP). The manufacturer's settings f = 12 1/min and Apnoea = 500 ml can be changed in "Customer Service Apnoea Mode", see page 77.
-
Page 41: Niv - Non-Invasive Ventilation Mask Ventilation
Select »on« and confirm ● The supplement NIV appears in the top line of the screen. Oxylog 3000 automatically adjusts to the requirements of mask ventilation. Leakage flows are compensated auto- matically and the leakage alarm is inactive. The minimum ventilation required for the patient must be ●... -
Page 42: O 2 Concentration Without Optional "O 2 Blending
flow range from 9 to 35 L/min. If Oxylog 3000 must deliver inspiratory flows outside this range or at a high mean airway pressure Pmean, these will be applied with a higher O concentration by the device. - Page 43 Operation When patients who are spontaneously breathing, the achievable O concentration will depend on the profile of the inspiratory flow. Even if this profile is changed, the message "Check settings O " may appear after some time. In toxic surroundings: the patient must be ventilated with 100 % O in order ●...
-
Page 44: Setting Alarm Limits
1 Set the maximum airway pressure Pmax via the »Pmax« control. The airway pressure is limited by Oxylog 3000 when Pmax is reached; inspiration is not ended prematurely. Lower alarm limit for Paw A lower alarm limit need not be set for the airway pressure Paw. -
Page 45: In The Event Of An Alarm
Warnings are highlighted by three exclamation marks and displayed in inverted form. Example: !!! Apnoea Oxylog 3000 generates a sequence of five tones which sounds twice and is repeated every 7.5 seconds. Caution An alarm of medium priority. 2 Yellow alarm lamp flashes. -
Page 46: Advisory
1 Yellow alarm lamp lights up. Advisory messages are identified by one exclamation mark. Example: ! Settings not confirmed Oxylog 3000 generates a two-tone alarm sequence which only sounds once. Oxylog 3000 Refer to the list "Fault – Cause – Remedy" on page 53 for ●... -
Page 47: Displaying Curves And Measured Values
Paw(t) or flow curve Flow(t) and two relevant measured values. To display a different curve 1 Press »Curves « key. Oxylog 3000 Example: airway pressure curve Paw(t) Example: flow curve (t) Displaying other measured values ∆∆... -
Page 48: Special Functions
To activate Manual inspiration or Inspiration hold 1 Press key »Insp. hold« for as long as inspiration is required. Oxylog 3000 will either extend the momentary automatic ventilation stroke accordingly or start a new ventilation stroke and hold it for up to max. 15 seconds. - Page 49 -Inhalation« for approx. 3 seconds 1 briefly press key »O -Inhalation« and confirm. 2 Connect the inhalation mask to the inspiration socket via an adapter (see accessories). Oxylog 3000 -Inhalation« Display (example): »O inhalation is performed with the previously effective setting.
-
Page 50: Calibration
« for 3 seconds. Its yellow lamp flashes and ventilation is subsequently ceased by the device. 2 The alarm !!! Confirm device OFF with rotary knob must be acknowledged. Oxylog 3000 When O is supplied from a cylinder: The cylinder valve must be closed completely in order ●... -
Page 51: Displaying Configuration And Information
(Hours since service time) — Battery type and battery capacity Set configuration parameters /display information 1 Switch Oxylog 3000 on = press the » « key. The device runs through a self-test and the operator is prompted, on the display, to call up the configuration menu or device check: Press rotary knob for device check and configuration... - Page 52 21 % regardless of the set O concentration. However, the control »O « can be set to 40 %, for example. In this way, Oxylog 3000 will use less medical air by additionally drawing in ambient air. Display battery type ∆∆...
-
Page 53: Fault - Cause - Remedy
Fault – Cause – Remedy Fault – Cause – Remedy Fault – cause – remedy ..........54 Messages in the Alarms window . - Page 54 (only in »Alarm Reset« key. CPAP mode). !! Charge int. battery Oxylog 3000 draws its power from the The ventilator must immediately be internal battery due to the absence of reconnected to the mains supply, an an external DC supply.
- Page 55 DC supply or a fully charged connected. battery. !! Int. battery in use Press »Alarm Reset« key to confirm Oxylog 3000 draws its power from the internal battery due to the absence of alarm. an external DC supply. !! Key failed Technical defect.
- Page 56 Fault – cause – remedy Message Cause Remedy !!! Paw low No pressure difference >5 mbar Inflate cuff and check for leaks. between inspiration and expiration or set pressure level is not achieved. Leak in cuff. Leakage or disconnection. Check hose system for leaking connections.
-
Page 57: Care
Care Care Care ..............58 Disassemble reusable ventilation set . -
Page 58: Care
● Disassemble reusable ventilation set 1 Disconnect ventilation hose from socket. 2 Disconnect flow measuring hoses from sockets. 3 Unscrew medical gas hose from Oxylog 3000. When disconnecting the ventilation hose, always grip ● the sleeve and not the corrugations! If this is not done, the corrugations or hose may be torn from the sleeve. - Page 59 Care 1 Disconnect flow sensor from breathing valve – do not twist or use force on the hose nozzles, as this can damage the flow sensor. 2 Carefully detach flow measuring hoses from flow sensor, pulling in the axial direction of the hose nozzles. 3 Detach angled connector from flow sensor.
-
Page 60: Remove Disposable Hose Set
Care Remove disposable hose set 1 Disconnect flow measuring hoses. 2 Disconnect ventilation hose. Correctly dispose of the complete disposable hose set. ● The disposable ventilation hose set must not be ● sterilized: it cannot withstand high temperatures and may be damaged! Cleaning and disinfecting To ensure material compatibility, use disinfectants based on: —... - Page 61 Care Users in the Federal Republic of Germany are recommended to use only disinfectants on the current DGHM list (DGHM: German Society for Hygiene and Microbiology). The following disinfectants on the DGHM list are recommended: — Dismozon pur — Incidur —...
-
Page 62: Sterilising Reusable Hose Sets
Care Sterilising reusable hose sets Disassemble the breathing valve, flow sensor and angled connector. Dismantle the breathing valve. The disassembled parts of the breathing valve, the flow sensor, the angled connector, the flow measuring hoses and the ventilation hose can be sterilized in hot steam at 134 °C in accordance with ●... -
Page 63: Batteries
They must be disposed of in accordance with the local ● waste disposal regulations. Device disposal — at the end of its useful life. Oxylog 3000 must be disposed of correctly in consultation ● with the relevant waste disposal companies. The statutory regulations must be observed. ●... - Page 64 This "Instructions for Use" manual is published for public use and is only meant for your information. We do not guarantee the accuracy of these instructions with respect to your specific device type or status. Only the "Instructions for Use" manual delivered together with a device is officially published for the use of that specific device.
-
Page 65: What's What
What's what What's what What's what ............66 Front panel –... -
Page 66: What's What
What's what What's what Front panel – standard version 14 Control knob for setting the O concentration »O « 1 Screen with screen pages for the specific application to 60 % or 100 %, no other values ∆∆ 2 Key »Alarms «... -
Page 67: Front Panel With All Options
What's what Front panel with all options 15 Central rotary knob for making selections / settings and for 1 Screen with screen pages for the specific application ∆∆ confirming these 2 Key »Alarms « for setting and displaying alarm limits 16 Control knob for setting the O ∆∆... -
Page 68: Side View, Right
What's what Side view, right 1 Screw for securing the battery compartment cover 2 Sockets for flow measuring hoses 3 Socket for ventilation hose or inhalation mask 4 Connector for medical gas hose 5 Socket for DC supply 6 Window for IrDA interface Note Instructions for Use Rear view 7 Filter cartridge for ambient air... -
Page 69: Reusable Hose Set
What's what Reusable hose set 1 Breathing valve 2 Ventilation hose 3 Flow measuring hoses 4 Angled connector 5 Flow sensor Disposable hose set 1 Breathing valve 2 Ventilation hose 3 Flow measuring hoses 4 Angled connector 5 Flow sensor This "Instructions for Use"... - Page 70 This "Instructions for Use" manual is published for public use and is only meant for your information. We do not guarantee the accuracy of these instructions with respect to your specific device type or status. Only the "Instructions for Use" manual delivered together with a device is officially published for the use of that specific device.
-
Page 71: Accessories
Accessories Accessories Carrier System 3000 (optional) ......... 72 Onboard Equipment Holder (optional) . - Page 72 ● tube profiles by means of the claw on the back of the Oxylog 3000. The device is hooked onto a standard rail by means of a rectangular recess provided for this purpose. Care must be taken to ensure that the claw is inserted completely in the rail.
- Page 73 Carrier System 3000 (optional) When mounted on a tube or rail, the Carrier System is only held by its own weight. The ventilator must be secured additionally, particularly when it is being transported. Vibrations may cause the ventilator to drop and injure the patient or user.
- Page 74 Hook the cross-bar of the onboard equipment holder into ● the claw recess on Oxylog 3000. Swing the ventilator to the rear about the cross-bar until resistance is felt. Press firmly against the bottom edge of the ventilator control unit to engage it.
-
Page 75: Service Mode
Service Mode Service Mode Service Mode ............76 Customer Service Mode . -
Page 76: Service Mode
3 Switch on the device = briefly press key » « and simultaneously press and hold 4 »Curves « key and ∆∆ Oxylog 3000 5 »Values « key until the main »Customer Service Mode« menu appears. Set the number of the required test in the main menu with ●... -
Page 77: Set Startup Settings
Service Mode Settings in service mode Select the required function with the cursor (asterisk). Select parameter = turn rotary knob. ● Activate parameter = press rotary knob. ● Set value = turn rotary knob. ● Confirm value = press rotary knob. ●... -
Page 78: Select Hose Type
Service Mode To restore the manufacturer's defaults: Select and confirm line »Set factory default«. ● Range of settings: Parameter Range Tinsp 0.2 to 10.0 s 3.0/1.0 to 1.0/4.0 PEEP 0 to 20 mbar ∆ ASB 0 to 35 mbar Pinsp 0 to 55 mbar Ramp SLOW,STANDARD, FAST... -
Page 79: Set Measured Values Display Window
Service Mode Set measured values display window The arrangement of measured value pairs on the individual pages of the measured values display window can be varied. Each measured value can be freely selected in any position and is only displayed at that position. Start configuration on page 1/5 and continue through ●... -
Page 80: Test Loudspeaker, Buzzer, Leds And Display
Service Mode Test loudspeaker, buzzer, LEDs and display Tests the loudspeaker, buzzer, all LEDs and the display. Select the required test Start the test. Each function is tested by the device. ● To test the screen display (Test display): Turn the rotary knob; various test cards are displayed. ●... -
Page 81: Display Error And Info Logbook
Service Mode Display error and info logbook Any technical errors and/or special occurrences, such as activation of a software option, completion of the device check and device calibration, are listed in chronological order. Display (example): Change over to the next page: Select line »Page«, confirm and turn rotary knob. -
Page 82: Exit Service Mode
Service Mode Exit service mode Press key » « for 3 seconds; its yellow lamp flashes. ● To switch ventilation on: Briefly press key » «. ● To switch off: Press rotary knob. ● This "Instructions for Use" manual is published for public use and is only meant for your information. We do not guarantee the accuracy of these instructions with respect to your specific device type or status. -
Page 83: Abbreviations And Symbols
Abbreviations and symbols Abbreviations and symbols Abbreviations ............84 Symbols . - Page 84 Abbreviations Abbreviations Abbreviation Explanation Abbreviation Explanation ASB (PS) Assisted Spontaneous Breathing Airway pressure Pressure-assisted spontaneous breathing Pressure Controlled Ventilation plus PCV+ BIPAP (PCV+) Biphasic Positive Airway Pressure PEEP Positive end expiratory pressure Spontaneous breathing with continuous Pinsp Set value of the upper pressure level in positive airway pressure and two different BIPAP pressure levels...
- Page 85 Symbols Symbols Symbol Explanation Inspiration is started and held manually Display screen window "Settings" Settings ∆∆ Alarms Display screen window "Alarms" ∆∆ Values Display screen window "Measured values" ∆∆ Curves Changeover between flow / pressure curve Suppress acoustic alarm for 2 minutes Alarm Acknowledge alarms Reset...
- Page 86 This "Instructions for Use" manual is published for public use and is only meant for your information. We do not guarantee the accuracy of these instructions with respect to your specific device type or status. Only the "Instructions for Use" manual delivered together with a device is officially published for the use of that specific device.
-
Page 87: Technical Data
Technical Data Technical Data Technical Data ............88 This "Instructions for Use"... - Page 88 Technical Data Technical Data Ambient conditions During operation Temperature –20 to 50 Atmospheric pressure 570 to 1200 hPa Rel. humidity 5 to 95 % During storage Ventilator without replaceable battery, with reusable ventilation hose set Temperature –40 to 75 Atmospheric pressure 570 to 1200 hPa Rel.
- Page 89 Technical Data Pressure support ∆ASB 0 to 35 mbar (relative to PEEP) ±2 mbar Rise time for pressure support slow, standard, fast Performance data Control principle time-cycled, volume-constant, pressure-controlled Max. inspiratory flow 100 L/min Device compliance ≤1 mL/mbar with 1.5 m ventilation hose ≤2 mL/mbar with 3 m ventilation hose ≤4 mbar at 60 L/min...
- Page 90 Range of settings 15 to 60 s, can be set in 1 s increments Operating data Power supply Power supply Input voltage Oxylog 3000 19 V ±0.5 V DC With DC/DC converter 12 V / 24V / 28 V DC Current consumption With battery charge max.
- Page 91 Battery storage time The internal battery must always be removed from Oxylog 3000 for storage and recharged completely after 12 months at the latest (e.g. in the external Oxylog 3000 battery charging station) AC/DC power pack Temperature range –20...
- Page 92 Technical Data Gas cylinders and pressure reducers must comply with national regulations and be officially approved. Pressure reducer must have a vent valve on the output side to limit the delivery pressure to approx. 10 bar in the event of a fault. Gas consumption for internal control 0.1 to 0.5 L/min Accuracy of gas consumption indication...
- Page 93 Technical Data Materials used Housing, Oxylog 3000 Impact-proof acrylonitrile butadiene styrene (ABS) Housing, AC/DC power pack Impact-proof acrylonitrile butadiene styrene (ABS) Housing, DC/DC converter Impact-proof acrylonitrile butadiene styrene (ABS) Touch sensitive keypad on ventilator Polyester film Reusable ventilation hose set Ventilation hose, flow measuring hoses...
- Page 94 This "Instructions for Use" manual is published for public use and is only meant for your information. We do not guarantee the accuracy of these instructions with respect to your specific device type or status. Only the "Instructions for Use" manual delivered together with a device is officially published for the use of that specific device.
-
Page 95: Description
Description Description Description ............96 Ventilation modes . - Page 96 Description Description Ventilation modes Volume-controlled ventilation IPPV (CMV) Volume-constant mandatory ventilation stroke The ventilation pattern is specified by the settings for tidal with plateau without plateau volume V , frequency Freq., ventilation time ratio I:E and PEEP. plat At the end of the flow phase, the expiration valve remains closed until the end of the inspiration time Tinsp.
- Page 97 Since the synchronisation of the mandatory ventilation stroke reduces the effective SIMV time, which would result in an undesirable increase in effective frequency, Oxylog 3000 prolongs the subsequent spontaneous breathing time by the missing time difference ∆T – thus preventing an increase in SIMV frequency.
- Page 98 The time for this pressure increase (»Ramp«) is adjustable: — In case of rapid increase in pressure Oxylog 3000 supports the insufficient spontaneous breathing of the patient with a 25 % Insp. Flow high peak flow.
- Page 99 Description BIPAP (PCV+) Biphasic Positive Airway Pressure (Pressure Controlled Ventilation plus) The BIPAP ventilation mode is a pressure-controlled / time- cycled ventilation mode in which the patient can always Mandatory Spontaneous Synchronized BIPAP stroke breathing BIPAP stroke breathe spontaneously. BIPAP is therefore often described as a time-cycled alternation between two CPAP levels.
- Page 100 Description Using BIPAP As with SIMV, the time pattern is set using the basic setting parameters of frequency Freq. and inspiration time T . The Mandatory Synchronized Spontaneous insp BIPAP stroke BIPAP stroke breathing lower pressure level is set with the PEEP parameter, while the upper level is set with P insp When switching over from IPPV to BIPAP mode, note that...
- Page 101 S9 S7 Oxylog 3000 target values are reached. Breathing valve V10 on the patient The variable pneumatic actuators in the Oxylog 3000 are side, which is indirectly controlled by V6, seals off against controlled by the microprocessor system via digitized electrical test signals.
-
Page 102: Order List
Lithium ion battery 2M 86 733 Connector for O inhalation M 20 101 Oxylog 3000 battery charging station 2M 86 729 Reusable ventilation hose set, comprising: Ventilation hose with measuring leads, 1.5 m 84 12 068 Ventilation hose with measuring leads, 3 m... - Page 103 Part name Part No. Oxylog 3000 emergency rescue units Portable system, complete 2M 86 970 For supplying the Oxylog 3000 from a piped medical gas supply or cylinder via an manifold, comprising: Oxylog 3000 Ventilation hose with measuring leads Breathing valve...
-
Page 104: Index
Index Index 100 % O ......... 48 Flow curves main page . - Page 105 Index Primary care ........10 PS .
- Page 106 This "Instructions for Use" manual is published for public use and is only meant for your information. We do not guarantee the accuracy of these instructions with respect to your specific device type or status. Only the "Instructions for Use" manual delivered together with a device is officially published for the use of that specific device.
- Page 107 This "Instructions for Use" manual is published for public use and is only meant for your information. We do not guarantee the accuracy of these instructions with respect to your specific device type or status. Only the "Instructions for Use" manual delivered together with a device is officially published for the use of that specific device.
- Page 108 These Instructions for Use apply only to Oxylog 3000 with Serial No.: If no Serial No. has been filled in by Dräger these Instructions for Use are provided for general information only and are not intended for use with any specific machine or device.
Need help?
Do you have a question about the Oxylog 3000 and is the answer not in the manual?
Questions and answers