
Subscribe to Our Youtube Channel
Related Manuals for Electrothermal IA 9000 Series


Summary of Contents for Electrothermal IA 9000 Series
- Page 1 IA 9000 SERIES. Digital Melting Point INSTRUCTION BOOK. Page 1 of 40 M8144 Issue 2.0...
-
Page 2: Table Of Contents
© The copyright of this Instruction book is the property of Electrothermal. This instruction book is supplied by Electrothermal on the express understanding that it is to be used solely for the purpose for which it is supplied. It may not be copied, used or disclosed to others in whole or part for any purpose except as authorized in writing by Electrothermal. -
Page 3: Introduction
Daylight balanced LED oven illumination assists in the clear viewing of melt points. All IA 9000 series Digital Melting Point Apparatus from Firmware version V0.30 will support Electrothermal’s ECO mode power saving facility which gives the user the option of setting time out for the oven on/off facility together with the display back light and oven illumination LED’s. -
Page 4: Symbols And Using This Instruction Book
2. SYMBOLS AND USING THIS INSTRUCTION BOOK 2.1. Throughout this Instruction book the following symbols are shown to identify conditions which pose a hazard to the user, or to identify actions that should be observed. These symbols are also shown on the product, or its packaging. When a symbol is shown next to a paragraph or statement it is recommended the user takes particular note of that instruction in order to prevent damage to the equipment or to prevent injury to one’s self or other people. -
Page 5: Safety Information
3. SAFETY INFORMATION. This product has been designed for safe operation when used as detailed in accordance with the Manufacturer’s instructions. NOTE: Failure to use this equipment in accordance with the manufactures operating instructions may compromise your basic safety protection afforded by the equipment and may invalidate the warranty / guarantee. - Page 6 The equipment is not spark, flame or explosion proof and has not been designed for use in hazardous areas in terms of BSEN 60079- 14:1997. Keep flammable, low flash point substances away from the apparatus. Do not operate or handle any part of this product with wet hands. Do not lean or stretch over the unit when in operation.
-
Page 7: Unpacking And Contents
4. UNPACK AND CONTENTS. 4.1. Please check the contents of your carton against the diagram. Item Description Power supply Power Supply mains lead (illustration only) Guarantee card Operating and safety Instructions book Capillary tubes IA Melting point product Lens Hood Note: Additional Packing material may be present. -
Page 8: Installation
5. INSTALLATION. 5.1. Electrical Safety and Installation. 5.1.1. This equipment is designed to safe under the following conditions:- Indoor use. Altitude up to 2000 meters. Temperatures between 5C and 40C. Maximum relative humidity 80% for temperatures up to 31C decreasing linearly to 50% relative humidity at 40C. -
Page 9: Environmental Protection
Do Not dispose of product in a fire as batteries may explode. Electrothermal is registered as Electrothermal Engineering Limited with the Environment Agency as a producer of WEEE through B2B, an authorized compliance Scheme. Page 9 of 40 M8144 Issue 2.0... -
Page 10: Product Operation
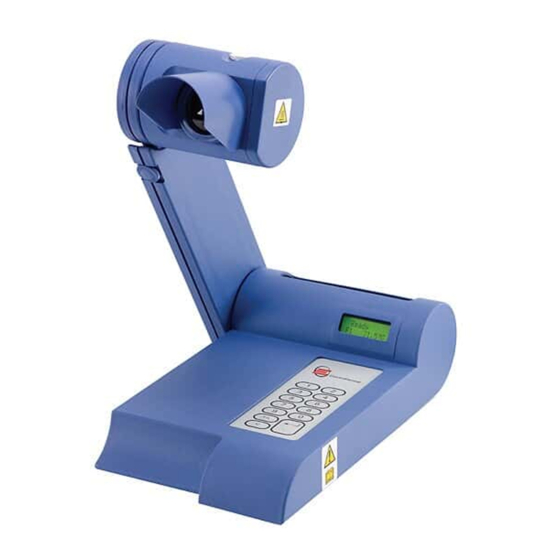
7. PRODUCT OPERATION. 7.1. Overview. Front view Rear view Number Description Lens hood Capillary Guide Lens Capillary tube holder 2 x 12 digit display Keypad Power input RS232 serial printer connection socket USB socket type B (Slave) USB socket type A (Master) Keypad layout Page 10 of 40 M8144... - Page 11 7.1.1. Connect the mains supply lead and power supply to your IA as illustrated. 7.1.2. The lense hood attachment is optional It’s purpose is to assis in viewing the sample when using the IA in direct light. Slide the lense hood over the threaded back section of the lense as illustrated.
- Page 12 7.2. Principals of Operation. 7.2.1. During operation the various parameters of the sample analysis are shown on the liquid crystal display, and all the stages of the process are indicated by the L.E.D. illumination or audible warning. The principles of the operation are as follows:- ...
- Page 13 7.2.2. Preparation of Samples. To obtain the best results the samples under melt should be perfectly dry. Drying is best accomplished by storing the samples in vacuum desiccators over a suitable drying agent such as phosphorus pent oxide. Always dry hygroscopic samples. Provided the sample is dry there is usually little difficulty in introducing a small amount of sample into the capillary tube.
- Page 14 7.3. Setting the Time and Date (9200 & 9300 models only). Date and time settings may also be accessed via the (F3) function facility. Note: The time clock has no daylight saving facility. You may wish to re-set the time when daylight saving takes place.
- Page 15 Press the return key. 7.4.4. You are now asked to ‘Set the Temperature’. Use the key pad to enter the required set point temperature. Refer to paragraph 7.2.1 Principals of Operation. Once the desired set point temperature has been entered press the return key. 7.4.5.
- Page 16 7.4.12. ECO Mode settings. IA9100. Eco Mode is provided to save on power when the IA keypad remains untouched for a pre specified length of time. The default setting is one hour unless adjustments are made. Upon subsequent use the settings will be remembered until the IA is turned off at the mains electrical supply.
- Page 17 7.5.2. Function key operation. (Fn). The function key is used for scrolling through the sub menus of the 9200 model. Each time the Fn key is pressed the IA will enter the next sequential function screen. The main home screen is F1 from which settings are made and melts are performed.
- Page 18 7.5.10. You are now asked if you wish to store the melt data. Press 1 for yes or 2 for no. If the answer is yes you will be asked to enter a batch number. Select a batch number between 1 and 2000 and press the return key. After making store data decision you are taken to the recorded data option screen.
- Page 19 7.5.18. The IA now says Display. This alows both settings and melt data to be viewed on the display. Press 1 for yes or 2 for no. If 1 = yes is selected you will see the following information. Press the return key to view the next field. ...
- Page 20 Eco Mode is provided to save on power when the IA keypad remains untouched for a pre specified length of time. The default setting is one hour unless adjustments are made. Upon subsequent use the settings will be remembered until the IA is turned off at the mains electrical supply.
- Page 21 F1 Operational mode. 7.6.3. Setting the IA9300 to perform a melt. You are now asked to ‘Set the Temperature’. Use the key pad to set the plateau temperature. Refer to paragraph 7.2.1 Principals of Operation. Once the desired set temperature has been entered press the return key. 7.6.4.
- Page 22 7.6.11. You are now asked if you wish to view the recorded melt data. Press 1 for yes or 2 for no. If you have selected yes, press the return key to scroll through the data settings and recorded melt data. If you pressed ‘no’ you are taken straight to the printing option screen.
- Page 23 To exit viewing melt data without viewing all the stored data press the ‘Fn’ to sequence into the printing option. To exit viewing the melt data and return to F2 screen inorder to view another stored batch press the ‘C’ key. 7.6.19.
- Page 24 7.6.27. Use the key pad to set the hours and minutes the required before the ECO mode power saving cuts in. (To enter 1 hour 30 minutes press 0130). By entering H00 M00, ECO mode will never be activated. Press ‘Enter’ to accept the time setting.
- Page 25 7.7.6. Insert calibration key into the RS232 socket located on the rear of the IA. 7.7.7. Observe the display screen says .Press the return key to accept entry into the calibration mode. 7.7.8. The display screen will now say . If you are using P-nitro toluene (AZ9218), use the keypad to enter a value of 48°C.
- Page 26 7.7.15. The display will now ask for the certified chemical melt value to be entered. . Enter the chemical reference value using the numeric keypad. Press the return key to accept the entered value. 7.7.16. A preprogrammed algorithem will now calculate the PID curve for all melt values. When that has been done the display will say 7.7.17.
- Page 27 7.8. Printer setu-up. PR2000S. Model printer is set as follows:. The PR2000S serial printer is set up for compatibility with the IA. The Baud rate on the PR2000S printer is factory set at 9600. If using a printer that has been used from a previous model of IA the baud rate must be changed to 9600.
- Page 28 7.9. PC connection and Hyperterminal use. From the Window’s ‘Start’ button, select Programs/Accessories/communications/hyperterminal. Enter name for connection (example IA9x00). Select the phone icon and click OK Page 28 of 40 M8144 Issue 2.0...
- Page 29 From the pull down menu select the port number applicable to your PC for the USB terminal in use. Make sure the port settings are as detailed below. Baud rate = 9600 Data bits = 8 Parity = None Stop bits = 1 Flow control = None Page 29 of 40 M8144...
- Page 30 Your print data will be shown in window. Any serial terminal emulator with USB support can be used. An example of which is given below. If your PC doesn’t have hyperterminal per installed a copy may be obtained from http://www.hilgraeve.com/hyperterminal/ Page 30 of 40 M8144 Issue 2.0...
-
Page 31: Technical Specification
TECHNICAL SPECIFICATION. 8.1. The specified data for each instrument is shown in the table below. IA9100 IA9200 IA9300 32- bit processor. 3 capillary Tubes up 2mm OD (storage for pack). Tube guide removal for cleaning and use of cold finger ... - Page 32 8.3. Weights and Dimensions. Page 32 of 40 M8144 Issue 2.0...
-
Page 33: Maintenance
9. Maintanance. 9.1. General Information. Unplug the unit from the Power supply and allow it to cool before undertaking any maintenance tasks. Maintenance should only be carried out under the direction of the Responsible Body, by a competent electrician. Failure to do so may result in damage to the product and in extreme cases be a danger to the end user. -
Page 34: Section 10 Customer Support
For further information contact Electrothermal, (See Customer support) or your distributor. Page 34 of 40 M8144... -
Page 35: Customer Support
CUSTOMER SUPPORT. For help and support in using this product, please contact Electrothermal at the following address. For the America’s and Canada, contact: Electrothermal. Electrothermal House. Techne Incorporated, 3 Terri Lane, Unit12A, Purdeys Way. Suite 10 Burlington, NJ 08016 USA. -
Page 36: Spares And Accessories
11. SPARES AND ACCESSORIES. Table 3. Accessories AZ9001 Cold Finger AZ9002 Dust Cover AZ9218 P-nitro toluene AZ9118 Carbazole AZ9253 Calibration key AZ6731 Interface cable for alternative Serial Drive Printer. AZ6733 Interface cable for Printer (PR2000) AT4042 Capillary Tubes 1.5mm (10x100 packs). AT4043 Capillary Tubes 2.0mm (10x100 packs). - Page 37 APPENDIX ‘A’. DECONTAMINATION CERTIFICATE. Electrothermal. Electrothermal House. Unit12A, Purdeys Way. Purdeys Industrial Estate. Rochford. Essex. SS4 1ND. Great Britain Phone:+44(0)1702 303350 Fax:+44(0)1702 468731. E-mail: help@electrothermal.com DECONTAMINATION CLEARANCE CERTIFICATE For the Inspection, Repair or Return of Medical, Laboratory or Industrial Equipment.
-
Page 38: Notes
NOTES Page 38 of 40 M8144 Issue 2.0... - Page 39 Page 39 of 40 M8144 Issue 2.0...
-
Page 40: Ec Declaration Of Conformity Notes
Email: General enquiries: info@electrothermal.com Orders: orders@electrothermal.com Help with existing products: help@electrothermal.com and electrothermalhelp@bibby-scientific.com www.electrothermal.com Electrothermal is part of the Bibby Scientific group of companies. 2013 Electrothermal. All rights reserved. Printed in Great Britain. Page 40 of 40 M8144 Issue 2.0...
Need help?
Do you have a question about the IA 9000 Series and is the answer not in the manual?
Questions and answers