
Subscribe to Our Youtube Channel
Related Manuals for FujiFilm instax mini TSUMTSUM


Summary of Contents for FujiFilm instax mini TSUMTSUM
- Page 1 使用説明書/困ったときには/安全にご使用いただくために User’s Guide/Trouble shooting/Safety precautions CPL9B103-200...
- Page 2 日本語: 3ページから22ページをご覧ください。 ENGLISH: See pages 23 to 43. © 2017 FUJIFILM Corporation. All rights reserved.
-
Page 3: Table Of Contents
日本語 目次 各部の名称.......................... 4 ス トラップを取り付ける....................... 5 電池を入れる........................6 フィルムパックを入れる...................... 7 撮影する..........................9 フィルムパックを取り出す......................11 明るい仕上がり (ハイキー) の写真を撮影する................11 接写レンズを使用する..................... 12 自分自身を撮影する........................13 仕様........................... 13 このようなときは......................14 安全にご使用いただくために................... 19... -
Page 4: 各部の名称
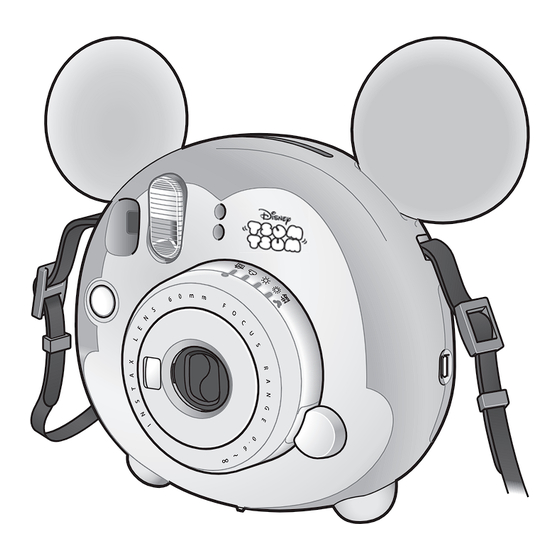
各部の名称 前面 背面 接写レンズ 受光部 明るさ調整ダイヤル 電池ぶた フラッシュ発光部 電池ぶたロック 裏ぶた ファインダー 電源ボタン フラッシュ充電ランプ シャ ッターボタン レンズ部 ファインダー接眼部 セルフショ ッ トミラー フィルム出口 フィルムパック確認窓 撮影レンズ/レンズカバー 裏ぶたロック フィルムカウンター 明るさモー ド表示部 ス トラップフック ツメ (裏側)... -
Page 5: ス トラップを取り付ける
ス トラップを取り付ける 下図のように、 ス トラップを左右のス トラップフックに取り付けます。 Ÿ 注意 • 安全のためス トラップは肩にかけて使用し、 首にはかけないでください。 • ス トラップがフィルム出口にかぶさらないように注意してください。... -
Page 6: 電池を入れる
電池を入れる Ÿ 注意 • 2本とも新しい同じ銘柄 ・ 種類のアルカリ電池 (単3) を ご使用ください。 • アルカリ電池以外は使用しないでください。 の方向に合わせて • 次のような場合は、 電池を2本とも交換してください。 電池を2本入れます。 - フ ラッシュ充電ランプが点灯したとき - 電 源ボタンを押して電源を入れたときに、 どのランプ も点灯または点滅しないとき • 新しい電池で約100枚 (約10パック) 撮影が可能です。 (当社試験条件) • 寒いときは、 電池の性能が低下します。 電池をポケッ ト の中などで温めてからご使用ください。 電池ぶたをスライ ドさせ • 同梱の電池は動作確認用の試供品です。 ながら閉めます。... -
Page 7: フィルムパックを入れる
フィルムパックを入れる 注意 • 電池が入っていることを確認してからフィルムパックを 入れてください。 • 直射日光があたらない場所でフィルムパックを入れて ください。 裏ぶたロックを押し下げて、 • フジフイルム instax mini以外のフィルムを使用しな 裏ぶたを開けます。 いでください。 • フ ィルムパックを入れるときは、 フィルムパック背面の2 カ所の長方形の穴は絶対に押さないでください。 Ÿ • フ ィルムを使い切るまで、 裏ぶたを開けないでください。 残りのフィルムが感光し、 使用できなくなる恐れがありま す。 • 有効期限を過ぎたフィルムは絶対に使用しないでくださ い (故障の原因となります) 。 • 詳細は、 フジフイルム instax miniの取扱説明を参照し てください。 フィルムパックの左右を持ち、 フィルムパックにある黄色 の線とカメラ内部の黄色のマークを合わせ、 まっすぐ押し 込むようにフィルムパックを入れます。... - Page 8 フィルムパックを入れる (続き) 裏ぶたロックがカチッと止ま るまで押し込んで、 裏ぶた を閉めます。 フィルムパックを入れた後 は、 裏ぶたをすぐに閉めてく ださい。 フィルムが感光し、 使用できなくなる恐れがあ ります。 シャ ッターボタンを押すとフィルムカバー (黒色) が ⁄ 排出され、 カメラ裏面にあるフィルムカウンターが 「S」 から 「10」 に変わります。 ¤ フィルムカバーを排出する音 が止まってから、 フィルムカ 電源ボタンを押して電源を入れます。 バーの先端を持って取り除 ファインダー接眼部左のフラッシュ充電ランプが点滅 きます。 します (フラッシュ充電中を示します) 。 撮影準備が完了します。...
-
Page 9: 撮影する
撮影する 電源ボタンを押して電源を 入れます。 ファインダー接眼部左のフ ラッシュ充電ランプが点滅し ます (フラッシュ充電中を示 します) 。 縦位置撮影 横位置撮影 点滅中は撮影することはで きません。 カメラを構え、 構図を決めて、 シャ ッターボタンを押します。 • 撮影対象から0.6 m以上離れて撮影してください。 ま 本機は適切な明るさを自動 Ÿ た、 フラッシュの光が届く範囲は0.6 m〜2.7 mです。 で感知し、 明るさモー ド表示 • 0.6mより被写体に近づくとピン トが合いません。 接近 部のランプを点灯してお知ら して撮影したい場合には、 接写レンズをご使用くださ せします。 明るさ調整ダイヤ い。 接写レンズを使用すると、 35cm〜50cmまで接近 ルを回して、 ランプが点灯し して撮影することができます。... - Page 10 撮影する (続き) フィルムを排出する音が止まって カメラを構えるときの注意 から、 送り出されたフィルムの先端 • 横位置撮影では、 フラッシュ発光部が上になるように構 を持って取り出します。 えてください。 • フィルムの取り出しについては、 • フラッシュ撮影が禁止されている場所では使用しないで フジフイルム instax miniの取 ください。 扱説明を参照してください。 • 指やス トラップが受光部、 フラッシュ発光部、 撮影レンズ、 • フィルムの現像時間は約90秒 フィルム出口に掛からないように注意してください。 です (気温によって時間は変動 • 構えるときはレンズ部を持たないでください。 します) 。 • ファインダーをのぞく時は、 ファインダー内の○が中央 に見えるように、 正面からのぞいてください • シャ ッターボタンを押すときは、 撮影レンズに触れないよ ¤...
-
Page 11: フィルムパックを取り出す
撮影する (続き) フィルムパックを取り出す 明るい仕上がり (ハイキー) の写真を撮影する 本機は適切な明るさの設定を自動で感知し、 明るさモー ド表示 フィルムカウンターに 「0」 が表示されたら、 以下の手順でフ 部のランプを点灯させてお知らせします。 ィルムパックを取り出します。 明るい仕上がり (ハイキー) の写真を撮影したいときは、 明るさ モー ド表示部のランプが点灯している位置を確認し、 下記のよ うにランプが点灯している位置から、 明るさ調整ダイヤルをず らして設定してください。 裏ぶたロックを押し下げて、 注意 裏ぶたを開けます。 屋外では (ハイキーモー ド) に 設定しないでください。 意図した以 Ÿ 上に写真が明るく (白く) なる場合 があります。 明るさモー ド表示部の ランプの点灯位置... -
Page 12: 接写レンズを使用する
接写レンズを使用する 被写体に近づいて大きく撮影したり、 セルフショ ッ トミラーを Ÿ 使用して、 自分自身を撮影したりすることができます。 注意 • 接 写レンズの取り付け/取り外しは、 必ず電源をオフにし てから行ってください。 • 接写レンズを取り付ける、 または取り外すときに、 接写 レンズを絶対に回転させないでください。 接写レンズ裏 側のツメが壊れる恐れがあります。 ファインダー内の○が、 被写体の中心のやや右上になる ようにカメラを構え、 撮影します。 接写レンズ裏側のツメをレンズの左側にはめてから (1) 、 右側のツメがカチッとはまるように、 撮影レン 接写レンズの左側を押さえながら右側を持ち上げるよ ズにはめ込みます (2) 。 うにして (1) 、 接写レンズを取り外します (2) 。... -
Page 13: 自分自身を撮影する
接写レンズを使用する (続き) 自分自身を撮影する Ÿ 両手でしっかりとカメラを持って、 セルフショ ッ トミラーで構図 レンズの先から35cm〜50cm を確認し、 撮影します。 になるように構えます。 仕様 使用フィルム フジフイルム instax mini 画面サイズ 62mm × 46mm レンズ 2群2枚構成 f=60mm 1:12.7 ファインダー 実像式ファインダー 0.37倍、 ターゲッ トマーク付き 撮影範囲 0.6m〜∞ シャ ッター 1/60秒 露光調節 手動切り替え方式 (簡易露出計のLED表示による) フィルム送り出し 電動式 フィルム現像時間 約90秒 (時間は気温によって変動します) フラッシュ... -
Page 14: このようなときは
このようなときは 撮影中 このようなときは 考えられる原因 こうしてください シャ ッターが切れな ① 電池が消耗している。 ① 電池を交換します。 い。 ② 電池の入れ方が間違っている。 ② 電池を正しく入れてください。 ③ 電源が入っていない。 ③ 電源ボタンを押して、電源を入れます。 ④ 電源が「入」のまま何も操作をし ④ レンズ部を一度押し戻し電源ボタンを押す ないで 5 分以上放置していた。 か、シャ ッターボタンを押すと、電源が「入」 の状態に復帰します。 ファインダー横のラン ● フラッシュ充電中。 ● 明るさ調整ダイヤルのランプが点灯するまで プが点滅し、 シャ ッタ お待ちください。 ーが切れない。 フィルムが入らない、 ① 撮影しようとしているフィルムパック ① フジフイルム instax mini を使用します(他 またはスムーズに入 がこのカメラに適合しない。 のフィルムは使用できません) 。 らない。 ② 入れ方が正しくない。 ② フィルムパックの黄色の線とカメラの位置合... - Page 15 このようなときは 考えられる原因 こうしてください 明るさ調整ダイヤル ① 電池が消耗し、フラッシュ充電時間 ●.電源が入った状態(レンズが飛び出している のランプが同時に点 がかかりすぎる。 状態)で電池を交換します。 滅している。 ② カメラ本体が故障している。 重要: 「電源が入った状態」で電池交換してくだ さい。 「電源が切れた状態(レンズが押し 戻された状態) 」で電池交換すると、電源 を入れたときに、再び明るさ調整ダイヤル のランプが点滅してしまいます。 ※ 原因が①の場合は、電池交換後に明るさ調 整ダイヤルのランプは点滅しなくなります。 原因が②の場合は、電池交換後も明るさ調 整ダイヤルのランプが点滅します。すぐに電 源を切って電池を抜き、ご購入店または富士 フイルム フィルムカメラ修理相談窓口へお 問い合わせください。 ファインダー横のラン ● 電池が消耗している。 ●電池を交換します。 プが点灯している。...
- Page 16 出来上がった写真 このようなときは 考えられる原因 こうしてください 出来上がった写真が ① 被写体の明るさの測り方が適切で ① レンズを被写体の中心に向けて、被写体の 白っぽい。 はない。 明るさを測ります。 ② 明るさ調節ダイヤルの設定が正しく ② レンズを被写体に向けたまま、明るさ調節ダ ない。 イヤルのマークを点灯しているランプに合わ せます。 ③ 撮影時の温度が低い (+ 5℃以下) 。 ③ 撮影前のカメラを暖かい場所に置いてから撮 影します。また、送り出された写真をポケッ トの中などで温めます。 ④ 黒っぽい背景の前で撮影した。 ④ 明るさ調節ダイヤルを 方向に一段階回して 試してください。 ⑤ 測光窓、またはフラッシュ受光窓を ⑤ 撮影するときは、フラッシュの横にある 2 つ ふさいでいた。 の窓をふさがないように、カメラの構え方に 注意してください。...
- Page 17 このようなときは 考えられる原因 こうしてください 出来上がった写真が ① 被写体の明るさの測り方が適切で ① レンズを被写体の中心に向けて、被写体の 暗い。 はない。 明るさを測ります。 ② 明るさ調節ダイヤルの設定が正しく ② レンズを被写体に向けたまま、明るさ調節ダ ない。 イヤルのマークを点灯しているランプに合わ せます。 ③ 撮影時の温度が高い(+ 40℃以 ③ カメラを涼しい場所に置いてから撮影しま 上) 。 す。また、送り出された写真を熱いものの 上や近くに置かないでください。 ④ 逆光で撮影した。 ④ 順光撮影を行うか、明るさ調節ダイヤルを 方向に一段階回します。 ⑤ フラッシュ発光部がふさがれている。 ⑤ カメラの構え方に注意してください。 ⑥ 白っぽい背景の前で撮影した。 ⑥ 明るさ調節ダイヤルを 方向に一段階回して 試してください。 ⑦ フラッシュの光が届かない。 ⑦ 被写体から 0.6m 〜 2.7m の範囲で撮影し ます。 ⑧ 鏡やガラスなどによるフラッシュ反 ⑧ 鏡やガラスに対して斜め方向から撮影しま 射光の影響を受けている。 す。...
- Page 18 このようなときは 考えられる原因 こうしてください 画面がぼんやり して ① 撮影距離が近すぎる。 ① 0.6m 以上離れて撮影します。 いる。 ② 撮影レンズが汚れている。 ② レンズを清掃します。 ③ 手ブレのため。 ③ カメラをしっかり構えて、ゆっくりシャ ッター ボタンを押します。 画面にむらがある。 ① 取り出してすぐ写真に圧力が掛かった。 ① 画面内を押さえたり、曲げたり しないでくだ さい。 ② 写真がスムーズに送り出されない。 ② フィルム出口を指などでふさがないでください。 ファインダーでねら ● 撮影距離が近すぎる。 ● 0.6m 以上離れて撮影します。 ったものとズレて写 った。...
-
Page 19: 安全にご使用いただくために
安全にご使用いただくために ● この製品および付属品は、 写真撮影以外の目的に使用しないでください。 ● 製品の安全性には十分配慮しておりますが、 下記の内容をよくお読みの上、 正しくご使用ください。 ● この説明書はお読みになった後で、 いつでも見られるところに必ず保管してください。 警 告 注 意 この表示を無視して誤った取り扱いをすると、 人が死亡また この表示を無視して誤った取り扱いをすると、 人が傷害を負 は重傷を負う可能性が想定される内容を示しています。 . う可能性が想定される内容または、 .物的損害の発生が想定 される内容を示しています。 警 告 絶対に分解しないでください。感電の原因になります。 落下などにより内部が露出したときは、 絶対に触れないでください。高圧回路があり感電する原因になります。 カメラ (電池) が熱くなる、 煙が出る、 焦げ臭いなどの異常を感じたときは、 ただちに電池を取り出してください。 発火ややけどの原因になります(電池を取り出す際、やけどには十分ご注意ください) 。 フラッシュを人の目に近づけて発光しないでください。一時的に視力に影響することがあります。特に乳幼児 を撮影するときは気をつけてください。 カメラを水中に落としたり、内部に水または金属や異物などが入ったときは、ただちに電池を取り出してくだ さい。発熱・発火の原因になります。 引火性の高いガスが充満している場所や、ガソリン、ベンジン、シンナーなどの近くでカメラを使用しないで ください。爆発や発火・やけどの原因になります。... - Page 20 警 告 カメラは乳幼児の手の届かないところに置いてください。乳幼児が誤ってス トラップを首に巻き付けると、窒 息する原因になります。 電池の分解、加熱、火中への投入、ショー トは絶対にしないでください。破裂の原因になります。 指定以外の電池を使わないでください。発熱・発火の原因になります。 電池は乳幼児の手の届かないところに置いてください。乳幼児が誤って飲み込む原因になります。万一飲み 込んだ場合には、ただちに医師の診察を受けてください。 付属の接写レンズを通して太陽を見ないでください。失明の原因になります。 注 意 カメラをぬらしたり、ぬれた手で触ったり しないでください。感電の原因となることがあります。 自転車や自動車・列車などを運転している人に向けて、フラッシュ発光撮影をしないでください。交通事故な どの原因となることがあります。 電池の を誤って装てんしないようにご注意ください。電池の破裂、液もれにより、発火、けがや周囲を 汚損する原因となることがあります。 カメラの内側の可動部に触れないでください。けがの原因となることがあります。 カメラを使用するときは、必ず電池ぶたを取り付けてください。電池ぶたが外れていると、けがの原因となる ことがあります。 付属の接写レンズを太陽光の当たる場所に放置しないでください。太陽光が集光した場合には高温になり、 発火ややけどの原因になる恐れがあります。 カメラを持って振り回さないでください。けがの原因となることがあります。...
- Page 21 このマークは、 安全性、 衛生、 環境及び消費者保護に関するEU (欧州連合) の要求事項を、 製品が満足 していることを証明するものです。 ( CEとはヨーロッパ認定 (Conformité Européenne) の略) 取扱上のお願い カメラの取り扱い 1 カメラは精密機械ですから、 水にぬらしたり、 落としたり してショ ックを与えないでください。 また、 砂の掛かりやす いところには置かないでください。 2 市販のス トラップをご使用になる場合は、 ス トラップの強度をご確認の上、 ご使用ください。 携帯電話、 PHS用ス ト ラップは軽量機器用ですので、 ご使用の際は特にご注意ください。 3 長期間お使いにならないときは、 電池を取り出して、 湿気、 熱、 ほこりの影響の少ないところに保管してください。 4 ファインダーなどが汚れたら、 ブロアーブラシでほこりを払い、 柔らかい布で軽くふきとってください。 5 汚れをふきとるのにシンナー、...
- Page 22 フィルム、 写真の取り扱い 1 フィルムは、 涼しい乾燥した場所に保管してください。 特に閉め切った自動車の中などの極端に高温の場所に長 時間放置しないでください。 2 カメラに入れたフィルムは、 できるだけ早く撮影してください。 3 フィルムを極端に温度の低い場所や高い場所に置いてしまった場合は、 通常の温度になじんでから撮影してくだ さい。 4 フィルムは有効期限内にお使いください。 5 空港の預け入れ荷物検査などでの強いX線照射を避けてください。 未使用のフィルムにカブリなどの影響が出 る場合があります。 手荷物としての機内持ち込みをおすすめします (詳しくは各空港でご確認ください) 。 6 写真は強い光を避け、 涼しく乾燥した場所に保存してください。 7 フィルムに穴をあけたり、 破いたり、 切ったり しないでください。 フィルムが損傷した場合は、 使用しないでください。 フィルムや出来上がった写真を取り扱うときの注意 詳細は、 フジフイルム instax miniの取扱説明を参照してください。...
- Page 23 ENGLISH Contents Parts Name ............................24 Attaching the Strap .........................25 Inserting Batteries ..........................26 Loading the INSTAX mini Film Pack ...................27 Taking Pictures ..........................29 Unloading the INSTAX mini film pack ........................31 Taking a lighter (Hi-Key) picture ..........................31 Using the Close-Up Lens .......................32 Taking self-portraits ..............................33 SPECIFICATIONS ..........................33 TROUBLE SHOOTING ........................34...
-
Page 24: Parts Name
Parts Name Front Rear Close-up lens Light sensor Brightness adjustment dial Battery lid Flash lampface Battery lid lock Back cover Viewfinder Power button Flash charging lamp Shutter button Lens barrel Eyepiece Self-portrait mirror Film ejection slot Film pack confirmation window Lens/Lens cover Back cover lock Film counter... -
Page 25: Attaching The Strap
Attaching the Strap Attach the provided camera strap to the strap hook on each side as in the illustrations below. Ÿ Caution • For safety, use the strap only as a shoulder strap. Do not put the strap around your neck. • Be careful so that the strap does not obstruct the film ejection slot. -
Page 26: Inserting Batteries
Inserting Batteries Ÿ Caution • Use new alkaline batteries of the same brand/type only (AA only). Insert two AA batteries • Do not use any batteries other than alkaline batteries. matching the • Replace both batteries in the following cases: polarities. -
Page 27: Loading The Instax Mini Film Pack
• Avoid direct sunlight when loading the film pack. • Do not use any film other than FUJIFILM INSTAX mini film. Press down the back cover • When you load the film pack, never press the two lock to open the back cover. - Page 28 Loading the INSTAX mini Film Pack (Continued) Close the back cover until the back cover lock clicks into place. After you have loaded the fi lm pack, close the back cover immediately; otherwise, the fi lm may be exposed and ruined for use. ⁄...
-
Page 29: Taking Pictures
Taking Pictures Press the power button to turn the camera on. The flash charging lamp on the left of the eyepiece starts blinking. (Indicates the flash is charging.) Vertical image Horizontal image You cannot take a photo Hold the camera, confirm the desired composition of the while the lamp is blinking. - Page 30 • For details on taking out the forbidden. film, refer to the instructions • Be careful so that your fingers or the strap do not cover and warnings on the FUJIFILM the light sensor, flash lampface, flash, lens, or film ejection INSTAX mini film pack. slot.
-
Page 31: Unloading The Instax Mini Film Pack
Taking Pictures (Continued) Unloading the INSTAX mini film pack Taking a lighter (Hi-Key) picture This camera automatically determines an appropriate When “0” is displayed on the film counter, unload the film brightness for taking any given picture, and informs you by pack following the procedure below and as indicated on the lighting the corresponding lamp. -
Page 32: Using The Close-Up Lens
Using the Close-Up Lens You can photograph objects close-up, and can photograph Ÿ yourself using the self-portrait mirror. Caution • Switch off the camera before you attach/detach the close- up lens. • Never turn the close-up lens when you attach/detach it;... -
Page 33: Taking Self-Portraits
35 cm to 50 cm between you and using the self-portrait mirror, the edge of the lens. then take a photo. SPECIFICATIONS Film FUJIFILM INSTAX mini film Picture Size 62 mm × 46 mm Lens 2 components, 2 elements, f=60mm, 1:12.7 Viewfinder Real image finder 0.37×... -
Page 34: Trouble Shooting
The film pack won’t 1 The film pack is not for your 1 Use FUJIFILM INSTAX mini film only. (No other load into your camera, camera. films can be used.) or won’t load into your... - Page 35 In this case, turn off the power and remove the batteries immediately, then contact an authorized FUJIFILM repair center. ● The battery power is low. ● Replace the batteries with new ones.
- Page 36 Printed pictures Problems Possible Causes Solutions The finished print 1 The method of measuring the subject 1 Point the lens toward the center of looks over exposed. brightness is unsuitable. the subject and measure the subject (White in color) 2 Brightness adjustment dial setting is brightness.
- Page 37 Problems Possible Causes Solutions The finished print 1 The method of measuring the subject 1 Point the lens toward the center of brightness is unsuitable. the subject and measure the subject looks under exposed. brightness. (Dark) 2 Brightness adjustment dial setting is 2 While pointing the lens toward the subject, incorrect.
- Page 38 Address, City: 7-3, Akasaka 9-Chome, Minato-ku, Tokyo FUJIFILM North America Corp. Country: JAPAN 200 Summit Lake Drive Valhalla, New York 10595, USA Authorized representative in Europe: FUJIFILM EUROPE GMBH Address, City: Dusseldorf Heesenstrasse Information for FUJIFILM in Canada 31, 40549 FUJIFILM Canada Inc.
-
Page 39: Important Safety Notice
IMPORTANT SAFETY NOTICE This product has been designed with safety in mind, and to provide safe service when handled correctly and in accor- dance with the User’s Guide and instructions. It is important that both the product and the INSTAX film are handled properly and used only to take pictures as instructed in this User’s Guide and in the INSTAX mini film instructions. - Page 40 WARNING Make sure batteries are stored in a safe, secure place and well out of the reach of any infants, young children or pets. Improper storage could result in a child swallowing a battery. (If a child swallows a battery, call a doctor or a hospital right away.) Do not look through the close-up lens at the sun or other strong light.
- Page 41 • Reorient or relocate the receiving antenna • Increase the separation between the equipment and receiver • Connect the equipment into an outlet on a circuit different from that to which the receiver id connected • Consult the dealer or an experienced radio/TV technician for help Changes or modifications not expressly approved by FUJIFILM responsible for compliance could void the user’s authority to operate the equipment. For customers in Canada: CAUTION: This Class B digital apparatus complies with Canadian ICES-003. Disposal of Electric and Electronic Equipment in Private Households Disposal of used Electrical &...
- Page 42 INSTAX mini FILM AND PRINT CARE See FUJIFILM INSTAX mini film for film use instructions. Follow all instructions for safe and proper use. 1 Keep the film in a cool and dry place. Do not leave the film in a place where the temperature is extremely high (e.g., in a closed car).
- Page 43 Cautions on handling the fi lm and prints For details, refer to the instructions and warnings on FUJIFILM INSTAX mini fi lm.
- Page 44 この製品に関するお問い合わせは、 同封の保証書 If you have any inquiries about this product, please に記載の窓口にご連絡いただくか、 下記のウェブサイ トに contact a FUJIFILM authorized distributor, or access the アクセスしてください。 website below. 富士フイルムホームページ : http://fujifilm.jp/ Printed in China FFBX-719209...
Need help?
Do you have a question about the instax mini TSUMTSUM and is the answer not in the manual?
Questions and answers