Table of Contents
Advertisement
Quick Links
Advertisement
Table of Contents

Subscribe to Our Youtube Channel
Related Manuals for Riken Keiki RM-6000 Series


Summary of Contents for Riken Keiki RM-6000 Series
- Page 1 PT1E-1099 Indicator/Alarm Unit RM-6000 Series Operating Manual...
-
Page 2: Table Of Contents
<Contents> 1. Outline of the Product ......................2 1-1. Preface ........................... 2 1-2. Purpose of use ....................... 2 1-3. Definition of DANGER, WARNING, CAUTION, and NOTE ..........3 1-4. Method of confirmation for CE marking type ..............3 2. Important Notices on Safety ....................4 2-1. -
Page 3: Outline Of The Product
Outline of the Product 1-1. Preface Thank you for choosing our indicator/alarm unit RM-6000 series for use with the gas detection and alarm system. Please check that the model number of the product you purchased is included in the specifications on this manual. -
Page 4: Definition Of Danger, Warning, Caution, And Note
1 Outline of the Product 1-3. Definition of DANGER, WARNING, CAUTION, and NOTE The gas detection and alarm system is a safety unit, not an analyzer or densitometer which performs quantitative/qualitative analysis/measurement for gases. You must understand the features of the indicator/alarm unit before using it, so that you can use it properly. -
Page 5: Important Notices On Safety
2 Important Notices on Safety 2-1. Danger cases Important Notices on Safety 2-1. Danger cases DANGER This is not an explosion-proof unit. RM-6000 - 4 -... -
Page 6: Warning Cases
2 Important Notices on Safety 2-2. Warning cases 2-2. Warning cases WARNING Specified devices Connect the indicator/alarm unit only to the specified devices. If it is connected to any unspecified device, the indicator/alarm unit or the connected device may be damaged. Power supply Before turning on the indicator/alarm unit, always check that the voltage is properly applied. -
Page 7: Precautions
2 Important Notices on Safety 2-3. Precautions 2-3. Precautions CAUTION Do not use a transceiver near the indicator/alarm unit. Radio wave from a transceiver, etc. near the indicator/alarm unit or its cables may disturb indication reading. If a transceiver or other radio wave transmitting device is used, it must be used in a place where it disturbs nothing. -
Page 8: Product Components
3 Product Components 3-1. Main unit and accessories Product Components 3-1. Main unit and accessories <Main Unit (RM-6000 Series)> <Standard Accessories> Operating manual One copy per system regardless of the number of units to be delivered RM-6000 - 7 -... -
Page 9: Outline Drawing
3 Product Components 3-2. Outline drawing 3-2. Outline drawing 3-2-1. Self-latching/auto-reset operation specifications <Wall mounting type> <Rack mounting type> Rack mounting bracket Panel Panel Cover Cover Cable inlet Cable inlet 3 - Φ23 3 - Φ23 3-2-2. Lock-in operation specifications <Wall mounting type>... -
Page 10: Names And Functions For Each Part
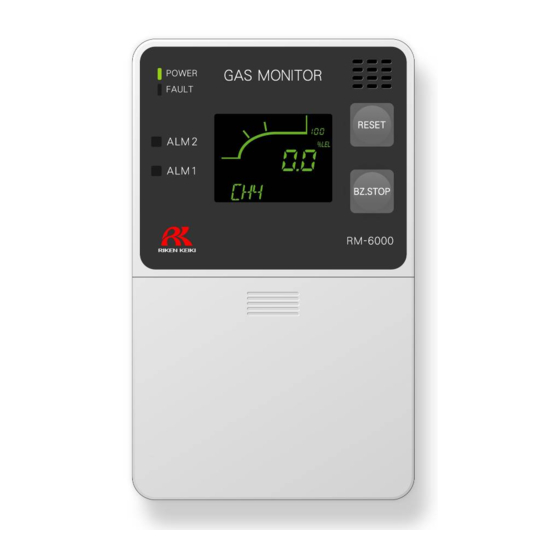
3 Product Components 3-3. Names and functions for each part 3-3. Names and functions for each part <Front Panel and Character LCD> (25) Alarm setpoint display (17) Gas concentration bar meter display (22) Inhibit display (21) Maintenance display (19) Full scale value display (20) Gas concentration unit display... - Page 11 3 Product Components 3-3. Names and functions for each part Number in Item Function the figure Power switch (POWER) Power switch. Terminal plate for external Used to connect power cables. connection (for power supply) Terminal plate for external Used to connect signal cables. connection (for signals) Mode key (MODE)
- Page 12 3 Product Components 3-3. Names and functions for each part <List of Display Symbols> Gas concentration digital display (seven-segment) Numbers Alphabet (upper-case) Alphabet (lower-case) Symbols Gas name and message display (14-segment) Numbers Alphabet (upper-case) Symbols RM-6000 - 11 -...
-
Page 13: Block Diagram
3 Product Components 3-4. Block diagram 3-4. Block diagram Detector head (option) Amplifier (*1) Controller (CPU) Power supply part POWER INPUT: AC specification 100 - 240 VAC DC specification 24 VDC LCD display Bar meter, gas name display, concentration display, unit display, etc. Alarm contact controller Lamp (POWER) (ALM1) (ALM2) (FAULT) -
Page 14: How To Use
4 How to Use 4-1. Before using the indicator/alarm unit How to Use 4-1. Before using the indicator/alarm unit Not only the first-time users but also the users who have already used the product must follow the operating precautions. Ignoring the precautions may damage the indicator/alarm unit, resulting in inaccurate gas detection. 4-2. - Page 15 4 How to Use 4-2. Precautions for installation points Do not install the indicator/alarm unit in a place where maintenance of the indicator/alarm unit cannot be performed or where handling the indicator/alarm unit involves dangers. Regular maintenance of the indicator/alarm unit must be performed. Do not install the indicator/alarm unit in a place where the machinery must be stopped when maintenance is performed in its inside, where parts of the machinery must be removed to perform maintenance, or where the indicator/alarm unit cannot be removed because tubes or racks prevent access to it.
-
Page 16: Precautions For System Designing
4 How to Use 4-3. Precautions for system designing 4-3. Precautions for system designing CAUTION An unstable power supply and noise may cause malfunctions or false alarms. The descriptions in this section must be reflected on the designing of a system using the indicator/alarm unit. - Page 17 4 How to Use 4-3. Precautions for system designing Proper use of alarm contact The alarm contact of the indicator/alarm unit is used to transmit signals to activate an external buzzer or alarm lamp. Do not use the indicator/alarm unit for controlling purpose (e.g., controlling the shutdown valve). CAUTION The "b"...
-
Page 18: How To Install
4 How to Use 4-4. How to install 4-4. How to install <Wall mounting type> Case Fixing angle Mounting hole*1 Mounting plate (SPCC) 4φ4.5 *1 Used for attaching to a switch box. Mounting hole Mounting hole*2 *2 For fixing RM-6000 and mounting plate <Installation method>... - Page 19 4 How to Use 4-4. How to install <Rack mounting type> *: n indicates the number of indicator/alarm units <Attaching procedure> After drilling holes in the panel, attach the indicator/alarm unit according to the following procedure. (1) Insert RM-6000 to the panel front side. (2) Set fixing bracket on the upper and lower parts of RM-6000.
-
Page 20: How To Wire
4 How to Use 4-5. How to wire 4-5. How to wire CAUTION Use the specified cables for each of the connections between the indicator/alarm unit and the detector head. When wiring, be careful not to apply stresses on the terminal plate when (overweight) cables are installed. - Page 21 4 How to Use 4-5. How to wire <Figure of Terminal Plate> AC specification Fault alarm First alarm Second alarm Detector Pump power Power input concentration contact contact contact head (same as power input) 100 - 240 VAC output signal 4 - 20 mA output output * Compatible bar terminal: 216 Series (manufactured by WAGO),...
- Page 22 4 How to Use 4-5. How to wire <Specifications of Terminal Plate> Specifications of terminal plate - Rated voltage: 250 VAC - Rated current: 24 A Electrical detection hole Push button Wiring hole Connection conditions - Cable: 0.5 mm - 2.5 mm (stranded wire) or Φ0.8 - 2.0 mm (solid wire) - Bare wire length: 10 - 11 mm - Connecting tools: Dedicated screwdrivers manufactured by WAGO and equivalent (edge width 3.0 - 4.5...
- Page 23 4 How to Use 4-5. How to wire CAUTION The specified bare wire length must be observed when the wire insulation is peeled off. Improper clamping of the wire due to a shorter bare wire length may cause defective electric conduction or heating.
- Page 24 4 How to Use 4-5. How to wire <Grounding> Connect the indicator/alarm unit to your grounding terminal. WARNING Before turning on the indicator/alarm unit, never fail to connect it to a grounding terminal. For stable operation of the indicator/alarm unit and safety, it must be connected to a grounding terminal.
- Page 25 4 How to Use 4-5. How to wire <Connecting to the Gas Detector Head> GP-6001, NC-6001, NC-6001W, SP-6001 Gas detector head Power supply for pump GP-6001 Pump power (same as power input) Detector head OX-6001, OX-6002 Gas detector head OX-6001 Detector head Detector head signal...
- Page 26 4 How to Use 4-5. How to wire GH-6001 Gas detector head Power supply for pump GH-6001 Pump power (same as power input) Detector head EC-6002 Gas detector head Power supply for pump EC-6002 Pump power (same as power input) Detector head NOTE...
- Page 27 4 How to Use 4-5. How to wire RM-6002 Gas detector head that outputs general measurement signals RM-6002 Detector head RM-6003, RM-6003T DC24V Gas detector head RM-6003 Detector head WARNING Be careful of a wrong wiring enough. It becomes fire and cause of equipment failure. RM-6000 - 26 -...
-
Page 28: How To Operate
5 How to Operate 5-1. Preparation for start-up How to Operate 5-1. Preparation for start-up Before connecting a power supply, read and understand the following precautions. Ignoring these precautions may cause an electric shock or damage the indicator/alarm unit. Check that the wiring is connected to external device properly. ... -
Page 29: Basic Operating Procedures
5 How to Operate 5-2. Basic operating procedures 5-2. Basic operating procedures Normally, the detection mode is used for normal operations. (The detection mode is activated after the power is turned on.) The following is display example of GP-6001. The detector is <<Detection Mode>>... -
Page 30: How To Start The Indicator/Alarm Unit
5 How to Operate 5-3. How to start the indicator/alarm unit 5-3. How to start the indicator/alarm unit Before turning on the power switch, check whether the indicator/alarm unit is installed properly. Open the lower front cover of the indicator/alarm unit to find the power switch. ... -
Page 31: Modes
5 How to Operate 5-4. Modes 5-4. Modes Details on each mode are provided as follows. (* Operations are slightly different depending on the model.) Mode Item LCD display Details Detection ― Normal state Mode concentration Gas name Gas Alarm ―... - Page 32 5 How to Operate 5-4. Modes SE13 External output adjustment (MA 4-20) Environmental 2-7 SETTING3 Adjustment and setting Setting 3 SE 0 Amplifier initialization (AMP DEF) SE 1 Heater current adjustment (HEAT ADJ) SE 2 Load voltage adjustment (LOAD ADJ) SE 3 Measured gas selection (GAS SEL) SE 4 Peak hold setting (PEAKHOLD) SE 5 First alarm LCD setting (ALM1 LCD)
-
Page 33: Detection Mode
5 How to Operate 5-5. Detection mode 5-5. Detection mode <Gas Name and Full Scale Display> Display a gas name, full scale value, etc. that have been set in advance. The following is display example of GP-6001. Alarm point Full scale value Power lamp Gas concentration bar meter display... -
Page 34: Alarm Test Mode
5 How to Operate 5-6. Alarm test mode 5-6. Alarm test mode This is used when dummy signals the same as the signals of the gas concentration are generated to check the alarm lamp activation of the indicator/alarm unit and the transmission to external circuits. WARNING Before starting the alarm test (transmission test), provide a notification to the related sections so that they can prepare for false abnormalities (external output signals and alarm contact). -
Page 35: User Mode
5 How to Operate 5-7. User mode 5-7. User mode WARNING After the adjustment is completed, never fail to press the MODE key to return to the detection mode. (If the indicator/alarm unit remains in the user mode, it automatically returns to the detection mode in ten hours.) <<User Mode>>... - Page 36 5 How to Operate 5-7. User mode See "7-2. Regular 1-8. M MODE maintenance mode". Switch to the regular maintenance mode. To 1-1. ZERO RM-6000 - 35 -...
- Page 37 5 How to Operate 5-7. User mode <Zero Adjustment "1-1"> This is used to perform the zero adjustment. Before starting the zero adjustment, let the detector head (sensor) draw the zero adjustment gas and wait until the reading is stabilized. For oxygen deficiency alarm specification (O2:0 - 25%), "1-1"...
- Page 38 5 How to Operate 5-7. User mode <Setting Display "1-2"> This is used to check the setting of typical menus. <<Setting Display>> (The following is display example of GP-6001.) 1-2. CONFIRM Press SET key. During maintenance During inhibit First Alarm Setpoint Display Second Alarm Setpoint Display Alarm Delay Time Display...
-
Page 39: How To Exit
5 How to Operate 5-8. How to exit 5-8. How to exit To turn off the indicator/alarm unit, open the front cover of the main unit, and turn "OFF" the power switch. Then, turn off the power supply (24 VDC) to the indicator/alarm unit. WARNING ... -
Page 40: Operations And Functions
6 Operations and Functions 6-1. Gas alarm activation Operations and Functions 6-1. Gas alarm activation Gas alarm: Triggered when the concentration of detected gas reaches or exceeds the alarm setpoint value. <<Self-latching>> NOTE The alarm setpoint (first alarm and second alarm) is factory-set. Although the alarm delay time (standard: 2 seconds) works in the indicator/alarm unit to prevent a false activation, it can be cancelled if not needed. - Page 41 6 Operations and Functions 6-1. Gas alarm activation "Alarm Pattern Example (H-HH)" Normal Alarm Recovered SP. HH side (second) concentration SP. H side (first) Reset Reset ALM1 alarm lamp (red) ALM2 alarm lamp (red) ALM1 alarm contact ALM2 alarm contact Green Orange Orange...
- Page 42 6 Operations and Functions 6-1. Gas alarm activation "Alarm Pattern Example (L-LL)" Recovered Normal Alarm SP. L side (first) concentration SP. LL side (second) Reset Reset ALM1 alarm lamp (red) ALM2 alarm lamp (red) ALM1 alarm contact ALM2 alarm contact Green Orange Orange...
-
Page 43: Fault Alarm Activation
After the indicator/alarm unit is successfully returned from the fault, it restarts with the process normally performed right after it is turned on (initial clear). If the indicator/alarm unit has problems and is repeatedly malfunctioning, contact RIKEN KEIKI immediately. NOTE For information on malfunctions (error messages), see "9. -
Page 44: External Output Operation
6 Operations and Functions 6-3. External output operation 6-3. External output operation Specifications 4 - 20 mA RS-485 (option) Signal Transmission Electric current transmission (non-isolated) Two-wire digital data System transmission system Transmission Path CVVS KPEV-S Transmission Distance Below 1 km (Depending on the system designing conditions) Connection Load... - Page 45 6 Operations and Functions 6-3. External output operation <GP-6001, NC-6001, SP-6001, GH-6001, EC-6002, OX-6001, OX-6002, RM-6002, RM-6003, RM-6003T> External output Detection mode (*1) Maintenance mode (*2) For the case zero suppression value is For the case external output is set to 2.5 mA in the maintenance mode Zero suppression...
-
Page 46: Other Functions
6 Operations and Functions 6-4. Other functions 6-4. Other functions <Suppression Function> Some types of detector heads connected to the indicator/alarm unit are influenced by environmental changes (temperature, humidity, and other characteristics) or interference gases (interference characteristics) in no small measure, which affects the reading. Therefore, the reading might fluctuate around zero even in a normal state with no gas leakage. - Page 47 To disable the peak display, keep the SET key pressed in 1-3.PEAK in the maintenance mode (user). <Calibration History/Alarm Trend History/Event History Functions> The indicator/alarm unit has history functions. To use these functions, please contact RIKEN KEIKI. <Dimming Function for Display>...
-
Page 48: Maintenance
Our qualified service engineers have expertise and knowledge on the dedicated tools used for services, along with other products. To maintain the safety operation of the indicator/alarm unit, please use our maintenance service. The followings are typical maintenance services. Please contact RIKEN KEIKI for more information. RM-6000 - 47 -... - Page 49 7 Maintenance 7-1. Maintenance intervals and items Main Services Power Supply Checks the power supply voltage. Check Verifies that the power lamp lights up. (Verifies that relevant points can be identified on the system.) (When a UPS (uninterruptible power system) is used, checks the operation with the UPS.) Concentration Verifies that the concentration display value is zero (or 20.9 vol% on the...
-
Page 50: Regular Maintenance Mode
7 Maintenance 7-2. Regular maintenance mode 7-2. Regular maintenance mode WARNING After the adjustment is completed, never fail to press the MODE key to return to the detection mode. (If the indicator/alarm unit remains in the regular maintenance mode, it automatically returns to the detection mode in ten hours.) Mode Item... - Page 51 7 Maintenance 7-2. Regular maintenance mode Return to the user 2-11 U MODE Returns to the user mode "1-1". mode. Factory Mode 2-12 F MODE Not used. Switching NOTE Operations are slightly different depending on the model. Key operations are disabled for the key switches of operation menus not available for the model.
- Page 52 7 Maintenance 7-2. Regular maintenance mode <<Regular Maintenance Mode>> User Mode In "1-8.M MODE", press the SET key. During maintenance During inhibit Then press the SET key again for three seconds. Regular Maintenance Mode 2-0. GAS TEST Perform a test with the gas. Similar to the detection mode, the reading changes and the alarm lamp lights up after the...
- Page 53 7 Maintenance 7-2. Regular maintenance mode 2-6. SETTING2 Environmental Setting 2 Specify the environmental => P55 setting 2. 2-7. SETTING3 Environmental Setting 3 Specify the environmental => P60 setting 3. 2-8. FAULT This is used (by the manufacturer) to investigate and analyze the causes of faults.
- Page 54 7 Maintenance 7-2. Regular maintenance mode <Environmental Setting 1 "2-5"> In the environmental setting 1, specify the operation setting. <<Environmental Setting 1>> 2-5. SETTING1 Press SET key. During maintenance During inhibit SE 0. INHIBIT Set Inhibit. Press the ▲or ▼ key to select either ON/OFF, and then press the SET key to confirm the selection.
- Page 55 7 Maintenance 7-2. Regular maintenance mode <Alarm Setpoint Value Setting 1 "2-5" - "SET 1"> <<Alarm Setpoint Value Setting>> SE 1. ALM P Press SET key. During maintenance During inhibit First Alarm Setpoint Value Setting Change the value by pressing the ▲...
- Page 56 7 Maintenance 7-2. Regular maintenance mode <Environmental Setting 2 "2-6"> In the environmental setting 2, specify the settings of functions. (* It is recommended that setting changes should be recorded in a log.) The environmental setting 2 includes setting menus which are usually not used. Be careful not to change these settings by mistake.
- Page 57 7 Maintenance 7-2. Regular maintenance mode Press the ▲ or ▼ key to select either ON/OFF, and then press the SET key to confirm the selection. When ON is selected, the test concentration is output as the external output during an alarm test. When OFF is selected, the output is kept at the one before the alarm test mode is entered.
- Page 58 7 Maintenance 7-2. Regular maintenance mode SE 12. MNT OUT Set the external output for the maintenance mode. Press the ▲ or ▼ key to select either 2.5/4.0 mA/HOLD (previous value)/4 - 20 mA (linked to display value), and then press the SET key to confirm the selection.
- Page 59 7 Maintenance 7-2. Regular maintenance mode <Date/Time Setting 2 "2-6" - "SET 1"> <<Date/Time Setting>> SE 1. DAY TIME Press SET key. During maintenance During inhibit Date/Time Setting Display Press SET key. Year Setting Change the value by pressing the ▲ or ▼ key, and then press the SET key to confirm the value.
- Page 60 7 Maintenance 7-2. Regular maintenance mode <Energized/De-Energized Contact Setting “2-6” - ”SET 6”> <<Energized/De-Energized Contact Setting>> SE 6. RLY PTRN Press SET key. During maintenance During inhibit First Alarm Contact Setting Press the ▲ or ▼ key to select either nd (de-energized)/nE(energized), and then press the SET key to confirm the selection.
- Page 61 7 Maintenance 7-2. Regular maintenance mode <Environmental Setting 3 "2-7"> In the environmental setting 2, specify the settings of functions. (* It is recommended that setting changes should be recorded in a log.) The environmental setting 2 includes setting menus which are usually not used. Be careful not to change these settings by mistake.
- Page 62 7 Maintenance 7-2. Regular maintenance mode SE 3. GAS SEL Setting of Type of Gas Select and set the type of gas of of Measured Gas and measured gas and the full scale. Full Scale Press the ▲ or ▼ key to make a =>...
- Page 63 7 Maintenance 7-2. Regular maintenance mode SE 7. DR OUT Set the double range external output. (NC-6001W only.) SE 8. FLOW SET Select either ON/OFF of the low flow rate alarm activation. (EC-6002 only.) SE 9. OUT SET Set the resolution of external output.
- Page 64 7 Maintenance 7-2. Regular maintenance mode SE 11. GRN ADJ Adjust the brightness of the LCD backlight (green LED). Press the ▲ or ▼ key to increase or decrease the value to adjust the brightness, and then press the SET key to confirm the value.
- Page 65 7 Maintenance 7-2. Regular maintenance mode SE 14. BZ RLY The second alarm contact can be changed to offer the same action as the buzzer. Press the SET key to confirm the setting. To SE 0. ADDRESS RM-6000 - 64 -...
-
Page 66: Gas Calibration Method
7 Maintenance 7-3. Gas calibration method 7-3. Gas calibration method Perform a gas calibration on the detector head (sensor) connected to the indicator/alarm unit in each mode (zero adjustment mode and span adjustment mode) using the calibration gas. Zero adjustment gas (collected in a gas sampling bag) ... - Page 67 7 Maintenance 7-3. Gas calibration method <Span Adjustment "2-2"> This is used to perform the span adjustment on the detector head (sensor). For the oxygen deficiency alarm specification (O2: 0 - 25 vol%), this is the same as “1-1”. <<Span Adjustment Display>> (The following is display example of GP-6001.) 2-2.
- Page 68 7 Maintenance 7-3. Gas calibration method <Setting of Type of Measured Gas and Full Scale "2-7" - "SET 3"> ※This is not typically used by the user. <<Setting of Type of Measured Gas and Full Scale>> (The following is display example of GP-6001.) SET 3.
-
Page 69: How To Clean
Turn the POWER switch OFF and disconnect the power plug from the outlet before replacing a fuse. Do not use an unspecified fuse or short-circuit the fuse holder. For more information on fuses, please contact RIKEN KEIKI. RM-6000 - 68 -... -
Page 70: Storage, Relocation And Disposal
CAUTION When using a relocated or stopped/stored indicator/alarm unit again, never fail to perform a gas calibration. For information on readjustment including a gas calibration, please contact RIKEN KEIKI. 8-3. Disposal of products When the indicator/alarm unit is disposed of, it must be treated properly as an industrial waste in accordance with the local regulations. -
Page 71: Troubleshooting
This simply helps to find the causes of malfunctions which frequently occur. If the indicator/alarm unit shows a symptom which is not explained in this manual, or still has malfunctions even though remedial actions are taken, please contact RIKEN KEIKI. NOTE Read also the operating manual of the detector head connected to the indicator/alarm unit. - Page 72 For more information, see the operating E-5d manual of the detector head. (EC-6002 only) Communication Abnormalities in Please contact RIKEN KEIKI. abnormalities communications with the upper unit (Only on a model with RS-485 (option) mounted) ...
- Page 73 For information on actions, such as removal filter, please contact RIKEN KEIKI. Slow leak A very small amount of the gas to be detected may be leaking (slow leak). Because ignoring it may cause dangers, take a remedial measure, i.e.,...
-
Page 74: Product Specifications
10 Product Specifications 10-1. List of specifications Product Specifications 10-1. List of specifications <Common Specifications> Concentration Character LCD (digital and bar meter display <three colors: green, orange, and display red>) Power display POWER lamp on (green) Gas alarm display First: ALM1 lamp blinks or lights up (red)/buzzer Second: ALM2 lamp blinks or lights up (red)/buzzer Gas alarm pattern Self-latching, auto-reset, or lock-in... - Page 75 10 Product Specifications 10-1. List of specifications <Specifications for Each Model> Model GP-6001 NC-6001 NC-6001W Gas to be detected Combustible gas Applicable gas Catalytic combustion New ceramic type detector head detector head type detector head Gas alarm type Two-step alarm (H-HH) Detector head Sensor direct signal signal...
-
Page 76: List Of Accessories
10 Product Specifications 10-2. List of accessories Model EC-6002 OX-6001 OX-6002 Gas to be detected Toxic gas Oxygen Applicable gas Electrochemical type Galvanic cell type detector head detector head detector head/ Pyrolysis-particle type detector head Gas alarm type Two-step alarm (H-HH) Two-step alarm (H-HH or L-H, L-LL) Detector head Current signal (4 - 20... -
Page 77: Definition Of Terms
11 Definition of Terms 10-2. List of accessories Definition of Terms %LEL A percentage unit of the concentration of a combustible gas assuming the lower explosive limit (LEL) of the combustible gas as 100. LEL (Lower Explosion Limit) refers to the lowest concentration of a combustible gas in air capable of causing explosion when ignited.
Need help?
Do you have a question about the RM-6000 Series and is the answer not in the manual?
Questions and answers