Table of Contents
Advertisement
Advertisement
Chapters
Table of Contents

Related Manuals for Ariston Sensys Net


Summary of Contents for Ariston Sensys Net
- Page 1 智能系统管家 SENSYS NET 3319034 INSTALLATION AND USER MAN UAL 用户安装和使用手册...
-
Page 2: Table Of Contents
目 录 1. 总则 ............. 2 2. 安全守则 ............3 3. 技术参数 ............6 4. 安装智能系统管家 ..........10 5. 通过APP或者浏览器连接网络 ........18 6. 注册产品和账户 ........... 24 7. 网关运行状态 指示..........26 1.总 则 非常感谢您选择阿里斯顿云控制系统,此系统由阿里斯顿设计和制造,将 给国内的供热和供暖用户提供一个全新的体验。 阿里斯顿云控制系统允许你通过智能手机或者电脑,随时随地开启、关闭 和查看家庭供暖和热水温度。它能够允许你不间断的监控能源消耗,来确 保你可以节省燃气费用。当热水炉出现故障时,它会及时提醒你。 2 /CN... -
Page 3: 安全守则
2.安全守则 警 告 以下手册是产品完整、必不可缺少的一部分,必须妥善保管。即使当热水炉转 交给另一个用户或者安装者时,也请将手册一起交付,可被用作其它用途。 除了此说明书规定的内容,不要把本产品用作其他任何用途 。制造商不对由于不 正确使用、没有按照此说明书安装而引起的损害负责。 必须由专业资格认证的技术人员使用原装配件对产品进行维修。 制造商对不遵守说明书,而可能造成降低产品安全的安装带来的损害不承担 责任。 关键符号 不遵守本警告会有人身伤害的危险,在某些情况下甚至是致命的。 不遵守本警告会有损坏的风险,在某些情况下对财产、动植物甚 至很严重。 制造商不对由于错误的使用产品、不正确安装产品引起的损害负责。 CN / 3... - Page 4 当设备从原来的安装位置移动时,请不要操作。 对设备有损害。 不要站在椅子、凳子、梯子或者不稳定的支持物上来清洁设备。 由于从高处或缺口处(梯子意外闭合)导致人身伤害。 请勿使用任何杀虫剂、溶剂或者腐蚀性清洁剂来清洗设备。 对塑料和外壳喷漆有损害。 不要把设备用于产生正常生活热水之外的其它任何目的。 过载有可能导致设备损坏。 不正确使用可能会损坏其它物体。 不允许儿童或者无经验的人操作设备。 不正确使用可能会损坏本设备。 当对设备进行清洁、维修和连接时,有必要通过拔掉插头来使装置 和主电源切断。 否则可能会因为漏电带来人身伤害。 身体残体、有精神和心理疾病或者缺少必要知识经验的人(包括儿童) 不能操作该设备,除非他们有人监督或者被一个对他们安全负责的人 充分的培训过如何使用该装置。儿童必须被监护好,确保他们不玩耍 此装置或者配件(订书钉、塑料袋、塑料件等等),产品的保护面板 和所有电气设备的维护和连接的操作必须有资质的人完成。 4 /CN...
- Page 5 产品符合欧盟认证 2012/19/EU 当带禁止垃圾桶的图标出现在设备上时,它的意思是一旦产品达到使用寿命时必 须和生活垃圾分开处理,并且转移到电气和电子的废物处置场,或者在购买一台 相同的型号产品时归还给经销商。 使用者负责使报废的设备送到一个合适的垃圾处理厂。 合适的分离报废设备以及随后的生态回收、处理和处置,除了鼓励材料、产品的 再利用,并且有助于防止对环境和健康产生负面影响。 为进一步的了解可用的废物收集系统,可以联系当地废物处理部门或者购买产品 的经销商。 CN / 5...
-
Page 6: 技术参数
EMC: ETSI EN 301 489-17 CMIIT ID: 2015DJ6514 产品安装 安装在墙上或者任何光滑的表面 -10°C - 60°C 工作温度 -20°C - 70°C 贮存温度 0-24V 总线2供电 Ariston BridgeNet 供电电源 最大40 mA -最大 0.7 W 网关消耗 最大120 mA -最大 3 W 总的消耗 (BUS 设备) 0.1 k g 重量... - Page 7 系统管家 网桥总线 电源 电力吸收 最大< 0.5W 工作温度 -10 °C- 60°C 储存温度 -20°C - 70°C 总线长度和横截面积 注意: 最长50 米 为了避免干扰问题,请使用屏蔽电缆或者 最小Φ0.5平方毫米 扭曲对绞电缆。 缓冲存储器 LVD 2006/95/EC - EMC 2004/108/EC 电磁干扰 电磁发射 EN 60730-1 符合一致性 温度精度 0.1°C ERP 特征 级别: V (只和有网桥总线的锅炉连接) 加热贡献: +3% 通过阿里斯顿外置探头连接:...
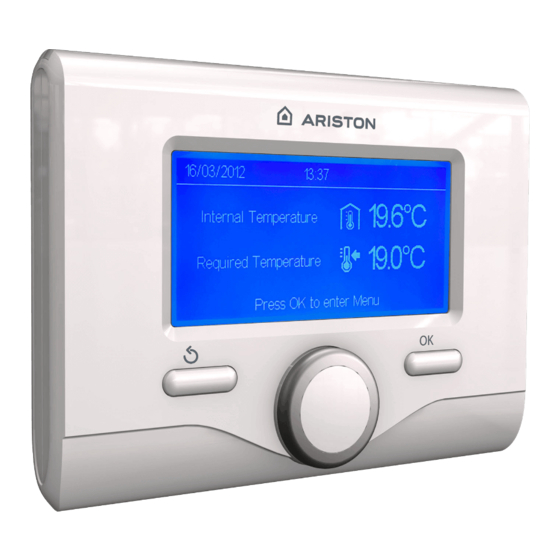
- Page 8 网关 120 mm 23,3 mm 说明: 1、 2. 网络连接LED 3. WiFi配置按钮 系统管家 134 mm 16 mm 说明: 1. 返回键 (上一次显示) 2. 旋钮 3. 确认键(确认或者进入菜单 ) 4. 显示屏 8 /CN...
- Page 9 ) 时间编程 ) 供暖设置 ) 手动 生活热水设置 火焰指示 系统性能 需求温度 显示屏选项 内部温度 AP配置 (AP) 所需室温优先控制 ) 网管连接到网络 室外温度 ) 网关未成功连接到路由器 启用“AUTO变频”功能 启用“度假”功能 ) 网关连接到路由器但未 成功连接到网络 供暖激活 生活热水激活 ) 软件正在更新中 错误指示 - (COMFORT) 启用“舒适热水”功能 使用下列连接可以迅速下载智能系统管家说明书: www .ariston. com. cn CN / 9...
-
Page 10: 安装智能系统管家
4.安装智能系统管家 警告! 应当有合格的技术人员对产品进行安装。 在安装之前,燃气采暖热水炉应当断电。网桥总线的连接是区分有顺序的:为 了避免智能系统管家启动过程中出现问题,应当检查和系统部件的连接顺序。 “远程控制”一词,相反,实际是服务针对终端用户,通过他们使用的智能手机应 用程序或门户网站监控和设置阿里斯顿产品。 安装智能系统管家和激活阿里斯顿网络服务十分快捷和简单,仅需要三个步骤! 注册一个有关 通过浏览器或者APP 安装智能系统管家 产品的账号 连接到网络 下面的段落展示一些主要的可行的系统方案,使用已经在阿里斯顿产品范围内的其 他配件类型来服务,使用配置同样可以被激活。 10 /CN... - Page 11 4.1 可能的安装类型 类型 1 在一个基础的供暖系统中激活远程遥控(图1). 这个系统是阿里斯顿连接产品,专有的一个开/关温度调节配件,你需要去那里激活阿里斯 顿智能管家系统的远程控制 采取的措施 (图2): 移除开/关功能的配件并且断开从锅炉输入的双相电线TA。 通过网桥总线把阿里斯顿系统管家和网关连接到加热产品设备上面。 图1 图2 温控器 系统管家 网关 网桥总线 CN / 11...
- Page 12 类型2 激活系统远程遥控,该系统最多最多支持3条水路区域连接,并由网桥BUS总线装置 进行控制(如图3)。 此系统有一个阿里斯顿多水路连接模块,该模块连接系统管家或温控器之类的网桥总 线区域管理附件。 需要的操作(如图4): 移除所有阿里斯顿的房间温度传感器配件、系统中的温控器,用阿里斯顿系统管家 替代。 通过阿里斯顿BUS网桥总线把网关连接到加热系统中。 图3 图4 系统管家 温控器 GATEWAY 系统管家 水路装置模块 水路装置模块 12 /CN...
- Page 13 类型3 激活系统上的远程遥控,该系统最多最多支持3条水路区域连接,并由网桥BUS总线 装置和两区域开关进行控制(如图5)。 有一个系统,它有一个阿里斯顿多水路连接模块,该模块连接一个像Sensys或温控 器开关之类的网桥总线区域管理附件。 需要的操作(如图6) 通过网桥总线把网关连接到加热系统中 。 用系统管家激活区域1的远程控制和其他区域的开关功能(参考下面表格)。 图5 图6 系统管家 温控器 网关 温控器 系统管家 水路装置模块 水路装置模块 CN / 13...
- Page 14 控制实现 所有区域可完全远程控制 适用产品 1个温区 2个温区 3个温区 4个温区 5个温区 6个温区 配件(个数) 系统管家 多功能组件 Alteas X WIFI 区域管理器 Genus X WIFI 一个区域完全远程控制 + 其它温区仅开关远程控制 配件(个数) 1个温区 2个温区 3个温区 4个温区 5个温区 6个温区 系统管家 房间温控器 多功能组件 控制实现 所有区域可完全远程控制 适用产品 1个温区 2个温区 3个温区 4个温区 5个温区 6个温区...
- Page 15 4.2 在墙上安装网关 1、利用提供的螺丝把支撑板固定在 2、把网关反过来。 墙上。 3、用支撑板上的挂钩临时固定网关。 4、用两根电线从壁挂炉主板上的网桥总线 的接口连接到网关(B端接B端、T端接T 端)。轻轻的按下突起,固定电线。 CN / 15...
- Page 16 6、轻轻的向下滑把阿里斯顿系统管家 5、从临时位置(图2)移走网关,把 固定到底座上。 网关固定到支撑板上,直到听到4 个挂钩卡合的声音。 为了更方便的连接电线,塑料薄片可 以移除(如图所示) 16 /CN...
- Page 17 4.3 在锅炉上安装网关 警告! 在使用双面胶之前,应当使用清洁剂清洁网关 表面并且使其充分晾干。 1.在支撑板的背面弄粘贴双面胶(如图7);揭 掉保护膜,粘贴到锅炉上面。 2. 装上底座(如图8)。 3. 轻轻的按压装上封盖(如图9)。 注意: 为了避免电磁干扰问题,请使用屏蔽电线, 或者相互缠绕的电线。 下面系统管家的软件版本和阿里斯顿的网 络不匹配。 - 01.00.00 - 01.00.04 如果是这样的情况,请用阿里斯顿提供的 现有的配件更换现有的系统管家。 CN / 17...
-
Page 18: 通过App或者浏览器连接网络
5. 通过APP或者浏览器连接网络 安装完成后,打开加热系统。由于网桥总线的供电从而打开网关。 1、 稍等片刻,网关开始执行开机程序,在这期间所有的的LED灯 都依次以为红色闪烁。 2. 几秒之后,BUS LED变绿,WEB LED稳定为红色时,说明设备 正在等待配置,系统管家显示图标” ” 5. 1 WiFi 配置 在启动网关WiFi配置过程之前,从应用商店下载阿里斯顿APP,检查ADLS路由器网络 是否正常工作。 注意:阿里斯顿网络支持以下WiFi网络的加密技术:WEP,WPA/WPA2 个人 5. 1. 1 利用系统管家配置 1.按OK键进入主菜单,旋转旋钮选择“接入点配置”选项,按OK 键确认。 2.检查连接服务是否适用你的国家,如果适用,按OK键。 3.旋转旋钮选择“AP连接配置”,按OK键 4.至多40s之后, 系统管家显示屏稳定显示AP图标,网关产生一个新的WiFi并保持10 分钟的激活状态。如果超过10分钟,你要重复上面步骤。 18 /CN... - Page 19 5. 随着系统管家的提示,打开联网设备(智能手机,电脑,平板电脑)的网络设置, 搜索可用的WiFi,选择名称为“Remote GW Thermo”的网络,下面按照5.2段 操作。 开/关Wi-Fi网络 供暖设置 AP连接配置 生活热水设置 序列号 接入点配置 恢复出厂设置 屏幕设置 信号强度 5.1.2 通过AP按键配置(可在5.1.1中两者中挑选一种) 1. 按住AP键(至少5秒钟)直到WEB灯以绿色闪烁。在40秒以内,网关会 创建一个无线网络,此网络可以激活十分钟。如果超过10分钟,需要重 复上面步骤。 2.打开联网设备(智能手机,电脑,平板电脑)的网络设置,搜索可用的 WiFi,选择名称为“Remote GW Thermo”的网络,下面按照5.2段操作。 CN / 19...
- Page 20 5.2 连接网关到网络 5.2.1 用APP自动连接 1. 在连接完 “Remote Gw Thermo”网络后,按照下面提示操作APP. 连接到Wi-Fi网络 连接到Wi-Fi网络 连接到Wi-Fi网络 选择你的Wi-Fi网络连接产品 请再次检查WEB灯或者 密码 产品上的图标 是否 点亮和稳定,如果不是 没有在列表 请重起连接步骤 确认 产品的序列号是: 请妥善保管此序列号,当账户 连接到产品时需要此序列号 关闭 网关的WEB LED以绿色快闪,然后当以绿色稳定时确定这个过程操作已经成功。 系统管家上的图标“ ” 稳定亮起。此过程的平均等待时间是1-2分钟。 20 /CN...
- Page 21 5.2.2 用浏览器自动连接(在5.2.1之间任选一种) 1. 连接到 Remote Gw Thermo 网络, 打开浏览器(Internet Explorer, Safari,Chrome, etc.)并在地址栏 中输入192.168.1.1 2. 确保以下选项是选择的: 身份验证= Wpa & Wpa2 Personal 安全验证 = Open 3. 选择你的WiFi网络并输入密码。 4. 保留默认设置 DHCP = 开 5. 点击确认 Wpa&Wpa2 Personal 6. 网关的 WEB 灯开始以绿色快速闪 烁,然后变稳定,这样的说明此 过程是成功的。系统管家显示屏 上图标“...
- Page 22 注意: 如果没法正常工作(WEB灯为红色,系统管家显示屏上显示 图标)请重复以上过程。 当你每次改变家里的网络时(更改密码、更换路由器等),必须重复以上步骤。 5.2.3 通过APP手动连接 1. 连接 网络,打开阿里斯顿APP. Remote Gw Thermo 2. 取消选定 DHCP (default). 连接到Wi-Fi网络 3. 在SSID区域中输入你的 WiFi 网络名字。 4. 选择DHCP = OFF 5. 给网关分配静态IP地址 6. 进入子掩护码 7. 进入路由器和DNS服务器的IP地址 确认 22 /CN...
- Page 23 5.2.4 通过浏览器手动注册 1. 连接 网络,在浏览 Remote Gw Thermo 器的地址栏中输入192.168.1.1 在SSID区域中输入你的 WiFi 网络名字。 选择DHCP = OFF 给网关分配静态IP地址 进入子掩护码 进入路由器和DNS服务器的IP地址 Ariston_T_and_I Ariston_T_and_I Wpa&Wpa2 Personal .... 192.168.0.100 255.255.255.0 192.168.0.1 8.8.8.8 CN / 23...
-
Page 24: 注册产品和账户
6. 注册产品和账号 从苹果商店或者安卓市场下载阿里斯顿智能系统管家APP来远程控制锅炉; 或者通过登陆阿里斯顿门户网站:https://www .ariston-net.remotethermo .com 把设备连接到网络后(见第5点),你才可以注册你的产品账号. 重要提示: 你可以同时用几个设备登陆阿里斯顿APP:只要使用相同的登录凭证。 这个APP包含一个选项:一个用户账号可以注册多个阿里斯顿网关。 24 /CN... - Page 25 1. 填写完必要信息注册账户,你会收到 一个包含链接的邮件。 注册 用户名(邮箱) 2. 单击这个链接来激活账号。 3. 打开这个链接后弹出的页面内容中你 第二邮箱 必须填写网关的序列号(序列号可以 在产品的标签和系统的主菜中找到) 密码 4. 当你收到一封内容为:欢迎使用阿里 确认密码 斯顿 APP 时,你就可以开始远程控制 你的锅炉。 名字 注册 电话 手机 语言 中文 保存 星号标注的段落是强制的 序列号 产品注册的序列号: XXXXXXXXXXXX CN / 25...
-
Page 26: 网关运行状态 指示
7.网关操作状态指示 网关侧面的的3个LED指示灯可以使你及时了解产品操作状态的信息。 LED 准则 WEB LED (网络连通) 灭 网关没有通电或者关闭 稳定的绿色 网关正确配置并且连接到网络 绿色闪烁(慢闪) 网关正在等待配置 绿色闪烁(快闪) 网关正在连接网络 没有连接服务或者网关没有配置 稳定的红色 BUS LED (与产品有关的网桥协议) 灭 网关关闭 稳定的绿色 网桥正在连接 稳定的红的 网桥总线连接错误或总线电缆没有连接 所有的LED灯 灭 网关关闭 交替红色闪烁 网关启动 网关正在工作(配置后两分钟内可行的,如果按 绿色闪烁(间隔5s) 钮按下或者参数改变将会失去作用) 绿色闪烁(连续闪烁) 软件更新正在进行中 26 /CN... -
Page 27: Overview
OVERVIEW Thank you for choosing Ariston Net, the system designed and manufactured by Ariston to provide a whole new experience in using a domestic heating and water system. Ariston Net allows you to start, stop and check the temperature of domestic heating and water anytime, anywhere from a smartphone or PC. -
Page 28: Safety Rules
SAFETY RULES WARNING The following manual is an integral and essential part of the product and must always be kept with care and attached to the product, even if it is transferred to another owner or user, or when it is used with a different application. Do not use the product for any purpose other than that specified in this manual. - Page 29 Do not perform operations that involve removing the appliance from its installation location. Damage to the device. Do not climb onto chairs, stools, ladders or unstable supports to clean the device. Personal injuries due to falling from a height or shearing (double stepladders). Do not use any insecticides, solvents or aggressive detergents to clean the appliance.
- Page 30 PRODUCT CONFORMING TO EU DIRECTIVE 2012/19/EU The barred dustbin symbol appearing on the device indicates that the product must be disposed of separately from household waste once it reaches the end of its lifespan, and transferred to a waste disposal site for electric and electronic equipment, or returned to the dealer when purchasing a new device of the same kind.
-
Page 31: Technical Features
Operating temperatures -10°C ÷ 60°C Storage temperatures -20°C ÷ 70°C Power supply 0-24V Powered by Ebus2 Ariston BridgeNet® Gateway consumption Max 40 mA ÷ Max 0.7 W Total consumption (BUS devices) Max 120 mA ÷ Max 3 W Weight 0.1 kg... - Page 32 LVD 2006/95/EC - EMC 2004/108/EC Conformity Electromagnetic interference Electromagnetic emissions EN 60730-1 standard conformity Resolution degree 0.1°C ERP Characteristics Class: V (only with BridgeNet Bus boiler) Heating contribution: +3% By adding Ariston external probe: Class: VI Heating contribution: 4% 32 /GB...
- Page 33 Gateway 120 mm 23,3 mm Legend: 1. BridgeNet Bus LED 2. Internet Connection LED 3. WiFi configuration butto Sensys 134 mm 16 mm Legend: 1. back button (previous display) 2. knob 3. OK button (to confirm operation or access main menu) 4.
- Page 34 Domestic hot water enabled Software update in pro- Error indication gress - (COMFORT) Comfort function enabled Use the following link to rapidly download the interface instructions manual for the Sen- sys system: www.ariston.com.cn 34 /GB...
-
Page 35: Installing Sensys Net
The term “Remote Control” (RC) means, conversely, the service directed to end users, through which they can use the smartphone App or web portal to monitor and set their Ariston products. Installing Sensys Net and activating the Ariston Net services is quick and easy: it takes just 3 steps! CONNECTION TO... - Page 36 Activation of RC in a basic heating system (fig.1) System where the Ariston product is connected exclusively to a single ON/OFF temperature regulation accessory and you need to go there to activate the Ariston Net Remote Control. Actions required (Fig. 2):...
- Page 37 Activation of RC on a system with maximum 3 plumbing zones controlled by (Fig. 3) BridgeNet BUS devices System where there is an Ariston multi-zone plumbing module to which BridgeNet Bus zone management accessories are connected such as an Ariston Sensys and/or Ariston Room Sensor.
- Page 38 Activation of RC on a system with maximum 3 plumbing zones controlled by 1 zone (Fig. 5) BridgeNet BUS devices, 2 zones ON/OFF System where there is an Ariston multi-zone plumbing module to which BridgeNet Bus zone management accessories are connected such as an Ariston Sensys and/or Ariston ON/ OFF Thermostat.
- Page 39 Multifuntional Kit Control/Product Full control of every zone 1 Zone 2 Zone 3 Zone 4 Zone 5 Zone 6 Zone Sensys Net Genus X not feasible Sensys Clas X Zone Manager Cares X HS X Genus Premium Evo 1 Zone...
- Page 40 4.2 Installation of gateway to wall Screw the support plate into the wall Rotate the gateway using the supplied screws Connect the pair of cables from the BridgeNet BUS connector on the boiler PCB to the Fix the gateway temporarily to the BridgeNet BUS connector on the gateway plate using the hooks (respecting pole B with B and pole T with T)
- Page 41 Position the Ariston Sensy onto the Remove gateway from base and push it delicately downwards. temporary position (Figure 2) and attach it to the plate, pressing along the sides until you hear the four small side hooks click. for easier connection of the cables, the plastic tab can be removed, as shown in the figur .
- Page 42 3. Attach the cover, pushing gently (Figure NOTE: In order to avoid interference problems, use a shielded cable or twisted pair cable. The following versions of the Ariston Sensys software are not compatible with Ariston Net: - 01.00.00 - 01.00.04...
-
Page 43: Connecting To The Internet With The App Or Web Browser
1. Press the OK button to access the Menu. Turn the knob and select the "Connectivity settings" menu. Press OK. 2. Check that Ariston Net is available in your country and if it is, press OK. 3. Turn the knob to select “Network configuration with AP . Press OK. - Page 44 6. Follow Sensys's prompts, open the network settings of your internet device (smart- phone, PC, Tablet...) and search for available Wi-Fi networks. Select the Remote GW Thermo network. Now go to paragraph 5.2. ON/OFF Wi-Fi Network CH Settings Network configuration via AP DHW Settings Serial Number Connectivity Settings...
- Page 45 5.2 Connecting the gateway to the Internet 5.2.1 Automatic connection with the APP 1. After connecting to the Remote Gw Thermo network, launch the Ariston Net app and follow the prompts. The gateway's WEB led will start flashing green rapidly and then turn steady on to con- firm that the procedure was successful.
- Page 46 5.2.2 Automatic connection with the browser (as alternative to par. 5.2.1) 1. Connect to the Remote Gw Thermo net- work, launch the web browser (Internet Explorer, Safari, Chrome, etc.) and enter 192.168.1.1 in the address bar. 2. Make sure that the following options are selected: Authentication = Wpa &...
- Page 47 5.2.3 Manual connection with the APP 1. Connect to the Remote Gw Thermo network and launch the Ariston Net APP. 2. Deselect the DHCP field (default) 3. Enter the name of your Wi-Fi network in the SSID field 4. Select DHCP = OFF 5.
- Page 48 5.2.4 Manual connection with the browser 1. Connect to the Remote Gw Thermo net- work, launch the web browser (Internet Explorer, Safari, Chrome, etc.) and enter 192.168.1.1 in the address bar. 2. Enter the name of your Wi-Fi network in the SSID field 3.
-
Page 49: Registering An Account And Product
REGISTERING AN ACCOUNT AND PRODUCT Download the officia Ariston Net app from the Apple Store or Android storeS to control your boiler remotely; or connect to the Ariston Net portal: https://www.ariston-net.remotethermo.com You can register your account and product only after connecting the device to the In- ternet (see paragraph 5). - Page 50 Sen- sys menu) 4. You will receive an email welcoming you to Ariston Net, and you can now start controlling your boiler remotely Serial number The serial number that have to use for the...
-
Page 51: Gateway Operating Status
GATEWAY OPERATING STATUS The three LEDs on the side of the gateway allow you to have instant feedback on the operating status of the product. LED CODES WEB LED (internet connection) Gateway is not powered or is OFF Gateway correctly configured and connected to Stable Green the internet Flashing Green (slow) - Page 52 Ariston Thermo SpA Viale Aristide Merloni 45 60044 Fabriano (AN) Italy 阿里斯顿热能产品(中国)有限公司 地址:江苏省无锡市新加坡工业园区行创一路9号 邮编:214028 电话:(0510)6889 9777 客服热线:4008-32-32-32 邮箱:customer@cn.aristonthermo.com 网址:www.ariston.com.cn 420010766000 - 06/2016...
Need help?
Do you have a question about the Sensys Net and is the answer not in the manual?
Questions and answers