Table of Contents
Advertisement
Available languages
Available languages
Quick Links
Sony Corporation
Printed in Japan
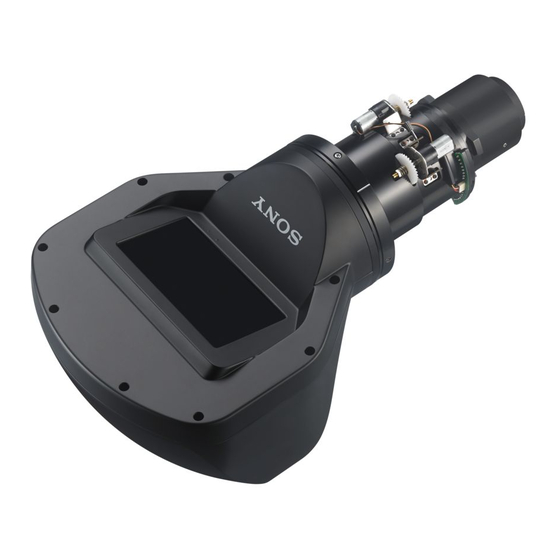
Projection Lens
VPLL-3003
お買い上げいただきありがとうございます。
電気製品は安全のための注意事項を守らないと、
火災や人身事故になることがあります。
この取扱説明書には、事故を防ぐための重要な注意事項と製品の取り扱いかたを示してあります。
この取扱説明書をよくお読みのうえ、製品を安全にお使いください。お読みになったあとは、
いつでも見られるところに必ず保管してください。
© 2015 Sony Corporation
4-583-683-02 (1)
取扱説明書 ̲̲̲̲̲̲̲̲̲̲̲̲̲̲̲
JP
Operating Instructions _____
GB
Mode d'emploi____________
FR
Manual de instrucciones ___
ES
Bedienungsanleitung ______
DE
Istruzioni per l'uso _________
IT
_______________
CS
Инструкция по эксплуатации ___
RU
Advertisement
Chapters
Table of Contents

Related Manuals for Sony VPLL-3003


Summary of Contents for Sony VPLL-3003
- Page 1 Projection Lens 取扱説明書 ̲̲̲̲̲̲̲̲̲̲̲̲̲̲̲ Operating Instructions _____ Mode d’emploi____________ Manual de instrucciones ___ Bedienungsanleitung ______ Istruzioni per l’uso _________ _______________ Инструкция по эксплуатации ___ VPLL-3003 お買い上げいただきありがとうございます。 電気製品は安全のための注意事項を守らないと、 火災や人身事故になることがあります。 この取扱説明書には、事故を防ぐための重要な注意事項と製品の取り扱いかたを示してあります。 この取扱説明書をよくお読みのうえ、製品を安全にお使いください。お読みになったあとは、 いつでも見られるところに必ず保管してください。 Sony Corporation Printed in Japan © 2015 Sony Corporation...
- Page 2 日本語 このレンズはソニープロジェクター用のレンズです。 安全のために 対応機種については、お買い上げ店またはソニーの相談 窓口にご相談ください。 ソニー製品は安全に充分配慮して設計されています。し お客様へ かし、まちがった使いかたをすると、火災や人身事故に つながることがあり、危険です。事故を防ぐために次の お客様によるレンズの取り付けは、火災や人身事故につ ことを必ずお守りください。 ながることがあります。レンズの取り付けについては、 お買い上げ店またはソニーの相談窓口にご依頼くださ 安全のための注意事項を守る い。 4 ページの注意事項をよくお読みください。製品全般の安 サービスの方へ 全上の注意事項が記されています。 安全上の注意をよくお読みのうえ、設置や保守、点検、 破損したら使わない 修理などを安全に行ってください。 お買い上げ店またはソニーの相談窓口にご相談ください。 警告表示の意味 この取扱説明書および製品では、次のような表示 をしています。表示の内容をよく理解してから本 文をお読みください。 この表示の注意事項を守らないと、火災や感電な どにより死亡や大けがなど人身事故につながるこ とがあります。 この表示の注意事項を守らないと、感電やその他 の事故によりけがをしたり周辺の物品に損害を与 えたりすることがあります。 注意を促す記号 行為を禁止する記号 行為を指示する記号...
-
Page 3: Table Of Contents
注意 ................4 使用上のご注意 ..............5 付属品を確かめる ..............6 投写レンズを取り付ける ............6 脚を取り付ける ................... 6 プロジェクターに取り付けられていた投写レンズを 取り外す ....................7 オプティカルフィルターを取り付ける ......7 像面基準ピンを取り外す ............. 8 投写レンズ VPLL-3003 を取り付ける ........ 8 調整する ................9 調整フロー ..................... 9 事前準備 ....................10 プロジェクターの設置調整 ............. 10 シフト調整 ..................12 フォーカス調整 ................12 コーナーフォーカス調整 ............12 像面調整 ....................13 出荷状態の像面位置確認方法 ... - Page 4 注意 感電にご注意を 脚を運搬目的に使用しない • 部品交換の場合は感電の危険があるので 脚をもって運搬すると脚が本体から外れて、 電源プラグを抜いてください。 本体が落下してけがをする恐れがあります。 • 内部には高電圧の部分があり、通電時に おいては感電の危険がありますので充分 レンズをのぞかない にご注意ください。 投影中にプロジェクターのレンズをのぞく と強い光が目に入り、目に悪影響を与える 部品の取り付けや配線の引き回しは ことがあります。 元どおりに レンズの取り付けのために、動かしたハー レンズの取り付け時には安全性を確 ネスや開放したクランパーなどは、そのま 保する までは、発熱部品や高電圧部品および可動 レンズの取り付け作業は、作業台に置いて 部分などに触れる危険がありますので、必 行い、天つり状態では行わないでください。 ず元どおりにハーネスを引き回し、クラン けがの原因となります。 パーで元どおりに固定してください。 製品本体へ確実にレンズを取り付け サービス後は安全点検を る サービスのために取りはずしたネジ、部品、 確実に取り付けないとレンズが外れてけが 配線が元どおりになっていること、また異 や事故の原因となります。 物が入っていないことを確認してください。 またサービスした箇所の周辺の部品および レンズにぶら下がらない 線材の損傷してしまったところがないかな どを点検してください。...
-
Page 5: 使用上のご注意
結露が起きたときは、プロジェクターの電源を入れたま 使用上のご注意 ま約 2 時間放置した後でお使いください。 • お使いになる前に、必ず動作確認を行ってください。 故障その他に伴う営業上の機会損失等は保証期間中お • 取り外したレンズまたは取り付けるレンズを置くとき よび保証期間経過後にかかわらず、補償はいたしかね は、しっかりした水平な台の上に静かに横にして置いて ますのでご了承ください。 ください。レンズ面は傷つきやすいので取り扱いには充 • 本製品を使用したことによるお客様、または第三者か 分注意してください。 らのいかなる請求についても、当社は一切の責任を負 • 投写窓やレンズ面には手を触れないようにしてくださ いかねます。 い。 • 諸事情による本製品に関連するサービスの停止、中断 • 投写中に投写窓のすぐ前で光を遮らないでください。 について、一切の責任を負いかねます。 光を遮ると、熱により、遮光した物およびレンズに変形 などの影響を与えることがあります。投写を一時的に中 断するときには、ピクチャーミューティング機能をお使 いください。 • 投写レンズを落とさないように気を付けてください。 レンズ部分のお手入れについて 投写窓やレンズ面についた汚れは、クリーニングクロス やメガネ拭きなどの柔らかい布で軽く拭き取ってくださ い。アルコールやベンジン、シンナー、酸性洗浄剤、ア ルカリ性洗浄剤、研磨剤入り洗浄剤、化学ぞうきんなど はレンズ表面を傷めますので、絶対に使用しないでくだ さい。 ご注意... -
Page 6: 付属品を確かめる
付属品を確かめる 投写レンズを取り付ける 前脚(2) 脚を取り付ける ご注意 • 投写レンズ VPLL-3003 を取り付ける際は、 設置条件に関 後脚(2) わらず、プロジェクターに脚を取り付けた状態で行って ください。脚が付いた状態でも天吊り金具を取り付ける ことができます。 • 脚を取り付ける際は、平らな机などの上で行ってくださ オプティカルフィルター(1) い。 プロジェクターを裏返す。 付属の前脚 2 本と後脚 2 本をプロジェクターに取り付 ける。 取扱説明書(1) 長い脚を前側に、短い脚を後側に取り付けてくださ い。 後脚(短い) 前脚(長い) 天吊り金具を使用する場合は、天吊り金具のベース を取り付けてください。取り付け方は、天吊り金具 の取扱説明書ご覧ください。 プロジェクターを床置き状態にする。 付属品を確かめる / 投写レンズを取り付ける... -
Page 7: 取り外す
傷める恐れがあります。レンズ交換は、電源を切り、 電源プラグを抜いてから行ってください。 オプティカルフィルター 突起 LENS RELEASE ボタンを押しながら、投写レンズを 反時計方向に回し、レンズをまっすぐに引き出す。 下部 プリズムベース ピンセットでつまむ場所 LENS RELEASE ボタン 投写レンズ ご注意 着脱時に正しく作業を行わないとオプティカルフィル オプティカルフィルターを取り付け ターが破損する恐れがあります。 る ちょっと一言 オプティカルフィルターのお手入れについて ご注意 • お手入れをする前に: 投写レンズ VPLL-3003 をご使用の際は、オプティカル 必ずプロジェクターの電源を落として光源が消灯してい フィルターを取り付けてください。オプティカルフィル ることを確認してください。 ターを使用しないと、画像が正しく表示されない場合が • お手入れのしかた: あります。 オプティカルフィルターについたチリやほこりは、飲用 水を付けたティッシュペーパーで軽く拭き取ってくださ い。アルコールやベンジン、シンナー、酸性洗浄剤、ア ルカリ性洗浄剤、研磨剤入り洗浄剤、化学ぞうきんなど はフィルター表面を傷めますので、絶対に使用しないで ください。 投写レンズを取り付ける... -
Page 8: 像面基準ピンを取り外す
像面基準ピンを取り外す 投写レンズ VPLL-3003 を取り付け る ご注意 ご使用の前に必ず 2 本の像面基準ピンを取り外してくだ ご注意 さい。取り外さないと投写レンズが破損する恐れがあり • 投写レンズの取り付けは、プロジェクターを床置きにし ます。 て行ってください。 • 投写レンズを取り付ける際は、LENS RELEASE ボタン 投写レンズの天面側と側面側にある、2 本の像面基準 を押さないでください。 ピンをまっすぐ引き抜く。 投写レンズの目印線をプロジェクター上面に向けて 固くて指で引き抜けない場合は、ペンチ等の工具を 奥まで差し込む。 使用してください。 取り外したピンは、外した位置の近くにあるネジ穴 ご注意 に差し込むことで保存が可能です。 像面基準ピンを用いると、出荷状態の像面位置を確 投写レンズを取り付ける際は、図の位置を両手で 認可能です。確認方法は、 「出荷状態の像面位置確認 持って行ってください。 方法」 (14 ページ)をご覧ください。 プロジェクター上面 像面基準ピン A 目印線... -
Page 9: 調整する
調整する 調整フロー 標準調整 事前準備(10 ページ) プロジェクターの設置 プロジェクターの設置調整(10 ページ) シフト調整(12 ページ) フォーカス調整(12 ページ) コーナーフォーカス調整(12 ページ) 画面上下または左右方向の 必要 フォーカス微調整 不要 追い込み調整 像面調整(13 ページ) シフト調整(12 ページ) 必要 画位置調整 不要 プロジェクターの設置調整(10 ページ) フォーカス調整(12 ページ) コーナーフォーカス調整(12 ページ) ワープ補正 調整完了 ◆ ワープ補正については、プロジェクターの取扱説明書をご覧ください。 調整する... -
Page 10: 事前準備
事前準備 プロジェクターの電源を入れる。 ご注意 投写レンズが初期位置まで自動で移動します。 • 投写環境に合わせて画の上下左右が正しく投写されるよ うに、プロジェクターの画像反転を設定してください。 ご注意 • 投写レンズのシフト初期位置は、天吊り状態のシフト上 端、床置き状態のシフト下端です。上下方向を微調整す 投写レンズを初期位置に移動させる際は、投写レン ズに物がぶつからないようにしてください。 るために、プロジェクターの設置前にシフトをほぼ中央 に移動してください。 シフトの上下方向をほぼセンターの位置に移動する。 プロジェクターのリモコンまたは操作部の SHIFT ボ タンを押して、V/v で調整します。 プロジェクターの設置調整 画面の上辺と下辺が平行になっているかを確認する。 平行になっていない場合は、投写面に対してプロジェクターを平行(a = b)に設置してください。 画歪状態 投写面に対しての設置状態(上から見た図) a > b a < b 調整する... - Page 11 画面の下辺が水平になっているか確認する。 水平になっていない場合は、プロジェクターが水平になるように天吊り金具、または脚部(調整可)を調整してくだ さい。 天吊り金具の調整方法は、天吊り金具の取扱説明書をご覧ください。 脚部の調整方法について詳しくは「脚部調整のしかた」 (12 ページ)をご覧ください。 画歪状態 脚部調整箇所 画面の左右の辺が垂直になっていることを確認する。 垂直になっていない場合は、プロジェクターが投写面に対して垂直になるように天吊り金具、または脚部(調整可) を調整してください。 天吊り金具の調整方法は、天吊り金具の取扱説明書をご覧ください。 脚部の調整方法について詳しくは「脚部調整のしかた」 (12 ページ)をご覧ください。 画歪状態 投写面に対しての設置状態 脚部調整箇所 (横から見た図) c > 90° c < 90° 調整する...
-
Page 12: シフト調整
脚部調整のしかた フォーカス調整 底面にある 4 箇所の脚部で高さを調整できます。 画面中心部を見ながらフォーカスを調整する。 リモコンまたは操作部の FOCUS ボタンを 1 回押し て、V/v/B/b で調整します。 コーナーフォーカス調整 投写レンズ VPLL-3003 を取り付けたときは、通常の フォーカス調整の他に、コーナーフォーカス調整が必要 脚高さ です。 脚 画面のコーナーを見ながら、フォーカスを調整する。 リモコンまたは操作部の FOCUS ボタンを 2 回押し 脚の下部をプロジェクターの上面から見て右に回し、 て、V/v/B/b で調整します。 ゆるめる。 シフト調整 リモコンの PATTERN ボタンを押す。 リモコンまたは操作部の SHIFT ボタンを押して、 V/v/B/b で調整する。... -
Page 13: 像面調整
像面調整ネジ A(天面側プラスネジ)調整イメージ 像面調整 左回し 右回し 通常は標準調整(10 〜 12 ページ)を行ってください。 本体から遠い 投写面 さらにフォーカスの追い込み調整が必要な場合、以下の 像面調整を行ってください。 本体に近い 像面調整ネジを回すと、像面の上下および左右の傾きを 投写面 調整することで投写面内におけるフォーカスのずれが調 整可能です。 像面調整は、繰り返し行うことにより、調整精度が高く 投写面(スクリーン面) なります。 像面 上下方向の像面調整 全体でフォーカスが合うように手順 2 〜 4 を繰り返し 像面を調整する。 像面調整ネジ A(天面側プラスネジ) 調整が終わったら、 像面調整固定ネジ B を右に回して 固定する。 左右方向の像面調整 像面調整固定ネジ D (側面側プラスネジ) 像面調整固定ネジ... -
Page 14: 出荷状態の像面位置確認方法
手順 3 で確認した像面が手前にある場合は像面調整ネ 側面側の像面基準ピン B を奥までまっすぐ差し込む。 ジ C を右方向に回転、像面が投写面奥にある場合は ピンが奥まで入らない場合は、手順 1 〜 2 を繰り返 像面調整ネジ C を左方向に回転させて、右側の投写 してください。 面の部分でフォーカスが合うように像面を調整する。 像面調整ネジC を像面基準ピンB が簡単に抜けない位 像面調整ネジ C(側面側プラスネジ)調整イメージ 置まで左に回す。 左回し 右回し この位置が、出荷状態の像面位置となります。 ご注意 • 像面調整固定ネジを緩め過ぎると、ネジが脱落し紛失す る恐れがあります。 • ご使用の際は、像面基準ピンを取り外してください。方 法は「像面基準ピンを取り外す」 (8 ページ)をご覧く 投写面(スクリーン面) ださい。 像面 全体でフォーカスが合うように手順... -
Page 15: 投写レンズ Vpll-3003 の取り外しかた
投写レンズ VPLL- 投写レンズを取り外す際は、図の位置を両手で持っ 3003 の取り外しかた て行ってください。 ご注意 投写レンズの取り外しは、プロジェクターを床置きにし • 投写レンズをセンター位置に戻さないと、レンズの取 て行ってください。 り外しができません。 • 電源がオフになる直前にレンズがセンター位置に移動 するため、電源オフの途中で電源ケーブルを抜かない でください。 投写レンズをセンター位置に戻す。 プロジェクターの電源が入っている状態で、リモコ ンの LENS SHIFT ボタンを押し、その後、リモコン の RESET ボタンを押してください。投写レンズが センター位置に戻ります。 LENS RELEASE ボタンを押しながら、投写レンズを 反時計方向に回し( ) 、レンズをまっすぐに引き出 す( ) 。 プロジェクター上面 目印線 LENS RELEASE ボタン 投写レンズ VPLL-3003 の取り外しかた... -
Page 16: その他
その他 主な仕様 最大外形寸法(幅×高さ×奥行き) 約 229 mm × 193.7 mm × 424.7 mm 質量 約 2.9 kg ご注意 外形寸法、質量は概寸です。 本機の仕様および外観は、改良のため予告なく変更することがありますので、ご了承ください。 投写距離とレンズシフト量 投写距離表 画面サイズ 対角 D 横×縦 80 型 (2.03) 1.72 × 1.08 0.55 0.66 0.41 -0.11 0.20 0.30 0.36 0.48 0.54 100 型 (2.54) 2.15 × 1.35 0.69 0.81 0.55... - Page 17 スクリーン *1 天吊り金具の取扱説明書ご覧ください。 *2 カバーガラス中央 レンズシフト量 投写画面 レンズ中心 その他...
-
Page 18: 寸法図
寸法図 254.4 170.3 単位:mm 単位:mm ご注意 ランプを使用したプロジェクターでは、プロジェクター 本体の後ろに空間を取らないと、設置状態のままでラン プの交換ができません。 その他... - Page 19 SONY LIMITED WARRANTY - Please visit http:// www.sony.com/psa/warranty for important This lens is designed for use with the Sony Projector. information and complete terms and conditions of For details concerning compatible models, consult with Sony’s limited warranty applicable to this product.
- Page 20 Removing the Projection Lens attached to the Projector ............23 Attaching the Optical Filter ......23 Removing the default image surface pins ..24 Attaching the Projection Lens VPLL-3003 ..24 Adjusting .............. 25 Adjustment flow ..........25 Preparation ............26 Setting and adjustment of the projector ...
-
Page 21: Precaution
If light is blocked, heat may damage the object or the WHATSOEVER. lens of the unit (resulting in deformation, etc.). Use the • SONY WILL NOT BE LIABLE FOR CLAIMS OF picture muting function to suspend projection for a ANY KIND MADE BY USERS OF THIS UNIT short while. -
Page 22: Checking The Supplied Accessories
Lens Front foot (2) Attaching the feet Notes • When the projection lens VPLL-3003 is attached, Rear foot (2) attach the feet to the projector regardless of the installing condition. You can attach the ceiling mount unit even if the feet are attached. -
Page 23: Removing The Projection Lens Attached To The Projector
Note • Cleaning the optical filter: When the projection lens VPLL-3003 is used, attach the Wipe the filter gently with a tissue paper which is optical filter. When the optical filter is not used, the moistened with potable water. Never use solvents image may be not displayed correctly. -
Page 24: Removing The Default Image Surface Pins
Removing the default image Attaching the Projection Lens surface pins VPLL-3003 Note Notes Make sure to remove the two default image surface pins • When attaching the projection lens, put the projector before use. Otherwise, the projection lens may be on the floor. -
Page 25: Adjusting
Adjusting Adjustment flow Standard adjustments Preparation (page 26) Setting up the projector Setting and adjustment of the projector (page 26) Shift adjustment (page 28) Focus adjustment (page 28) Corner focus adjustment (page 28) Fine focus adjustment necessary of the vertical and horizontal directions unnecessary Fine adjustments... -
Page 26: Preparation
Preparation Turn on the projector. Notes The projection lens moves automatically to the • Set the image inversion of the projector so that the top initial position. and bottom, left and right of the image is projected correctly depending on the projection environment. Note •... - Page 27 Check if the lower side of the picture is horizontal. When the projector is not positioned horizontally, adjust the ceiling mount unit or feet (adjustable) so that the projector is positioned horizontally. For details concerning the adjusting of the ceiling mount unit, see the operating instructions of the ceiling mount unit.
-
Page 28: Shift Adjustment
Commander or the control panel of the projector once, and adjust with V/v/B/b. Corner focus adjustment Normal focus adjustment and corner focus adjustment Foot height are also necessary when the projection lens VPLL-3003 is attached. Foot Adjust the focus while watching the corner of the screen. -
Page 29: Image Surface Adjustment
projected surface, turn the image surface Image surface adjustment adjustment screw A to the left. When the image surface confirmed in step 3 is at the far back of the projected surface, turn the image surface Normally, perform the procedures for the standard adjustment screw A to the right. -
Page 30: Confirmation Method Of The Default Position Of The Image Surface
Loosen the image surface adjustment fixing screw Confirmation method of the default D by turning it to the left several times. position of the vertical image surface Adjust the focus of the projection lens at the left of Loosen the image surface adjustment fixing screw the projected surface (or at the projected surface B by turning it to the left several times. -
Page 31: Removing The Projection Lens Vpll-3003
While pressing and holding down the LENS RELEASE button, rotate the projection lens counterclockwise ( 1 ) to pull out the lens straight ( 2 ). Top of surface of the projector Index LENS RELEASE button Removing the Projection Lens VPLL-3003... -
Page 32: Others
Others Specifications Maximum dimensions (W/H/D) Approx. 229 mm × 193.7 mm × 424.7 mm inches × 7 inches × 16 inches) Mass Approx. 2.9 kg (6.4 lb) Note The external form measurement and the mass are approximate values. Design and specifications are subject to change without notice. Projection Distance and Lens Shift Range Projection distance Projection image size... - Page 33 Projection distance formula D: Projected image size (Diagonal) L1 = 0.007053 × D – 0.016810 (L1 = 0.277674 × D – 0.661950) L2 = 0.007048 × D + 0.101010 (L2 = 0.277471 × D + 3.976810) L3 = 0.007048 × D – 0.154990 (L3 = 0.277471 ×...
-
Page 34: Dimensions
Lens shift range Projected image Center of the lens Dimensions 254.4 (10 170.3 (6 Unit: mm (inches) Others... - Page 35 256 (10 208 (8 307 (12 464 (18 Unit: mm (inches) Note For the projector that uses lamps, a space is required behind the projector or you cannot change the lamp. Others...
- Page 36 Ne pas utiliser cet appareil dans une zone résidentielle. Pour les clients au Canada GARANTIE LIMITÉE DE SONY - Rendez-vous sur http://www.sonybiz.ca/pro/lang/en/ca/article/ resources-warranty-product-registration pour obtenir les informations importantes et l’ensemble des termes et conditions de la garantie limitée de Sony applicable à ce produit.
- Page 37 Fixation du filtre optique ........40 Retrait des goupilles de surface d’image par défaut .............. 41 Fixation de l’objectif de projection VPLL-3003 ............ 41 Réglage ..............43 Flux de réglage ..........43 Préparation ............44 Réglage et ajustement du projecteur ....44 Réglage du déplacement ........
-
Page 38: Précautions D'emploi
Nettoyage de l’objectif autre raison quelle qu’elle soit. Essuyez délicatement la fenêtre de projection et la • Sony n’assumera pas de responsabilité pour les surface de l’objectif avec un chiffon de nettoyage ou un réclamations, quelle qu’elles soient, effectuées chiffon à lunettes. N’utilisez jamais de solvants tels que par les utilisateurs de cet appareil ou par des l’alcool, le benzène, les diluants ou les détergents... -
Page 39: Vérification Des Accessoires Fournis
Pied avant (2) Fixation des pieds Remarques • Une fois l’objectif de projection VPLL-3003 fixé, Pied arrière (2) attachez les pieds au projecteur indépendamment de la condition d’installation. Vous pouvez fixer le dispositif de montage au plafond même si les pieds sont attachés. -
Page 40: Retrait De L'objectif De Projection Fixé Au Projecteur
éteinte. Remarque • Nettoyage du filtre optique : Lorsque l’objectif de projection VPLL-3003 est utilisé, Essuyez délicatement le filtre avec un mouchoir en fixez le filtre optique. Lorsque le filtre optique n’est pas papier imbibé d’eau potable. N’utilisez jamais de utilisé, il se peut que l’image ne s’affiche pas... -
Page 41: Retrait Des Goupilles De Surface D'image Par Défaut
(page 48). Trous de vis pour stocker les goupilles de surface d’image par défaut Fixation de l’objectif de projection VPLL-3003 Remarques • Pour fixer l’objectif de projection, posez le projecteur sur le sol. • Pour fixer l’objectif de projection, n’appuyez pas sur la touche LENS RELEASE. - Page 42 Insérez complètement l’objectif de projection en orientant l’index de l’objectif face à la surface supérieure du projecteur. Remarque Pour fixer l’objectif de projection, portez-le en le saisissant à deux mains, comme illustré. Surface supérieure du projecteur Index Faites pivoter l’objectif dans le sens horaire jusqu’à enclenchement.
-
Page 43: Réglage
Réglage Flux de réglage Réglages standard Préparation (page 44) Mise en place du projecteur Réglage et ajustement du projecteur (page 44) Réglage du déplacement (page 46) Réglage de la mise au point (page 46) Réglage de la mise au point de coin (page 46) Réglage précis de la mise nécessaire... -
Page 44: Préparation
Préparation Mettez le projecteur sous tension. Remarques L’objectif de projection revient automatiquement • Réglez l’inversion d’image du projecteur de sorte que sur la position initiale. le haut, le bas, la gauche et la droite de l’image soient projetés correctement en fonction de l’environnement Remarque de projection. - Page 45 Vérifiez si le côté inférieur de l’image est horizontal. Si le projecteur n’est pas positionné à l’horizontale, ajustez le dispositif de montage au plafond ou les pieds (réglables) de sorte à positionner le projecteur à l’horizontale. Pour plus de détails concernant le réglage du dispositif de montage au plafond, consultez son mode d’emploi. Pour plus de détails concernant le réglage des pieds, voir page 46.
-
Page 46: Réglage Du Déplacement
Le réglage de la mise au point normale et le réglage de Pied la mise au point de coin sont également nécessaires lorsque l’objectif de projection VPLL-3003 est fixé. Réglez la mise au point en regardant le coin de Faites pivoter le dessous du pied dans le sens l’écran. - Page 47 Ajustement de la surface d’image Exemple de réglage à l’aide de la vis de réglage de la surface verticale d’image A (vis cruciforme du côté plafond) Tour vers la gauche Tour vers la droite Vis de réglage de la surface d’image A (vis cruciforme du côté...
-
Page 48: Méthode De Vérification De La Position Par Défaut De La Surface D'image
Desserrez la vis de fixation pour le réglage de la Méthode de vérification de la surface d’image D en la faisant pivoter plusieurs position par défaut de la surface fois vers la gauche. d’image Réglez la mise au point de l’objectif de projection sur la gauche de la surface projetée (ou sur la Pour connaître la position des goupilles de surface surface projetée à... -
Page 49: Retrait De L'objectif De Projection Vpll-3003
Pour plus de détails, reportez-vous à maintenant droit ( 2 ). la section « Retrait des goupilles de surface d’image par défaut » (page 41). Surface supérieure du projecteur Index Touche LENS RELEASE Retrait de l’objectif de projection VPLL-3003... - Page 50 Remarque Pour retirer l’objectif de projection, portez-le en le saisissant à deux mains, comme illustré. Remarque Pour retirer l’objectif de projection, posez le projecteur sur le sol. Retrait de l’objectif de projection VPLL-3003...
-
Page 51: Autres
Autres Caractéristiques techniques Dimensions maximales (L/H/P) Environ 229 mm × 193,7 mm × 424,7 mm po × 7 po × 16 Masse Environ 2,9 kg (6,4 lb) Remarque La mesure de forme externe et la masse sont des valeurs approximatives. La conception et les spécifications sont sujettes à... - Page 52 Formule de la distance de projection D : taille de l’image projetée (diagonale) L1 = 0,007053 × D – 0,016810 (L1 = 0,277674 × D – 0,661950) L2 = 0,007048 × D + 0,101010 (L2 = 0,277471 × D + 3,976810) L3 = 0,007048 ×...
-
Page 53: Dimensions
Plage de déplacement d’objectif Image projetée Centre de l’objectif Dimensions 254,4 (10 170,3 (6 Unité : mm (po) Autres... - Page 54 256 (10 208 (8 307 (12 464 (18 Unité : mm (po) Remarque Pour le projecteur qui utilise des lampes, un espace est nécessaire derrière le projecteur afin de vous permettre de changer la lampe. Autres...
- Page 55 Sony. La instalación del objetivo puede provocar un incendio o lesiones personales. Los usuarios deben dejar la instalación del objetivo en manos de un representante autorizado de Sony. Para los clientes de Europa, Australia y Nueva Zelanda ADVERTENCIA Éste es un equipo conforme con los requisitos de la clase A de la norma CISPR 32.
- Page 56 Colocación del filtro óptico ......59 Extracción de los pasadores de la superficie de la imagen predeterminada ........60 Colocación del objetivo de proyección VPLL-3003 ............ 60 Ajuste ..............62 Procedimiento de ajuste ........62 Preparación ............63 Configuración y ajuste del proyector ....63 Ajuste del desplazamiento .......
-
Page 57: Precaución
REALIZADAS POR USUARIOS DE ESTA paños de limpieza químicos, ya que podrían dañar la UNIDAD O POR TERCEROS. superficie del objetivo. • SONY NO SE HACE RESPONSABLE DE LA FINALIZACIÓN NI DE LA INTERRUPCIÓN, Nota POR LA CIRCUNSTANCIA QUE FUERA, DE CUALQUIER SERVICIO RELACIONADO CON La ventana de proyección es de cristal. -
Page 58: Comprobación De Los Accesorios Suministrados
Colocación de las patas Pata delantera (2) Notas • Con el objetivo de proyección VPLL-3003 instalado, monte las patas en el proyector independientemente de la posición de instalación. Es posible instalar la Pata trasera (2) unidad de montaje en techo aunque las patas estén colocadas. -
Page 59: Desmontaje Del Objetivo De Proyección Instalado En El Proyector
Nota diluyentes, ácido, detergentes alcalinos o abrasivos, o Cuando utilice el objetivo de proyección VPLL-3003, paños con soluciones químicas, ya que pueden coloque el filtro óptico. Si no se utiliza el filtro óptico, provocar desperfectos en la superficie del filtro. -
Page 60: Extracción De Los Pasadores De La Superficie De La Imagen Predeterminada
(página 67). Orificios de tornillos para guardar los pasadores de la superficie de la imagen predeterminada Colocación del objetivo de proyección VPLL-3003 Notas • Al colocar el objetivo de proyección, ponga el proyector en el suelo. - Page 61 Introduzca completamente el objetivo de proyección con la marca del objetivo mirando hacia la parte superior de la superficie del proyector. Nota Al colocar el objetivo de proyección, sujételo con ambas manos, tal y como se muestra en la ilustración. Parte superior de la superficie del proyector Índice Gire el objetivo en el sentido de las agujas del reloj...
-
Page 62: Ajuste
Ajuste Procedimiento de ajuste Ajustes estándar Preparación (página 63) Colocación del proyector Configuración y ajuste del proyector (página 63) Ajuste del desplazamiento (página 65) Ajuste del enfoque (página 65) Ajuste del enfoque en la esquina (página 65) Ajuste preciso del enfoque necesario de las direcciones horizontal y vertical... -
Page 63: Preparación
Preparación Encienda el proyector. Notas El objetivo de proyección se coloca • Configure la inversión de la imagen del proyector de automáticamente en la posición inicial. modo que los lados arriba y abajo e izquierdo y derecho de la imagen se proyecten correctamente Nota teniendo en cuenta el entorno de proyección. - Page 64 Compruebe si el lado inferior de la imagen está horizontal. Si el proyector no se encuentra en la posición horizontal, ajuste la unidad de montaje en techo o las patas (ajustables) para que el proyector esté horizontal. Para obtener más información sobre el ajuste de la unidad de montaje en techo, consulte el manual de instrucciones de la unidad de montaje en techo.
-
Page 65: Ajuste Del Desplazamiento
V/v/B/b. Ajuste del enfoque en la esquina Al montar el objetivo de proyección VPLL-3003, es Altura de la necesario tanto el ajuste de enfoque normal como el pata ajuste de enfoque en la esquina. - Page 66 Ajuste de la superficie de la imagen Ejemplo de ajuste con el tornillo de ajuste de la superficie de la vertical imagen A (tornillo en cruz en el lado del techo) Giro hacia la izquierda Giro hacia la derecha Tornillo de ajuste de la superficie de la imagen A (tornillo en cruz en el lado del techo) Superficie proyectada...
-
Page 67: Método De Confirmación De La Posición Predeterminada De La Superficie De La Imagen
Afloje el tornillo de fijación del ajuste de la Método de confirmación de la superficie de la imagen D girándolo varias veces posición predeterminada de la hacia la izquierda. superficie de la imagen Ajuste el enfoque del objetivo de proyección hacia la izquierda de la superficie proyectada (o en la Para saber las posiciones de los pasadores de la superficie proyectada, cerca del tornillo de ajuste... -
Page 68: Extracción Del Objetivo De Proyección Vpll-3003
Para ladearlo ( 2 ). obtener más información, consulte “Extracción de los pasadores de la superficie de la imagen predeterminada” (página 60). Parte superior de la superficie del proyector Índice Botón LENS RELEASE Extracción del objetivo de proyección VPLL-3003... - Page 69 Nota Al extraer el objetivo de proyección, sujételo con ambas manos, tal y como se muestra en la ilustración. Nota Al extraer el objetivo de proyección, ponga el proyector en el suelo. Extracción del objetivo de proyección VPLL-3003...
-
Page 70: Otros
Otros Especificaciones Dimensiones máximas (an./al./pr.) Aprox. 229 mm × 193,7 mm × 424,7 mm Peso Aprox. 2,9 kg Nota Las dimensiones externas y el peso son aproximados. El diseño y las especificaciones están sujetos a cambios sin previo aviso. Distancia de proyección e intervalo de desplazamiento del objetivo Distancia de proyección Tamaño de imagen de proyección Diagonal... - Page 71 Fórmula de la distancia de proyección D: tamaño de la imagen proyectada (diagonal) L1 = 0,007053 × D – 0,016810 L2 = 0,007048 × D + 0,101010 L3 = 0,007048 × D – 0,154990 L4 = 0,007048 × D – 0,669990 L5 = 0,007048 ×...
-
Page 72: Dimensiones
Intervalo de desplazamiento del objetivo Imagen proyectada Centro del objetivo Dimensiones 254,4 170,3 Unidad: mm Otros... - Page 73 Unidad: mm Nota En los proyectores que utilizan lámparas, es necesario dejar un espacio detrás del proyector o no podrá cambiar la lámpara. Otros...
- Page 74 Bitte lesen Sie dieses Handbuch vor der Benutzung des Geräts sorgfältig durch und bewahren Sie es zum späteren Nachschlagen auf. Dieses Objektiv ist für Sony-Projektoren gedacht. Einzelheiten zu kompatiblen Modellen erfragen Sie bitte bei qualifizierten Sony-Mitarbeitern. Beim Anbringen des Objektivs besteht Feuer- und Verletzungsgefahr.
- Page 75 Projektor ............78 Anbringen des optischen Filters ....... 78 Entfernen der Stifte für die Standardbildebene .......... 79 Anbringen des Projektionsobjektivs VPLL-3003 ............ 79 Einstellen .............. 81 Ablauf des Einstellvorgangs ......81 Vorbereitungen ..........82 Aufstellen und Einstellen des Projektors ..82 Einstellen der Objektivlage ......
-
Page 76: Sicherheitsmaßnahmen
Reinigungstücher, da andernfalls die BENUTZERN DIESES GERÄTS ODER VON Oberfläche der Linse beschädigt werden kann. DRITTER SEITE ÜBERNEHMEN. • SONY KANN KEINE HAFTUNG FÜR DIE Hinweis BEENDIGUNG ODER EINSTELLUNG VON DIENSTLEISTUNGEN BEZÜGLICH DIESES Das Projektionsfenster besteht aus Glas. Wenn Sie stark GERÄTS GLEICH AUS WELCHEM GRUND... -
Page 77: Prüfen Des Mitgelieferten Zubehörs
Zubehörs Projektionsobjektivs Vorderer Fuß (2) Anbringen der Füße Hinweise • Wenn Sie das Projektionsobjektiv VPLL-3003 Hinterer Fuß (2) anbringen, müssen Sie auch die Füße anbringen, unabhängig davon, wie der Projektor installiert wird. Sie können die Deckenhalterung auch bei angebrachten Füßen anbringen. -
Page 78: Abnehmen Des Projektionsobjektivs Vom Projektor
• Reinigen des optischen Filters: Bringen Sie den optischen Filter an, wenn Sie das Wischen Sie den Filter vorsichtig mit einem Projektionsobjektiv VPLL-3003 verwenden. Wenn Sie Papiertuch ab, das Sie mit klarem Wasser den optischen Filter nicht verwenden, wird das Bild angefeuchtet haben. -
Page 79: Entfernen Der Stifte Für Die Standardbildebene
Einzelheiten dazu finden Sie unter „Prüfverfahren für die Standardposition der Bildebene“ (Seite 86). Schraubenbohrungen zum Verstauen der Stifte für die Standardbildebene Anbringen des Projektionsobjektivs VPLL-3003 Hinweise • Stellen Sie den Projektor zum Anbringen des Projektionsobjektivs auf den Boden. • Drücken Sie beim Anbringen des Projektionsobjektivs nicht die Taste LENS RELEASE. - Page 80 Setzen Sie das Projektionsobjektiv vollständig ein, und zwar so, dass die Markierung am Objektiv auf die Oberseite des Projektors weist. Hinweis Fassen Sie das Projektionsobjektiv beim Anbringen mit beiden Händen, wie in der Abbildung gezeigt. Oberseite des Projektors Markierung Drehen Sie das Objektiv im Uhrzeigersinn, bis es mit einem Klicken einrastet.
-
Page 81: Einstellen
Einstellen Ablauf des Einstellvorgangs Standardeinstellungen Vorbereitungen (Seite 82) Einrichten des Projektors Aufstellen und Einstellen des Projektors (Seite 82) Einstellen der Objektivlage (Seite 84) Einstellen des Fokus (Seite 84) Einstellen des Eckenfokus (Seite 84) Feineinstellung des nötig Fokus in der Vertikalen und Horizontalen nicht nötig Feineinstellungen... -
Page 82: Vorbereitungen
Vorbereitungen Schalten Sie den Projektor ein. Hinweise Das Projektionsobjektiv fährt automatisch in die • Stellen Sie die Bildumkehrung des Projektors je nach Ausgangsposition. Projektionsumgebung so ein, dass die Ober- und Unterkante sowie die linke und rechte Kante des Bilds Hinweis seitenrichtig angezeigt werden. - Page 83 Prüfen Sie, ob die Unterkante des Bilds horizontal ist. Wenn der Projektor in der Horizontalen nicht richtig ausgerichtet ist, richten Sie ihn horizontal aus, indem Sie die Deckenhalterung oder die (einstellbaren) Füße einstellen. Einzelheiten zum Einstellen der Deckenhalterung finden Sie in der Bedienungsanleitung zur Deckenhalterung. Einzelheiten zum Einstellen der Füße finden Sie auf Seite 84.
-
Page 84: Einstellen Der Objektivlage
Fernbedienung oder dem Bedienfeld des Projektors und nehmen Sie die Einstellung mit V/v/B/b vor. Einstellen des Eckenfokus Höhe des Auch beim Projektionsobjektiv VPLL-3003 müssen der Fußes normale Fokus und der Eckenfokus eingestellt werden. Fuß Beachten Sie beim Einstellen des Fokus die Ecken der Projektionsleinwand. - Page 85 Einstellen der vertikalen Bildebene Beispiel für das Einstellen mit der Einstellschraube für die Bildebene A (Kreuzschlitzschraube an der zur Decke weisenden Einstellschraube für die Bildebene A Seite) (Kreuzschlitzschraube an der zur Decke weisenden Seite) Nach links drehen Nach rechts drehen Projektionsfläche in größerer Entfernung vom...
-
Page 86: Prüfverfahren Für Die Standardposition Der Bildebene
Drehen Sie die Fixierschraube für die Prüfverfahren für die Bildebeneneinstellung D zum Lösen mehrere Male Standardposition der Bildebene nach links. Wo sich die Stifte für die Standardbildebene A und B Stellen Sie den Fokus des Projektionsobjektivs auf befinden, sehen Sie in der Abbildung auf Seite 79. Wo der linken Seite der Projektionsfläche (bzw. -
Page 87: Abnehmen Des Projektionsobjektivs Vpll-3003
Bildebeneneinstellung zu weit gelöst werden, können die Schrauben herunterfallen und verloren gehen. • Entfernen Sie vor dem Gebrauch die Stifte für die Standardbildebene. Einzelheiten dazu finden Sie unter „Entfernen der Stifte für die Standardbildebene“ (Seite 79). Abnehmen des Projektionsobjektivs VPLL-3003... - Page 88 ( 2 ). Oberseite des Projektors Markierung Taste LENS RELEASE Hinweis Fassen Sie das Projektionsobjektiv beim Abnehmen mit beiden Händen, wie in der Abbildung gezeigt. Hinweis Stellen Sie den Projektor zum Abnehmen des Projektionsobjektivs auf den Boden. Abnehmen des Projektionsobjektivs VPLL-3003...
-
Page 89: Sonstiges
Sonstiges Technische Daten Maximale Abmessungen (B/H/T) ca. 229 mm × 193,7 mm × 424,7 mm Gewicht ca. 2,9 kg Hinweis Die Außenabmessungen und das Gewicht sind Näherungswerte. Änderungen, die dem technischen Fortschritt dienen, bleiben vorbehalten. Projektionsentfernung und Objektivlagebereich Projektionsentfernung Projektionsbildgröße Diagonale Breite ×... - Page 90 Formel zur Projektionsentfernung D: Projektionsbildgröße (Diagonale) L1 = 0,007053 × D – 0,016810 L2 = 0,007048 × D + 0,101010 L3 = 0,007048 × D – 0,154990 L4 = 0,007048 × D – 0,669990 L5 = 0,007048 × D – 0,363290 H1 = 0,004712 ×...
-
Page 91: Abmessungen
Objektivlagebereich Projiziertes Bild Objektivmitte Abmessungen 254,4 170,3 Einheit: mm Sonstiges... - Page 92 Einheit: mm Hinweis Bei einem Projektor mit Lampe muss hinter dem Projektor ausreichend Platz zum Auswechseln der Lampe vorhanden sein. Sonstiges...
- Page 93 Per informazioni relative ai modelli compatibili, rivolgersi a personale Sony qualificato. Il montaggio dell’obiettivo può provocare incendi o lesioni personali. Si consiglia agli utenti di richiedere al rappresentante Sony qualificato di effettuare il montaggio dell’obiettivo. Per i clienti in Europa, Australia e Nuova Zelanda AVVERTENZA Questo è...
- Page 94 ............97 Montaggio del filtro ottico ....... 97 Rimozione dei piedini per la superficie predefinita dell’immagine ..........98 Montaggio dell’obiettivo di proiezione VPLL-3003 ............ 98 Regolazione ............100 Flusso di regolazione ........100 Preparazione ........... 101 Configurazione e regolazione del proiettore ............
-
Page 95: Precauzioni
PRESENTATI DA UTENTI DI QUESTO chimici che potrebbero danneggiare la superficie APPARATO O DA TERZI. dell’obiettivo. • SONY NON SARÀ RESPONSABILE PER LA CANCELLAZIONE O LA MANCATA Nota CONTINUAZIONE PER QUALSIASI CAUSA O CIRCOSTANZA DI SERVIZI CORRELATI A La finestra di proiezione è... -
Page 96: Verifica Degli Accessori In Dotazione
Montaggio dei piedini Note • Quando è montato l’obiettivo di proiezione Piedino posteriore (2) VPLL-3003, montare i piedini sul proiettore indipendentemente dalla condizione di installazione. È possibile fissare l’unità di montaggio a soffitto anche se sono montati i piedini. Filtro ottico (1) •... -
Page 97: Rimozione Dell'obiettivo Di Proiezione Fissato Al Proiettore
• Pulizia del filtro ottico: Nota Pulire il filtro delicatamente con un fazzolettino di Quando si utilizza l’obiettivo di proiezione VPLL-3003, carta inumidito con acqua potabile. Non utilizzare montare il filtro ottico. Se non si utilizza il filtro ottico, solventi come alcool, benzene, solventi, acidi, l’immagine potrebbe non essere visualizzata... -
Page 98: Rimozione Dei Piedini Per La Superficie Predefinita Dell'immagine
(pagina 105). Fori filettati per riporre i piedini per la superficie predefinita dell’immagine Montaggio dell’obiettivo di proiezione VPLL-3003 Note • Quando si monta l’obiettivo di proiezione, posizionare il proiettore sul pavimento. • Quando si monta l’obiettivo di proiezione, non premere il pulsante LENS RELEASE. - Page 99 Inserire a fondo l’obiettivo di proiezione con l’indice sull’obiettivo rivolto verso la superficie superiore del proiettore. Nota Quando si monta l’obiettivo di proiezione, afferrarlo con entrambe le mani come indicato nell’illustrazione. Parte superiore della superficie del proiettore Indice Ruotare l’obiettivo in senso orario fino a udire un clic.
-
Page 100: Regolazione
Regolazione Flusso di regolazione Regolazioni standard Preparazione (pagina 101) Configurazione del proiettore Configurazione e regolazione del proiettore (pagina 101) Regolazione spostamento (pagina 103) Regolazione messa a fuoco (pagina 103) Regolazione messa a fuoco angolare (pagina 103) Regolazione precisa della necessario messa a fuoco per le direzioni verticale e orizzontale non necessario... -
Page 101: Preparazione
Preparazione Accendere il proiettore. Note L’obiettivo di proiezione si sposta • Definire l’inversione immagine del proiettore in modo automaticamente nella posizione iniziale. che la parte superiore e inferiore, sinistra e destra dell’immagine sia proiettata correttamente in base Nota all’ambiente di proiezione. •... - Page 102 Verificare che il lato inferiore dell’immagine sia orizzontale. Se il proiettore non è posizionato orizzontalmente, regolare l’unità di montaggio a soffitto o i piedini (regolabili) in modo da posizionare il proiettore in orizzontale. Per informazioni relative alla regolazione dell’unità di montaggio a soffitto, vedere le istruzioni per l’uso dell’unità.
-
Page 103: Regolazione Spostamento
Piedino La regolazione della messa a fuoco normale e angolare è necessaria quando è montato l’obiettivo di proiezione VPLL-3003. Osservando il proiettore dall’alto, ruotare la parte Regolare la messa a fuoco mentre si osserva inferiore dei piedini a destra e allentarla. - Page 104 Per migliorare la precisione della regolazione della Esempio di regolazione utilizzando la vite A di regolazione della superficie dell’immagine, ripetere la regolazione più superficie dell’immagine (vite più sul lato soffitto) volte. Rotazione a sinistra Rotazione a destra Regolazione della superficie Superficie dell’immagine in verticale proiettata lontana...
-
Page 105: Metodo Di Conferma Della Posizione Predefinita Della Superficie Dell'immagine
Allentare la vite D di fissaggio regolazione della Metodo di conferma della posizione superficie dell’immagine ruotandola più volte predefinita della superficie verso sinistra. dell’immagine Regolare la messa a fuoco dell’obiettivo di proiezione a sinistra della superficie proiettata (o Per le posizioni dei piedini della superficie predefinita sulla superficie proiettata vicino alla vite C di dell’immagine A e B, vedere l’illustrazione a pagina 98. -
Page 106: Rimozione Dell'obiettivo Di Proiezione Vpll-3003
( 1 ) per estrarlo ( 2 ). • Rimuovere i piedini per la superficie predefinita dell’immagine prima dell’utilizzo. Per dettagli, consultare “Rimozione dei piedini per la superficie Parte superiore della superficie del proiettore predefinita dell’immagine” (pagina 98). Indice Pulsante LENS RELEASE Rimozione dell’obiettivo di proiezione VPLL-3003... - Page 107 Nota Quando si rimuove l’obiettivo di proiezione, afferrarlo con entrambe le mani come indicato nell’illustrazione. Nota Quando si rimuove l’obiettivo di proiezione, posizionare il proiettore sul pavimento. Rimozione dell’obiettivo di proiezione VPLL-3003...
-
Page 108: Altro
Altro Caratteristiche tecniche Dimensioni massime (L/A/P) Circa 229 mm × 193,7 mm × 424,7 mm Massa Circa 2,9 kg Nota La misurazione della forma esterna e la massa sono valori approssimati. Design e caratteristiche tecniche sono soggetti a modifiche senza preavviso. Distanza di proiezione e valori spostamento obiettivo Distanza di proiezione Dimensione immagine proiezione... - Page 109 Formula distanza di proiezione D: dimensione immagine proiettata (Diagonale) L1 = 0,007053 × D – 0,016810 L2 = 0,007048 × D + 0,101010 L3 = 0,007048 × D – 0,154990 L4 = 0,007048 × D – 0,669990 L5 = 0,007048 × D – 0,363290 H1 = 0,004712 ×...
-
Page 110: Dimensioni
Campo di spostamento obiettivo Immagine proiettata Centro dell’obiettivo Dimensioni 254,4 170,3 Unità: mm Altro... - Page 111 Unità: mm Nota Per il proiettore che utilizza lampade, è richiesto uno spazio dietro il proiettore per poter sostituire la lampada. Altro...
- Page 112 简体中文 机型名称:投影镜头 使用产品前请仔细阅读本使用说明书,并请妥善保 管。 此镜头设计用于 Sony 投影机。 有关兼容型号的详细信息,请咨询合格的 Sony 工 作人员。 安装镜头可能会导致火灾或人身伤害。 用户应要求合格的 Sony 代表安装镜头。 警告 本设备符合 CISPR 32 的 A 类标准。在住宅区中使 用时本设备可能会造成无线电干扰。 关于废弃产品的处理 请不要将废弃的产品与一般生活垃圾一同弃置。 正确处置废弃的产品有助于避免对环境和人类健康 造成潜在的负面影响。 具体的处理方法请遵循当地的规章制度。...
- Page 113 检查附件 ............. 114 安装投影镜头 ............. 115 安装支脚 ............115 拆下安装到投影机的投影镜头 ....115 安装滤光片 ............ 115 拆下默认像面调节销 ........116 安装投影镜头 VPLL-3003 ......117 调节 ..............118 调节流程 ............118 准备 ..............119 投影机设置和调节 ........119 位移调节 ............121 对焦调节 ............121 角对焦调节...
-
Page 114: 注意事项
有灰尘,将软布蘸取少量稀释的温和洗涤剂溶液 后进行擦拭。 • 切勿使用任何类型的研磨垫、碱性 / 酸性清洁剂、 擦洗粉或挥发性溶剂,例如酒精、苯、稀释剂或 杀虫剂。 • 用干净的布清洁本产品。用脏布擦拭可能会划伤 本产品。 • 使用这些材料或长时间接触橡胶或乙烯材料,可 能会损坏机柜材料。 关于湿气凝结 如果投影机安装地的室温急剧变化,或如果突然将 投影机从寒冷的地方搬到温暖的地方,投影机中可 能会出现湿气凝结。由于湿气凝结可能会造成故 障,所以在调节空调温度设定时请小心。如果出现 湿气凝结,请让投影机保持开启状态约两小时后再 使用。 注意 • 在使用前请始终确认本机运行正常。 无论保修期内外或基于任何理由, SONY 对任 何损坏概不负责。由于本机故障造成的利润损 失等,无论是在保修期以内或者以外, SONY 均不作任何赔偿。 • SONY对本产品用户或第三方的任何索赔概不负 责。 • SONY对因任何情况导致终止或停止使用本机相 关服务概不负责。 注意事项 / 检查附件... -
Page 115: 安装投影镜头
拆下安装到投影机的投影镜头 安装投影镜头 使投影镜头返回中心位置。 当投影机打开时,按遥控器上的 LENS SHIFT 安装支脚 按钮,然后按 RESET 按钮。投影镜头返回中 心位置。 注意 注意 • 当安装投影镜头 VPLL-3003 时,无论安装条件如 何,均需将支脚安装到投影机。即使安装了支 除非投影镜头返回中心位置,否则无法拆下投 脚,也可以连接天花板安装件。 影镜头。 • 在平坦桌面上等,将支脚安装到投影机。 关闭投影机,然后从电源插座中拔下交流电源 倒置投影机。 线插头。 将 2 个前支脚 (附送)和 2 个后支脚 (附送) 注意 安装到投影机。 更换镜头时,如果强光意外射入眼睛,眼睛可 将长支脚安装到前侧,将短支脚安装到后侧。 能会损伤。更换镜头前,关闭投影机,然后拔 下交流电源线插头。 后支脚 (短)... -
Page 116: 拆下默认像面调节销
用镊子镊住支架下部,向下拉至前部,并拆下 拆下默认像面调节销 投影机上安装的玻璃。 注意 务必在使用前拆下两个默认像面调节销。否则可能 会损坏投影镜头。 笔直朝前拉出天花板侧和投影镜头侧面的两个 默认像面调节销。 如果调节销太紧而难以拉出,请使用钳子等工 具。 支架下部 通过将拆下的销放入拆下位置附近的螺丝孔, 可以进行存放。 用镊子安装滤光片 (附送) 。 可以使用默认像面调节销来确认像面的默认位 置。有关详细信息,请参阅 “像面默认位置的 将滤光片上部的突出部分放入投影机棱镜底座 确认方法” (第 123 页) 。 (1) ,并插入下部直至咔嗒锁紧 (2) 。 滤光片 突出部分 默认像面调节销 A 默认像面调节销 B 下部 棱镜底座 可以用镊子镊起的位置 注意 如果安装或拆卸期间未正确操作滤光片,滤光片可 能会损坏。... -
Page 117: 安装投影镜头 Vpll-3003
安装投影镜头 VPLL-3003 注意 • 安装投影镜头时,将投影机放在地板上。 • 安装投影镜头时,请勿按 LENS RELEASE 按钮。 使投影镜头上的标记朝向投影机顶部表面,完 全插入投影镜头。 注意 安装投影镜头时,如图所示双手抓握。 投影机表面顶部 标记 顺时针旋转镜头,直至听到咔嗒一声。 安装投影镜头... -
Page 118: 调节流程
调节 调节流程 标准调节 准备 (第 119 页) 放置投影机 投影机设置和调节 (第 119 页) 位移调节 (第 121 页) 对焦调节 (第 121 页) 角对焦调节 (第 121 页) 需要 垂直和水平方向的 精细对焦调节 无需 精细调节 像面调节 (第 122 页) 位移调节 (第 121 页) 需要 图像位置调节 无需 投影机设置和调节... -
Page 119: 投影机设置和调节
准备 打开投影机。 注意 投影镜头自动移到初始位置。 • 设置投影机的图像倒置,使图像的上下左右能够 根据投影环境正确投影。 注意 • 投影镜头的初始位移位置是悬挂状态的顶部位移 位置和地板位置状态的底部位移位置。设置投影 当投影镜头移到初始位置时,确保镜头不会碰 机前,位移应靠近垂直方向的精细调节中心。 到任何物品。 将位移的垂直方向靠近中心移动。 按遥控器或投影机控制面板上的 SHIFT 按钮, 并使用 V/v 调节。 投影机设置和调节 检查图像的上侧和下侧是否平行。 如果不平行,请将投影机安装到与投影表面平行的位置 (a=b) 。 图像失真 投影表面的安装状态 (顶视图) a > b a < b 调节... - Page 120 检查图像的下侧是否水平。 当投影机未水平放置时,调节天花板安装件或支脚 (可调节) ,使投影机水平放置。 有关天花板安装件调节的详细信息,请参阅天花板安装件的使用说明书。 有关支脚调节的详细信息,请参阅第 121 页。 图像失真 支脚调节 检查图像的左侧和右侧是否垂直。 当投影机未垂直放置时,调节天花板安装件或支脚 (可调节) ,使投影机垂直放置。 有关天花板安装件调节的详细信息,请参阅天花板安装件的使用说明书。 有关支脚调节的详细信息,请参阅第 121 页。 图像失真 投影表面的安装状态 (侧视图) 支脚调节 c > 90° c < 90° 调节...
-
Page 121: 位移调节
调节支脚 对焦调节 可以使用投影机底部的四个支脚调节高度。 通过观看屏幕中心调节对焦。 按一下遥控器或投影机控制面板上的 FOCUS 按钮,并使用 V/v/B/b 调节。 角对焦调节 安装投影镜头 VPLL-3003 时,也必须进行普通对 支脚高度 焦调节和角对焦调节。 支脚 观察屏幕的角时,调节对焦。 按两下遥控器或投影机控制面板上的 FOCUS 按钮,并使用 V/v/B/b 调节。 以投影机顶部位置为视角,将支脚底部向右转 动并拧松。 位移调节 按遥控器上的 PATTERN 按钮。 按遥控器或投影机控制面板上的 SHIFT 按钮, 并使用 V/v/B/b 调节。 调节... -
Page 122: 像面调节
像面调节 使用像面调节螺丝 A 的调节示例 (天花板侧的十字螺丝) 向左转动 向右转动 一般情况下,执行标准调节步骤 (第 119 至 121 距离投影机较远的 页) 。另外,如果需要精细调节,请执行以下步 投影表面 骤。 靠近投影机的 转动像面调节螺丝时,通过调节像面上下或左右的 投影表面 倾斜度可以调节投影表面的对焦。 若要提高像面调节的精确度,请重复调节数次。 调节垂直像面 投影表面 (屏幕) 像面 像面调节螺丝 A (天花板侧的十字螺丝) 重复步骤 2 至 4 调节像面位置, 以便可以在所有 位置调节对焦。 完成调节时,向右转动像面调节固定螺丝 B 以 将其拧紧固定。 调节水平像面... -
Page 123: 像面默认位置的确认方法
调节像面位置以调节投影表面右边的对焦。如 水平像面默认位置的确认方法 果在步骤 3 中确认的像面在投影表面的前方, 请向右转动像面调节螺丝 C。如果在步骤 3 中 向左转动像面调节固定螺丝 D 数次以将其拧 确认的像面在投影表面较远的后方,请向左转 松。 动像面调节螺丝 C。 向右转动像面调节螺丝 C 直至可以插入投影镜 头侧面的默认像面调节销 B 为止。 使用像面调节螺丝 C 的调节示例 (投影镜头侧面的十字螺丝) 向左转动 向右转动 将投影镜头侧面的默认像面调节销 B 笔直插入 到底。 如果未完全插入调节销,请重复步骤 1 和 2。 向左转动像面调节螺丝 C 直至默认像面调节销 B 牢牢固定为止。 即可确认像面的默认位置。... -
Page 124: 拆下投影镜头 Vpll-3003
拆下投影镜头 VPLL-3003 • 除非投影镜头返回中心位置,否则无法拆下投 影镜头。 • 电源正在关闭时,请勿拔下交流电源线的插头, 因为镜头会在电源临关闭之前移动到中心位置。 使投影镜头返回中心位置。 当投影机打开时,按遥控器上的 LENS SHIFT 按钮,然后按 RESET 按钮。投影镜头返回中 心位置。 按住 LENS RELEASE 按钮的同时, 逆时针旋转 投影镜头 ( 1 )笔直拉出镜头 ( 2 ) 。 投影机表面顶部 标记 LENS RELEASE 按钮 注意 拆卸投影镜头时,如图所示双手抓握。 注意 拆卸投影镜头时,将投影机向下放在地板上。 拆下投影镜头 VPLL-3003... -
Page 125: 投影距离和镜头位移范围
其他 规格 最大尺寸 (宽 / 高 / 深) 约 229 mm × 193.7 mm × 424.7 mm 质量 约 2.9 kg 注意 外形测量和质量为近似值。 设计和规格若有变更,恕不另行通知。 投影距离和镜头位移范围 投影距离 投影图像尺寸 对角线 宽×高 80 英寸 (2.03 m) 1.72 × 1.08 0.55 0.66 0.41 –0.11 0.20 0.30 0.36... - Page 126 投影距离公式 D:投影图像尺寸 (对角线) L1 = 0.007053 × D – 0.016810 L2 = 0.007048 × D + 0.101010 L3 = 0.007048 × D – 0.154990 L4 = 0.007048 × D – 0.669990 L5 = 0.007048 × D – 0.363290 H1 = 0.004712 × D – 0.072000 H2 = 0.004712 ×...
- Page 127 镜头位移范围 投影图像 镜头中心 尺寸 254.4 170.3 单位:mm 其他...
- Page 128 单位:mm 注意 对于使用投影灯的投影机,投影机后方需留出空 间,否则无法更换投影灯。 其他...
- Page 129 Перед использованием устройства внимательно прочитайте настоящее руководство и сохраните его для получения необходимой информации в будущем. Этот объектив предназначен для использования только с проектором Sony. Для получения дополнительной информации о совместимых моделях обратитесь к квалифицированным работникам компании Sony. Установка объектива может стать причиной...
- Page 130 установленного на проектор ....133 Установка оптического фильтра ... 133 Извлечение штифтов стандартной поверхности изображения ..... 134 Установка объектива проектора VPLL-3003 ..........134 Регулировка ............. 136 Блок-схема последовательности регулировки ..........136 Подготовка ..........137 Настройка и регулировка проектора ..137 Регулировка...
-
Page 131: Меры Предосторожности
Примечание ВСЛЕДСТВИЕ ЛЮБЫХ ИНЫХ Проекционное окно выполнено из стекла. Если ВОЗМОЖНЫХ ПРИЧИН. нажимать на него с усилием или стучать по нему, • КОМПАНИЯ SONY НЕ НЕСЕТ это может вызвать повреждение и нанести ОТВЕТСТВЕННОСТИ ЗА ПРЕТЕНЗИИ травму. ЛЮБОГО РОДА, ПРЕДЪЯВЛЕННЫЕ ПОЛЬЗОВАТЕЛЯМИ ЭТОГО ПРИБОРА... -
Page 132: Проверка Аксессуаров Из Комплекта Поставки
Передняя ножка (2) Установка ножек Примечания • После установки объектива проектора Задняя ножка (2) VPLL-3003 устанавливайте ножки на проектор независимо от типа монтажа проектора. Кронштейн для крепления на потолке можно установить, даже если установлены ножки. Оптический фильтр (1) • Устанавливайте ножки на проектор на ровной... -
Page 133: Снятие Объектива Проектора, Установленного На Проектор
смоченной питьевой водой. Ни в коем случае Примечание не используйте растворители, такие как спирт, При использовании объектива проектора бензол или разбавитель; кислотные, VPLL-3003 устанавливайте оптический фильтр. щелочные или абразивные моющие средства; Если не использовать оптический фильтр, химические чистящие салфетки, поскольку изображение может отображаться неправильно. -
Page 134: Извлечение Штифтов Стандартной Поверхности Изображения
“Способ определения стандартного положения поверхности изображения” (стр. 141). Отверстия под винты крепления штифтов стандартной поверхности изображения Установка объектива проектора VPLL-3003 Примечания • При установке объектива проектора ставьте проектор на пол. • При установке объектива проектора не нажимайте кнопку LENS RELEASE. - Page 135 Полностью вставьте объектив проектора, направив метку на объективе в сторону верхней поверхности проектора. Примечание При установке объектива проектора держите его обеими руками, как показано на рисунке. Верхняя поверхность проектора Алфавитный указатель Поверните объектив по часовой стрелке до щелчка. Установка объектива проектора...
-
Page 136: Регулировка
Регулировка Блок-схема последовательности регулировки Стандартные Подготовка (стр. 137) регулировки Настройка параметров проектора Настройка и регулировка проектора (стр. 137) Регулировка сдвига (стр. 139) Регулировка фокусировки (стр. 139) Регулировка фокусировки по углам (стр. 139) Ручная настройка фокусировки в обязательно вертикальном и горизонтальном направлениях... -
Page 137: Подготовка
Подготовка Включите проектор. Примечания Объектив проектора автоматически • Настройте инверсию изображения проектора переместится в исходное положение. так, чтобы верхняя, нижняя, левая и правая стороны изображения проецировались Примечание правильно в зависимости от условий. • Исходным положением сдвига объектива Когда объектив проектора перемещается в проектора... - Page 138 Проверьте, находится ли нижняя сторона изображения в горизонтальном положении. Если проектор не выровнен по горизонтали, отрегулируйте кронштейн для крепления на потолке или ножки (регулируемые) так, чтобы установить проектор горизонтально. Для получения дополнительной информации о регулировке кронштейна для крепления на потолке см.
-
Page 139: Регулировка Сдвига
четырех ножек в нижней части проектора. Регулировка фокусировки по углам Обычная регулировка фокусировки и регулировка фокусировки по углам также необходима при установке объектива проектора VPLL-3003. Отрегулируйте фокусировку, смотря в угол Высота ножки экрана. Ножка Дважды нажмите кнопку FOCUS на пульте... - Page 140 Регулировка поверхности Пример регулировки с помощью винта регулировки изображения по вертикали поверхности изображения A (дополнительный винт со стороны потолка) Винт регулировки поверхности изображения A Поворот влево Поворот вправо (дополнительный винт со стороны потолка) Поверхность проецирования дальше от Поверхность проектора проецирования рядом...
-
Page 141: Способ Определения Стандартного Положения Поверхности Изображения
Ослабьте фиксирующий винт регулировки По завершении регулировки поверните поверхности изображения D, повернув его фиксирующий винт регулировки влево на несколько оборотов. поверхности изображения D вправо и плотно затяните его. С помощью кнопки на пульте дистанционного управления или на проекторе отрегулируйте фокус объектива Способ... -
Page 142: Снятие Объектива Проектора Vpll-3003
Примечания • Если фиксирующие винты регулировки поверхности изображения чрезмерно ослаблены, они могут выпасть и потеряться. • Перед использованием извлеките штифты стандартной поверхности изображения. Для получения дополнительной информации см. раздел “Извлечение штифтов стандартной поверхности изображения” (стр. 134). Снятие объектива проектора VPLL-3003... - Page 143 против часовой стрелки ( 1 ) и выньте его без перекоса ( 2 ). Верхняя поверхность проектора Алфавитный указатель Кнопка LENS RELEASE Примечание При снятии объектива проектора держите его обеими руками, как показано на рисунке. Примечание При снятии объектива проектора ставьте проектор на пол. Снятие объектива проектора VPLL-3003...
-
Page 144: Прочее
Прочее Технические характеристики Максимальные размеры (Ш/В/Г) Прибл. 229 мм × 193,7 мм × 424,7 мм Масса Прибл. 2,9 кг Примечание Внешние размеры и масса измерены приблизительно. Конструкция и технические характеристики могут быть изменены без уведомления. Расстояние проецирования и диапазон сдвига объектива Расстояние... - Page 145 Формула расчета расстояния проецирования D: размер проецируемого изображения (диагональ) L1 = 0,007053 × D – 0,016810 L2 = 0,007048 × D + 0,101010 L3 = 0,007048 × D – 0,154990 L4 = 0,007048 × D – 0,669990 L5 = 0,007048 × D – 0,363290 H1 = 0,004712 ×...
-
Page 146: Размеры
Диапазон сдвига объектива Проецируемое изображение Центр объектива Размеры 254,4 170,3 Единица измерения: мм Прочее... - Page 147 Единица измерения: мм Примечание Если в проекторе используются лампы, сзади проектора необходимо оставить свободное пространство, иначе лампу не удастся заменить. Прочее...