Table of Contents
Advertisement
XT32 Transmitter User Manual (V1.0.6)
XT32 TRANSMITTER USER MANUAL
Thank you for purchasing SIYI Technology's product. XT32 is a professional, intelligent and
universal radio transmitting and receiving system, applied with advanced SHTT digital frequency
hopping technology. To maintain a safe and orderly public space and to ensure you a good using
experience of XT32 transmitter, please read this manual carefully. If you have any issue using
the product, please consult the manual or check online pages of XT32 on SIYI Technology's
official website (http://www.siyi.biz). You can also inquire our after-sale service coordinator
(support@siyi.biz).
2017 SIYI Tech All Right Reserved
- 1 -
Advertisement
Table of Contents

Related Manuals for SIYI XT32


Summary of Contents for SIYI XT32
- Page 1 To maintain a safe and orderly public space and to ensure you a good using experience of XT32 transmitter, please read this manual carefully. If you have any issue using the product, please consult the manual or check online pages of XT32 on SIYI Technology’s official website (http://www.siyi.biz).
-
Page 2: Table Of Contents
3.1 How to Place Transmitter Antenna Right ..................- 21 - 3.2 How to Charge XT32 Transmitter...................... - 22 - 3.3 How to Link XT32 Transmitter to XR32 Receiver ................- 24 - 3.4 Select Transmitter Throttle Joystick Type ..................- 26 - 4 MAIN MENU INTRODUCTION ........................ - Page 3 7.2 Voltage Calibrating ..........................- 77 - 7.3 PWM Settings ............................. - 78 - 7.4 Port Settings............................- 79 - 8 Datalink Settings (For XT32 Datalink Version)..................- 81 - 8.1 Basic Settings ............................. - 82 - 8.2 Advanced Settings..........................- 84 - 8.3 Bluetooth .............................
- Page 4 XT32 Transmitter User Manual (V1.0.6) 10.1 To-be-repair Procedure........................- 88 - 10.2 After-sale Policy..........................- 89 - 10.1.1 7-Day Return & Refund......................- 89 - 10.1.2 15-Day Replacement......................... - 91 - 10.1.3 1-Year Warranty Repair ......................- 92 - 2017 SIYI Tech All Right Reserved...
-
Page 5: Read Tips
Mandatory Mark 1.2 Flight Safety XT32 transmitting and receiving system is designed for professional application in specific industries, users who approaches to the device should have at least basic ability manipulating it. Any irregular or irresponsible manipulations of the device may cause damages and lead to property loss or human injuries. - Page 6 To maintain a safe and orderly public space and to ensure you a good using experience of SIYI’s product, please read the prohibited and mandatory carefully: Do not use XT32 transmitter to control aircraft in places of intensive crowd (squares, parks), places of many obstructions (streets, parking lots), fields of strong magnetic or interference (power/radar stations, railways) or any other fields that may cause property loss or human injuries.
-
Page 7: Precautions On Charging Xt32 Transmitter
Do not charge XT32 transmitter when the temperature is over 60℃. DANGER Keep it away from places that a baby or a kid may reach while you are charging XT32 transmitter, and better if there were supervision in case of accidents. -
Page 8: Precautions On Using Sd Card
Keep SD card away from places that a baby or a kid may reach in case of swallowing mistakenly. 1.5 Precautions on Storage/Carrying/Recycling CAUTION Keep XT32 transmitter away from places that a baby or a kid may reach when you are placing or storing it. DANGER Please avoid placing or storing XT32 transmitter at places below: Places are extremely hot (above 60℃) or cold (under 20℃);... - Page 9 XT32 Transmitter User Manual (V1.0.6) Places with direct sunshine, too dusty or wet; Places with an unstable structure or may cause vibration; Places near steam or other heat sources. 2017 SIYI Tech All Right Reserved - 9 -...
-
Page 10: Product Introduction
All these ideas and results enable you to free your mind before taking off a flight. 16-Channel Multi-functional Fast-response Mode XT32 transmitter’s 16 channels support all kinds of model aircrafts including fixed wings, helicopters, gliders, quadcopters and multi-rotors, and other models. * 5ms fast-response mode... - Page 11 Fulfils the Requirement of Complicated Models or Robots In default, XT32 transmitter can save 64 sets of model data, the amount can be extended without a limit if necessary. 2017 SIYI Tech All Right Reserved...
- Page 12 Channel mapping function supports customize channel definition; Fail-safe function provides more security to flight safety. Extensible Ports XT32 transmitter opens its ports to support SDK and other external hardware devices. SIYI Technology proudly invites all users to develop the ultimate potential of our transmitters.
- Page 13 XT32 transmitter is equipped with a high capacity Li-Po 1S rechargeable battery, reliable and easy to maintain. Through standard Micro-USB port you can charge XT32 transmitter, and it continuously works for more than 12 hours after one time charging. You’ll never have to worry about long-time flight in outdoor.
-
Page 14: Parts
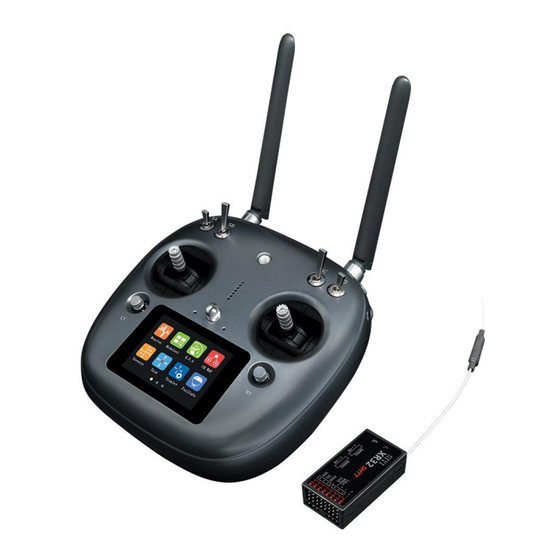
XT32 Transmitter User Manual (V1.0.6) 2.2 Parts 2.2.1 At a Glance 2017 SIYI Tech All Right Reserved - 14 -... - Page 15 XT32 Transmitter User Manual (V1.0.6) 2017 SIYI Tech All Right Reserved - 15 -...
- Page 16 XT32 Transmitter User Manual (V1.0.6) 2017 SIYI Tech All Right Reserved - 16 -...
-
Page 17: Button/Switch Types
XT32 Transmitter User Manual (V1.0.6) 2.2.2 Button/Switch Types Name Type 3-stage Switch 3-stage Switch 3-stage Switch 3-stage Switch Self-centering Dial Thumb-slide Dial Self-resetting Button Self-locking Button Self-locking Button Self-resetting Button Self-resetting Button Self-resetting Button Mark: Self-locking button stays in the position you press them to; Self-resetting button rebound to original position after a press. -
Page 18: Sub-Trim Button
XT32 Transmitter User Manual (V1.0.6) 2.2.3 Sub-trim Button There are 2 sub-trim buttons on XT32 transmitter, which support continuous sub-trim on all 4 channels. Each sub-trim button has 2 dimensions (up-down, left-right) for direct trim settings to mapped channel. -
Page 19: Technical Specifications
XT32 Transmitter User Manual (V1.0.6) Sub-trim buttons can also be used to unlock transmitter system menu when transmitter lock is activated. Press and hold left/right sub-trim button to unlock transmitter. Mark: Please refer to “Sub-trim Settings” menu to adjusting settings of Sub-trim button. -
Page 20: Led Indicator Definition
Product Weight 610 g 2.4 LED Indicator Definition On XT32 transmitter, above touch screen there are two LED indicators. The left one is status indicator, the right one is charging indicator. Status Indicator: displays transmitter’s RF transmitting status. Charging Indicator: displays transmitter’s charging status. -
Page 21: Get Ready To Use Xt32
XT32 Transmitter User Manual (V1.0.6) 3 GET READY TO USE XT32 3.1 How to Place Transmitter Antenna Right 2017 SIYI Tech All Right Reserved - 21 -... -
Page 22: How To Charge Xt32 Transmitter
3.2 How to Charge XT32 Transmitter Before charging XT32 transmitter, please read the part “1 READ TIPS - 1.3 Precautions on Charging XT32 Transmitter” in this manual carefully. - Page 23 5. In charging, transmitter charging indicator is solid red; charging finished, it turns to solid green. Mark: XT32 transmitter is equipped with a built-in 3000mAh Li-Po 1S battery. Charging time is generally between 2.5 to 3 hours using a standard 5V/2A adapter charger.
-
Page 24: How To Link Xt32 Transmitter To Xr32 Receiver
3.3 How to Link XT32 Transmitter to XR32 Receiver Each unit of XT32 transmitter is assigned with a unique ID code. Before linking XR32 receiver to XT32 transmitter, receiver must identify transmitter ID (Linking). - Page 25 XT32 Transmitter User Manual (V1.0.6) 4. In transmitter “General Settings” menu, tap on “Start Linking” button, and wait for 1 second, when both transmitter status indicator and receiver indicator blink green, linking steps are done. WARNING Before linking transmitter to receiver, make sure aircraft engine is powered off and motor wires are off connection.
-
Page 26: Select Transmitter Throttle Joystick Type
XT32 Transmitter User Manual (V1.0.6) 3.4 Select Transmitter Throttle Joystick Type XT32 transmitter’s throttle joystick has two types, Thumb-slide and self-centering joystick. Users can select throttle joystick type according to their preferences. Thumb-slide Joystick: While users are powering on transmitter, it alerts with voice broadcast if throttle joystick is not in its bottom position, and disables RF transmitting automatically (transmitter status indicator is off). -
Page 27: Main Menu Introduction
Model Name: Displays your current model after selecting a set of model data. Model Type: Displays your current model type after choosing one. Battery Level: Displays XT32 transmitter’s current remaining battery level. Settings: Tap on the icon to enter “Transmitter Settings” menu. - Page 28 Screen Lock: XT32 Transmitter main menu is locked, touch screen is disabled (the icon disappears when main menu is unlocked). SD Card: SD card is inserted in XT32 transmitter (the icon disappears when SD card is taken out). Timer: Displays maximum two timers to assist users with their flights.
-
Page 29: Model Settings
XT32 Transmitter User Manual (V1.0.6) 5 MODEL SETTINGS In XT32 transmitter’s “Model Settings” menu there are a series of transmitter functions, offering basic and advanced settings for different kind of model devices. General Functions CH Monitor (Channel Monitor): Display real-time output value of all channels. - Page 30 XT32 Transmitter User Manual (V1.0.6) End Point: Set each channel’s output value and the maximum / minimum limit. CH Mapping (Channel Mapping): Set / Change each channel’s function. CH Reverse (Channel Reverse): Reverse a channel’s output direction. Sub-trim: Do trim adjustment on aircraft’s flight attitude.
-
Page 31: Servo Monitor
XT32 Transmitter User Manual (V1.0.6) 5.1 Servo Monitor Through servo monitor, users can check output value changing of all 16 channels in real-time after their customized settings on transmitter. 5.2 Model Select In Model Select function, users can select, rename, copy and reset model data. -
Page 32: Select A Model
XT32 Transmitter User Manual (V1.0.6) 5.2.1 Select a Model In XT32 transmitter’s model list there are maximum 64 sets of model data for your selection. Steps to Select a Model 1. In “Model Settings” menu, tap on “Model Select” icon to enter model select menu;... -
Page 33: Rename A Model
XT32 Transmitter User Manual (V1.0.6) 5.2.2 Rename a Model Users can rename model data in model list to differ them from various purposes. Your currently selected model data is displayed in transmitter main menu. Steps to Rename a Model 1. Tap on your requiring model, then “Rename”, in screen menu it pops up “Confirm to rename the model”;... -
Page 34: Copy A Model
XT32 Transmitter User Manual (V1.0.6) About Virtual Keyboard CAPS: Switch keyboard to input capital letters. SCAP: Switch keyboard to input lower case letters. NUM: Switch keyboard to input numbers and punctuations. Backspace: Delete what is already input. Cancel: Cancel inputting, transmitter does not save what is already input. - Page 35 XT32 Transmitter User Manual (V1.0.6) Steps to Copy a Model 1. Tap on your requiring model, then “Copy”, in screen it shows “Copying Model” menu; 2. Select a target model through turntable, then tap on “Yes” to finish copying. 2017 SIYI Tech All Right Reserved...
-
Page 36: Reset All Models
XT32 Transmitter User Manual (V1.0.6) 5.2.4 Reset all Models Users can reset former model data in model list, after resetting, the model recovers to default settings. Steps to Reset a Model 1. Tap on your requiring model, then “Reset”, in screen menu it pops up “Confirm to reset the model”... -
Page 37: Model Type
XT32 Transmitter User Manual (V1.0.6) 5.3 Model Type In XT32 transmitter there are several default model types, Fixed-wings / Gliders, Multi-rotors (racing drones, agricultural drones) and others (helicopters), each model type with necessary settings done in advance. Users need to select your requiring model and do advanced settings. - Page 38 XT32 Transmitter User Manual (V1.0.6) 3. Tap on your requiring model type; select your requiring type and tap on “Apply” to finish. 2017 SIYI Tech All Right Reserved - 38 -...
-
Page 39: End Point
XT32 Transmitter User Manual (V1.0.6) 5.4 End Point End point function helps users adjust channel value and the maximum / minimum limit on both ends. Steps to Adjust End Point 1. In model settings menu, tap on “End Point”, in screen it shows end point menu;... - Page 40 XT32 Transmitter User Manual (V1.0.6) 2. Tap on a value in your requiring channel, then use turntable dial to select target channel value or limit value; limit value range is from -150 to 150; 3. Limit value protects servo and other external devices. With limits, channel value doesn’t exceed a certain value even under programmable mixing...
-
Page 41: Channel Mapping
1. In model settings menu, tap on “Channel Mapping”, in screen it shows channel mapping menu; 2. In XT32 transmitter, Channel 1-4 are default to functions such as aileron, elevator, throttle and rudder; 3. Take an example of channel 1 (aileron), tap on “J1”, in screen it shows transmitter channel list;... - Page 42 XT32 Transmitter User Manual (V1.0.6) 4. Select your requiring joysticks, switches, buttons or dials from channel list; 5. Tap on “Return” to finish channel mapping. Mark: In channel mapping menu, if you need to redefine a channel, tap on the channel name, in screen it shows transmitter channel definition list;...
- Page 43 XT32 Transmitter User Manual (V1.0.6) In channel mapping menu, tap on “Reset” to rest all channel data. 2017 SIYI Tech All Right Reserved - 43 -...
- Page 44 XT32 Transmitter User Manual (V1.0.6) XT32 Transmitter’s Channel Definition Introductio Sub-Trim Mapping 2017 SIYI Tech All Right Reserved - 44 -...
- Page 45 XT32 Transmitter User Manual (V1.0.6) When channel mapping is finished, users can set digital sub-trim mapping according to their preference. Digital sub-trim channel definition is default to Up-Down (LT1-LT3, RT1-RT3) and Left-Right (LT2-LT4, RT2-RT4). Steps to Set Sub-trim Mapping When channel mapping is done, tap on the blank option next to your requiring channel, select your target sub-trim direction to finish settings.
-
Page 46: Channel Reverse
Channel reverse function helps users reverse a channel’s direction. Steps to Set Servo Reverse 1. When XT32 transmitter is linked to a new model, please confirm if all servos are mapping to the right channels first; 2. Try to manipulate transmitter’s joysticks, switches, buttons and dials to confirm if each channel direction is normal or reverse;... -
Page 47: Sub-Trim
XT32 Transmitter User Manual (V1.0.6) Mark: In servo reverse menu, tap on “Reset” to reset all settings. 5.7 Sub-Trim Sub-trim function helps users set channel’s middle position and do trim adjustment to aircraft’s flight attitude. Before sub-trim settings, please make sure that the target sub-trim channel is in middle position. - Page 48 XT32 Transmitter User Manual (V1.0.6) We do not suggest using sub-trim function when you are flying agricultural drones. Steps to Adjust Sub-Trim 1. In model select menu, tap on “Sub-trim”, in screen it shows sub-trim menu; 2. Tap on your requiring channel; use turntable to select a target middle value;...
-
Page 49: Trim Settings
That is, when trim setting value changes in 5, trim stepping value changes in XT32 transmitter’s trim setting value is default to be 5, trim setting value’s minimum limit is 0, maximum limit is 100; trim stepping value’s minimum limit is 0, maximum limit is 20. - Page 50 XT32 Transmitter User Manual (V1.0.6) 2. Through trim settings function, users are able to adjust all 4 sub-trim channels; tap on your requiring to change its trim stepping value; 3. Use virtual turntable to select your target trim stepping value, adjustable range is from 0 to 100;...
-
Page 51: Trainer Mode
Users decide which channel to do training. In trainer mode, XT32 transmitter supports turning on/off the function through a physical switch or button. And users can switch identity between trainer and student. - Page 52 XT32 Transmitter User Manual (V1.0.6) 4. The transmitter with trainer mode turned on is master transmitter, the other one is slave transmitter; in master transmitter the channel is default to be “Trainer”; 5. Each channel in the list has two status, trainer and student; when in master transmitter you change the status to “Student”, slave transmitter gets authority...
- Page 53 XT32 Transmitter User Manual (V1.0.6) 7. When definition is done, the physical switch / button takes control of turning on / off trainer mode. 2017 SIYI Tech All Right Reserved - 53 -...
-
Page 54: Fail Safe
XT32 Transmitter User Manual (V1.0.6) 5.10 Fail Safe Before linking XT32 transmitter to XR32 receiver, receiver has to be input fail safe program to turn on fail safe function. Thus if in some moments there’s no signal transmission between transmitter and receiver, receiver runs on the program immediately to protect the aircraft from crash in flight. - Page 55 XT32 Transmitter User Manual (V1.0.6) 4. While fail safe function is working, tap on your requiring channel and switch “HOLD” to “0”; use virtual turntable to input channel value; 5. You can also input channel value by manipulate a joystick, switch, button, or dial which is mapped to the channel;...
-
Page 56: Timer
XT32 Transmitter User Manual (V1.0.6) 5.11 Timer In XT32 transmitter main menu it displays two timers, users can use both if necessary. Timing Mode Up: Counts from 0, timer alerts when it reaches setting time. Down: Counts from setting time, timer alerts when it gets back to 0. -
Page 57: Voltage Alert
XT32 Transmitter User Manual (V1.0.6) 5.12 Voltage Alert XT32 transmitter’s power telemetry function helps users set voltage alert. When aircraft’s power voltage is lower than a safe level, users receive voice and vibration alert from transmitter. Steps to Set Voltage Alert 1. -
Page 58: Farming Voice
XT32 Transmitter User Manual (V1.0.6) 5.13 Farming Voice In XT32 transmitter there is a voice broadcast function specialized for farming drones. The function is supported by at most 6 switches and their 16 positions. They are SA, SB, SC, SD, S2 and S3. - Page 59 XT32 Transmitter User Manual (V1.0.6) Atti. (Attitude): Attitude Mode Stab. (Stablize): Stable Mode Hold (AttiHold): Attitude Hold Mode GPS: GPS Mode AB Ln (AB Line): A/B Line Flight Mode Auto (AutoMode): Auto Flight Mode Rcd A (Record A): Record A Point...
-
Page 60: System Settings
XT32 Transmitter User Manual (V1.0.6) 6 SYSTEM SETTINGS Functions General Stts (General Settings): Set transmitter’s basic functions. Lock&Display (Screen Lock & Display): Turn on / off transmitter touch screen display, adjust brightness. H/W Settings (Hardware Settings): Change several transmitter channels’ hardware definition through software settings. -
Page 61: General Settings
EXT/IMT Stt (Export/Import Setting Data): Export transmitter settings or model settings. 6.1 General Settings General Settings Menu Introduction Link (Linking): Start linking XT32 transmitter to XR32 receiver. Lang. (Language): Switch XT32 transmitter’s system language between Chinese/English. Thrttl (Throttle Type): Switch throttle joystick type between “Self-centering” and “Thumb-slide”. -
Page 62: Screen Lock & Display
Higher it is, more channel value the channel value increases in every movement. 6.2 Screen Lock & Display Users can turn on / off XT32 transmitter’s screen lock, setting screen lock waiting time, adjust screen brightness and screen sleep waiting time. - Page 63 XT32 Transmitter User Manual (V1.0.6) Screen Lock Waiting Time: Set waiting time before locking transmitter screen. Screen Brightness: Adjust screen brightness (range 1 - 20). Screen Sleeping Time: Turn on / off transmitter screen’s sleeping function (screen display turns off automatically after waiting time) and set waiting time. When you set it “Never”, transmitter screen stays on.
-
Page 64: H / W Settings
XT32 Transmitter User Manual (V1.0.6) 6.3 H / W Settings H / W settings help users do advanced settings for XT32 transmitter’s LD dial (switch between Position / Speed Mode) and S1 / S4 / S5 / S6 switches (switch between Self-locking / Self-resetting). -
Page 65: Extending Ports Settings
6.4 Extending Ports Settings XT32 transmitter’s extending ports help users extend transmitter function to external hardware devices and SDK. Currently XT32 transmitter supports Micro- USB, USB and 4-Pin Groove Port (DATA1 / DATA 2). - Page 66 (for details please refer to XR32 Receiver User Manual); 6. In “GPS” mode, DATA1 / DATA2 is assigned for GPS module. By extending to GPS module, farming drone users can handle XT32 transmitter to mark flight points in farmland;...
-
Page 67: Joystick Calibrating
XT32 Transmitter User Manual (V1.0.6) SDK Agreement Format Field Index Bytes Description 0X55 Data field byte length value: Data Length CMD ID 0x00 Joystick channel data DATA Data type: 16-byte unsigned int for channel 1-16 8 bytes (check sum from 0... - Page 68 XT32 Transmitter User Manual (V1.0.6) Joystick calibrating function help users calibrate joysticks’ middle position. Regularly calibrating joysticks help users maintain joysticks’ control accuracy. Only the self-centering joysticks require calibrating. They require calibrating when they fail to reach their maximum / minimum positions or stay out of their middle position (channel output value is not 0).
- Page 69 XT32 Transmitter User Manual (V1.0.6) 5. Transmitter starts detecting joysticks’ middle position automatically, do not move joysticks while you are waiting; 6. When detecting is finished, push both joysticks to their maximum positions, moving and circling them for several times;...
-
Page 70: Ld Calibrating
XT32 Transmitter User Manual (V1.0.6) 6.6 LD Calibrating LD calibrating function helps users maintain LD dial’s output accuracy. LD dial requires calibrating when it stays out of its middle position (channel output value is not 0) or fail to reach its maximum / minimum position. -
Page 71: Export/Import Setting Data
SD card, sharing the settings to other XT32 transmitters. Steps to Export Setting Data 1. Insert SD card to XT32 transmitter (ignore this step if it was already there); 2017 SIYI Tech All Right Reserved - 71 -... - Page 72 “SYS.CFG”, all model setting data is name as “ALL.CFG”; current model setting data is name as “MODEL+number.CFG”; 3. In “SIYI Assistant”, tap on “Upgrade”; in “Setting Files”, tap on “Select File” to load setting files; 2017 SIYI Tech All Right Reserved...
- Page 73 XT32 Transmitter User Manual (V1.0.6) 4. Tap on “Upgrade” to finish. 2017 SIYI Tech All Right Reserved - 73 -...
-
Page 74: Receiver Settings
XT32 Transmitter User Manual (V1.0.6) 7 Receiver Settings Functions General Stts (General Settings): Set XR32 receiver’s basic functions. Voltage Cali (Voltage Calibrating): Calibrate receiver voltage telemetry. PWM Settings: Change channel definition under PWM mode. Port Settings: Set receiver ports’ function. -
Page 75: General Settings
XT32 Transmitter User Manual (V1.0.6) 7.1 General Settings 7.1.1 Signal Mode Set signal mode for XR32 receiver’s 3 different output mode, SBUS, PPM and PWM. Steps to Set Signal Mode 1. In general settings menu, select “Signal Mode” and tap on “SBUS / PPM / PWM”... -
Page 76: Remote Control Relay
How to Use Remote Control Relay Function 1. Prepare two XT32 transmitters, mark them with 1 and 2; 2. Please link transmitter 1 to receiver first, then turn on “Remote Control Relay” in “General Settings Relay” menu; transmitter 1 is the slave transmitter;... -
Page 77: Voltage Calibrating
XT32 Transmitter User Manual (V1.0.6) 7.2 Voltage Calibrating Before using XR32 receiver, we suggest users to manually calibrate receiver telemetry voltage and aircraft power telemetry voltage once. Here are some preparing work before calibrating. Power on receiver and transmitter; Link receiver to transmitter. -
Page 78: Pwm Settings
7.3 PWM Settings In XT32 transmitter users can redefine XR32 receiver’s output channel in PWM mode (Channel 1-9 in default), so that if receiver’s channel 9 is already working in SBUS or PPM mode, PWM ports 1 to 8 can still be defined to output transmitter channels 1 to 16. -
Page 79: Port Settings
XT32 Transmitter User Manual (V1.0.6) 3. In “PWM Settings” menu, tap on a PWM port, select your requiring channel through virtual turntable in screen; 4. Tap on “SET” to finish. 7.4 Port Settings Port settings help users switch receiver DATA1/DATA2 port’s output mode (Receiver Extension / Data Telemetry) in transmitter Receiver Extension: supports dual XR32 receiver interconnection. - Page 80 XT32 Transmitter User Manual (V1.0.6) 2017 SIYI Tech All Right Reserved - 80 -...
-
Page 81: Datalink Settings (For Xt32 Datalink Version)
XT32 Transmitter User Manual (V1.0.6) 8 Datalink Settings (For XT32 Datalink Version) Datalink settings function requires SIYI 2.4GHz or 915MHz datalink, please make sure that you’ve bought XT32 transmitter datalink version. Before setting datalink, please read datalink sky station’s user manual carefully. Functions Basic Stts (Basic Settings): Set datalink module’s basic functions. -
Page 82: Basic Settings
Port: Select a transmitter output way to smartphone or tablet. Available ports: A-USB output, Micro-USB output and Bluetooth output. Flight Controller: Select a flight controller. XT32 supports all major flight controllers in market such as TOPXGUN(T1-A), WOOZOOM(THEONE-A), EFY(FINIX200M), BOYING(PALADIN), CHIAO(MATRIX), JIYI(K3-A), PIX, APM, CFUAS(C1-A) and other flight controllers under open source Mavlink agreement flight controllers such as PIX and APM. - Page 83 XT32 Transmitter User Manual (V1.0.6) station; 2. Connect datalink sky station to flight controller, power on flight controller to power datalink sky station; then press down “linking” button on datalink sky station, its status indicator blinks red quickly; 3. Return to “Datalink Settings” menu, tap on “Linking”, datalink ground “Start Linking”;...
-
Page 84: Advanced Settings
XT32 Transmitter User Manual (V1.0.6) Steps to Switch Transmitter Micro-USB Port Mode In “System Settings” menu, tap on “Port Settings”; tap on “Micro-USB” to switch port mode from “Parameter” to “Datalink”. Mark: When you switch Micro-USB port mode to “Datalink”, transmitter can no longer communicate with computer through the port. -
Page 85: Bluetooth
XT32 Transmitter User Manual (V1.0.6) CAUTION Do not turn on automatic linking when you are using more than one pair of datalink sky station and ground station at the same time. Baud Rate In “Basic Settings”, if your requiring flight controller type was not there in list, you can set a baud rate to match your flight controller. -
Page 86: Firmware And Voice Upgrading
1. Please visit SIYI Technology’s official website (http://www.siyi.biz); 2. In XT32 transmitter product description page, tap on “Downloads”; 3. Select SIYI Assistant software, driver, the latest firmware and voice broadcast files, tap on “Download”; 4. Unzip the files, install SIYI Assistant and driver to computer;... - Page 87 5. When installation is finished, use an USB cable, connect its one end to the Micro-USB port on XT32 transmitter, another end to computer; 6. Open SIYI Assistant, check transmitter’s current firmware version; if it was not the latest version, tap on “Upgrade” to firmware upgrading menu;...
-
Page 88: After-Sale Service
3. Find after-sale service center or technical support staff information and consult them with your product issue; 4. If the issue stays unsolved after confirming with SIYI Tech, then please refer to our after-service for filling in a “To-be-repair” form (personal repair form for individuals, distributor repair form for distributors);... -
Page 89: After-Sale Policy
XT32 Transmitter User Manual (V1.0.6) 6. If the product is confirmed damaged or defected by SIYI Technology, it goes in repair procedure. Product will be returned to you after repairing. 10.2 After-sale Policy SIYI Technology guarantees that, subject to the following conditions, Return &... - Page 90 It is requested beyond seven (7) calendar days of receiving a product. A product sent to SIYI for Return & Refund Service does not include all original accessories, attachments or packaging, or any item is not in new or like-new condition, i.e.
-
Page 91: 15-Day Replacement
Legal proof-of-purchase, receipts, or invoices are not provided, or are reasonably believed to have been forged or tampered with. A product sent to SIYI for replacement does not include all original accessories, attachments and packaging, or contains items damaged by user error. -
Page 92: 1-Year Warranty Repair
You can request warranty repair service: If a product does not function as warranted during the warranty period, you may obtain after-sales service by contacting SIYI’s service center. You will need to provide a valid proof-of-purchase, receipt or order number for the warranty service. - Page 93 XT32 Transmitter User Manual (V1.0.6) Please note that the warranty service is only available in the respective SIYI service regions where you purchased your SIYI product. Warranty Repair service will not be provided where: Crashes or fire damage caused by non-manufacturing factors, including but not limited to pilot errors.
- Page 94 XT32 Transmitter User Manual (V1.0.6) Damage caused by operating the product in an environment suffering from interference from other wireless devices (i.e. transmitter, video-downlink, Wi-Fi signals, etc.) Damage caused by reliability or compatibility issues when using unauthorized third-party parts. Damage caused by operating the unit with a low-charged or defective battery.
Need help?
Do you have a question about the XT32 and is the answer not in the manual?
Questions and answers