Table of Contents

Related Manuals for Toolex 532215


Summary of Contents for Toolex 532215
- Page 1 532215 BANDSAW HORIZONTAL & VERTICAL 150 X 115MM INSTRUCTION MANUAL PLEASE READ THESE INSTRUCTIONS CAREFULLY TO ENSURE THE SAFE AND EFFECTIVE USE OF THIS TOOL. CONSUMER SERVICE CENTRE PO BOX 1012 HAMILTON NSW 2303 AUSTRALIA Made in P.R.C.
-
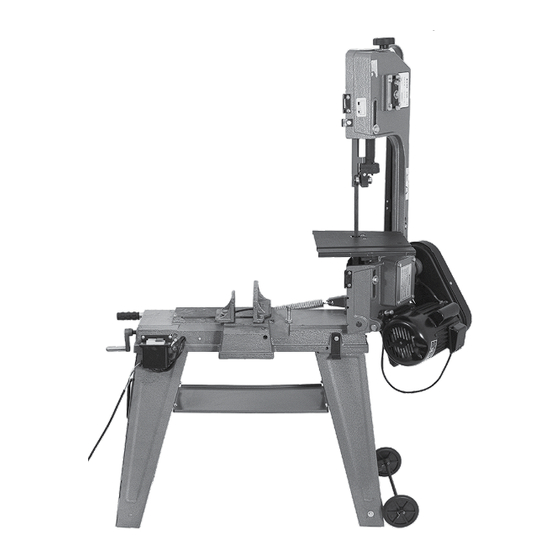
Page 2: Specifications
S A F E T Y 1.Knowyourbandsaw.Readtheoperator'sManualcarefully.Learntheoperations, applicationsandlimitations. 2.Userecommendedaccessories.Improperaoclxsoricsmaybeha?ardous. 3.Wearproprapparel. 4.Keepunnecessarypeopleaway. 5.Don'tverreachorstandontool. 6.Avoiddangerousenvironment.Don'tusebandsawindamporwetlocations. keepworkareawelllighted. 7.Keepworkareaclean.Clutteredandslipperynoorsinviteaccidents. 8.Removeadjustingkeysandwrcnch«sfrombandsawbeforeturningonpower. 9.Avoidaccidentalstarting.Makesureswitchisoflbeforeplugginginpowercord. 10.Don'tforeebandsaw.Itissafetooperateatthecuttingrateforwhichitwas designed. 11.Bespeciallycarelulwhmusingbandsawsinverticalpositiontokeepfingersand handsoutofthcpathofblade,bothaboveandbeneaththetable. 12.Neverhandholdthematerialwithsawinhorizontalposition.Alwaysusethe vise,clampsecurely. 13.Keepbeltguardandwheelcoversinplaceandinworkingorder. 14.Supportlong,heavyworkfromthenoor. 15.Alwaysremembertoswitchoflthcmachinewhentheworkiscompleted. 16.Disconnlcctpowercordbeforeadjusting.servicingandchangingblade. 17.Checkdamagedparts.Damagedpartsmustbcr中组cedorrepaired. 18.Movingpartsshouldkeepinalignment.Alladjustmemsaretobemadewith powerdisconnected. 19.Useasharpbladeandkeeptoolcleanforbestandsakstperformance. 20·Safetyisacombinationofoperator'scommonsenseand.Alertnessatall timeswhmthesawisfunctioning. 21.Keepingthebandsawintopconditionisessentialforsafety. FEATURES 1.Specialdesignedhorizontalandverticalbandsaw. 2.Offersthreespeedsforcuttingmetalplasticorwood. 3.Shutsoflautomaticallywhenmaterialiscut. 4.Withscaleforthemiteringvise. 5.Nonoisewhileoperating. 6.Castcrs(optional)quickandeasymoving SPECIFICATIONS 1.Capacity :41/2"(l15mm)round 4x6"(100mmx150mm)rectangular... -
Page 3: BladeGuideBearingAdjustmEnt
SPECIFICATIONS 1.Capacity :41/2"(l15mm)round 4x6"(100mmx150mm)rectangular 2.Speeds :24-36-61m/min60HZ(20-29-50m/min50HD 3.Motor : I/3HPorI/2HP1700RPM60HZ(1400RPM50HZ) 4.Blades : 1/2"X.025"X641/2"(12.5nunx0.64mmx1638mm) 5.Bladevnlals :73/8(187mm)Highstrengthflangcdcastiron.. ASSEMBLY 1.AssemblestandlegsonBandSawBase.Assemblydiagram 2.Assemblehandlevicewheel,ti8htcnsctscrew.... -
Page 4: BladeGuideAssemBlyAdjustment
2.Theouterguidebearingismountedtoaneccentricboltandcanbeadjusted. 3.Mosenthenutwhileholdingtheboltwithawrench. 4.Positiontheeccentricbyturningthebolttothedesiredpositionofclearance. 5.Tightenthenut. 6.Adjustthesecondbladeguidebearinginthcsamemanner. 7.ThebackedgeofthebladeshouldjusttouchthelipoftheBladeGuideBearing. BLADEGUIDEASSEMBLYADJUSTMENT TheMetalCuttingBandsawisequippedwithtwoadjustablebladeguide assemblies.Thisfeaturewillpermityoutoadjustthepositionofthcbladeguidesfor varipuswidthsofworkpicces. Toeflectthemostaccuratecutandprolongthelifeoftheblade.Thcblade guideassembliesshouldbeadjustedtojustclearthepiecetobecut.Thisisdoneas follows 1.Placethcworkpieceintheviseofbandsawandclamptightly. 2.Adjustcatchbladeguideassemblytothedesiredpositionbylooseningthehand knobsandpositioningtheguidesasrequired. 3.Tightenthehandknobs. ADJUSTINGBLADETENSION 1.MakesurethemotorisshutofF. 2.Pressthebladelightlywiththe lefthand,maketherearblade againstthenangeofbladewheel andtestthebladetension. 3.Adjustthebladetensionadjus- tableknobwiththerighthand untilthebladeobtaintheproper tension. CHANGINGSPEED WhenusingyourBandSaw,alwayschangethebladespeedtobestsuitthematerial beingcut.Thematerialcuttingchartisshowninfig(2). Cutoflpower.Openthepulleyguardcover.Loosentheleadscrew(.98.),youarenow 3 ‐ ‐ Page 4... -
Page 5: Blade Selection
abletochangethepositionofthebelttogainthedesiredspeed.Cheekthebelttension asins-bcfone.Whenthctensionofbeltiswelladjusted,lockthemotorlırmly. Closethepulleyguardcover Material Speed(m/min) BeltGrooveUsed 50Hz 60Hz Motorpuml SawPuïley Stainless SmallA LargeD Alloy Steel BearingBronzes Mild Steei Hard MediumB MediumE brassorBronze Soft Brass LargeC SmallF Aluminum and othermaterials Fig(2)MaterialCuttingChart BLADESELECTION I.Specialnote:1(112 ° xo.025"X64ı/zmin,651/2max)14toothperinchgeneralweblade isfurnshedwiththemetalcuttingBandSaw.AdditionalbladesinIOand14 toothsizesareavailable. 2.Thechoiceofbladepitchisgovernedbythethicknessoftheworktobecut;the thinnertheworkpiece,themoreteethadvised.Aminimumof3teethshouldbcin theworkpieceatalltimesforpropercutting. 3.Ifthcteethofthcbladearesofarapartthattheystraddlethework,severedamage ... -
Page 6: ChAngingBlade
totheworkpieceandtothebladecanresult. CHANGINGBLADE Raisesawheadtoverticalposition.Loosenbladetensionadjustableknob sufficientlytoallowthcsawbladetoslipolTthewheeıs.Instauthcnewbladeas follows: I.Placethebladeinbetweeneachof guidebearing. 2.Slipthebladearoundthemotorpulley(bottom)withthelefthandandholdinposition. 3.Holdthebladetautagainstthemotorpulleybypullinsthebladeupwardwiththe righthandwhichisplacedatthetopoftheblade. 4.Removelefthandfrombottompulleyandplaceitatthetopsideofthebladeto continuetheapplicationontheupwardpullontheblade. 5.Remove ńghthandfrombladeandadjustthepositionofthetoppulleytopermitleft handtoslipthebladearoundthepulleyusingthethumb,indexandlittlefingeras guides. 6.Adjustthebladetensionknobclockwiseuntilitisjustrightenoughsonoblade slippageoccure.Donottightenexcessively. 7.Place2-3dropsofoilontheblade. 8.Replacethebladeguard. ADJUSTINGTHEBLADETRACKING Thisadjustmenthasbeencompletedandpower-testedatthefactory.Theneedfor adjustmentshouldrarelyoccurwhenthesawisusedproperly.Ifthetrackinggoesoutof adjustmentthebladewillleavethewheelanddamagewillresult.Themethodof adjustmentislistedbelow. 5 ‐ ‐ Page 6... -
Page 7: WorkSetUp
HORIZONTALCU-GOPERATION Beforeoperating,pleasereadinstructionmanualandexamineeverypartincluding spd.Bladeselection,guideassembleposition,etc.Operationisasfollows: WORKSETUP 1.Raisethesawheadtothev«ticalposition. 2.Openthevisetoacceptthcpiecetobecutbyrotatingthewheelatthecndof thebase(counterclockwise). 3.Placetheworkpieceonthesawbed.Ifthepieceislong,supporttheend. 4.Clamptheworkpiecesecwelyinthevisebyrotatingthehandwheelclockwise. CUTTING Closeswitch,lettingtheheaddownslowlyontothework,Donotdropor force.Iettheweightofthesawheadprovidethecuttingforce.Thesawautomatically shutsoftatthccndofthecut. 6 ‐ ‐ Page 7... - Page 8 Methodofadjustingblade: A.Lossenthescrew#11. B.Adjustthebladeadjustableseat#64tomakethebladeverticaltobcd. c.Placethcsquareonthebedtocheckifthebladeisvertical,ifnot,repeatthe processAtoc. D.Tightenthescrew#11. Fig(4)Adjustingtheblade LUBRICATION LubńcatethefollowingcomponentsusingLubńcant,L-HV32 1.Ballbeańng-none. 2.Bladeguidebearing-none. 3.Drivenwheelbearing-none. 4.Viseleadscrew-asneeded. 5.Thcdrivegearsrunintheoilbathandwillbotrequirealubricantchanegemoreoften thenonceayear.Whenneedingachange,mtputdownthehtadtoaHorizontal Position,thenloosen4screw(#75)ofthegearboxopenthecover(#93).Placing apanunderthetightlowercomerofthegearbox,slowlyraisetheheaduntil thcoilnowsout,Lowerhead.Thenwipeupexcmodandforeignmatterwith softrags.Thenaddlubricantintotheboxuntilitisfullandnotflowover.Close thecover,tighten4screws. THEVERHCALCUTHNGPLATEASSH Stepsforassembling 7 ‐ ‐ Page 8...
- Page 9 1.LoosentheA.B.C.threescrewsfromthebladeguide.Z Andtakeawaythepart"D" 2. Tolocktheverticalcutting platestandonthevalve. 3.Toputthephteonthe guideandvertica\cutting platestand,thenlocktheA.B. C.threescrews. 4.Pleaseoperatethevertica\ cutting. 5.Usethemilergaugeinthe worktablegroovesto obtainanyanglenpto4S degreeeitherleftorright. CAUTION-Theuscofany otheraccessorisesmaybe hazardous. CAUTION-Alwaysusepush sticksparticulartywhen. cuttingsmallpieces. 8 ‐ ‐ Page 9...
- Page 10 9 ‐ ‐ Page 10...
- Page 11 symptom PossibleCause(s) CorrectiveAction 1.Materiallooseinvise 1.Clampworksecurely ExcessiveBlade 2.IncorTectspeedor 2.AdjustspMorfeed Breakagc 3.Bladeteethspacingtoo 3.Replacewithasmallteeth large spacingblade 4.Materialtoocoarse 4.Useabladeofslowspeed 5.Incorrectbladetension andsmallteethspacing 5.Adjusttbwherebladejust 6.Teethincontactwith materialbeforesaw doesnotsliponwheel 6.Placebladeincontactwith started 7.Bladerubsonwheel workaftermotorisstarted Hange 7.Adjustwhlalignment 8.Misalignedguide 8.Adjustguidebearings bearings 9.Weldagain,notetheweld 9.Crackingatweld skill...
- Page 12 symptom CorrectiveAction PossibleCause(s) 1.usefinertoothblade TeethRipping 1.Toothtoocoarsefor fromBlade work 2.Decreasepressure, 2.Tooheavypmure, increasespeed tooslowspeed 3.Clampworkpteccsecurely 3.Vibratingworkpiece 4.Usecoarsertooth 4.Gulletsloading bladeorbrushtoremovechips Motornuuling 1.Bladetensiontoohigh 1.Reducetensiononblade 2.Drivebelttensiontoo 2.Reducetensionondrive toobot Mgh belt 3.Gearsneedlubrication 3.Checkoiloath 4.Cutisbindingblade 4.Decreasefeedandspeed 5.Gearsallignedimprop- 5.Adjustgearssothatworm erly isincenterofgear 1.Feedpressuretoogreat 1.Reducepressuneby BadCuts 2.Guidebearingsnot incrcasinBspringtension adjustedproperly onsideofsaw (Cr(x)ked) 3.Inadequatebladetension...
- Page 13 12 ‐ ‐ Page 13...
- Page 14 13 ‐ ‐ Page 14...
- Page 15 14 ‐ ‐ Page 15...
- Page 16 532215 BANDSAW HORIZONTAL & VERTICAL 150 X 115MM Page 16...
Need help?
Do you have a question about the 532215 and is the answer not in the manual?
Questions and answers