
Related Manuals for Hospira Plum 360 with Hospira MedNet System


Summary of Contents for Hospira Plum 360 with Hospira MedNet System
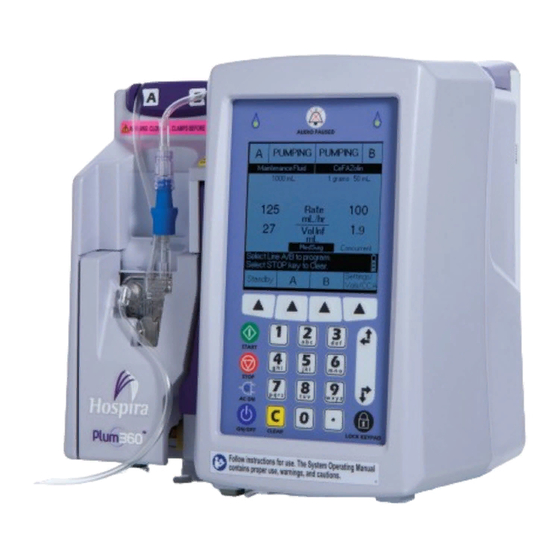
- Page 1 Plum 360 with ® Hospira MedNet System ® Quick Reference Card Software 15.02 and 15.10 Please refer to the System Operating Manual for complete operating instructions.
-
Page 2: Table Of Contents
CONTENTS Unlock the Keypad Definition of Terms Set the Post Infusion Rate Definition of Operating Keys – Indicators – Display Symbols View/Clear Volumes Infused Set Up PlumSet ® Adjust Display Lighting and Contrast Clinical Care Area (CCA) Selection View CCA and Infuser Settings Change CCA During Infusion Set Distal Pressure Alarm Limit Programming Line A/B... -
Page 3: Definition Of Terms
Upper Soft Limit (USL): The upper limit that can be overridden. Upper Hard Limit (UHL): The upper limit that cannot be overridden. Auto-Program: Auto-programming refers to the ability to receive a remotely configured therapy from Hospira MedNet software. ® DEFINITION OF OPERATING KEYS –... - Page 4 [SELECT] – Moves the cursor between fields on the display. The top pair of arrows moves the cursor up or to the left. The bottom pair of arrows moves the cursor down or to the right [LOCK KEYPAD] – Pressing this key, followed by entering a lock passcode disables all keys on the keypad except [STOP] until a valid passcode is entered.
- Page 5 Wireless Connection – Appears when the infuser is communicating with the network using a wireless connection. Hospira MedNet Connection – Appears when the infuser is communicating with Hospira MedNet software over either a wireless or Ethernet connection. Battery Capacity – Shows the battery charge level when a battery is installed in the infuser, or indicates that a battery is not installed.
-
Page 6: Set Up Plumset
SET UP PLUMSET ® Prime the set according to package instructions. Push in flow regulator to close. Insert primed cassette into the infuser, close door. Press [ON/OFF] to turn on the infuser. CLINICAL CARE AREA (CCA) SELECTION Use to highlight the desired CCA. After you select the desired CCA, press s [Choose]. -
Page 7: Programming Line A/B With A Custom Drug Library
PROGRAMMING LINE A/B WITH A CUSTOM DRUG LIBRARY On the Delivery (A/B) screen, select a line to program. If you are programming a primary delivery, select Line A. If you are programming a secondary delivery, select Line B. In the drug list, select the drug – You may use the alphanumeric keypad to search. -
Page 8: Programming Line A/B Without A Drug List
• Before starting delivery, verify the values. Press s [Yes] to start delivery. PROGRAMMING A BOLUS (FOR PLUM 360_15.1 AND HIGHER WITH HOSPIRA MEDNET SAFETY SOFTWARE) • A Bolus can be delivered from either Line A or Line B (while in the piggyback mode). -
Page 9: Nurse Callback
Press s [A]. Press s [Bolus]. The Bolus softkey is available only if the medication to be bolused is enabled in the drug library and is currently infusing. On the Bolus programming screen enter: Dose: ___________________________________ Duration: ________________________________ The Rate and VTBI will be calculated. Press [START] for confirmation. -
Page 10: Address Vtbi Complete Alarm
ADDRESS VTBI COMPLETE ALARM Upon completion of delivery, the screen shows a flashing “VTBI completed Line A! – Add more VTBI or Clear Line A” message and the audible alarm sounds. You can change the default setting to one of the following: —... -
Page 11: Stop And Start With 1 Line Pumping
If the cassette test detects that there is still air in the line, repeat Step1 until the cassette test is successful. Press [START] to restart the delivery. If two lines were pumping when delivery stopped, press the appropriate softkey in response to the prompt. -
Page 12: Standby - A/B Delivery Screen
STANDBY – A/B DELIVERY SCREEN AND CONFIRMATION SCREEN Standby - Enables the clinician to postpone starting the delivery for a period of 24-72 hours. Default is 72 hours. If a line is in standby and the confi gured maximum standby time expires, the program is cleared and the infuser alarms 2 minutes later if there has been no interaction with the pump on either line. -
Page 13: Delayed Start
DELAYED START On the Program screen, press s [Delay]. Enter time in hours and minutes up to 23:59 hh:mm and press s [Done]. Delivery screen shows DELAYED and delay time countdown. Press [START] and s [Yes] to confirm to resume the infusion. To clear a delay, choose the line, press s [Delay], then change or clear the delay settings, then press s [Done]. -
Page 14: Multistep
MULTISTEP After your medication is highlighted, press s [Choose]. Press s [Multistep] before entering any values on the programming screen. Enter Rate and/or Dose, VTBI, and Duration as appropriate for the parameters displayed for Step 1. After programming all values in 1 (Step 1), navigate to the 2 (Step 2), and program that step. -
Page 15: Lock Keypad (Method #2)
LOCK KEYPAD (METHOD #2) Via Settings/Vols/CCA At the main delivery screen, press [Settings/Vols/CCA] softkey. Press s [Lock Keypad] – the Passcode data entry screen appears on the display. Enter Passcode to Lock using the numeric keypad. Press s [Enter] softkey. When the keypad is locked, the lock symbol appears in the bottom right corner of the delivery screen. -
Page 16: Set The Post Infusion Rate
SET THE POST INFUSION RATE On the Main Delivery screen, press s [Settings/Vols/CCA]. The Settings/Vols/CCA screen appears, with the Post Infusion Rate highlighted. Press s [Choose]. The Post Infusion Rate screen appears, with the current setting highlighted. To change the current setting, press s [KVO/Rate]. To return to the previous setting, press s [KVO/Rate] again. -
Page 17: Adjust Display Lighting And Contrast
Press s [Clear Total] to clear all values, including the Total Volume. To return to the Settings/Vols/CCA screen, press s [Previous Screen]. If you do not press a key in 30 seconds, the Delivery screen automatically returns. ADJUST DISPLAY LIGHTING AND CONTRAST On the Main Delivery screen, press s [Settings/Vols/CCA]. -
Page 18: Set Distal Pressure Alarm Limit
SET DISTAL PRESSURE ALARM LIMIT NOTE: Prior to changing the Distal Pressure Alarm Limit, the infuser must be stopped. On the Main Delivery screen, press s [Settings/Vols/CCA]. Change the Distal Pressure Alarm Limit. ––––––––––––––––––––––––––––––– CAUTION DO NOT SET THE DISTAL PRESSURE ALARM LEVEL LOWER THAN 3 PSI (155 HG) OR HIGHER THAN 12 PSI (624 HG). -
Page 19: Discontinue Fluid Administration
If only 1 line was pumping, open all clamps. If 2 lines were pumping, you must choose one line for gravity flow. Open the clamps on that proximal line and on the distal line. Make sure one proximal line stays clamped. Holding the cassette upright, set gravity flow by turning the flow regulator counter-clockwise. -
Page 20: High Priority Alarms
HIGH PRIORITY ALARMS Alarm Message Possible Cause Corrective Action and Priority Power Off then On. Malfunction. Power the infuser off, Replace pump if and then on. Replace alarm continues. infuser if this does not clear the alarm. High Replace pump. Audio alarm is OFF Power off the infuser. - Page 21 Distal OCCLUSION! A distal occlusion Examine the distal Check IV line and site. is detected and line for kinks and either the maximum correct any found. High auto-restarts have Restart the delivery. occurred for the NOTE: The alarm infusion or auto- can also be cleared by restart was set to zero.
- Page 22 Data was cleared. Corruption of retained Acknowledge the Re-enter all delivery parameters alarm. programming. is detected. Autoclear of SEEP requires fresh High delivery setup. Distal AIR! The single air bolus Open the cassette Disconnect/reprime. or the cumulative air door. Clear programs. Press START.
-
Page 23: Medium Priority Alarms
MEDIUM PRIORITY ALARMS Alarm Message Possible Cause Corrective Action and Priority Door opened! The cassette door Close the cassette Delayed Start! was opened while door with cassette Close Door. an infusion was in inserted. Delayed Start. Medium Distal OCCLUSION - A distal occlusion Examine the distal line Paused! -
Page 24: Low Priority Alarms
LOW PRIORITY ALARMS Alarm Message Possible Cause Corrective Action and Priority Keep Plugged into AC! The battery or battery Power off the infuser. Service battery/replace charge circuitry needs Replace the infuser pump. servicing. as soon as possible, so that it can be sent for repair. -
Page 25: Line A - High Priority Alarms
LINE A – HIGH PRIORITY ALARMS Alarm Message Possible Cause Corrective Action and Priority No Action Alarm! No operator action for Press any key on Start or Clear Line A. 2 minutes when Line the infuser except A has been stopped [AUDIO PAUSED]. - Page 26 Proximal OCCLUSION Proximal occlusion or Examine the proximal line for kinks and A! Check Line A. air detected on Line A correct any found. during delivery. High If the occlusion is caused by a closed clamp, open the clamp. If all clamps are open, the alarm may be caused by excessive air that is...
-
Page 27: Line A - Medium Priority Alarms
LINE A – MEDIUM PRIORITY ALARMS Alarm Message Possible Cause Corrective Action and Priority Callback to Line A! A Callback Alarm was Press Silence audio to clear. programmed for Line [AUDIO PAUSED]. A, and the VTBI for Medium Line A reaches 0 for a Loading Dose or any step in a multistep therapy except the... -
Page 28: Line B - High Priority Alarms
Proximal OCCLUSION A proximal occlusion Examine Line A for A Startup! Open/close was detected on Line kinks. Resolve the door or Backprime. A during the cassette occlusion. Either integrity test. backprime or open Medium and close the cassette door. See section in SOM on Opening the Cassette Door... - Page 29 VTBI Completed A Piggyback delivery Add VTBI on Line B. Line B! Add more VTBI on Line B is complete Clear program on or Clear B. and the line was Line B. Open the programmed under cassette door. High the current CCA and no delivery is programmed to deliver on Line A.
-
Page 30: Line B - Medium Priority Alarms
Proximal OCCLUSION Proximal occlusion Examine the proximal line for kinks and B! Check Line B. detected on Line B correct any found. during delivery. High Restart Line B. NOTE: The alarm can also be cleared by clearing the confirmed program or opening the cassette door. - Page 31 Callback to Line B! Loading Dose, Press Silence audio to clear. Maintenance Dose or [AUDIO PAUSED]. any step in a multistep Medium therapy. A Callback Alarm was programed for Line B, which is in Piggyback mode, Line A is not programmed to resume when Line B completes, and the VTBI for Line B...
-
Page 32: Line A And B - High Priority Alarms
Proximal OCCLUSION Proximal occlusion Examine Line B for B. Resolve then detected on Line kinks. Make sure a line Backprime. B during cassette or syringe is attached integrity test. to the secondary Medium port and that the line is unclamped or the syringe has enough free space to accept the backprimed fluid. - Page 33 Line not in STANDBY! No operator action for Press Choose line(s) 15 seconds when the s [Standby All], to Standby: user has selected s [Standby A], s [Standby] when s [Standby B], High both lines are able to or s [Cancel]. be put in standby, but has not selected a line (A, B or A &...
- Page 34 Yes: Start titration. Standby is not possible Press s [Yes] to No: Edit and no operator action confirm the program for 30 seconds when or s [No] to go back High a titrated program is to the Program screen. waiting to be confirmed. No Action Alarm! Standby is possible Press s [Yes] to...
- Page 35 No Action Alarm! Soft limit override Press s [Yes] to Yes: Override. and no operator action confirm the program No: Edit for 2 minutes when a or s [No] to go back new program is waiting to the Program screen. High to be confirmed.
- Page 36 Alarm Message Possible Cause Corrective Action and Priority Proximal AIR! The cumulative air de- Press s [Backprime]. Backprime. tected at the proximal See section in SOM on sensors in Line A and Backpriming. High Line B exceeds the air Check the syringe size. detection threshold.
Need help?
Do you have a question about the Plum 360 with Hospira MedNet System and is the answer not in the manual?
Questions and answers