Rothenberger Supertronic 2 SE Technical Data Manual
Hide thumbs
Also See for Supertronic 2 SE:
- Instructions for use manual (279 pages) ,
- Instructions for use manual (304 pages)
Table of Contents
Advertisement
Contents
1
1.1
1.2
1.3
2
2.1
2.1
2.1
3
3.1
3.1.1
3.1.2
3.1.3
3.1.4
4
4.1
4.2
4.3
4.4
4.5
4.6
4.7
4.8
5
5.1
5.2
5.3
5.4
5.4.1
5.4.2
5.4.2
5.5
5.5.1
5.5.2
5.6
5.7
5.8
5.9
5.10
5.10.1
5.10.2
Page
35
35
35
35
37
37
38
38
38
38
38
38
39
40
40
40
40
41
41
42
43
43
44
44
44
45
46
47
47
47
47
48
48
50
51
51
52
54
55
55
55
33
Advertisement
Table of Contents

Related Manuals for Rothenberger Supertronic 2 SE


Summary of Contents for Rothenberger Supertronic 2 SE
-
Page 1: Table Of Contents
Changing the complete thread jaws and the thread-tapping head Changing the thread size Tapping threads Setting the thread length (only automatic thread-tapping head) 5.10 Setting the thread depth (only automatic thread-tapping head) 5.10.1 Only thread-tapping machine SUPERTRONIC 2 SE 5.10.2 Only thread-tapping machine SUPERTRONIC 3 SE/4 SE... - Page 2 Contens Page 5.11 Thread-tapping in 2 work steps (automatic thread-tapping head 2 ½” … 3”) 5.12 Removing the workpiece 5.13 Cleaning after use Maintenance and inspection Changing the internal deburring blade Changing the pipe cutter cutting blade Changing the clamping jaw insert Daily inspection Troubleshooting Disposal...
-
Page 3: Safety Notes
Correct use The thread-tapping machine SUPERTRONIC 2 SE; 3 SE and 4 SE may only be used for cutting off, making and deburring BSPT, NPT and bolt threads measuring ¼” … 2” (2 SE), ½” … 3” (3 SE) and ¼” … 4”... - Page 4 In the event of faults (unusual smell, vibrations, unusual noises) during work with the SUPERTRONIC, it is essential to immediately press the safety pedal and perform an EMERGENCY STOP of the machine! If the machine is running, it is prohibited to hold the workpieces manually or to perform similar work, and to fit and remove parts such as filters, valves, pipe sections etc! Only persons who have been instructed on how to operate the machine may carry out work listed in Chapter 1.1 “Correct use”!
-
Page 5: Technical Data
SUPERTRONIC 2 SE AUTO,110 V Art.-No. 05.6150 SUPERTRONIC 2 SE, 230 V Art.-No. 05.6175 SUPERTRONIC 2 SE AUTO, 230 V Cutting capacity: BSPT R ¼” … 2”, NPT ¼” … 2”, bolt thread 3/8” … 2” Speed: 40 rpm under no load... -
Page 6: Technical Data Supertronic 3 Se
Technical data SUPERTRONIC 3 SE Art.-No. 05.6253 SUPERTRONIC 3 SE, 110 V Art.-No. 05.6254 SUPERTRONIC 3 SE AUTO, 110 V Art.-No. 05.6250 SUPERTRONIC 3 SE, 230 V Art.-No. 05.6255 SUPERTRONIC 3 SE AUTO, 230 V Cutting capacity: BSPT R ¼” … 3”, NPT ¼” … 3”, bolt thread 3/8” … 2” Speed: 33 rpm under no load Motor:... -
Page 7: Accessories
3.1.3 Accessories Use only suitable accessories recommended by ROTHENBERGER Werkzeuge GmbH! Standard tapping head Pipe stand alternatively Height-adjustable, with ball guide, Automatic tapping head for pipes up to 6” NIPPEL MAX Spare cutting wheel For internally clamping D=41 mm, L=19 mm, DA=9 mm... -
Page 8: Functional Description
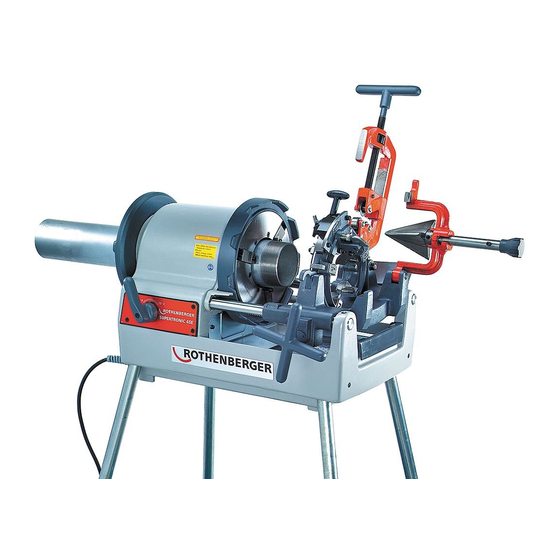
3.1.4 Functional description Threads are cut or turned on workpieces such as pipes or rods in the thread-tapping machine SUPERTRONIC 2 SE, 3 SE and 4 SE. The machine consists of: a drive motor that rotates the centring chuck (8) -
Page 9: Setting Up The Machine
Fix the tool carriage so that it cannot move while the machine is being transported. Hold the machine securely by its base to lift it. Do not hold the machine by its centring chuck or the internal deburrer when carrying it! If the machine is transported with the thread-tapping oil still inside, the oil might splash out onto clothing due to vibrations! Thread-tapping oil on the surface of the machine makes it slippery. -
Page 10: The Thread-Tapping Oil
! The cable should not be longer than 30 m! The thread-tapping oil For tapping, use ROTHENBERGER high-performance thread-tapping oil art. no. 6.5010. This oil is not suitable for tapping drinking water pipes! Alternatively, you can use ROTHENBERGER high-performance thread-tapping fluid, art. -
Page 11: Checking The Thread-Tapping Oil
Checking the thread-tapping oil When cleaning, servicing, inspecting or repairing the machine, it is essential to switch it off and pull out the mains plug (de-energised operation)! A new machine or a machine that has not been used for an extended period is covered with an oil film to protect it. -
Page 12: Draining Off The Oil
Draining off the oil It is essential to also observe the safety and disposal regulations in Chapter 8! Oil drainage screw Operation of the thread-tapping machine Clamping the workpieces The tool carriage can make contact with the frame before the tapping process has ended and the clamping chuck and the machine can be damaged as a result! A clearance of at least 70 mm must therefore be maintained between the thread cut on the workpiece and the clamping chuck! -
Page 13: Cutting The Workpieces With The Pipe Cutter
Hold the workpiece on the clamping chuck side (9) securely with your right hand and gradually tighten it with the clamping chuck. Clamping chuck Turn slowly Hold workpiece tightly with your right hand Ensure that the three clamping jaws are in contact with the workpiece. If the three clamping jaws are not in contact with the workpiece, it will wobble and neither cutting nor thread- tapping can be performed correctly. -
Page 14: Reaming The Workpieces
Move the pipe cutter (1) up so that it is not in the way. Turn the feeder hand wheel (6) anti-clockwise in order to bring the pipe cutter into the position necessary for cutting the workpiece. Turn rotary handle into cutting position Move the pipe cutter down onto the workpiece and then press the ON switch (7) or press the pedal. -
Page 15: Changing The Thread Size
Changing the thread size 5.4.1 Thread-tapping machine SUPERTRONIC 2 SE The thread jaws ½” … ¾” must be used for thread sizes ½” and ¾”. The thread jaws 1” … 2” must be used for pipe sizes 1, 1 ¼”, 1 ½” and 2”. -
Page 16: Removing And Installing The Thread Jaws From And In The Thread-Tapping Head
Removing and installing the thread jaws from and in the thread-tapping head (10) in the tool carriage (4) 5.5.1 Automatic thread-tapping head Removal: Wear gloves in order to prevent cut injuries to the hands caused by the thread jaws! Pull the parking lever into the “A” position in order to open the thread jaws. Parking lever Insert the selector pin (silver colour) into the selector block of the thread jaws. - Page 17 Installation: Precise thread-tapping is only possible if the number on the slot of the thread-tapping head corresponds with the number on the thread jaw! Pull the parking lever in the “A” direction in order to open the thread jaws. Parking lever Insert the selector pin (silver colour) into the selector block of the thread jaws.
-
Page 18: Standard Thread-Tapping Head
5.5.2 Standard thread-tapping head Removal: Wear protective gloves in order to prevent hand injuries caused by the thread jaws! Release the die holder, bring the cradle into the lowest position, tighten the die and move the opening and closing lever up to remove the thread jaws. Opening and closing lever Move up... -
Page 19: Changing The Complete Thread Jaws And The Thread-Tapping Head
Changing the complete thread jaws and the thread-tapping head Installing and removing the thread-tapping head (10) into and out of the bed carriage: Lift the thread-tapping head to half height. Bring the thread-tapping head into the diagonal position and remove it. Not until the thread-tapping head is in a parallel position to the flat side of the thread-tapping pin can it be removed from or installed in the machine. -
Page 20: Tapping Threads
For the standard thread-tapping head: After releasing the pipe cutter (1), the cradle can be moved up and down. Balance the reading-off device on the cradle with the defined measuring division on the scale plate. Scale plate Cradle Die holder Release Opening closing... - Page 21 To guarantee precisely ground threads, follow the instructions below: Use the thread-tapping head and the corresponding thread-tapping jaws that matches the thread size! Secure the thread-tapping head correctly on the tool carriage. Do not place the thread-tapping head directly and unprotected on the floor and handle it with care! Ensure that the thread-tapping oil runs on the thread-tapping jaws! For the automatic thread-tapping head: Lower the thread-tapping head and insert the T handle, pressing in fully in the “B”...
-
Page 22: Setting The Thread Length (Only Automatic Thread-Tapping Head)
For the standard thread-tapping head: Lower the thread-tapping head and move the opening and closing lever down towards you. Switch on the machine with the pedal, turn the rotary handle clockwise so that the thread jaws press on the workpiece. Release the rotary handle when two to three threads have been cut. -
Page 23: Setting The Thread Depth (Only Automatic Thread-Tapping Head)
5.10 Setting the thread depth (only automatic thread-tapping head) 5.10.1 Only thread-tapping machine SUPERTRONIC 2 SE Undo the block screw with which the selector block is secured on the cam plate. Move the selector block to adjust the thread depth. -
Page 24: Thread-Tapping In 2 Work Steps
5.11 Thread-tapping in 2 work steps (only automatic thread-tapping head 2 ½” … 3” / 4”) To tap a thread on a pipe with a large diameter with low tension, first use the 2-step thread-tapping pin (black) for thread-tapping (pre-tapping) and then the selector pin (silver) for tapping (post-tapping) standard threads. -
Page 25: Maintenance And Inspection
All machines are subject to natural wear during use. They must be maintained from time to time and wear parts must be replaced. This work may only be carried out by an authorised ROTHENBERGER service station. This gives you a full warranty on the material and workmanship! -
Page 26: Changing The Clamping Jaw Insert
Hold the cutting wheel and push the cutting wheel straight pin slowly out on the opposite side. Cutting wheel straight pin Cutting wheel Remove chips, dirt, oil etc. from the pin and grease the groove. Insert a new cutting wheel into the blade holder and insert the pin again. Insert a new cotter pin into the cutting wheel straight pin and secure it by bending it apart. - Page 27 Undo the screws that secure the clamping jaw inserts. Release Place a thin rod onto the upper edge of the spring and pull out the clamping chuck pin. Spring Clamping chuck pin Pull the clamping jaw insert forward. Clamping jaw inserts Remove Remove the other two clamping jaw inserts if three clamping jaw inserts must be replaced at the same time.
-
Page 28: Daily Inspection
Daily inspection Check the mains plug, mains cable and extension cable to ensure they are undamaged. Correctly filled oil trough Adjust the oil screw if necessary Clean the oil tank if there are impurities in it. Inspect the thread-tapping jaws, pipe cutter and internal deburrer for any wear and replace parts if there is wear. -
Page 29: Oils And Lubricants
Warranty The warranty for the ROTHENBERGER thread-tapping machine SUPERTRONIC 2 SE, 3 SE and 4 SE takes the form of a contractual agreement. The warranty covers the free remedying of all faults or defects on the machine that have occurred within the warranty period and that can be proven to be attributable to material or manufacturing errors.
Need help?
Do you have a question about the Supertronic 2 SE and is the answer not in the manual?
Questions and answers