Table of Contents
Advertisement
Quick Links
Installation Instructions – ZUG30 Heater Kit/Cover
TO BE USED WITH HOUSEHOLD REFRIGERATORS
30" BUILT-IN
BOTTOM-FREEZER, 2 DRAWER
Unit 1 - Spacer Clips Installed
ALL REFERENCES TO ASSEMBLY ARE FROM THE FRONT OF THE UNITS
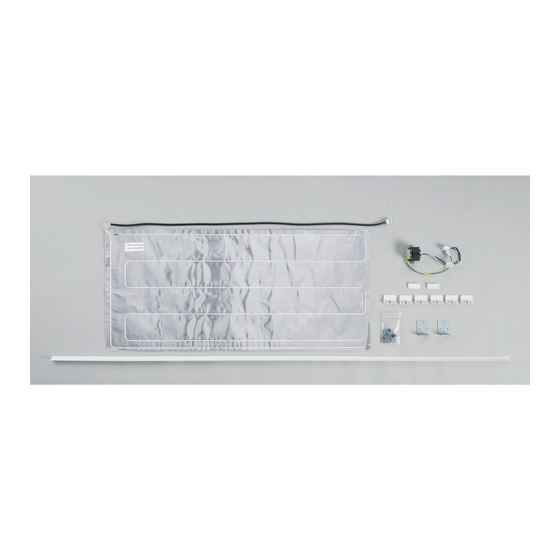
PARTS PROVIDED:
Installation Instructions (1)
Heater (1)
Transformer (1)
Plastic Cover (1)
Brackets (2)
Tools Required:
#2 Phillips Head Screw Driver
Step Ladder
Open Wrench Set
5 mm. Allen Wrench
NOTE: WHILE PERFORMING INSTALLATIONS
DESCRIBED IN THIS BOOK, SAFETY GLASSES OR
GOGGLES SHOULD BE WORN.
IMPORTANT SAFETY NOTICE:
This kit is to be installed by a qualified service technician only. Any attempt to repair a major appliance may result in
personal injury and property damage. Neither the manufacturer nor the seller can be responsible for the interpretation
of this information or assume any liability in connection with its use.
Unit 2 - Heater Installed
Spacer Clips (8)
Strain Relief (1)
Screw, 4.8 x 13 (4)
Bolt, M4 x 18 (2)
Nut, M4 (2)
PPE Required:
Safety Glasses
Safety Gloves
STOP
Disconnect power to the appliance before beginning installation.
Do not operate the refrigerator until the installation is complete.
This refrigerator is top heavy and must be handled with care.
Failure to do so can result in the unit tipping over and result in death or serious injury.
Do not cut lower banding on units.
Do not remove foam base pad from front of units.
Unit 2
Unit 1
Washer, star (4)
Bolt, M6 x 45 (3)
Nut, M6 (3)
Washer, flat (6)
Wiring 'Y' Splitter (1)
BEFORE YOU BEGIN
Read these instructions
completely and carefully.
WARNING
WARNING
197D9290P001
31-45446-1 05-12 GE
Advertisement
Table of Contents

Summary of Contents for GE Monogram ZUG30
- Page 1 This kit is to be installed by a qualified service technician only. Any attempt to repair a major appliance may result in personal injury and property damage. Neither the manufacturer nor the seller can be responsible for the interpretation of this information or assume any liability in connection with its use. 197D9290P001 31-45446-1 05-12 GE...
- Page 2 1. This heater kit will only fit two units, if the doors face each other when opened. Door swing of unit 1 must be switched from right hand swing to left hand swing. Refer to Installation Instructions 31-46542 for proper procedure and safety measures.
- Page 3 4. On Unit 2, use top and center holes to locate the foil heater. There is a hole in the foil heater. This lines up with the hole at the center of the case. The "V" notch at the top of the heater, lines up with the top hole in the side of the case.
- Page 4 6. Attach joining brackets to rear of reach unit, using screws provided with kit, add spacer between brackets. Join with bolt, washers and nut. Do not cut lower banding strap during this step. 7. Refer to Installation Instructions 31-46542 included with the units. Connect water lines to units, plug units into electrical outlets, push units into cabinet enclosure and fasten to anti-tip brackets.
- Page 5 Fasten heater leads to open slot in vent cover, using the strain relief provided with the kit. Vent cover Strain relief Heater leads Locate the vertical, metal plate behind the vent cover. There are two holes in the plate for mounting the transformer. Locate the transformer on the plate and attach using bolts, nuts and washers supplied.
- Page 6 Trim cover snaps into the front six spacer clips NOTE: PRODUCT IMPROVEMENT IS A CONTINUING ENDEAVOR AT GENERAL ELECTRIC. THEREFORE, MATERIALS, APPEARANCE AND SPECIFICATIONS ARE SUBJECT TO CHANGE WITHOUT NOTICE. GE Appliances & Lighting General Electric Company Louisville, KY 40225 GEAppliances.com...
Need help?
Do you have a question about the Monogram ZUG30 and is the answer not in the manual?
Questions and answers