vita vPad comfort Operating Manual
Hide thumbs
Also See for vPad comfort:
- Operating manual (64 pages) ,
- Operating manual (50 pages) ,
- Operating manual (8 pages)
Table of Contents
Advertisement
Quick Links
Download this manual
See also:
Operating Manual
Advertisement
Table of Contents

Related Manuals for vita vPad comfort


Summary of Contents for vita vPad comfort
- Page 1 VITA vPad comfort Operating manual VITA shade determination VITA shade communication VITA shade reproduction VITA shade control Date of issue: 09. 18 VITA – perfect match.
- Page 2 The VITA vPad comfort is a state-of-the-art control unit that complies with all international safety standards. In order to ensure that you can operate the VITA vPad comfort safely and effectively, please read this operating manual and all the relevant notices carefully. The operating manual must always be kept close to the device.
-
Page 3: Table Of Contents
3.9 Help ..........15 3.4 VITA Energy Efficiency ....... . 11 3.5 Standby temperature . - Page 5 2. First use 1. The system VITA vPad comfort system VITA vPad comfort Note: • What? A control unit for controlling a firing device. • The VITA vPad comfort is not compatible with the VITA SWITCHBOX or the VITA MultiPump.
-
Page 6: The Control Unit
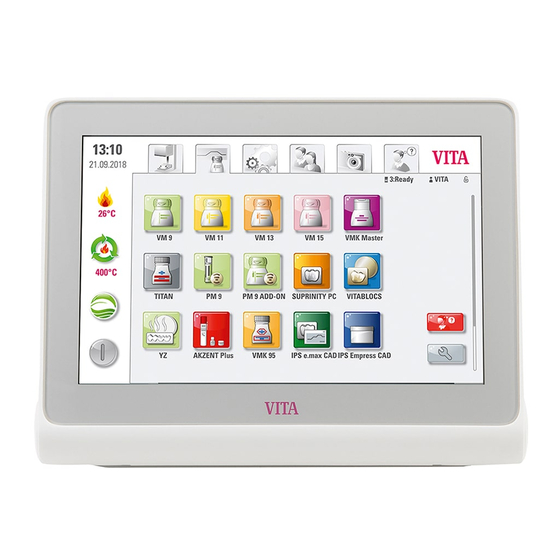
1. The system 2. First use 1.1 The control unit 1 USB input Port for connecting cable Adjustable stand 10-inch TFT display... -
Page 7: Connections On The Vita Vacumat 6000 M
1. The system 2. First use 3. Operation 2. First use 2.1 Connections on the VITA VACUMAT 6000 M (see VITA VACUMAT 6000 M operating manual) Status display Device fuses (see VITA VACUMAT 6000 M/VITA VACUMAT 6000 MP operating manual) -
Page 8: Connections On The Vita Vacumat 6000 Ms
6. Lift path measurement: The lift moves down to the bottom position, up to the top position and down again to the bottom position. • If you are using a VITA VACUMAT 6000 MP, please also connect the compressed air connection (max. 5 bar) to the pressure regulator of the VITA vacuum pump. -
Page 9: Gesture Controls Of The Control Unit
2. First use 3. Operation 4. Materials and firing programs 3. Operation 3.1 Gesture controls of the control unit Zooming You can maximize or minimize photos or PDFs by using two fingers to enlarge or contract the image. Scrolling Swipe downwards or upwards to move between pages in a PDF. Short tap You open the basic firing window, e.g., for a firing program, with a short tap. -
Page 10: System Functions
2. First use 3. Operation 4. Materials and firing programs 3.2 System functions Materials/firing programs Altering the lift position Settings Profiles Photoviewer Help Date/time Active profile Combustion chamber Firing device status temperature Standby temperature VITA Energy Efficiency Switching off the system... -
Page 11: Switching Off The System
Note: • What? Tapping the VITA Energy Efficiency button warms the firing unit up to a temperature of 200°C and keeps it there. Tap the button again to deactivate this function. Hold your finger down on the button to switch to the normal standby temperature. -
Page 12: Altering The Lift Position
You can adjust the "Lab" profile to suit your individual needs. There is no option for adding new profiles. • What for? The "VITA" profile allows you to use the VITA programs with their original settings. The "Lab" profile allows... -
Page 13: Photoviewer
(see section 6.6.), the images in the "Screensaver" folder will be loaded. The vPAD comfort has 2 GB of memory. It can open image files in JPEG and PNG formats. You cannot save any changes you make to images in the vPad comfort. - Page 14 3. Operation 2. First use 4. Materials and firing programs Example: Exporting images onto a USB drive Select the "Screensaver" folder. Press and hold your finger down on the Select "Export." first image until it is selected. Short-tap on other images to select them as well. Select "Save."...
-
Page 15: Help
VITA operating manuals. In the Material overview, Help shows all the working instructions for VITA materials. Help in the "Settings" tab shows all the operating manuals for VITA devices. The last manual that you view will remain open in the "Help" tab until the device is restarted. - Page 16 3. Operation 4. Materials and firing programs 5. Firing window...
-
Page 17: Materials And Firing Programs
• What for? Saves time, thanks to pre-installed materials. 4.1 Working Instructions Select "Working Instructions." Note: • What? Here you will find all the working instructions for the VITA materials integrated into the software. • What for? Quick assistance, thanks to pre-installed working instructions. -
Page 18: Managing Materials
• What? This function allows you to create, copy, edit, delete, import and export materials. • It is not possible to make changes to the "VITA" profile. The "Lab" profile is a copy of the "VITA" profile, and can be modified to suit your needs. - Page 19 3. Operation 4. Materials and firing programs 5. Firing window Example: Creating a material Select "Manage material." Select "Create material." Activate the text box. Enter a material name. Confirm. Select the firing curve type and background color and confirm. Your final material. Firing curve types Single-stage curve = standard firing curve,...
- Page 20 3. Operation 4. Materials and firing programs 5. Firing window Example: Editing material Select "Manage material." Select the material you want to edit, The material can be edited. then "Edit material." Example: Copying material Select the material you want to Select "Copy material."...
- Page 21 Note: • In order for you to export materials, there must be a USB drive connected to your vPad comfort. • Once the export is complete, the exported material will be on your USB drive. You can then send it via e-mail, for example.
- Page 22 Select the material you want to import. Click on "Import." Select "Back." The "TEST" material has now been imported. Note: • In order for you to import a material, a USB drive containing a file in .2vtm format must be connected to your vPad comfort.
-
Page 23: Managing Firing Programs
3. Operation 4. Materials and firing programs 5. Firing window 4.3 Managing firing programs Select the required material. Select "Manage firing The firing program management menu. programs." Create new firing Back program Import firing Copy firing program program Rename firing program Export firing program Delete firing program... - Page 24 4. Materials and firing programs 3. Operation 5. Firing window Example: Creating firing program Select "Manage firing Select "Create firing Enter a firing program name. programs." program." Confirm. Your final firing program. Example: Renaming firing program Enter a program name and Your final, renamed firing program.
- Page 25 3. Operation 4. Materials and firing programs 5. Firing window Example: Deleting a firing program Confirm. Your final deleted firing program. Select a firing program, then click on "Delete firing program." Example: Drag & drop Press and hold your finger on the firing Your final moved firing program.
- Page 26 Select "Import firing Select the firing program you want to program." program." import. Select "Import." Note: • In order for you to import a firing program, a USB drive containing a file in .2vtm format must be connected to your vPad comfort.
-
Page 27: Firing Window
4. Materials and firing programs 5. Firing window 6. Settings 5. Firing window 5.1 Firing programs for single and two-stage curves Select a material. Select a firing program. Firing window with single-stage curve. Prevacuum Rise time/ Firing tempera- gradient ture/holding time Main vacuum Duration of firing program... - Page 28 • The data can subsequently be exported onto a USB drive and then transferred to the FDS (Firing Data System – the VITA program used to analyze the firing data) on the PC.
- Page 29 4. Materials and firing programs 5. Firing window 6. Settings Pre-drying lift position Modifiable parameters: Lift position: • Value c: highest lift position entry: min. value b – max. 100 % • Value b: middle lift position entry: min. value a – max. value c •...
- Page 30 4. Materials and firing programs 5. Firing window 6. Settings Rise time/gradient Modifiable parameters: • Rise time: 0:05 – 120:00 min • Rise gradient: 2°C/min – 120°C/min Note: • The rise time is automatically calculated and adjusted after the pre-drying temperature or firing temperature is entered.
- Page 31 4. Materials and firing programs 5. Firing window 6. Settings Firing temperature and holding time Modifiable parameters: • Firing chamber temperature: pre-drying temperature plus 10°C – 1200°C • Holding time: 00:00 min – 60:00 min Note: • The possible values to enter are displayed above the number field. •...
- Page 32 4. Materials and firing programs 5. Firing window 6. Settings Cooling lift position Modifiable parameters: • Cooling lift position: 0 % – 100 % Note: • The possible values to enter are displayed above the number field. • This function is available when the cooling temperature is active. •...
-
Page 33: Firing Program: Pressing Curve
4. Materials and firing programs 5. Firing window 6. Settings 5.2 Firing program: Pressing curve Pressing time and pressing pressure 2 Firing temperature/holding time Pressing time and Rise time/gradient pressing pressure 1 Duration of firing program Cooling temperature/ Start temperature cooling time Main vacuum Cooling lift position... - Page 34 4. Materials and firing programs 5. Firing window 6. Settings Start temperature Note: • Start temperature: 60°C – 1000°C • The possible values to enter are displayed above the number field. Pressing time and pressing pressure 1 Note: • Pressing time: 0:00 min – 120:00 min •...
- Page 35 4. Materials and firing programs 5. Firing window 6. Settings Pressing time and pressing pressure 2 Note: • Pressing time: 0:00 min – 120:00 min • Pressing pressure: The pressing pressure is changed using the "Change pressing pressure" button. • Pressing time 2 runs in accordance with the set time. Starting the pressing program Start the pressing program Confirm the message.
-
Page 36: Firing Program: Sintering Curve
4. Materials and firing programs 5. Firing window 6. Settings 5.3 Firing program: Sintering curve Third phase: Gradient/rise time Second phase: Gradient/Rise time/ Gradient/rise time First cooling phase Pre-dry Third phase: firing temperature/ First phase: Gradient/ holding time Rise time/Pre-dry Duration of firing program Second phase: Selection of cooling... - Page 37 4. Materials and firing programs 5. Firing window 6. Settings Activating/deactivating Pre-drying (VITA Pre-dry) Select firing temperature/holding time. Activate pre-dry. Once you have done this, confirm. Activating/deactivating the first phase Select first phase: Gradient/rise time. Activate first phase. Once you have done this, confirm.
- Page 38 4. Materials and firing programs 5. Firing window 6. Settings Activating/deactivating controlled cooling Select the first cooling phase. Select first cooling phase: "Controlled Confirm. cooling." Select the second cooling phase. Select second cooling phase: Confirm. "Controlled cooling." Select the third cooling phase. Select third cooling phase: "Controlled Confirm.
-
Page 39: Changes After Program Startup
4. Materials and firing programs 5. Firing window 6. Settings Cooling mode 2 Note: • Three fixed cooling positions. • Lift position at the following temperatures: Temperature: > 1200°C, Lift position: 80 % Temperature: < 1200°C, Lift position 60 % Temperature: <... - Page 40 4. Materials and firing programs 5. Firing window 6. Settings...
- Page 41 • What? This area contains information and settings for the firing unit and the control unit. The Pressing pressure settings option is only available when connected to a VITA VACUMAT 6000 MP. • What for? For changing factory settings, performing updates and viewing operating data.
-
Page 42: Setting Up The Dental Furnace
Temperature calibration using the VITA VACUMAT 6000 M/MP Silver Probe: • You can use the Silver Probe program and the VITA Silver Probe set to check the temperature in the firing room and adjust it within a range of plus/minus 40°C. -
Page 43: Setting The Pressing Pressure
Sound settings • The vPad comfort has a choice of six sound schemes for its three signal sounds: program start, program end and alarm/service notice. Each sound scheme contains a melody for each of the three signals. Press the "Test" button to play the individual sounds. -
Page 44: Setting The Device Data
USB drive and sent to instruments-service@vita-zahnfabrik.com for evaluation. To do this, plug a USB drive into the USB input and press the corresponding button to transfer the operating data/device information/all the data to the USB drive. -
Page 45: Setting The System Protection
Select "System protection settings." Note: • You can enter a password to protect the settings on your vPad comfort. • The password may consist of symbols, letters or numbers and may be between 1 and a maximum of 8 characters long. -
Page 46: Language Settings
5. Firing window 6. Settings 7. Technical data 6.7 Language settings Select "Language settings." Note: • Here you can adjust the language, temperature unit and time and date format. 6.8 Setting the date/time Select "Date settings." Note: • It is important to enter the correct date and time in order for the firing data system (FDS) to work correctly. This will allow you to clearly identify firing processes of the same type. -
Page 47: Factory Settings
Note: • The following settings can be reset to the factory defaults: start profile (reset to VITA), display brightness, program cancellation, lift speed, language and date and time format. Doing this will delete all your own program settings and custom profiles. - Page 48 5. Firing window 6. Settings 7. Technical data...
-
Page 49: Specification And Symbols
Application area Approved for indoor operation only Symbols CE marking The VITA vPad comfort complies with the applicable European Union (EU) regulations. The declaration of conformity can be requested from VITA (Regulatory Affairs Depart- ment) at: www.vita-zahnfabrik.com 7.2 Notices Basic information on the instrument design •... -
Page 50: Safety Functions
The firing devices are equipped with a system for monitoring the energy supply. This element prevents firing programs from aborting in the event of a short-term power failure. If the power failure lasts less than 15 seconds on the VITA VACUMAT 6000 M and MP or less than 2 minutes on the VITA ZYRCOMAT 6000 MS, the current program will continue to run even though the display will remain out of service for the duration of the power failure. -
Page 51: Scope Of Supply For The Vita Vpad Comfort
• Use VITA AKZENT Plus masking and glazing stains Shade for feldspar and glass ceramics. modification* • Use the VITA platinum pins and VITA Firing Paste provided to ensure Firing that the restoration is securely placed on the firing tray. preparation •... -
Page 52: Additional Information
30% is not reached within 30 seconds. seal. • Clean the edge seal on the firing chamber floor. For cleaning work, see the VITA VACUMAT 6000 M or VITA VACUMAT 6000 MP operating manual. • Inspect the vacuum pump separate- ly from the device. - Page 53 8. Scope of supply/VITA System Solutions 9. Additional information Additional error message from the VITA ZYRCOMAT 6000 MS Display Recognition Cause/correction • Inspect connections to the circuit Ventilator power board defective. Current program is stopped, heating off. board. • Inspect/replace ventilator.
-
Page 54: Vita Warranty And Consumer Protection
9.5 Competitor material The VITA vPad comfort includes firing programs for Celtra Duo, IPS e.max CAD, IPS e.max ZirCAD, IPS Empress CAD, Celtra Ceram, Celtra Press and n!ce. However, it should be noted that the firing processes for IPS e.max CAD must be carried out on an Ivoclar Vivadent firing tray. -
Page 55: Hotline And Support
Mr. Udo Wolfner and his team If you have technical questions concerning (Internal Sales Department) will VITA product solutions, you can contact be glad to assist you with orders or our technical specialists, Mr. Ralf Mehlin questions about the delivery, product and Mr. - Page 56 The VITA Modulbox is not necessarily a component of the product. Date of issue of this information: 09/18 After the publication of this information for use any previous versions become obsolete.
Need help?
Do you have a question about the vPad comfort and is the answer not in the manual?
Questions and answers