Targa WAL 14 A1 Operating Instructions And Safety Instructions
Wifi outdoor camera with led light
Hide thumbs
Also See for WAL 14 A1:
- Operating instructions and safety instructions (72 pages) ,
- Operating instructions and safety instructions (72 pages)
Table of Contents
Advertisement
Available languages
Available languages
Advertisement
Chapters
Table of Contents

Subscribe to Our Youtube Channel
Related Manuals for Targa WAL 14 A1

Summary of Contents for Targa WAL 14 A1
- Page 3 Deutsch ........................2 English ........................25 Français ........................48 Nederlands ......................75 Čeština ........................98 Español ........................121 Português ....................... 144 V 1.23...
-
Page 4: Table Of Contents
WAL 14 A1 Inhalt 1. Bestimmungsgemäße Verwendung ................ 3 2. Informationen zu Warenzeichen ................3 3. Lieferumfang ......................4 4. Technische Daten ....................5 5. Sicherheitshinweise ....................6 5.1. Verletzung von Rechten Dritter / Recht am eigenen Bild..............7 ... -
Page 5: Bestimmungsgemäße Verwendung
WAL 14 A1 Herzlichen Glückwunsch! Mit dem Kauf der WLAN Außenkamera WAL 14 A1 haben Sie sich für ein hochwertiges Produkt entschieden. Machen Sie sich vor der ersten Inbetriebnahme mit der Außenkamera vertraut und lesen Sie diese Bedienungsanleitung aufmerksam durch. Beachten Sie vor allem die Sicherheitshinweise und benutzen Sie die Außenkamera nur, wie in dieser Bedienungsanleitung beschrieben und für die angegebenen... -
Page 6: Lieferumfang
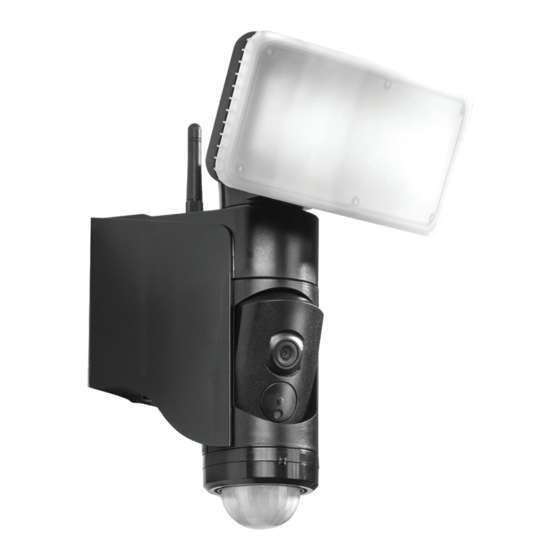
WAL 14 A1 3. Lieferumfang WLAN Außenkamera WAL 14 A1 Spezialschraubendreher 2 x Schraube 4 x 40mm 2 x Dübel 6 x 27mm Bedienungsanleitung (Symboldbild) Diese Bedienungsanleitung ist mit einem ausklappbaren Umschlag versehen. Auf der Innenseite des Umschlags ist die Außenkamera mit einer Bezifferung abgebildet. Die Ziffern haben folgende Bedeutung: LED-Strahler Kameraträger... -
Page 7: Technische Daten
WAL 14 A1 4. Technische Daten Das Typenschild der Außenkamera befindet sich an der Montageplatte (10). LED-Strahler Modellbezeichnung: WAL 14 A1 Betriebsspannung: 220 – 240 V , 50 Hz Leistungsaufnahme gesamt: ca. 20 Watt Leistungsaufnahme Leuchte ohne ca. 18 Watt Zusatzgeräte:... -
Page 8: Sicherheitshinweise
WAL 14 A1 5. Sicherheitshinweise Vor der ersten Verwendung des Gerätes lesen Sie bitte die folgenden Anweisungen genau durch und beachten Sie alle Warnhinweise, selbst wenn Ihnen der Umgang mit elektronischen Geräten vertraut ist. Bewahren Sie diese Bedienungsanleitung sorgfältig als zukünftige Referenz auf. Wenn Sie das Gerät verkaufen oder weitergeben, händigen Sie unbedingt auch diese Bedienungsanleitung aus, sie ist... -
Page 9: Verletzung Von Rechten Dritter / Recht Am Eigenen Bild
WAL 14 A1 herausdrehen bzw. in Stellung „0“ schalten. In diesen Fällen darf das Gerät nicht weiter verwendet werden, bevor eine Überprüfung durch einen Fachmann durchgeführt wurde. Atmen Sie keinesfalls Rauch aus einem möglichen Gerätebrand ein. Sollten Sie dennoch Rauch eingeatmet haben, suchen Sie einen Arzt auf. -
Page 10: Urheberrecht
WAL 14 A1 Einzige Einschränkung: Alle Personen, die von dieser Videoüberwachung betroffen sind bzw. sein können, müssen über die durchgeführte Überwachung in Kenntnis gesetzt werden. Um dieser Pflicht nachzukommen ist es ausreichend, Hinweisschilder oder Aufkleber am überwachten Objekt anzubringen. Diese Hinweise müssen jedoch vor dem Betreten der überwachten Fläche erkennbar sein. Wenn Sie z.B. -
Page 11: Vor Der Inbetriebnahme
WAL 14 A1 7. Vor der Inbetriebnahme Entnehmen Sie die Außenkamera und das Montagematerial aus der Verpackung. Prüfen Sie die Außenkamera auf Beschädigungen. Bei Beschädigungen darf die Außenkamera nicht in Betrieb genommen werden. Bitte wenden Sie sich bei defekter oder unvollständiger Lieferung an den Kundendienst des Herstellers. -
Page 12: Vor Der Montage
WAL 14 A1 7.3. Vor der Montage GEFAHR! Die Montage darf nur von einer autorisierten Elektrofachkraft durchgeführt werden! Die Spannungsversorgung darf ausschließlich über die elektrische Anlage des Gebäudes hergestellt werden. GEFAHR! Der Stromkreis muss während der Montage abgeschaltet sein! WARNUNG! Achten Sie beim Bohren der Bohrlöcher darauf, dass keine in der Wand liegenden Leitungen beschädigt werden. - Page 13 WAL 14 A1 Drücken Sie nun die Verriegelung (9) der Montageplatte (10) nach unten und ziehen Sie die Montageplatte (10) an dem Zugband aus dem Gehäuse der Außenkamera heraus. Entfernen Sie die Zugentlastung, nachdem Sie die 2 Schrauben entfernt haben.
- Page 14 WAL 14 A1 Schrauben Sie jetzt die Schrauben ein, um die Montageplatte (10) sicher an der Wand zu fixieren. Verdrahten fachgerecht Anschlussleitung in der Anschlussklemme an der Montageplatte (10). Beachten Sie dabei die Kennzeichnung der einzelnen Klemmen. Fixeren Sie anschließend das Kabel, indem Sie die Zugentlastung mit den 2 Schrauben wieder einsetzen.
-
Page 15: Led-Strahler, Kamera Und Bewegungsmelder Ausrichten
WAL 14 A1 Drehen Sie als letzten Schritt die Schraube (11) mit dem Schraubendreher (B) von unten durch das Kameragehäuse in die Montageplatte (10) ein. Bei der Schraube (11) handelt es sich um eine Spezialschraube, mit der ein erhöhter Diebstahlschutz gewährleistet wird. -
Page 16: Inbetriebnahme
WAL 14 A1 Folgende Grafik gibt Ihnen Informationen zum Erfassungsbereich des Bewegungsmelders (7). Richten Sie den Bewegungsmelder (7) so aus, dass dieser den gewünschten Bereich möglichst gut erfassen kann. Die Sicht darf nicht durch Gegenstände o. ä. behindert werden. Achten Sie darauf, dass im Erfassungsbereich des Bewegungsmelders (7) keine Bewegungen vorkommen, die nicht erfasst werden sollen (z.B. - Page 17 WAL 14 A1 Neigen Sie den Kameraträger (2) bis zum Anschlag um ca.70°. Entfernen Sie die Schraube der Abdeckung des SD- Kartenschachtes mit dem mitgelieferten Spezialschraubendreher. Entfernen Sie die Abdeckung des SD-Kartenschachtes. Der SD-Kartenschacht liegt direkt unter der Abdeckung, noch verdeckt und geschützt von einer...
-
Page 18: Download Und Installation Der Steuerungs-App
WAL 14 A1 8.2. Download und Installation der Steuerungs-App Die Bedienung der Außenkamera erfolgt über die Steuerungs-App L-Guard HD, die Sie zu diesem Zweck auf Ihrem Smartphone bzw. Tablet-PC installieren müssen. Die App steht im jeweiligen App Store zum kostenlosen Download bereit. - Page 19 WAL 14 A1 https://www.targa.de/downloads/IAN284704/Android_NL.pdf Android https://www.targa.de/downloads/IAN284704/iOS_NL.pdf https://www.targa.de/downloads/IAN284704/Android_CZ.pdf Android https://www.targa.de/downloads/IAN284704/iOS_CZ.pdf https://www.targa.de/downloads/IAN284704/Android_ES.pdf Android https://www.targa.de/downloads/IAN284704/iOS_ES.pdf https://www.targa.de/downloads/IAN284704/Android_PT.pdf Android https://www.targa.de/downloads/IAN284704/iOS_PT.pdf Deutsch - 17...
- Page 20 WAL 14 A1 https://www.targa.de/downloads/IAN284704/Android_SI.pdf Android https://www.targa.de/downloads/IAN284704/iOS_SI.pdf https://www.targa.de/downloads/IAN284704/Android_IT.pdf Android https://www.targa.de/downloads/IAN284704/iOS_IT.pdf https://www.targa.de/downloads/IAN284704/Android_DK.pdf Android https://www.targa.de/downloads/IAN284704/iOS_DK.pdf 18 - Deutsch...
-
Page 21: Zugangsdaten (Kameraname / Passwort)
WAL 14 A1 8.3. Zugangsdaten (Kameraname / Passwort) Zur Einrichtung der Außenkamera müssen Sie später einen Kameranamen (zur eindeutigen Identifizierung im Netzwerk), einen Benutzernamen und ein Passwort vergeben. Aus Gründen der IT-Sicherheit werden Benutzername und Passwort in der Kommunikation mit der WLAN- Außenkamera verschlüsselt übertragen. -
Page 22: Werkseinstellung Wiederherstellen
WAL 14 A1 8.4. Werkseinstellung wiederherstellen Der RESET-Taster der Außenkamera ist bewusst versteckt angebracht, um Missbrauch durch Unbefugte zu vermeiden. Falls Sie Ihr Passwort vergessen haben oder aus einem anderen Grund die Außenkamera auf die Werksseinstellung zurücksetzen wollen, gehen Sie folgendermaßen vor: ... -
Page 23: Problemlösung
WAL 14 A1 Reinigung GEFAHR! Der Stromkreis muss während aller Arbeiten an der Außenkamera, auch während der Reinigung abgeschaltet sein! Es besteht Gefahr durch elektrischen Schlag! GEFAHR! Stellen Sie sicher, dass keine Flüssigkeiten in das Gehäuse der Außenkamera eindringen können. Es besteht die Gefahr eines elektrischen Schlages. -
Page 24: Umwelthinweise Und Entsorgungsangaben
WAL 14 A1 11. Umwelthinweise und Entsorgungsangaben Wenn dieses Symbol eines durchgestrichenen Abfalleimers auf einem Produkt angebracht ist, unterliegt dieses Produkt der europäischen Richtlinie 2012/19/EU. Alle Elektro- und Elektronikaltgeräte müssen getrennt vom Hausmüll über dafür staatlich vorgesehene Stellen entsorgt werden. Auch das Leuchtmittel muss ebenso fachgerecht entsorgt werden. -
Page 25: Hinweise Zu Garantie Und Serviceabwicklung
WAL 14 A1 13. Hinweise zu Garantie und Serviceabwicklung Garantie der TARGA GmbH Sehr geehrte Kundin, sehr geehrter Kunde, Sie erhalten auf dieses Gerät 3 Jahre Garantie ab Kaufdatum. Im Falle von Mängeln dieses Produkts stehen Ihnen gegen den Verkäufer des Produkts gesetzliche Rechte zu. Diese gesetzlichen Rechte werden durch unsere im Folgenden dargestellte Garantie nicht eingeschränkt. - Page 26 WAL 14 A1 Für den Fall, dass eine telefonische Lösung nicht möglich ist, wird durch unsere Hotline in Abhängigkeit der Fehlerursache ein weiterführender Service veranlasst. Service Telefon: 02921 - 89 13 000 E-Mail: service.DE@targa-online.com Telefon: 01 – 26 76 195 E-Mail: service.AT@targa-online.com...
-
Page 27: English
WAL 14 A1 Contents 1. Intended use ......................26 2. Trademark information ..................26 3. Package contents ....................27 4. Technical specifications ..................28 5. Safety instructions ....................29 5.1. Infringing third-party rights / Rights to own images ................30 ... -
Page 28: Intended Use
WAL 14 A1 Congratulations! By purchasing the WAL 14 A1 WiFi outdoor camera, you have opted for a quality product. Before first using it, familiarise yourself with the way the outdoor camera works and read these operating instructions through carefully. Be careful to follow the safety instructions and only use the outdoor camera as described in the operating instructions and for the applications given. -
Page 29: Package Contents
WAL 14 A1 3. Package contents WiFi outdoor camera WAL 14 A1 Special screwdriver 2x screws, 4 x 40mm 2x dowels, 6 x 27mm Operating instructions (lineart illustration) These operating instructions have a fold-out cover. On the inside of the cover, the outdoor camera is shown with figures indicated. -
Page 30: Technical Specifications
WAL 14 A1 4. Technical specifications The rating plate for the outdoor camera can be found on the mounting plate (10). LED emitter Model name: WAL 14 A1 Operating voltage: 220 – 240 V , 50 Hz Total power consumption: approx. -
Page 31: Safety Instructions
WAL 14 A1 5. Safety instructions Before you use this device for the first time, please read the following notes in this manual and heed all warnings, even if you are familiar with handling electronic devices. Keep these operating instructions in a safe place for future reference. -
Page 32: Infringing Third-Party Rights / Rights To Own Images
WAL 14 A1 DANGER! The housing of the outdoor camera must not be damaged. If the housing is damaged, there is a risk of electric shock. DANGER! Do not use the outdoor camera in environments with a high risk of explosion from flammable gases, vapours or dust. -
Page 33: Copyright
WAL 14 A1 similar location. The answer to the question as to whether a person is incidental depends on the circumstances of the individual case. In order to be safe from a legal perspective, warning signs should be placed in all areas where recordings with identifiable persons are possible. -
Page 34: Before You Start
WAL 14 A1 7. Before you start Remove the outdoor camera and mounting fittings from the packaging. Check the outdoor camera for damage. If the outdoor camera is damaged, do not use it. If the delivery is damaged or incomplete, please contact the manufacturer’s customer services. -
Page 35: Mounting
WAL 14 A1 DANGER! Power must be switched off during the mounting process! WARNING! When drilling holes, make sure there are no cables in the walls. Before mounting the outdoor camera, make sure you are familiar with all its individual parts and read and observe the instructions and diagrams in these operating instructions. - Page 36 WAL 14 A1 Now press the catch (9) on the mounting plate (10) and pull the mounting plate (10) on the strap out of the housing of the outdoor camera. Remove the 2 screws and then remove the strain relief.
- Page 37 WAL 14 A1 Now screw in the screws to fix the mounting plate (10) securely to the wall. Now properly wire the power cable to the connection terminal on the mounting plate (10). Note the labelling of the individual terminals.
-
Page 38: Setting Up The Led Emitter, Camera And Movement Sensor
WAL 14 A1 Finally, use the screwdriver (B) to turn the screw (11) from underneath through the camera housing into the mounting plate (10). The screw (11) is a special screw to guarantee extra protection against theft. Always use this... - Page 39 WAL 14 A1 The diagram below gives information on the detection range of the movement sensor (7). Adjust the movement sensor (7) so it covers the area you want as best possible. It must not be blocked by objects or similar.
-
Page 40: Getting Started
WAL 14 A1 8. Getting started For reasons of IT security, please note the following: Never commission multiple WiFi cameras at the same time and install them in the control app! Each WiFi camera must be commissioned separately and added to the control app. Only ever connect one camera per scan. -
Page 41: Downloading And Installing The Control App
WAL 14 A1 8.2. Downloading and installing the control app The outdoor camera is operated using the control app L-Guard HD, which you must install on your smartphone or tablet. The app is free to download from the relevant app store. - Page 42 WAL 14 A1 https://www.targa.de/downloads/IAN284704/Android_NL.pdf Android https://www.targa.de/downloads/IAN284704/iOS_NL.pdf https://www.targa.de/downloads/IAN284704/Android_CZ.pdf Android https://www.targa.de/downloads/IAN284704/iOS_CZ.pdf https://www.targa.de/downloads/IAN284704/Android_ES.pdf Android https://www.targa.de/downloads/IAN284704/iOS_ES.pdf https://www.targa.de/downloads/IAN284704/Android_PT.pdf Android https://www.targa.de/downloads/IAN284704/iOS_PT.pdf 40 - English...
- Page 43 WAL 14 A1 https://www.targa.de/downloads/IAN284704/Android_SI.pdf Android https://www.targa.de/downloads/IAN284704/iOS_SI.pdf https://www.targa.de/downloads/IAN284704/Android_IT.pdf Android https://www.targa.de/downloads/IAN284704/iOS_IT.pdf https://www.targa.de/downloads/IAN284704/Android_DK.pdf Android https://www.targa.de/downloads/IAN284704/iOS_DK.pdf English - 41...
-
Page 44: Access Data (Camera Name / Password)
WAL 14 A1 8.3. Access data (camera name / password) To set up the outdoor camera, you need to assign a camera name (to allow unique identification in the network), a username and a password. For reasons of IT security, the username and password are transmitted encrypted for communication with the WiFi outdoor camera. -
Page 45: Restoring Factory Settings
WAL 14 A1 8.4. Restoring factory settings The RESET button on the outdoor camera is deliberately concealed to prevent misuse by unauthorised persons. If you have forgotten your password or you wish to restore the factory settings on the outdoor camera for another reason, proceed as follows: ... -
Page 46: Maintenance/Cleaning
WAL 14 A1 9. Maintenance/cleaning Maintenance The outdoor camera does not contain any parts that require maintenance. Cleaning DANGER! The mains power must be switched off for all work on the outdoor camera, even cleaning! Otherwise there is a risk of electric shock! DANGER! Make sure that no liquid gets into the housing of the outdoor camera. -
Page 47: Environmental Regulations And Disposal Information
WAL 14 A1 Please format the Micro SD card immediately after inserting it into the camera. For manual formatting, the camera hast to be installed and it has to be connected to the app. After this, trigger the alarm a few times to check if the recordings are properly saved on the Micro SD card. -
Page 48: Warranty And Servicing Advice
WAL 14 A1 13. Warranty and servicing advice Warranty of TARGA GmbH Dear Customer, This device is sold with three years warranty from the date of purchase. In the event of product defects, you have legal rights towards the seller. These statutory rights are not restricted by our warranty as described below. - Page 49 WAL 14 A1 Service Phone: 020 – 70 49 04 03 E-Mail: service.GB@targa-online.com Phone: 01 - 4370121 E-Mail: service.IE@targa-online.com Phone: 027 78 11 03 E-Mail: service.MT@targa-online.com Phone: 02 – 20 09 025 E-Mail: service.CY@targa-online.com IAN: 284704 Manufacturer Please note that the following address is not a service address. First contact the service point stated above.
-
Page 50: Français
WAL 14 A1 Table des matières 1. Utilisation prévue ....................49 2. Informations sur les marques ................49 3. Contenu de l'emballage ..................50 4. Spécifications techniques ..................51 5. Instructions de sécurité ..................52 ... -
Page 51: Utilisation Prévue
WAL 14 A1 Félicitations ! En achetant la caméra extérieure WiFi WAL 14 A1, vous avez choisi un produit de qualité. Avant de l’utiliser, veuillez vous familiariser avec le fonctionnement de la caméra extérieure et lire ce manuel d’utilisation avec la plus grande attention. Veillez à respecter les consignes de sécurité et n’utilisez la caméra extérieure que de la manière décrite dans le manuel d’utilisation et pour les usages indiqués. -
Page 52: Contenu De L'emballage
WAL 14 A1 3. Contenu de l'emballage Caméra extérieure WiFi WAL 14 A1 Tournevis spécial 2 vis de 4 x 40 mm 2 chevilles de 6 x 27 mm Manuel d'utilisation (représenté par un dessin) Ce manuel d'utilisation inclut une couverture dépliante. L’intérieur de la couverture comporte une illustration de la caméra extérieure avec des numéros. -
Page 53: Spécifications Techniques
WAL 14 A1 4. Spécifications techniques La plaque signalétique de la caméra extérieure se situe sur la plaque de montage (10). Émetteur à LED Nom du modèle : WAL 14 A1 Tension de fonctionnement : 220 – 240 V , 50 Hz Consommation électrique totale :... -
Page 54: Instructions De Sécurité
WAL 14 A1 Puissance de transmission WiFi : Environ 8,7 mW Compatibilité de l'application iOS 8.0 (et versions supérieures) / Android 4.4 (et versions supérieures) Les informations techniques et le design peuvent faire l’objet de modifications sans préavis. 5. Instructions de sécurité... -
Page 55: Violation Des Droits De Tiers / Droit À L'image
WAL 14 A1 DANGER ! La caméra extérieure doit être raccordée à l'alimentation électrique en 230 V par un électricien qualifié. La caméra extérieure est conforme à la Classe de sécurité I, ce qui signifie que le conducteur de terre doit toujours être connecté à la caméra. -
Page 56: Droits D'auteur
WAL 14 A1 utilisés comme espaces communs (ex : espaces communs aux propriétaires ou locataires). Cela signifie, par exemple, les entrées ou les passages utilisés par plusieurs personnes. Que puis-je surveiller avec ma caméra IP ? La vidéosurveillance à l'aide d'une caméra IP est autorisée pour surveiller ses propres propriétés. -
Page 57: Avant De Commencer
WAL 14 A1 7. Avant de commencer Sortez la caméra extérieure et les éléments de montage de l'emballage. Vérifiez que la caméra extérieure n'est pas endommagée. Si la caméra extérieure est endommagée, ne l’utilisez pas. Si le produit livré est endommagé ou incomplet, veuillez contacter le service client du fabricant. -
Page 58: Avant L'installation
WAL 14 A1 7.3. Avant l'installation DANGER ! L’appareil doit être monté exclusivement par un électricien agréé ! L'alimentation électrique doit se faire par le biais du circuit électrique du bâtiment. DANGER ! Le courant électrique doit être coupé pendant le montage ! AVERTISSEMENT ! Lors du perçage des trous, vérifiez qu’il n’existe pas de câble dans les... - Page 59 WAL 14 A1 Maintenant, appuyez sur la languette (9) située sur la plaque de montage (10) et tirez la plaque de montage (10) par l'attache hors du boîtier de la caméra extérieure. Retirez les 2 vis puis retirez le collier de décharge de traction.
- Page 60 WAL 14 A1 Maintenant, vissez les vis afin de fixer solidement la plaque de montage (10) au mur. Ensuite, raccordez correctement le câble d'alimentation à la borne de connexion située sur la plaque de montage (10). Tenez compte des lettres indiquées sur les différentes bornes.
-
Page 61: Configuration De L'émetteur À Led, De La Caméra Et Du Détecteur De Mouvement
WAL 14 A1 Enfin, à l'aide du tournevis (B), vissez la vis (11) dans la plaque de montage (10) en passant par le dessous à travers le boîtier de la caméra. La vis (11) est une vis spécialement conçue pour garantir une protection supplémentaire contre le vol. -
Page 62: Mise En Route
WAL 14 A1 L'illustration ci-dessous fournit des informations sur la plage de détection du détecteur de mouvement (7). Ajustez le détecteur de mouvement (7) de sorte qu’il couvre le mieux possible la zone souhaitée. Il ne doit pas être entravé par des objets ou choses équivalentes. - Page 63 WAL 14 A1 Inclinez le support de caméra (2) d'environ 70° jusqu'à ce qu'il soit en butée. Retirez la vis du cache de l'emplacement pour carte SD à l'aide du tournevis spécial fourni. Retirez le cache de l'emplacement pour carte SD.
-
Page 64: Téléchargement Et Installation De L'application De Contrôle
WAL 14 A1 8.2. Téléchargement et installation de l'application de contrôle La caméra extérieure se commande par le biais de l'application de contrôle L-Guard HD, que vous devez installer sur votre smartphone ou votre tablette. L'application est gratuite et peut être téléchargée depuis la boutique d'applications correspondante. - Page 65 WAL 14 A1 https://www.targa.de/downloads/IAN284704/Android_NL.pdf Android https://www.targa.de/downloads/IAN284704/iOS_NL.pdf https://www.targa.de/downloads/IAN284704/Android_CZ.pdf Android https://www.targa.de/downloads/IAN284704/iOS_CZ.pdf https://www.targa.de/downloads/IAN284704/Android_ES.pdf Android https://www.targa.de/downloads/IAN284704/iOS_ES.pdf https://www.targa.de/downloads/IAN284704/Android_PT.pdf Android https://www.targa.de/downloads/IAN284704/iOS_PT.pdf Français - 63...
- Page 66 WAL 14 A1 https://www.targa.de/downloads/IAN284704/Android_SI.pdf Android https://www.targa.de/downloads/IAN284704/iOS_SI.pdf https://www.targa.de/downloads/IAN284704/Android_IT.pdf Android https://www.targa.de/downloads/IAN284704/iOS_IT.pdf https://www.targa.de/downloads/IAN284704/Android_DK.pdf Android https://www.targa.de/downloads/IAN284704/iOS_DK.pdf 64 - Français...
-
Page 67: Données D'accès (Nom De La Caméra / Mot De Passe)
WAL 14 A1 8.3. Données d'accès (nom de la caméra / mot de passe) Pour configurer votre caméra extérieure, vous devez créer un nom de caméra (pour permettre son identification unique sur le réseau), un nom d'utilisateur et un mot de passe. -
Page 68: Restauration Des Paramètres D'usine
WAL 14 A1 8.4 Restauration des paramètres d’usine Le bouton RESET (Réinitialisation) situé sur la caméra extérieure est délibérément dissimulé afin d'éviter toute utilisation abusive par des personnes non autorisées. Si vous avez oublié votre mot de passe ou que vous souhaitez restaurer les paramètres d'usine de la caméra extérieure pour une autre raison, procédez comme suit :... -
Page 69: Entretien / Nettoyage
WAL 14 A1 9. Entretien / nettoyage Entretien La caméra extérieure ne contient pas de pièces nécessitant l’intervention de l’utilisateur pour leur maintenance. Nettoyage DANGER ! L'alimentation électrique doit être coupée pour toute intervention sur la caméra extérieure, même pour son nettoyage ! Dans le cas contraire, vous pourriez vous électrocuter ! DANGER ! Veillez à... - Page 70 WAL 14 A1 Enregistrements défectueux / Pas d'enregistrements Différents types d'enregistrements défectueux peuvent être liés à l'utilisation d'une carte Micro SD défaillante. De ce fait, si vos enregistrements sont défectueux, essayez d'insérer dans la caméra une carte Micro SD dont vous savez qu'elle fonctionne. La procédure est la même s'il n'y a pas d'enregistrements.
-
Page 71: Réglementation Environnementale Et Informations Sur La Mise Au Rebut
WAL 14 A1 11. Réglementation environnementale et informations sur la mise au rebut Si le symbole d'une poubelle barrée figure sur un produit, ledit produit est soumis à la Directive européenne 2012/19/EU. Les appareils électriques ou électroniques usagés ne doivent en aucun cas être jetés avec les déchets ménagers, mais déposés dans des centres de collecte officiels. -
Page 72: Garantie Et Conseils Relatifs Aux Réparations
WAL 14 A1 13. Garantie et conseils relatifs aux réparations Garantie de TARGA GmbH Cher client, chère cliente, La garantie accordée sur ce produit est de trois ans à partir de la date d'achat. En cas de vice sur ce produit, vous disposez de droits que vous pouvez faire valoir vis-à-vis du vendeur du produit. - Page 73 WAL 14 A1 Avant de mettre votre produit en service, merci de lire avec attention la documentation jointe. Si un problème survient qui ne peut être résolu de cette manière, merci de vous adresser à notre assistance téléphonique. Pour toute demande, ayez la référence de l'article et si disponible, le numéro de série, à portée de main pour apporter la preuve de votre achat.
- Page 74 WAL 14 A1 Article L217-12 du Code de la consommation L‘action résultant du défaut de conformité se prescrit par deux ans à compter de la délivrance du bien. Article 1641 du Code civil Le vendeur est tenu de la garantie à raison des défauts cachés de la chose vendue qui la rendent impropre à...
- Page 75 WAL 14 A1 Garantie de TARGA GmbH Cher client, chère cliente, La garantie accordée sur ce produit est de trois ans à partir de la date d'achat. En cas de vice sur ce produit, vous disposez de droits que vous pouvez faire valoir vis-à-vis du vendeur du produit. L’exercice de ces droits n’est pas limité...
- Page 76 WAL 14 A1 S’il est impossible d’apporter une solution par téléphone, notre assistance téléphonique organisera une intervention technique en fonction de l’origine de la panne. Service Téléphone : 02 – 58 87 036 E-Mail : service.BE@targa-online.com Téléphone : 02 02 04 223 E-Mail : service.LU@targa-online.com...
-
Page 77: Nederlands
WAL 14 A1 Inhoud 1. Beoogd gebruik ....................76 2. Informatie over handelsmerken ................76 3. Inhoud van de verpakking ................... 77 4. Technische specificaties ..................78 5. Veiligheidsinstructies .................... 79 5.1. Inbreuk op rechten van derden/rechten op eigen beelden .............. 80 ... -
Page 78: Beoogd Gebruik
WAL 14 A1 Gefeliciteerd! Met de aanschaf van deze wifi-buitencamera WAL 14 A1 hebt u gekozen voor een kwaliteitsproduct. Raak vóór het eerste gebruik vertrouwd met de manier waarop de buitencamera werkt en lees deze gebruiksaanwijzing zorgvuldig door. Volg de veiligheidsinstructies zorgvuldig op en gebruik de buitencamera alleen zoals beschreven in de gebruiksaanwijzing en voor de aangegeven toepassingen. -
Page 79: Inhoud Van De Verpakking
WAL 14 A1 3. Inhoud van de verpakking Wifi-buitencamera WAL 14 A1 Speciale schroevendraaier 2x schroeven, 4 x 40 mm 2x pluggen, 6 x 27mm Bedieningsinstructies (lijntekening) Deze bedieningsinstructies hebben een uitvouwbare omslag. Aan de binnenzijde van de omslag staat een afbeelding van de buitencamera met nummers. -
Page 80: Technische Specificaties
WAL 14 A1 4. Technische specificaties Het typeplaatje voor de buitencamera bevindt zich op de montageplaat (10). Lichtstraler Modelnaam: WAL 14 A1 Werkingsvoltage: 220 – 240 V , 50 Hz Totaal stroomverbruik: circa 20 watt Stroomverbruik van verlichting zonder circa 18 watt... -
Page 81: Veiligheidsinstructies
WAL 14 A1 5. Veiligheidsinstructies Voordat u dit apparaat voor het eerst gebruikt, dient u de onderstaande opmerkingen te lezen en alle waarschuwingen op te volgen, zelfs als u bekend bent met de bediening van elektronische apparatuur. Bewaar deze bedieningsinstructies op een veilige plaats, zodat u deze later kunt raadplegen. Als u het apparaat verkoopt of weggeeft, moet u ook deze bedieningsinstructies erbij geven, omdat deze onderdeel zijn van het product. -
Page 82: Inbreuk Op Rechten Van Derden/Rechten Op Eigen Beelden
WAL 14 A1 arts als u per ongeluk rook inademt. De ingeademde rook kan schadelijk zijn voor uw gezondheid. GEVAAR! De behuizing van de buitencamera mag niet beschadigd zijn. Als de behuizing is beschadigd, is er een risico op een elektrische schok. -
Page 83: Copyright
WAL 14 A1 Copyright In wezen heeft iedereen recht op zijn of haar eigen beeld. Volgens de wetten op de auteursrechten mogen beelden alleen zonder toestemming van de betreffende mensen worden gepubliceerd als zij zich toevallig naast een oriëntatiepunt of soortgelijke plaats bevinden. Het antwoord op de vraag of een persoon daar toevallig is, hangt af van de omstandigheden van het individuele geval. -
Page 84: Voordat U Begint
WAL 14 A1 7. Voordat u begint Haal de buitencamera en het montagebeslag uit de verpakking. Controleer de buitencamera op beschadigingen. Als de buitencamera is beschadigd, gebruikt u deze niet. Als de levering beschadigd of onvolledig is, neemt u contact op met de klantenservice van de fabrikant. -
Page 85: Vóór De Montage
WAL 14 A1 7.3. Vóór de montage GEVAAR! Het apparaat mag uitsluitend worden gemonteerd door een bevoegd elektricien. De voeding moet via het elektrische circuit van het gebouw zijn aangesloten. GEVAAR! Zet het apparaat uit terwijl dit wordt gemonteerd! WAARSCHUWING! Let er bij het boren van gaten op dat er geen kabels in de muur lopen. - Page 86 WAL 14 A1 Druk nu de meenemer (9) op de montageplaat (10) en trek de montageplaat (10) aan de band uit de behuizing van de buitencamera. Verwijder de 2 schroeven en verwijder daarna de trekontlasting. Steek rubberen afdichting kabelvoering (bijv. met een schroevendraaier) en druk dan de voorbereide voedingskabel van achteren erdoor.
- Page 87 WAL 14 A1 Schroef de schroeven vast om de montageplaat (10) stevig op de muur te bevestigen. Steek voedingskabel goed aansluitklem op de montageplaat (10). Let op de labels van de afzonderlijke polen. Zet de kabel vast door de trekontlasting met de 2 schroeven te bevestigen.
-
Page 88: De Lichtstraler, Camera En Bewegingssensor Installeren
WAL 14 A1 Draai tenslotte de schroef (11) met de schroevendraaier (B) van onderen door de camerabehuizing in de montageplaat (10). De schroef (11) is een speciale schroef voor extra bescherming tegen diefstal. Gebruik deze schroef altijd! Het is absoluut... -
Page 89: Aan De Slag
WAL 14 A1 Het onderstaande schema toont informatie over het detectiebereik van de bewegingssensor (7). Stel de bewegingssensor (7) zo in, dat deze de gewenste zone zo goed mogelijk weergeeft. De sensor mag niet worden geblokkeerd door voorwerpen en dergelijke. - Page 90 WAL 14 A1 Kantel de camerahouder (2) ongeveer 70° tot deze niet meer verder gekanteld kan worden. Verwijder de schroef die de SD-kaartsleuf bedekt met behulp van de meegeleverde, speciale schroevendraaier. Verwijder de afdekking van de SD-kaartsleuf.
-
Page 91: De Beheerapp Downloaden En Installeren
WAL 14 A1 8.2. De beheerapp downloaden en installeren De buitencamera wordt bediend met behulp van de beheerapp L-Guard HD, die u op uw smartphone of tablet moet installeren. De app is gratis te downloaden in de relevante app store. - Page 92 WAL 14 A1 https://www.targa.de/downloads/IAN284704/Android_NL.pdf Android https://www.targa.de/downloads/IAN284704/iOS_NL.pdf https://www.targa.de/downloads/IAN284704/Android_CZ.pdf Android https://www.targa.de/downloads/IAN284704/iOS_CZ.pdf https://www.targa.de/downloads/IAN284704/Android_ES.pdf Android https://www.targa.de/downloads/IAN284704/iOS_ES.pdf https://www.targa.de/downloads/IAN284704/Android_PT.pdf Android https://www.targa.de/downloads/IAN284704/iOS_PT.pdf 90 - Nederlands...
- Page 93 WAL 14 A1 https://www.targa.de/downloads/IAN284704/Android_SI.pdf Android https://www.targa.de/downloads/IAN284704/iOS_SI.pdf https://www.targa.de/downloads/IAN284704/Android_IT.pdf Android https://www.targa.de/downloads/IAN284704/iOS_IT.pdf https://www.targa.de/downloads/IAN284704/Android_DK.pdf Android https://www.targa.de/downloads/IAN284704/iOS_DK.pdf Nederlands - 91...
-
Page 94: Toegang Tot Gegevens (Naam Camera/Wachtwoord)
WAL 14 A1 8.3. Toegang tot gegevens (naam camera/wachtwoord) Voor het instellen van de buitencamera moet u een naam (voor een unieke identificatie in het netwerk), een gebruikersnaam en een wachtwoord toewijzen aan de camera. Om redenen van IT-beveiliging worden de gebruikersnaam en het wachtwoord voor communicatie met de wifi-buitencamera versleuteld verzonden. -
Page 95: Fabrieksinstellingen Herstellen
WAL 14 A1 8.4. Fabrieksinstellingen herstellen De RESET-knop op de buitencamera is opzettelijk verborgen om misbruik door onbevoegden te voorkomen. Als u uw wachtwoord bent vergeten of u wilt de fabrieksinstellingen van de buitencamera om een andere reden herstellen, gaat u als volgt te werk: ... -
Page 96: Problemen Oplossen
WAL 14 A1 Reinigen GEVAAR! De netvoeding moet zijn uitgeschakeld bij alle werkzaamheden aan de buitencamera, zelfs tijdens het reinigen! Anders loopt u het risico op een elektrische schok. GEVAAR! Zorg ervoor dat er geen vloeistof in de buitencamera terechtkomt. Anders loopt u het risico op een elektrische schok. -
Page 97: Milieuregelgeving En Informatie Over Afvalverwerking
WAL 14 A1 11. Milieuregelgeving en informatie over afvalverwerking Een symbool van een doorgekruiste afvalbak op een product betekent dat het is onderworpen aan de Europese richtlijn 2012/19/EU. Alle elektrische en elektronische apparaten moeten worden gescheiden van huishoudelijk afval en bij een officiële afvalverwerkingsinstantie worden ingeleverd. -
Page 98: Garantie En Onderhoudsadvies
WAL 14 A1 13. Garantie en onderhoudsadvies Garantie van TARGA GmbH Geachte klant, U krijgt op dit apparaat 3 jaar garantie vanaf de datum van aankoop. In het geval van gebreken aan dit product heeft u ten opzichte van de verkoper van het product bepaalde wettelijke rechten. Deze wettelijke rechten worden door onze hierna volgende garantie niet beperkt. - Page 99 WAL 14 A1 In het geval dat een oplossing per telefoon niet mogelijk is, zal onze hotline er afhankelijk van de oorzaak van het probleem voor zorgen dat het probleem op andere wijze wordt opgelost. Service Telefoon: 020 – 26 21 941 E-Mail: service.NL@targa-online.com...
-
Page 100: Čeština
WAL 14 A1 Obsah 1. Určené použití ...................... 99 2. Informace o ochranných známkách ..............99 3. Obsah balení ...................... 100 4. Technické údaje ....................101 5. Bezpečnostní pokyny ..................102 5.1. Porušení práv třetích stran / Práva na vlastní snímky ............... 103 ... -
Page 101: Určené Použití
1. Určené použití Venkovní Wi-Fi kamera WAL 14 A1 je elektronické zařízení, které je určeno k automatickému střežení prostor v interiérech a exteriérech. Za špatné viditelnosti lze také zapnout LED osvětlení, aby byla střežená... -
Page 102: Obsah Balení
WAL 14 A1 3. Obsah balení Venkovní Wi-Fi kamera WAL 14 A1 Speciální šroubovák 2 šrouby, 4 x 40 mm 2 hmoždinky 6 x 27 mm Tyto provozní pokyny (vyobrazení) Tento uživatelský návod má rozkládací obálku. Na vnitřní straně je znázorněna venkovní kamera s očíslovanými položkami. -
Page 103: Technické Údaje
WAL 14 A1 4. Technické údaje Typový štítek venkovní kamery naleznete na upínací desce (10). LED osvětlení Název modelu: WAL 14 A1 Provozní napětí: 220 – 240 V , 50 Hz Celkový příkon: cca 20 W Příkon osvětlení bez pomocných obvodů: cca 18 W Světelný... -
Page 104: Bezpečnostní Pokyny
WAL 14 A1 5. Bezpečnostní pokyny Před prvním použitím tohoto zařízení si přečtěte níže uvedené poznámky a dbejte na všechna upozornění, a to i v případě, že máte s používáním elektronických zařízení zkušenosti. Tyto provozní pokyny si uložte na bezpečném místě k pozdějšímu nahlédnutí. Při prodeji zařízení nebo jeho postoupení jiné osobě je nezbytné, abyste jí... -
Page 105: Porušení Práv Třetích Stran / Práva Na Vlastní Snímky
WAL 14 A1 POZOR! Kryt venkovní kamery nesmí být nijak poškozen. Při otevření krytu hrozí nebezpečí zásahu elektrickým proudem. POZOR! Venkovní kameru nepoužívejte v prostředí, kde hrozí nebezpečí výbuchu hořlavých plynů, výparů nebo prachu. Hrozí nebezpečí výbuchu. POZOR! Kromě výměny paměťové karty kryt venkovní kamery nikdy neotvírejte. Při veškeré... -
Page 106: Ochrana Autorských Práv
WAL 14 A1 Odpověď na otázku, zda je přítomnost osoby náhodná, závisí na okolnostech konkrétního případu. Kvůli zajištění právního hlediska by měl být varovné symboly umístěny ve všech oblastech, kde lze uskutečnit záznamy identifikovatelných osob. Ochrana osobních údajů Zobrazené záběry nesmí narušit soukromí ostatních. Kameru nikdy nezaměřujte na zahradu nebo přední... -
Page 107: Dříve Než Začnete
WAL 14 A1 7. Dříve než začnete Venkovní kameru a příslušenství k montáži vyndejte z obalu. Zkontrolujte, zda není venkovní kamera poškozena. Pokud je venkovní kamera poškozena, nepoužívejte Pokud zjistíte jakoukoli poškozenou nebo chybějící položku, kontaktujte zákaznický servis výrobce. 7.1. Vhodné místo k montáži Při hledání... -
Page 108: Před Montáží
WAL 14 A1 7.3. Před montáží POZOR! Montáž přístroje musí provádět pouze kvalifikovaný elektrotechnik! Napájení musí být zajištěno z elektrorozvodné sítě v budově. POZOR! Během montáže musí být vypnut přívod elektrické energie! VAROVÁNÍ! Před vrtáním otvorů se ujistěte, že ve zdi nejsou žádné kabely. - Page 109 WAL 14 A1 Na upínací desce (10) nyní stiskněte západku (9) a desku (10) na poutku vytáhněte ven z krytu venkovní kamery. Sundejte 2 šrouby a poté odeberte fixační úchytku. Prorazte gumové těsnění v kabelové průchodce (např. šroubovákem) a poté zezadu protáhněte připravený...
- Page 110 WAL 14 A1 Upínací desku (10) připevněte pomocí šroubů ke stěně. Nyní správně připojte napájecí kabel k připojovací svorkovnici na upínací desce (10). Dodržujte označení jednotlivých svorek. Poté kabel zajistěte fixační úchytkou a 2 šrouby. Venkovní kameru nasaďte rovným pohybem na upínací...
-
Page 111: Nastavení Led Osvětlení, Kamery A Snímače Pohybu
WAL 14 A1 Nakonec použijte šroubovák (B) a šroub (11) na spodní straně fotoaparátu utáhněte skrz kryt kamery do upínací desky (10). Speciální šroub (11) zaručuje zvláštní ochranu proti krádeži. Vždy ho použijte! Umístění šroubu (11) je naprosto nezbytné kvůli ochraně... -
Page 112: Začínáme
WAL 14 A1 Níže znázorněné schéma znázorňuje rozsah detekce snímače pohybu (7). Snímač pohybu (7) upravte tak, aby pokryl oblast, kterou chcete jako nejlepší možnou. Nesmí být blokována jinými předměty apod. Ověřte si, že v detekční oblasti snímače pohybu (7) (např. chodníky, ulice) nedochází k pohybům, které... - Page 113 WAL 14 A1 Držák kamery (2) nakloňte asi o 70 °, dokud se nezastaví. Dodávaným speciálním šroubovákem odstraňte šroub zakrývající slot pro kartu SD. Ze slotu pro kartu SD sundejte víčko. Slot pro kartu SD je umístěn přímo pod víčkem, ukrytý...
-
Page 114: Stažení A Instalace Řídící Aplikace
WAL 14 A1 8.2. Stažení a instalace řídící aplikace Venkovní kamera se ovládá prostřednictvím řídící aplikace L-Guard HD, kterou musíte nainstalovat na svůj smartphone nebo tablet. Aplikace je zdarma a lze ji stáhnout z příslušných App Store. 8.2.1. Pokyny k ovládání řídící aplikace Aktuální... - Page 115 WAL 14 A1 https://www.targa.de/downloads/IAN284704/Android_NL.pdf Android https://www.targa.de/downloads/IAN284704/iOS_NL.pdf https://www.targa.de/downloads/IAN284704/Android_CZ.pdf Android https://www.targa.de/downloads/IAN284704/iOS_CZ.pdf https://www.targa.de/downloads/IAN284704/Android_ES.pdf Android https://www.targa.de/downloads/IAN284704/iOS_ES.pdf https://www.targa.de/downloads/IAN284704/Android_PT.pdf Android https://www.targa.de/downloads/IAN284704/iOS_PT.pdf Čeština - 113...
- Page 116 WAL 14 A1 https://www.targa.de/downloads/IAN284704/Android_SI.pdf Android https://www.targa.de/downloads/IAN284704/iOS_SI.pdf https://www.targa.de/downloads/IAN284704/Android_IT.pdf Android https://www.targa.de/downloads/IAN284704/iOS_IT.pdf https://www.targa.de/downloads/IAN284704/Android_DK.pdf Android https://www.targa.de/downloads/IAN284704/iOS_DK.pdf 114 - Čeština...
-
Page 117: Přístupová Data (Název Kamery / Heslo)
WAL 14 A1 8.3. Přístupová data (název kamery / heslo) Chcete-li uvést venkovní kameru do provozu, musíte jí přiřadit název (umožnit jedinečnou identifikaci v síti), uživatelské jméno a heslo. Kvůli IT zabezpečení se uživatelské jméno a heslo odesílá při komunikaci s venkovní Wi-Fi kamerou zašifrovaně. -
Page 118: Led Indikátor
WAL 14 A1 Pokud jste heslo zapomněli nebo chcete obnovit nastavení z výroby z jiných důvodů, postupujte následovně: Šroub ve středu tlačítka RESET (4) je překryt gumovou zátkou. Zátku sundejte pomocí ostrého předmětu, například malého šroubováku. Nyní pomocí speciálního šroubováku vyjměte šroub z krytu (4) a kryt (4) nadzvedněte. -
Page 119: Odstraňování Problémů
WAL 14 A1 Čištění POZOR! Při veškeré manipulaci s kamerou, včetně čištění, musí být její hlavní vypínač vypnutý! Jinak hrozí nebezpečí zásahu elektrickým proudem! POZOR! Dbejte na to, aby se dovnitř venkovní kamery nedostala žádná tekutina. Jinak hrozí nebezpečí zásahu elektrickým proudem. -
Page 120: Předpisy Na Ochranu Životního Prostředí A Informace O Likvidaci
WAL 14 A1 11. Předpisy na ochranu životního prostředí a informace o likvidaci Pokud je výrobek označen symbolem přeškrtnutého kontejneru, vztahuje se na něj evropská směrnice 2012/19/EU. Veškeré elektrické a elektronické přístroje musí být likvidovány odděleně od domácího odpadu v oficiálních likvidačních střediscích. Také... -
Page 121: Informace O Záruce A Servisu
WAL 14 A1 13. Informace o záruce a servisu Záruka TARGA GmbH Vážená zákaznice, vážený zákazníku, Na přístroj obdržíte záruku 3 roky od data nákupu. V případě závad na tomto produktu můžete vůči prodávajícímu uplatnit svá zákonná práva. Tato zákonná práva nejsou omezena naší níže uvedenou zárukou. - Page 122 WAL 14 A1 Servis Telefon: 02 – 34 102 195 E-mailový: service.CZ@targa-online.com IAN: 284704 Výrobce Uvědomte si, prosím, že následující adresa není adresou servisu. Nejprve kontaktujte výše uvedené servisní místo. TARGA GmbH Coesterweg 45 DE-59494 Soest NĚMECKO 120 - Čeština...
-
Page 123: Español
WAL 14 A1 Índice 1. Uso destinado ....................122 2. Información sobre marcas .................. 122 3. Contenido del embalaje ..................123 4. Datos técnicos ..................... 124 5. Instrucciones de seguridad ................. 125 5.1. Infracción de los derechos de terceros y de los derechos de imagen ........... 126 ... -
Page 124: Uso Destinado
WAL 14 A1 ¡Enhorabuena! Con la adquisición de esta cámara para exterior WiFi WAL 14 A1 ha obtenido un producto de calidad. Antes de ponerla en funcionamiento, es necesario que se familiarice con su manejo y que lea este manual del usuario detenidamente. -
Page 125: Contenido Del Embalaje
WAL 14 A1 3. Contenido del embalaje Cámara para exterior WiFi WAL 14 A1 Destornillador especial 2 tornillos, 4 x 40 mm 2 tacos, 6 x 27 mm Manual del usuario (ilustración dibujada) Este Manual del usuario dispone de una portada desplegable. En la contraportada, encontrará una ilustración de la cámara para exterior con números. -
Page 126: Datos Técnicos
WAL 14 A1 4. Datos técnicos La etiqueta de características de la cámara para exterior se encuentra en la placa de montaje (10). Foco LED Modelo: WAL 14 A1 Tensión de funcionamiento: 220 – 240 V , 50 Hz Consumo total: Aprox. -
Page 127: Instrucciones De Seguridad
WAL 14 A1 5. Instrucciones de seguridad Antes de utilizar este aparato por primera vez, lea detenidamente las instrucciones correspondientes en este manual y siga todas las advertencias, incluso si está acostumbrado a manejar dispositivos eléctricos. Conserve este manual en un lugar seguro para cualquier referencia futura. Si vende o traspasa el producto, acompáñelo siempre del presente manual del usuario, dado que es una parte del producto. -
Page 128: Infracción De Los Derechos De Terceros Y De Los Derechos De Imagen
WAL 14 A1 inmediatamente a un médico. La inhalación de humo puede ser nociva para la salud. ¡PELIGRO! La carcasa de la cámara para exterior no debe dañarse. En caso de daño de la carcasa corre el riesgo de sufrir una sacudida eléctrica. -
Page 129: Copyright
WAL 14 A1 de que estas señales están visibles antes de entrar en el área vigilada. Si, por ejemplo, está vigilando su propiedad con una cámara IP, debería colocar un aviso en todas las entradas de la propiedad. Cuando configure una cámara IP, tenga en cuenta lo siguiente: Copyright: Todas las personas tienen derecho a su propia imagen. -
Page 130: Antes De Empezar
WAL 14 A1 7. Antes de empezar Extraiga la cámara para exterior y los accesorios de montaje del embalaje. Examine la cámara para exterior para ver si está en perfectas condiciones. Si la cámara para exterior tiene algún defecto, no la utilice. -
Page 131: Antes Del Montaje
WAL 14 A1 7.3. Antes del montaje ¡PELIGRO! La unidad solo debe ser instalada por un electricista homologado. Utilice el circuito eléctrico de la propiedad para el suministro eléctrico. ¡PELIGRO! Durante el proceso de instalación y montaje, interrumpa el suministro eléctrico. - Page 132 WAL 14 A1 Ahora sostenga el cierre (9) de la placa de montaje (10) y tire de la placa (10) para extraerla del precinto de la carcasa de la cámara para exterior. Extraiga los 2 tornillos y luego la protección de los cables.
- Page 133 WAL 14 A1 Atornille los tornillos en la placa de montaje (10) para fijarla en la pared. Ahora lleve el cable de alimentación hasta el terminal de conexión de la placa de montaje (10). Consulte las etiquetas de los terminales.
-
Page 134: Configuración Del Foco Led, De La Cámara Y Del Sensor De Movimiento
WAL 14 A1 Con el destornillador (B), coloque el tornillo (11) desde la parte de abajo para fijar la carcasa de la cámara a la placa de montaje (10). El tornillo (11) es un tornillo especial que ofrece protección adicional contra los robos. Utilice siempre este tornillo. -
Page 135: Primeros Pasos
WAL 14 A1 En el siguiente diagrama encontrará información sobre el alcance de detección del sensor de movimiento (7). Ajuste el sensor de movimiento (7) para que cubra la zona que desee lo mejor posible. Procure que no quede tapado por otros objetos u obstáculos. - Page 136 WAL 14 A1 Incline el soporte de la cámara (2) unos 70° hasta que llegue a su tope. Extraiga el tornillo que fija la ranura de la tarjeta SD con el destornillador especial incluido. Quite la tapa de la ranura de la tarjeta SD.
-
Page 137: Descarga E Instalación De La Aplicación De Control
WAL 14 A1 8.2. Descarga e instalación de la aplicación de control La cámara para exterior funciona mediante la aplicación de control L-Guard HD, que deberá instalar en su smartphone o tableta. Descárguela gratis desde la página de la tienda correspondiente de la aplicación. - Page 138 WAL 14 A1 https://www.targa.de/downloads/IAN284704/Android_NL.pdf Android https://www.targa.de/downloads/IAN284704/iOS_NL.pdf https://www.targa.de/downloads/IAN284704/Android_CZ.pdf Android https://www.targa.de/downloads/IAN284704/iOS_CZ.pdf https://www.targa.de/downloads/IAN284704/Android_ES.pdf Android https://www.targa.de/downloads/IAN284704/iOS_ES.pdf https://www.targa.de/downloads/IAN284704/Android_PT.pdf Android https://www.targa.de/downloads/IAN284704/iOS_PT.pdf 136 - Español...
- Page 139 WAL 14 A1 https://www.targa.de/downloads/IAN284704/Android_SI.pdf Android https://www.targa.de/downloads/IAN284704/iOS_SI.pdf https://www.targa.de/downloads/IAN284704/Android_IT.pdf Android https://www.targa.de/downloads/IAN284704/iOS_IT.pdf https://www.targa.de/downloads/IAN284704/Android_DK.pdf Android https://www.targa.de/downloads/IAN284704/iOS_DK.pdf Español - 137...
-
Page 140: Datos De Acceso (Nombre Y Contraseña De La Cámara)
WAL 14 A1 8.3. Datos de acceso (nombre y contraseña de la cámara) Para configurar la cámara para exterior, tiene que asignarle un nombre (que sea único para poder distinguirla en la red), un nombre de usuario y una contraseña. -
Page 141: Restauración De Los Ajustes Predeterminados
WAL 14 A1 8.4. Restauración de los ajustes predeterminados El botón RESET se ha protegido a propósito para evitar que personas no autorizadas hagan un uso fraudulento de la misma. Si ha olvidado la contraseña o desea restaurar los valores predeterminados de fábrica de la cámara para exterior, siga estos pasos: ... -
Page 142: Resolución De Problemas
WAL 14 A1 Limpieza ¡PELIGRO! La cámara para exterior debe estar apagada cuando la manipule, incluso cuando la esté limpiando. De lo contrario existe peligro por sacudidas eléctricas. ¡PELIGRO! Asegúrese de que no entren líquidos en la carcasa de la cámara para exterior. -
Page 143: Normativa Medioambiental E Información Sobre El Desecho
WAL 14 A1 11. Normativa medioambiental e información sobre el desecho Si el producto viene etiquetado con un cubo de basura tachado, está sujeto a la Directiva europea 2012/19/EU. Todo dispositivo eléctrico o electrónico debe ser desechado por separado de la basura doméstica y en los puntos limpios municipales. -
Page 144: Información Sobre La Garantía Y El Servicio Técnico
WAL 14 A1 13. Información sobre la garantía y el servicio técnico Garantía de TARGA GmbH Muy estimado cliente, muy estimada cliente: Este aparato tiene 3 años de garantía a partir de la fecha de compra. Recuerde que, si detecta desperfectos en este aparato, usted tiene derechos legales respecto al vendedor del producto. - Page 145 WAL 14 A1 Siempre que vaya a realizar una consulta, tenga preparado el comprobante de caja y la referencia o el número de serie del aparato para poder acreditar la compra. Si no fuera posible solucionar el problema por teléfono, y dependiendo de la causa del mismo, nuestro servicio de atención al cliente le pasará...
-
Page 146: Português
WAL 14 A1 Índice 1. Fim a que se destina ................... 145 2. Informações relativas às marcas comerciais ............145 3. Conteúdo da embalagem ................... 146 4. Especificações técnicas ..................147 5. Instruções de segurança ..................148 ... -
Page 147: Fim A Que Se Destina
1. Fim a que se destina A câmara de exterior sem fios WAL 14 A1 é um dispositivo de eletrónica de informação que foi concebido para vigilância automática de áreas interiores e exteriores. Em condições de má visibilidade, a luz LED pode ser ligada para iluminar a área sob vigilância. -
Page 148: Conteúdo Da Embalagem
WAL 14 A1 3. Conteúdo da embalagem Câmara de exterior sem fios WAL 14 A1 Chave de parafusos especial 2 parafusos, 4 x 40 mm 2 buchas, 6 x 27 mm Instruções de utilização (ilustração a preto e branco) Estas instruções de utilização têm uma capa desdobrável. Na parte de dentro da capa, encontra-se a câmara de exterior com uma série de números. -
Page 149: Especificações Técnicas
WAL 14 A1 4. Especificações técnicas A placa de características para a câmara de exterior encontra-se na placa de montagem (10). Emissor LED: Nome do modelo: WAL 14 A1 Tensão de funcionamento: 220 – 240 V , 50 Hz Consumo de energia total: Aprox. -
Page 150: Instruções De Segurança
WAL 14 A1 Frequência Wi-Fi: 2,4 GHz Potência da transmissão Wi-Fi: Aprox. 8,7 mW Compatibilidade da iOS 8.0 (e superior) / Android 4.4 (e superior) design Os dados técnicos e o podem ser alterados sem aviso prévio. 5. Instruções de segurança Antes de utilizar este dispositivo pela primeira vez, leia as notas que se seguem neste manual, e preste atenção a todos os avisos, mesmo se estiver habituado/a a lidar com dispositivos eletrónicos. -
Page 151: Infringir Os Direitos De Terceiros / Direitos Às Imagens Da Sua Pessoa
WAL 14 A1 PERIGO! A câmara de exterior deve ser ligada à rede elétrica de 230 V por um eletricista qualificado. A câmara de exterior está em conformidade com a Classe de Segurança I, o que significa que a câmara deve estar sempre ligada à terra. -
Page 152: Copyright
WAL 14 A1 base comunal (como um coletivo de senhorios ou inquilinos). Tal quer dizer, por exemplo, áreas de entrada ou caminhos utilizados por múltiplas pessoas. O que posso monitorizar com a minha câmara de IP? A vigilância de vídeo utilizando uma câmara de IP é permitida para monitorizar as suas propriedades. -
Page 153: Antes De Começar
WAL 14 A1 7. Antes de começar Retire da embalagem a câmara de exterior e os componentes para montagem. Assegure-se que a câmara de exterior não está danificada. Se a câmara de exterior estiver danificada, não a utilize. Se o produto estiver danificado ou se faltarem componentes, contacte o serviço de apoio ao cliente do fabricante. -
Page 154: Antes De Montar
WAL 14 A1 7.3. Antes de montar PERIGO! A unidade apenas deve ser montada por um engenheiro elétrico autorizado! A energia elétrica deve ser transmitida à câmara de exterior através do circuito elétrico do edifício. PERIGO! A eletricidade deve estar cortada durante o processo de montagem! AVISO! Quando utilizar o berbequim, assegure-se que não há... - Page 155 WAL 14 A1 Prima o trinco (9) na placa de montagem (10) e puxe a placa de montagem (10), pela tira, para fora da câmara de exterior. Remova os 2 parafusos e, de seguida, remova a lingueta de alívio de tensão.
- Page 156 WAL 14 A1 Aparafuse os parafusos para fixar firmemente à parede a placa de montagem (10). Ligue devidamente o cabo elétrico ao terminal de ligação na placa de montagem (10). Preste atenção à legenda de cada um dos terminais. Fixe o cabo utilizando a lingueta de alívio de tensão e os 2 parafusos.
-
Page 157: Instalar O Emissor Led, A Câmara E O Detetor De Movimento
WAL 14 A1 Finalmente, utilize a chave de parafusos (B) para inserir o parafuso (11) por debaixo da cobertura da câmara na placa de montagem (10). O parafuso (11) é um parafuso especial que garante proteção adicional contra furto. Utilize sempre este parafuso! É... -
Page 158: Os Primeiros Passos
WAL 14 A1 O diagrama abaixo fornece informação relativa ao alcance da deteção do detetor de movimento (7). Ajuste o detetor de movimento (7) de forma a que ele cubra a área que deseja tão bem quanto possível. Ele não deve ser bloqueado por objetos ou algo semelhante. - Page 159 WAL 14 A1 Incline o suporte da câmara (2) cerca de 70 ° até ele parar. Remova o parafuso que cobre a ranhura do cartão SD utilizando a chave de parafusos especial fornecida. Remova a cobertura da ranhura do cartão SD.
-
Page 160: Descarregar E Instalar A App De Controlo
WAL 14 A1 8.2. Descarregar e instalar a de controlo A câmara de exterior é controlada utilizando a de controlo L-Guard HD, que tem de instalar no seu smartphone app store ou táblete. A é gratuita e pode descarregá-la do adequado. - Page 161 WAL 14 A1 https://www.targa.de/downloads/IAN284704/Android_NL.pdf Android https://www.targa.de/downloads/IAN284704/iOS_NL.pdf https://www.targa.de/downloads/IAN284704/Android_CZ.pdf Android https://www.targa.de/downloads/IAN284704/iOS_CZ.pdf https://www.targa.de/downloads/IAN284704/Android_ES.pdf Android https://www.targa.de/downloads/IAN284704/iOS_ES.pdf https://www.targa.de/downloads/IAN284704/Android_PT.pdf Android https://www.targa.de/downloads/IAN284704/iOS_PT.pdf Português - 159...
- Page 162 WAL 14 A1 https://www.targa.de/downloads/IAN284704/Android_SI.pdf Android https://www.targa.de/downloads/IAN284704/iOS_SI.pdf https://www.targa.de/downloads/IAN284704/Android_IT.pdf Android https://www.targa.de/downloads/IAN284704/iOS_IT.pdf https://www.targa.de/downloads/IAN284704/Android_DK.pdf Android https://www.targa.de/downloads/IAN284704/iOS_DK.pdf 160 - Português...
-
Page 163: Dados De Acesso (Nome Da Câmara / Palavra-Chave)
WAL 14 A1 8.3. Dados de acesso (nome da câmara / palavra-chave) Para configurar a câmara de exterior, precisa de definir um nome de câmara (para permitir uma identificação única na rede), um nome de utilizador, e uma palavra-chave. Por motivos de segurança informática, o nome de utilizador e a palavra-chave são transmitidos encriptados para comunicação com a câmara de exterior sem fios. -
Page 164: Repor As Definições De Fábrica
WAL 14 A1 8.4. Repor as definições de fábrica O botão RESET [repor] na câmara de exterior está deliberadamente oculto para evitar utilização indevida por pessoas não autorizadas. Se se esqueceu da palavra-chave ou se deseja repor as definições de fábrica da câmara de exterior por qualquer motivo, proceda da seguinte forma: ... -
Page 165: Manutenção/Limpeza
WAL 14 A1 9. Manutenção/limpeza Manutenção A câmara de exterior não contém componentes que necessitem de manutenção. Limpeza PERIGO! A energia da rede elétrica deve estar cortada para todo o trabalho na câmara de exterior, mesmo quando limpar a câmara! Caso contrário, incorre no risco de choque elétrico! PERIGO! Assegure-se que não entram líquidos na câmara de exterior. -
Page 166: Regulamentos Ambientais E Informação De Descarte
WAL 14 A1 Formate o cartão microSD imediatamente depois de o inserir na câmara. Para formatar manualmente, a câmara tem de estar instalada e ligada à . Depois disto, ative o alarme algumas vezes para confirmar que as gravações estão a ser devidamente guardadas no cartão microSD. -
Page 167: Notas Relativas À Garantia E Assistência
WAL 14 A1 13. Notas relativas à garantia e assistência Garantia da TARGA GmbH Estimado(a) cliente, Com este aparelho, usufrui de 3 anos de garantia a partir da data de compra. Em caso de defeitos neste produto, estão-lhe garantidos os direitos legais do consumidor. Estes direitos legais não são limitados pela garantia de seguida apresentada. - Page 168 WAL 14 A1 Caso não seja possível conseguir uma solução por via telefónica, a nossa linha de apoio ao cliente fará o encaminhamento para um serviço de assistência técnica complementar, consoante a causa do erro. Serviço Telefone: 021 – 00 06 117 E-Mail: service.PT@targa-online.com...
Need help?
Do you have a question about the WAL 14 A1 and is the answer not in the manual?
Questions and answers