Targa WAL 14 A1 Operating Instructions And Safety Instructions
Wifi outdoor camera with led light
Hide thumbs
Also See for WAL 14 A1:
- Operating instructions and safety instructions (72 pages) ,
- Operating instructions and safety instructions (168 pages)
Table of Contents
Advertisement
Available languages
Available languages
Advertisement
Chapters
Table of Contents

Related Manuals for Targa WAL 14 A1

Summary of Contents for Targa WAL 14 A1
- Page 3 Italiano ........................2 English ........................25 Deutsch ........................48 V 1.23...
-
Page 4: Table Of Contents
WAL 14 A1 Indice 1. Utilizzo previsto...................... 3 2. Informazioni sui marchi commerciali ..............3 3. Contenuto della confezione ..................4 4. Specifiche tecniche ....................5 5. Istruzioni di sicurezza ..................... 6 5.1. Violazione dei diritti di terzi / Diritto d'immagine ................. 7 ... -
Page 5: Utilizzo Previsto
1. Utilizzo previsto La telecamera WiFi da esterni WAL 14 A1 è un dispositivo elettronico informatico, progettato per la sorveglianza automatica di ambienti interni ed esterni. In scarse condizioni di visibilità, è possibile accendere la luce a LED per illuminare la zona da sorvegliare. -
Page 6: Contenuto Della Confezione
WAL 14 A1 3. Contenuto della confezione Telecamera WiFi da esterni WAL 14 A1 Cacciavite speciale 2 viti 4 x 40 mm 2 tasselli 6 x 27 mm Istruzioni operative (illustrazione grafica) Queste istruzioni sono dotate di una parte pieghevole della copertina. In essa è illustrato il dispositivo con i numeri di riferimento. -
Page 7: Specifiche Tecniche
WAL 14 A1 4. Specifiche tecniche L'etichetta di classificazione della telecamera da esterni si trova sul supporto di montaggio (10). Lampada a LED Nome del modello: WAL 14 A1 Tensione di funzionamento: 220 - 240 V , 50 Hz Consumo elettrico totale:... -
Page 8: Istruzioni Di Sicurezza
WAL 14 A1 5. Istruzioni di sicurezza Quando si utilizza questo dispositivo per la prima volta, leggere le seguenti note contenute in questo manuale e rispettare tutti gli avvertimenti, anche se si ha dimestichezza con i dispositivi elettronici. Conservare queste istruzioni in un luogo sicuro per un eventuale utilizzo futuro. In caso di vendita o cessione del dispositivo, è... -
Page 9: Violazione Dei Diritti Di Terzi / Diritto D'immagine
WAL 14 A1 PERICOLO! In presenza di fumo od odori o rumori insoliti, scollegare immediatamente il dispositivo dall'alimentazione di rete spostando l'interruttore relativo su “0”. In questo caso, non utilizzare ulteriormente l’apparecchio e farlo controllare da personale autorizzato. Non inalare mai il fumo derivante da un possibile incendio del dispositivo. -
Page 10: Copyright
L'identificazione può anche essere basata su un mezzo di identificazione personale come la targa di un veicolo. La determinabilità personale deve essere sempre evitata. Le leggi in materia possono variare da paese a paese. Rispettare le leggi in materia vigenti nel paese di utilizzo. -
Page 11: Prima Di Iniziare
WAL 14 A1 7. Prima di iniziare Estrarre la telecamera da esterni e il materiale per il montaggio dall'imballaggio. Ispezionare la telecamera da esterni per eventuali danni. In caso di danni alla telecamera da esterni, non utilizzarla. In presenza di danni o parti mancanti, contattare il servizio clienti del produttore. -
Page 12: Prima Del Montaggio
WAL 14 A1 7.3. Prima del montaggio PERICOLO! Far montare il dispositivo solo da personale qualificato! L'alimentazione deve avvenire tramite la rete elettrica dell'edificio. PERICOLO! Durante il montaggio staccare la corrente. ATTENZIONE! Quando si praticano i fori, accertarsi che non siano presenti cavi nel muro. - Page 13 WAL 14 A1 Premere quindi il gancio (9) sul supporto di montaggio (10) e staccare il supporto di montaggio (10) dal corpo della telecamera da esterni. Rimuovere le 2 viti e poi il passacavo. Forare la guarnizione di gomma sul portacavo (per es.
- Page 14 WAL 14 A1 Avvitare le viti per fissare saldamente il supporto di montaggio (10) alla parete. A questo punto, collegare correttamente il cavo d'alimentazione al terminale di connessione sul supporto di montaggio (10). Prestare attenzione alle etichette dei singoli terminali.
-
Page 15: Impostazione Della Lampada A Led, Della Telecamera E Del Sensore Di Movimento
WAL 14 A1 Infine, utilizzare il cacciavite (B) per avvitare la vite (11) dal di sotto, attraverso il corpo della telecamera, al supporto di montaggio (10). La vite (11) è una vite speciale, che garantisce una protezione extra contro il furto. Utilizzare sempre questa vite! Il fissaggio di questa vite (11) è... -
Page 16: Introduzione
WAL 14 A1 L'illustrazione seguente fornisce informazioni sul raggio di rilevamento del sensore di movimento (7). Regolare il sensore di movimento (7) in modo che copra la zona desiderata nel miglior modo possibile. Prestare attenzione che non sia bloccato da oggetti o simili. - Page 17 WAL 14 A1 L'alloggiamento della scheda SD è volutamente nascosto e difficilmente accessibile nel corpo della telecamera. Ciò rende difficile la rimozione della scheda SD da parte di persone non autorizzate. Per inserire o sostituire la scheda SD, procedere nel seguente modo: ...
-
Page 18: Download E Installazione Dell'applicazione Di Controllo
WAL 14 A1 8.2. Download e installazione dell'applicazione di controllo La telecamera da esterni viene fatta funzionare tramite l'applicazione L-Guard HD, che deve essere installata sul proprio smartphone o tablet. L'applicazione può essere scaricata gratuitamente dal relativo app store. 8.2.1. Istruzioni operative per l'applicazione di controllo Le istruzioni operative aggiornate e in diverse lingue possono essere scaricate dal link sottostante. - Page 19 WAL 14 A1 https://www.targa.de/downloads/IAN284704/Android_NL.pdf Android https://www.targa.de/downloads/IAN284704/iOS_NL.pdf https://www.targa.de/downloads/IAN284704/Android_CZ.pdf Android https://www.targa.de/downloads/IAN284704/iOS_CZ.pdf https://www.targa.de/downloads/IAN284704/Android_ES.pdf Android https://www.targa.de/downloads/IAN284704/iOS_ES.pdf https://www.targa.de/downloads/IAN284704/Android_PT.pdf Android https://www.targa.de/downloads/IAN284704/iOS_PT.pdf Italiano - 17...
- Page 20 WAL 14 A1 https://www.targa.de/downloads/IAN284704/Android_SI.pdf Android https://www.targa.de/downloads/IAN284704/iOS_SI.pdf https://www.targa.de/downloads/IAN284704/Android_IT.pdf Android https://www.targa.de/downloads/IAN284704/iOS_IT.pdf https://www.targa.de/downloads/IAN284704/Android_DK.pdf Android https://www.targa.de/downloads/IAN284704/iOS_DK.pdf 18 - Italiano...
-
Page 21: Dati Per L'accesso (Nome Della Telecamera/Password)
WAL 14 A1 8.3. Dati per l'accesso (nome della telecamera/password) Per impostare la telecamera da esterni è necessario assegnarle un nome della telecamera (per consentire l'identificazione nella rete), un nome utente e una password. Per ragioni di sicurezza informatica, nella comunicazione con la telecamera WiFi da esterni il nome utente e la password vengono trasmessi codificati. -
Page 22: Ripristino Delle Impostazioni Di Fabbrica
WAL 14 A1 8.4. Ripristino delle impostazioni di fabbrica Il pulsante RESET della telecamera da esterni è nascosto volutamente, per evitarne un utilizzo improprio da parte di persone non autorizzate. Nel caso in cui si sia dimenticata la password o, per qualsiasi ragione, si desideri ripristinare le impostazioni di fabbrica della telecamera da esterni, procedere nel seguente modo: ... -
Page 23: Manutenzione/Pulizia
WAL 14 A1 9. Manutenzione/pulizia Manutenzione Il dispositivo non contiene componenti che richiedono manutenzione. Pulizia PERICOLO! Scollegare l'alimentazione di rete per effettuare qualsiasi operazione sulla telecamera da esterni, anche per la pulizia! Rischio di scosse elettriche! PERICOLO! Accertarsi che liquidi non penetrino nel corpo della telecamera da esterni. -
Page 24: Normativa In Materia Ambientale E Informazioni Sullo Smaltimento
WAL 14 A1 Registrazioni difettose/assenti Le registrazioni difettose di vario tipo sono collegabili a una scheda MicroSD difettosa. Di conseguenza, in presenza di registrazioni difettose, inserire nel dispositivo una scheda MicroSD il cui funzionamento sia accertato. Stessa procedura in assenza di registrazioni. -
Page 25: Informazioni Sulla Garanzia E Sull'assistenza
WAL 14 A1 13. Informazioni sulla garanzia e sull'assistenza Garanzia di TARGA GmbH Gentile cliente, con questo apparecchio riceve 3 anni di garanzia a partire dalla data di acquisto. Nel caso in cui dovesse riscontrare difetti del presente prodotto, Lei gode di diritti legali nei confronti del venditore del prodotto. - Page 26 WAL 14 A1 Assistenza Telefono: 0200 68 97 67 E-Mail: service.IT@targa-online.com Telefono: 044 – 55 10 057 E-Mail: service.CH@targa-online.com Telefono: 027 78 11 03 E-Mail: service.MT@targa-online.com IAN: 284704 Produttore Considerare che il seguente indirizzo non coincide con l'indirizzo dell'assistenza. Contattare in primo luogo il centro di assistenza sopra indicato.
- Page 27 WAL 14 A1 Contents 1. Intended use ......................26 2. Trademark information ..................26 3. Package contents ....................27 4. Technical specifications ..................28 5. Safety instructions ....................29 5.1. Infringing third-party rights / Rights to own images ................30 ...
-
Page 28: Intended Use
WAL 14 A1 Congratulations! By purchasing the WAL 14 A1 WiFi outdoor camera, you have opted for a quality product. Before first using it, familiarise yourself with the way the outdoor camera works and read these operating instructions through carefully. Be careful to follow the safety instructions and only use the outdoor camera as described in the operating instructions and for the applications given. -
Page 29: Package Contents
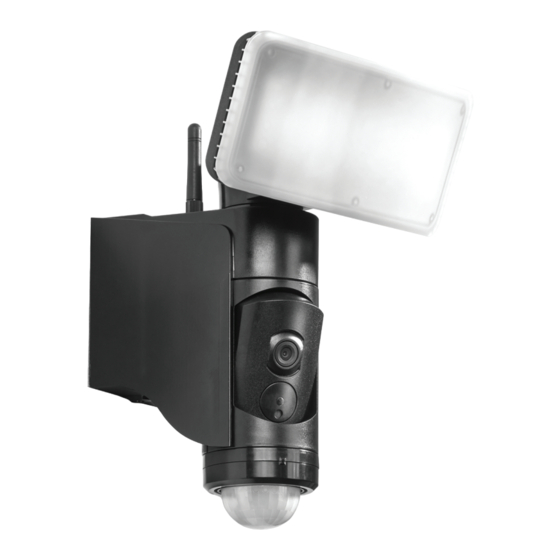
WAL 14 A1 3. Package contents WiFi outdoor camera WAL 14 A1 Special screwdriver 2x screws, 4 x 40mm 2x dowels, 6 x 27mm Operating instructions (lineart illustration) These operating instructions have a fold-out cover. On the inside of the cover, the outdoor camera is shown with figures indicated. -
Page 30: Technical Specifications
WAL 14 A1 4. Technical specifications The rating plate for the outdoor camera can be found on the mounting plate (10). LED emitter Model name: WAL 14 A1 Operating voltage: 220 – 240 V , 50 Hz Total power consumption: approx. -
Page 31: Safety Instructions
WAL 14 A1 5. Safety instructions Before you use this device for the first time, please read the following notes in this manual and heed all warnings, even if you are familiar with handling electronic devices. Keep these operating instructions in a safe place for future reference. -
Page 32: Infringing Third-Party Rights / Rights To Own Images
WAL 14 A1 DANGER! The housing of the outdoor camera must not be damaged. If the housing is damaged, there is a risk of electric shock. DANGER! Do not use the outdoor camera in environments with a high risk of explosion from flammable gases, vapours or dust. -
Page 33: Copyright
WAL 14 A1 similar location. The answer to the question as to whether a person is incidental depends on the circumstances of the individual case. In order to be safe from a legal perspective, warning signs should be placed in all areas where recordings with identifiable persons are possible. -
Page 34: Before You Start
WAL 14 A1 7. Before you start Remove the outdoor camera and mounting fittings from the packaging. Check the outdoor camera for damage. If the outdoor camera is damaged, do not use it. If the delivery is damaged or incomplete, please contact the manufacturer’s customer services. -
Page 35: Mounting
WAL 14 A1 DANGER! Power must be switched off during the mounting process! WARNING! When drilling holes, make sure there are no cables in the walls. Before mounting the outdoor camera, make sure you are familiar with all its individual parts and read and observe the instructions and diagrams in these operating instructions. - Page 36 WAL 14 A1 Now press the catch (9) on the mounting plate (10) and pull the mounting plate (10) on the strap out of the housing of the outdoor camera. Remove the 2 screws and then remove the strain relief.
- Page 37 WAL 14 A1 Now screw in the screws to fix the mounting plate (10) securely to the wall. Now properly wire the power cable to the connection terminal on the mounting plate (10). Note the labelling of the individual terminals.
-
Page 38: Setting Up The Led Emitter, Camera And Movement Sensor
WAL 14 A1 Finally, use the screwdriver (B) to turn the screw (11) from underneath through the camera housing into the mounting plate (10). The screw (11) is a special screw to guarantee extra protection against theft. Always use this... - Page 39 WAL 14 A1 The diagram below gives information on the detection range of the movement sensor (7). Adjust the movement sensor (7) so it covers the area you want as best possible. It must not be blocked by objects or similar.
-
Page 40: Getting Started
WAL 14 A1 8. Getting started For reasons of IT security, please note the following: Never commission multiple WiFi cameras at the same time and install them in the control app! Each WiFi camera must be commissioned separately and added to the control app. Only ever connect one camera per scan. -
Page 41: Downloading And Installing The Control App
WAL 14 A1 8.2. Downloading and installing the control app The outdoor camera is operated using the control app L-Guard HD, which you must install on your smartphone or tablet. The app is free to download from the relevant app store. - Page 42 WAL 14 A1 https://www.targa.de/downloads/IAN284704/Android_NL.pdf Android https://www.targa.de/downloads/IAN284704/iOS_NL.pdf https://www.targa.de/downloads/IAN284704/Android_CZ.pdf Android https://www.targa.de/downloads/IAN284704/iOS_CZ.pdf https://www.targa.de/downloads/IAN284704/Android_ES.pdf Android https://www.targa.de/downloads/IAN284704/iOS_ES.pdf https://www.targa.de/downloads/IAN284704/Android_PT.pdf Android https://www.targa.de/downloads/IAN284704/iOS_PT.pdf 40 - English...
- Page 43 WAL 14 A1 https://www.targa.de/downloads/IAN284704/Android_SI.pdf Android https://www.targa.de/downloads/IAN284704/iOS_SI.pdf https://www.targa.de/downloads/IAN284704/Android_IT.pdf Android https://www.targa.de/downloads/IAN284704/iOS_IT.pdf https://www.targa.de/downloads/IAN284704/Android_DK.pdf Android https://www.targa.de/downloads/IAN284704/iOS_DK.pdf English - 41...
-
Page 44: Access Data (Camera Name / Password)
WAL 14 A1 8.3. Access data (camera name / password) To set up the outdoor camera, you need to assign a camera name (to allow unique identification in the network), a username and a password. For reasons of IT security, the username and password are transmitted encrypted for communication with the WiFi outdoor camera. -
Page 45: Restoring Factory Settings
WAL 14 A1 8.4. Restoring factory settings The RESET button on the outdoor camera is deliberately concealed to prevent misuse by unauthorised persons. If you have forgotten your password or you wish to restore the factory settings on the outdoor camera for another reason, proceed as follows: ... -
Page 46: Maintenance/Cleaning
WAL 14 A1 9. Maintenance/cleaning Maintenance The outdoor camera does not contain any parts that require maintenance. Cleaning DANGER! The mains power must be switched off for all work on the outdoor camera, even cleaning! Otherwise there is a risk of electric shock! DANGER! Make sure that no liquid gets into the housing of the outdoor camera. -
Page 47: Environmental Regulations And Disposal Information
WAL 14 A1 Please format the Micro SD card immediately after inserting it into the camera. For manual formatting, the camera hast to be installed and it has to be connected to the app. After this, trigger the alarm a few times to check if the recordings are properly saved on the Micro SD card. -
Page 48: Warranty And Servicing Advice
WAL 14 A1 13. Warranty and servicing advice Warranty of TARGA GmbH Dear Customer, This device is sold with three years warranty from the date of purchase. In the event of product defects, you have legal rights towards the seller. These statutory rights are not restricted by our warranty as described below. - Page 49 WAL 14 A1 Service Phone: 020 – 70 49 04 03 E-Mail: service.GB@targa-online.com Phone: 01 - 4370121 E-Mail: service.IE@targa-online.com Phone: 027 78 11 03 E-Mail: service.MT@targa-online.com Phone: 02 – 20 09 025 E-Mail: service.CY@targa-online.com IAN: 284704 Manufacturer Please note that the following address is not a service address. First contact the service point stated above.
- Page 50 WAL 14 A1 Inhalt 1. Bestimmungsgemäße Verwendung ..............49 2. Informationen zu Warenzeichen ................49 3. Lieferumfang ......................50 4. Technische Daten ....................51 5. Sicherheitshinweise ....................52 5.1. Verletzung von Rechten Dritter / Recht am eigenen Bild..............53 ...
-
Page 51: Bestimmungsgemäße Verwendung
WAL 14 A1 Herzlichen Glückwunsch! Mit dem Kauf der WLAN Außenkamera WAL 14 A1 haben Sie sich für ein hochwertiges Produkt entschieden. Machen Sie sich vor der ersten Inbetriebnahme mit der Außenkamera vertraut und lesen Sie diese Bedienungsanleitung aufmerksam durch. Beachten Sie vor allem die Sicherheitshinweise und benutzen Sie die Außenkamera nur, wie in dieser Bedienungsanleitung beschrieben und für die angegebenen... -
Page 52: Lieferumfang
WAL 14 A1 3. Lieferumfang WLAN Außenkamera WAL 14 A1 Spezialschraubendreher 2 x Schraube 4 x 40mm 2 x Dübel 6 x 27mm Bedienungsanleitung (Symboldbild) Diese Bedienungsanleitung ist mit einem ausklappbaren Umschlag versehen. Auf der Innenseite des Umschlags ist die Außenkamera mit einer Bezifferung abgebildet. Die Ziffern haben folgende Bedeutung: LED-Strahler Kameraträger... -
Page 53: Technische Daten
WAL 14 A1 4. Technische Daten Das Typenschild der Außenkamera befindet sich an der Montageplatte (10). LED-Strahler Modellbezeichnung: WAL 14 A1 Betriebsspannung: 220 – 240 V , 50 Hz Leistungsaufnahme gesamt: ca. 20 Watt Leistungsaufnahme Leuchte ohne ca. 18 Watt Zusatzgeräte:... -
Page 54: Sicherheitshinweise
WAL 14 A1 5. Sicherheitshinweise Vor der ersten Verwendung des Gerätes lesen Sie bitte die folgenden Anweisungen genau durch und beachten Sie alle Warnhinweise, selbst wenn Ihnen der Umgang mit elektronischen Geräten vertraut ist. Bewahren Sie diese Bedienungsanleitung sorgfältig als zukünftige Referenz auf. Wenn Sie das Gerät verkaufen oder weitergeben, händigen Sie unbedingt auch diese Bedienungsanleitung aus, sie ist... -
Page 55: Verletzung Von Rechten Dritter / Recht Am Eigenen Bild
WAL 14 A1 herausdrehen bzw. in Stellung „0“ schalten. In diesen Fällen darf das Gerät nicht weiter verwendet werden, bevor eine Überprüfung durch einen Fachmann durchgeführt wurde. Atmen Sie keinesfalls Rauch aus einem möglichen Gerätebrand ein. Sollten Sie dennoch Rauch eingeatmet haben, suchen Sie einen Arzt auf. -
Page 56: Urheberrecht
WAL 14 A1 Einzige Einschränkung: Alle Personen, die von dieser Videoüberwachung betroffen sind bzw. sein können, müssen über die durchgeführte Überwachung in Kenntnis gesetzt werden. Um dieser Pflicht nachzukommen ist es ausreichend, Hinweisschilder oder Aufkleber am überwachten Objekt anzubringen. Diese Hinweise müssen jedoch vor dem Betreten der überwachten Fläche erkennbar sein. Wenn Sie z.B. -
Page 57: Vor Der Inbetriebnahme
WAL 14 A1 7. Vor der Inbetriebnahme Entnehmen Sie die Außenkamera und das Montagematerial aus der Verpackung. Prüfen Sie die Außenkamera auf Beschädigungen. Bei Beschädigungen darf die Außenkamera nicht in Betrieb genommen werden. Bitte wenden Sie sich bei defekter oder unvollständiger Lieferung an den Kundendienst des Herstellers. -
Page 58: Vor Der Montage
WAL 14 A1 7.3. Vor der Montage GEFAHR! Die Montage darf nur von einer autorisierten Elektrofachkraft durchgeführt werden! Die Spannungsversorgung darf ausschließlich über die elektrische Anlage des Gebäudes hergestellt werden. GEFAHR! Der Stromkreis muss während der Montage abgeschaltet sein! WARNUNG! Achten Sie beim Bohren der Bohrlöcher darauf, dass keine in der Wand liegenden Leitungen beschädigt werden. - Page 59 WAL 14 A1 Drücken Sie nun die Verriegelung (9) der Montageplatte (10) nach unten und ziehen Sie die Montageplatte (10) an dem Zugband aus dem Gehäuse der Außenkamera heraus. Entfernen Sie die Zugentlastung, nachdem Sie die 2 Schrauben entfernt haben.
- Page 60 WAL 14 A1 Schrauben Sie jetzt die Schrauben ein, um die Montageplatte (10) sicher an der Wand zu fixieren. Verdrahten fachgerecht Anschlussleitung in der Anschlussklemme an der Montageplatte (10). Beachten Sie dabei die Kennzeichnung der einzelnen Klemmen. Fixeren Sie anschließend das Kabel, indem Sie die Zugentlastung mit den 2 Schrauben wieder einsetzen.
-
Page 61: Led-Strahler, Kamera Und Bewegungsmelder Ausrichten
WAL 14 A1 Drehen Sie als letzten Schritt die Schraube (11) mit dem Schraubendreher (B) von unten durch das Kameragehäuse in die Montageplatte (10) ein. Bei der Schraube (11) handelt es sich um eine Spezialschraube, mit der ein erhöhter Diebstahlschutz gewährleistet wird. -
Page 62: Inbetriebnahme
WAL 14 A1 Folgende Grafik gibt Ihnen Informationen zum Erfassungsbereich des Bewegungsmelders (7). Richten Sie den Bewegungsmelder (7) so aus, dass dieser den gewünschten Bereich möglichst gut erfassen kann. Die Sicht darf nicht durch Gegenstände o. ä. behindert werden. Achten Sie darauf, dass im Erfassungsbereich des Bewegungsmelders (7) keine Bewegungen vorkommen, die nicht erfasst werden sollen (z.B. - Page 63 WAL 14 A1 Neigen Sie den Kameraträger (2) bis zum Anschlag um ca.70°. Entfernen Sie die Schraube der Abdeckung des SD- Kartenschachtes mit dem mitgelieferten Spezialschraubendreher. Entfernen Sie die Abdeckung des SD-Kartenschachtes. Der SD-Kartenschacht liegt direkt unter der Abdeckung, noch verdeckt und geschützt von einer...
-
Page 64: Download Und Installation Der Steuerungs-App
WAL 14 A1 8.2. Download und Installation der Steuerungs-App Die Bedienung der Außenkamera erfolgt über die Steuerungs-App L-Guard HD, die Sie zu diesem Zweck auf Ihrem Smartphone bzw. Tablet-PC installieren müssen. Die App steht im jeweiligen App Store zum kostenlosen Download bereit. - Page 65 WAL 14 A1 https://www.targa.de/downloads/IAN284704/Android_NL.pdf Android https://www.targa.de/downloads/IAN284704/iOS_NL.pdf https://www.targa.de/downloads/IAN284704/Android_CZ.pdf Android https://www.targa.de/downloads/IAN284704/iOS_CZ.pdf https://www.targa.de/downloads/IAN284704/Android_ES.pdf Android https://www.targa.de/downloads/IAN284704/iOS_ES.pdf https://www.targa.de/downloads/IAN284704/Android_PT.pdf Android https://www.targa.de/downloads/IAN284704/iOS_PT.pdf Deutsch - 63...
- Page 66 WAL 14 A1 https://www.targa.de/downloads/IAN284704/Android_SI.pdf Android https://www.targa.de/downloads/IAN284704/iOS_SI.pdf https://www.targa.de/downloads/IAN284704/Android_IT.pdf Android https://www.targa.de/downloads/IAN284704/iOS_IT.pdf https://www.targa.de/downloads/IAN284704/Android_DK.pdf Android https://www.targa.de/downloads/IAN284704/iOS_DK.pdf 64 - Deutsch...
-
Page 67: Zugangsdaten (Kameraname / Passwort)
WAL 14 A1 8.3. Zugangsdaten (Kameraname / Passwort) Zur Einrichtung der Außenkamera müssen Sie später einen Kameranamen (zur eindeutigen Identifizierung im Netzwerk), einen Benutzernamen und ein Passwort vergeben. Aus Gründen der IT-Sicherheit werden Benutzername und Passwort in der Kommunikation mit der WLAN- Außenkamera verschlüsselt übertragen. -
Page 68: Werkseinstellung Wiederherstellen
WAL 14 A1 8.4. Werkseinstellung wiederherstellen Der RESET-Taster der Außenkamera ist bewusst versteckt angebracht, um Missbrauch durch Unbefugte zu vermeiden. Falls Sie Ihr Passwort vergessen haben oder aus einem anderen Grund die Außenkamera auf die Werksseinstellung zurücksetzen wollen, gehen Sie folgendermaßen vor: ... -
Page 69: Problemlösung
WAL 14 A1 Reinigung GEFAHR! Der Stromkreis muss während aller Arbeiten an der Außenkamera, auch während der Reinigung abgeschaltet sein! Es besteht Gefahr durch elektrischen Schlag! GEFAHR! Stellen Sie sicher, dass keine Flüssigkeiten in das Gehäuse der Außenkamera eindringen können. Es besteht die Gefahr eines elektrischen Schlages. -
Page 70: Umwelthinweise Und Entsorgungsangaben
WAL 14 A1 11. Umwelthinweise und Entsorgungsangaben Wenn dieses Symbol eines durchgestrichenen Abfalleimers auf einem Produkt angebracht ist, unterliegt dieses Produkt der europäischen Richtlinie 2012/19/EU. Alle Elektro- und Elektronikaltgeräte müssen getrennt vom Hausmüll über dafür staatlich vorgesehene Stellen entsorgt werden. Auch das Leuchtmittel muss ebenso fachgerecht entsorgt werden. -
Page 71: Hinweise Zu Garantie Und Serviceabwicklung
WAL 14 A1 13. Hinweise zu Garantie und Serviceabwicklung Garantie der TARGA GmbH Sehr geehrte Kundin, sehr geehrter Kunde, Sie erhalten auf dieses Gerät 3 Jahre Garantie ab Kaufdatum. Im Falle von Mängeln dieses Produkts stehen Ihnen gegen den Verkäufer des Produkts gesetzliche Rechte zu. Diese gesetzlichen Rechte werden durch unsere im Folgenden dargestellte Garantie nicht eingeschränkt. - Page 72 WAL 14 A1 Für den Fall, dass eine telefonische Lösung nicht möglich ist, wird durch unsere Hotline in Abhängigkeit der Fehlerursache ein weiterführender Service veranlasst. Service Telefon: 02921 - 89 13 000 E-Mail: service.DE@targa-online.com Telefon: 01 – 26 76 195 E-Mail: service.AT@targa-online.com...
Need help?
Do you have a question about the WAL 14 A1 and is the answer not in the manual?
Questions and answers