Advertisement
KNOW YOUR PRODUCT
305MM
BANDSAW
WITH STAND
• 750W MOTOR
• 305MM THROAT CAPACITY
• 2 SPEED BELT DRIVE
• HEAVY DUTY STAND
INSTRUCTION MANUAL
WARNING: Read all safety warnings and all instructions. Failure to follow the
warnings and instructions may result in electric shock, fire and/or serious injury.
Save all warnings and instructions for future reference.
01/18
Advertisement
Table of Contents

Related Manuals for Full Boar FBBS-750


Summary of Contents for Full Boar FBBS-750
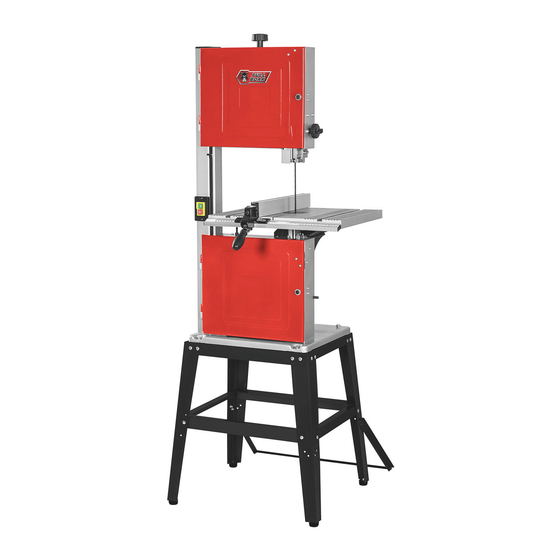
- Page 1 KNOW YOUR PRODUCT 305MM BANDSAW WITH STAND • 750W MOTOR • 305MM THROAT CAPACITY • 2 SPEED BELT DRIVE • HEAVY DUTY STAND INSTRUCTION MANUAL WARNING: Read all safety warnings and all instructions. Failure to follow the warnings and instructions may result in electric shock, fire and/or serious injury. Save all warnings and instructions for future reference.
-
Page 2: Specifications
SPECIFICATIONS - MODEL NO. FBBS-750 Voltage: 220-240V ~50Hz Power: 750W Idle speed: 1400/min Throat: 305mm Saw Band: 2320 x 12.7 mm Number of saw teeth: 4 / 25.4mm Saw band speed: 370 / 800 m/min Number of speed steps: 2 settings Max. - Page 3 KNOW YOUR PRODUCT 24 25 1. Push stick holder 10. Blade tracking lock 19. Drive belt tensioning crank 2. Upper pulley door 11. Guard adjustment knob 20. Stabilising leg 3. On/Off switch 12. Guard adjustment lock 21. Angle indicator 4. Rip fence 13.
-
Page 4: Table Of Contents
TABLE OF CONTENTS SPECIFICATIONS............Page 02 KNOW YOUR PRODUCT........... Page 02 INTRODUCTION............Page 05 SAFETY INSTRUCTIONS........... Page 05 STAND ASSEMBLY............. Page 09 SETUP & PREPARATION..........Page 11 SAW ASSEMBLY............Page 15 OPERATION............... Page 17 MAINTENANCE............Page 20 TROUBLE SHOOTING ..........Page 22 DESCRIPTION OF SYMBOLS........ -
Page 5: Introduction
INTRODUCTION Congratulations on purchasing a Full Boar Bandsaw. Your Full Boar Bandsaw FBBS-750 has been designed for cutting wood and wood composition products. It can be used for curve cuts and straight line cutting operations such as cross cutting, ripping, bevelling and compound cutting. - Page 6 GENERAL POWER TOOL SAFETY WARNINGS GENERAL SAFETY INSTRUCTIONS WARNING! Read all safety warnings and all instructions. Failure to follow the warnings and instructions may result in electric shock, fire and/or serious injury. Save all warnings and instructions for future reference. The term “power tool” in the warnings refers to your mains-operated (corded) power tool or battery-operated (cordless) power tool.
- Page 7 GENERAL POWER TOOL SAFETY WARNINGS e. Do not overreach. Keep proper footing and balance at all times. This enables better control of the power tool in unexpected situations. f. Dress properly. Do not wear loose clothing or jewellery. Keep your hair, clothing and gloves away from moving parts.
- Page 8 ADDITIONAL SAFETY RULES FOR BANDSAWS This appliance is not intended for use by young or infirm persons unless supervised by a responsible person to ensure that they can use the appliance safely. Young children should be supervised to ensure that they do not play with the appliance. Recommendations for the use of a residual current device with a rated residual current of 30mA or less.
-
Page 9: Stand Assembly
STAND ASSEMBLY Note: The band saw is heavy and it is recommend that two people are used in lifting or moving the bandsaw. Unpacking: 1. Open carton and remove top packing material. 2. Carefully lift the Bandsaw from the packaging and place it on a level work surface. 3. - Page 10 STAND ASSEMBLY 6. Assemble one of the short upper support and short lower support pieces, ensuring it sits inside of both the leg & long supports. 7. Once the nuts are hand tight, lift the frame up with only the legs contacting the floor. One half of the frame is now complete.
-
Page 11: Setup & Preparation
SETUP & PREPARATION WARNING! Prior to assembly, ensure you switch the machine off and disconnect it from the power supply. Tensioning the blade for tracking Before adjusting the tension & tracking of the blade, please ensure the upper & lower guides are well clear of the blade (following the steps below). - Page 12 SETUP & PREPARATION WARNING! Do not operate the machine when the door or guard protecting the band is not closed. Adjusting the blade tracking 1. Undo the door locks and open the upper and lower doors. 2. Manually turn the upper wheel slowly in a clockwise direction.
- Page 13 SETUP & PREPARATION Tensioning the blade for operation 1. Re-tension blade by turning the blade tension knob clockwise. The tension should be increased so the blade moves 1-2mm when applying pressure to the side of the blade. 2. Final tensioning of the blade may slightly affect the tracking.
- Page 14 SETUP & PREPARATION 6. Adjust the guide bearing at the back left or right to ensure the centre of the bearing and the blade align. Secure by tightening the hex bolt at the back. 7. Adjust the 2 guide pins so that a 0.5mm gap is created between them and the side of the blade.
-
Page 15: Saw Assembly
SAW ASSEMBLY WARNING! Prior to assembly, ensure you switch the machine off and disconnect it from the power supply. Assembling of saw table: 1. Ensure the blade guard is raised out of the way prior to fitting the saw table. 2. - Page 16 SAW ASSEMBLY Rip Fence: 1. Slide the two rip fence screws into the grooves at the top of the black leaver section 2. Slide the fence onto the two bolts in one of the two orientations 3. Lock in position by tightening the two knobs 4.
-
Page 17: Operation
OPERATION KNOW YOUR PRODUCT WARNING! Prior to assembly, ensure you switch the machine off and disconnect it from the power supply WARNING! Connect bandsaw to a dust collection device when operating. Adjusting the Upper Blade Guard The upper blade guard should always be set as close as practical against the workpiece. - Page 18 OPERATION On/Off Switch 1. To turn the bandsaw on, press the green button ON (I). 2. To turn the bandsaw off, press the red button OFF (O). Note: In the event of a voltage failure an undervoltage relay will trip. This prevents the bandsaw from starting up when the power is restored.
- Page 19 OPERATION KNOW YOUR PRODUCT WARNING! The drive belt must run either on both front or both rear pulleys. Never have the belt run diagonally. Adjusting the cutting speed The bandsaw can be operated at two blade speeds. 1. Open the lower housing door. 2.
-
Page 20: Maintenance
OPERATION Sawing • Always guide the workpiece with both hands, holding flat on the table in order to prevent the blade from jamming. • Feed the workpiece at a uniform speed that enables the blade to cut through the material without difficult and without blocking. - Page 21 MAINTENANCE Changing Blade 1. Move the blade guard into position approximately half way between the saw table and the machine housing. 2. Undo the fasteners and open the side cover. 3. Slide the 2 rulers at the front of the saw table across and remove the pin at the front of the table.
-
Page 22: Trouble Shooting
KNOW YOUR PRODUCT TROUBLESHOOTING Problem Cause Remedy Make sure the power plug is Bandsaw is not No power supplied connected and power outlet is in working working order Cannot adjust Unlock the tracking lock by turning Tracking lock knob is on tracking the tracking lock knob anti-clockwise Feed Pressure too high... -
Page 23: Description Of Symbols
KNOW YOUR PRODUCT DESCRIPTION OF SYMBOLS Hertz Volts Watts Alternating current /min Revolutions or No load speed reciprocation per minute Regulator compliance mark Read instruction manual Wear hearing protection Warning Wear a breathing mask Wear eye protection Important. Risk of injury! Do not reach into the running saw blade Pull the power plug before beginning any repair or maintenance work CARING FOR THE ENVIRONMENT Power tools that are no longer usable should not be disposed... -
Page 24: Contents
CONTENTS 1 x FBBS-750 bandsaw 1 x Push stick 1 x Stand 1 x Bags of bolts, nuts & washers 1 x Rip fence 6 x Hex keys 1 x Blade 1 x Instruction manual 1 x Mitre fence 1 x Dust extraction adaptor... -
Page 26: Warranty
WARRANTY YOUR WARRANTY FORM SHOULD BE RETAINED BY YOU AT ALL TIMES. IN ORDER TO MAKE A CLAIM UNDER THIS WARRANTY YOU MUST RETURN THE PRODUCT TO YOUR NEAREST BUNNINGS WAREHOUSE (see www.bunnings.com.au or www.bunnings.co.nz for store locations) WITH YOUR BUNNINGS REGISTER RECEIPT. PRIOR TO RETURNING YOUR PRODUCT FOR WARRANTY PLEASE TELEPHONE OUR CUSTOMER SERVICE HELPLINE: Australia 1800 069 486 New Zealand 0508 069 486...
Need help?
Do you have a question about the FBBS-750 and is the answer not in the manual?
Questions and answers