Table of Contents
Advertisement
TM
USER MANUAL
600 // CERAMIC HOB - TOUCH
TCT63E
IMPORTANT //
Please ensure that you read through this manual prior to installation and use.
This user manual contains important information to ensure optimal performance and keep you
safe. Please retain your proof of purchase, as this will be needed in the event that you require a
warranty service. Remember to keep this user manual for future reference.
www.tisira.com
Advertisement
Table of Contents

Subscribe to Our Youtube Channel
Related Manuals for Tisira TCT63E


Summary of Contents for Tisira TCT63E
- Page 1 USER MANUAL 600 // CERAMIC HOB - TOUCH TCT63E IMPORTANT // Please ensure that you read through this manual prior to installation and use. This user manual contains important information to ensure optimal performance and keep you safe. Please retain your proof of purchase, as this will be needed in the event that you require a warranty service.
-
Page 2: Table Of Contents
Content Content Warning & Safety Instructions Product Overview Product Specifications Electrical Connection Installation Installation Operation Instructions 11-31 Error Codes and Solutions Maintenance and Cleaning Troubles and Solution Proposals Notes 34-35 Page 2 Ceramic Hob User Manual... -
Page 3: Warning & Safety Instructions
Warning & Safety Instructions IMPORTANT // To ensure best performance, avoid risk of damage or accidents. Please read the operating instructions prior to first time use. Installation Operation and Maintenance Electrical Shock Hazard Electrical Shock Hazard • Disconnect the appliance from the mains WARNING // If the surface is cracked, switch off the electricity supply before carrying out any work appliance to avoid the possibility of electric shock. - Page 4 Warning & Safety Instructions • Failure to follow this advice could result in WARNING // This appliance is not intended for use by persons (including children) with reduced burns and scalds. physical, sensory or mental capabilities, or lack Cut Hazard of experience and knowledge, unless they have been given supervision or instruction concerning •...
-
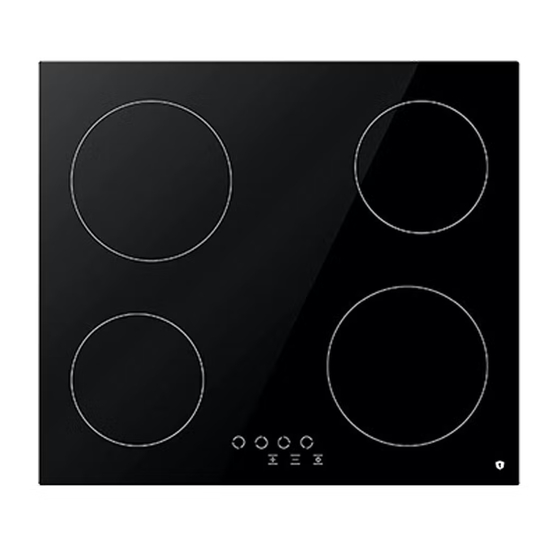
Page 5: Product Overview
Product Overview 1. Heater Positions 4. Hotplate 2. Glass or Metal Surface 5. Ovaldual Heater 3. Control Switches 6. Double Heater Ceramic Hob User Manual Page 5... -
Page 6: Product Specifications
Product Specifications Cooktop Panel Visual of 30 cm Cooktop Panel Visual of 45 cm Cooktop Panel Visual of 60 cm Electrical Connection Get electrical connection of your appliance done to authorized person in line with the following scheme. Page 6 Ceramic Hob User Manual... - Page 7 Electrical Connection Electrical Connection and Safety 1. Setting conditions of this appliance is 8. If feeder cord is damaged, this cord should indicated in tag or data plate. be replaced either by manufacturer or its service agency or same degree qualified 2.
-
Page 8: Installation
Installation 1. Turn the cooktop down and place on smooth ground. 2. In order to prevent entrance of foreign substances and liquids between cooktop and counter, apply the paste given in package to the sides of lower guard of counter. For corners, curl paste and increase curls till fi lling corner gaps. - Page 9 Installation 5. When product is mounted on a drawer, if it is possible to touch lower side of product, this section should be separated with a wooden shelf. 6. While mounting cooktop on a closet, as shown in the fi gure above, in order to separate between closet and cooktop, a shelf should be mounted.
-
Page 10: Installation
Installation Counter Cutting Sizes and Installation of Your Cooktop NOTICE // Pay attention to the drawings and dimensions given below while making cooktop installation and adjusting counter cutting sizes. Page 10 Ceramic Hob User Manual... -
Page 11: Operation Instructions
Operation Instructions You can operate electric cooktops by turning the button on control panel you want to use to the level you desire. Cooktop powers as per levels are given in the following table. LEVEL 1 LEVEL 2 LEVEL 3 LEVEL 4 LEVEL 5 LEVEL 6... - Page 12 Operation Instructions Control Panel Overview For: 30cm Built in Stove 45cm Built in Stove 60cm - 70cm Built in Stove Page 12 Ceramic Hob User Manual...
- Page 13 Operation Instructions 60cm - 70cm Built in Stove Lower left cooking area selection key Upper left cooking area selection key Upper right cooking area selection key Lower right cooking area selection key Plus key Minus key On / off key Temperature display icon Ceramic Hob User Manual Page 13...
- Page 14 Operation Instructions Note // Unit becomes operational within 1 second aft er it is plugged to the mains. All LEDs and displays illuminate for 1 second. Turning the Stove On Unit is turned on by pressing the Unit is turned on by pressing the Unit is turned on by pressing the key.
- Page 15 Operation Instructions Turning the Stove Cooking Areas On Turn the stove on by pressing the button. Turn the stove on by pressing the button. (See Fig. 5) Figure 5 Press the relevant hob selection key. The Press the relevant hob selection key. The icon shall icon shall be displayed in the relevant hob when you touch for the...
- Page 16 Operation Instructions Press the relevant hob selection key once. The Press the relevant hob selection key once. The icon is icon is displayed when you touch for the fi rst time. (See Fig. 9) Figure 9 Then, press the Then, press the Then, press the key once.
- Page 17 Operation Instructions Activating the Child Lock Function Press front left hob selection key Press front left hob selection key Press front left hob selection key minus key minus key minus key simultaneously, you shall hear a short warning signal at this time.
- Page 18 Operation Instructions The icon is displayed on all displays. (see Fig. 19) The The icon is displayed on all displays. (see Fig. 19) The The icon is displayed on all displays. (see Fig. 19) The The icon is displayed on all displays. (see Fig. 19) The icons are displayed alternatively if any hob is icons are displayed alternatively if any hob is icons are displayed alternatively if any hob is...
- Page 19 Operation Instructions 45cm Built in Stove Upper left cooking area selection key Upper left cooking area selection key Upper left cooking area selection key Plus key Minus key On / off key Temperature display icon Ceramic Hob User Manual Page 19...
- Page 20 Operation Instructions Turning the Stove On NOTE // Unit becomes operational within 1 second aft er it is plugged to the mains. All LEDs and displays illuminate for 1 second. Unit is turned on by pressing the Unit is turned on by pressing the Unit is turned on by pressing the key.
- Page 21 Operation Instructions Turning the Stove Cooking Areas On Turn the stove on by pressing the button. Turn the stove on by pressing the button. (See Fig. 5) Figure 5 Press the relevant hob selection key. The Press the relevant hob selection key. The icon shall icon shall be displayed in the relevant hob when you touch for...
- Page 22 Operation Instructions Press the relevant hob selection key once. The Press the relevant hob selection key once. The icon is icon is displayed when you touch for the fi rst time. (See Fig. 9) Figure 9 Then, press the Then, press the Then, press the key once.
- Page 23 Operation Instructions Aft er setting the auto heating, you may set the cooking Aft er setting the auto heating, you may set the cooking Aft er setting the auto heating, you may set the cooking level desired using the level desired using the level desired using the keys.
- Page 24 Operation Instructions Press the upper left hob selection key Press the upper left hob selection key again. (See again. (See Fig. 19) Figure 19 The child lock is activated at this time and the The child lock is activated at this time and the icon icon is displayed on all hobs to indicate this condition.
- Page 25 Operation Instructions To Activate The Child Lock Completely icon is displayed on all displays when the icon is displayed on all displays when the stove is on and the child lock is active. (see Fig. 24) icons are displayed alternatively if any icons are displayed alternatively if any icons are displayed alternatively if any hob is hot.
- Page 26 Operation Instructions 30cm Built in Stove Upper cooking area selection key Lower cooking area selection key Plus key Minus key On / off key Temperature display icon Page 26 Ceramic Hob User Manual...
- Page 27 Operation Instructions To Activate The Child Lock Completely NOTE // Unit becomes operational within 1 second aft er it is plugged to the mains. All LEDs and displays illuminate for 1 second. Unit is turned on by pressing the Unit is turned on by pressing the Unit is turned on by pressing the key.
- Page 28 Operation Instructions Turning the Stove Cooking Areas On Turn the stove on by pressing the button. Turn the stove on by pressing the button. (See Fig. 5) Figure 5 Press the relevant hob selection key. The Press the relevant hob selection key. The icon shall icon shall be displayed in the relevant hob when you touch for...
- Page 29 Operation Instructions Press the relevant hob selection key once. The icon is displayed when you touch for the fi rst time. (See Fig. 9) Figure 9 Then, press the Then, press the Then, press the key once. The key once. The key once.
- Page 30 Operation Instructions Child Lock Function To activate the child lock; Press upper hob selection key Press upper hob selection key Press upper hob selection key minus key minus key minus key simultaneously, you shall hear a short warning signal at this time. (see Fig. 14) Then, remove your fi ngers from the stove control panel.
- Page 31 Operation Instructions icon is displayed on all displays. (see Fig. 19) icon is displayed on all displays. (see Fig. 19) icon is displayed on all displays. (see Fig. 19) icons are displayed alternatively if any icons are displayed alternatively if any icons are displayed alternatively if any hob is hot.
-
Page 32: Error Codes And Solutions
Error Codes and Solutions Error codes, their probable causes and recommendations for solutions are provided in the chart below. WARNING // The chart below is applicable for all models. Error Code Error Description Potential Cause for Clearing Error Error ER 03 & Constant use of Water or cooking Clean the operating surface... -
Page 33: Maintenance And Cleaning
Maintenance and Cleaning Before starting to maintenance or cleaning, firstly unplug the plug supplying electricity to cooktop and turn down gas valve. If cooktop is hot, wait for cooling down. 1. For the purpose that your cooktop has long and economic life, regular cleaning and maintenance should be performed on your cooktop. -
Page 34: Notes
Notes Page 34 Ceramic Hob User Manual... - Page 35 Notes Ceramic Hob User Manual Page 35...
- Page 36 New Zealand P // 09 306 1020 F // 09 302 0077 sales@aristonappliances.co.nz Tisira is committed to ongoing research and development. Every effort has been made to ensure all information in this service manual is correct at time of going to print.
Need help?
Do you have a question about the TCT63E and is the answer not in the manual?
Questions and answers