Table of Contents
Advertisement
Quick Links
Advertisement
Table of Contents

Summary of Contents for Xerall X-TANKCOPTER
- Page 1 Ages 14 + X-TANKCOPTER Instruction Manual...
- Page 2 Catalogue Overview of drone and transmitter Part loading and unloading Precautions before flying Flying procedures Function introductions Know your App Precautions before taking photos Assembly parts list Troubleshooting...
-
Page 3: Main Parameter
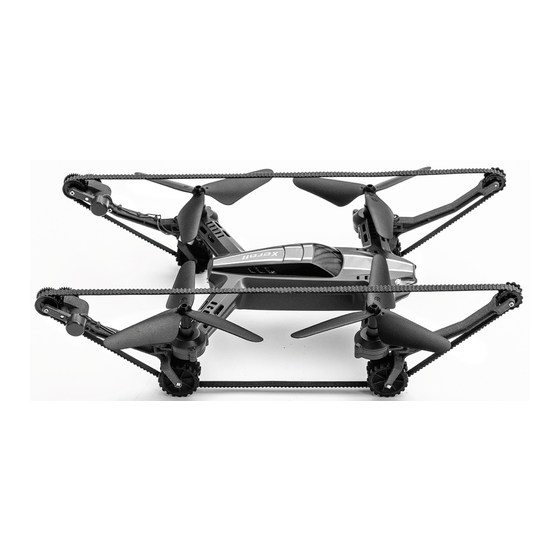
Overview of drone and transmitter Drone Front LED Propeller B Propeller A Tank Drone Cover Left Right Belt Propeller A Propeller B Back LED HD Camera Battery Cover Tank Drone Bottom Main parameter Drone Battery Drone Size 252x203x55.2mm 3.7V 900mAh... -
Page 4: Exploded View
Exploded View 28 27 18 17 Name Name Belt Belt big Wheel Propeller A Front Right Motor Cover Propeller B Front Left Motor Cover Tank Drone Cover Reverse Motor (White Plug) Dash Receiver Forward Motor( Red Plug) Battery Cover... - Page 5 Transmitter Phone Holder Slot Heading Hold High/Low Speed Mode One Button Take Photo / Video Off / Landing/ Emergency Power Stop Button Indicator Left Stick Right Stick Power Switch Notice: Taking photo and recording video are available after connecting with smart phone.
-
Page 6: Battery Installation
Battery Installation Open the battery cover on the back side of the transmitter, insert 4 AA batteries following the polarity indicators. (Picture 1/2, battery is not included.) Battery Cover Alkaline Battery Picture 1 Picture 2 1.Make sure the electrodes are correct. -
Page 7: Charging Instruction For Drone Battery
Charging Instruction for Drone Battery 1. Connect the drone battery with USB cable first and then choose one of the method as the picture below shows to connect with USB plug. 2. The red USB indicator light keeps bright when charging and the light turns green when fully charged. - Page 8 Motors Replacement 1. Twist out the the four screws of the motor cover anticlockwise with the screwdriver for distribution (Picture 8). 2. Twist out the screws of the scaffold, then open the motor cover (Picture 9). 3. Please firstly take out the broken motor, connect the plug in the relative color to the plug motor, then install the motor to the battery jar, close the motor cover, lock the screws, it’s finished now(Picture 10).
- Page 9 Diagram of scaffold loading and unloading 1. Please twist out the screws of the front support bracket anticlockwise with the screwdriver for distribution (Picture 12), take out the broken bracket,then replace a new one. 2. Please twist out the screws of the rear bracket anticlockwise with the screwdriver for distribution, pull out the plug to take out the broken bracket, then replace a new one ( Picture 13).
- Page 10 Precautions before flying 1. Please make sure that the battery power of the drones and the transmitter are in a state of saturation. 2. Before turning on the transmitter, please make sure that the left stick is in the middle position.
-
Page 11: Emergency Stop
Flight Instruction Frequency Pairing Turn on the transmitter switch and the power indicator light flashes rapidly. Power switch (Press down) Pull the Left Stick all the way down to the lowest position and then release. The Left Stick will back to the middle position automatically. - Page 12 Drone calibration (Only take this action when abnormal flying) After code pairing, push the right stick as picture shows. (Don’t move the left stick before successful calibration), the drone body light will flash 3 times indicating that the drone is calibrating.
-
Page 13: Flight Control
Flight Control... - Page 14 Trimmer mode Forward and backward trimmer When taking off, if the drone tilts forward, press down the trimmer button and push the right stick backwards. Otherwise push forwards. Left and right side flying trimmer When taking off, if the drone tilts to left, then press down the trimmer button and push the right stick backwards to adjust.
- Page 15 3. Push the right stick upwards, the tank drone starts forward and turns left. ( Picture 17) 4. Push the left stick upwards, the tank drone starts forward and turns right. ( Picture 18) Picture 17 Picture 18 5.
-
Page 16: Function Introduction
7. Push the left stick downside, and push the right stick upwards, the tank drone makes left turn circle (Picture 21). 8. Push the left stick upwards, and push the right stick downsides, the tank drone makes right turn circle. (Picture 22) -
Page 17: Heading Hold Mode
Heading Hold Mode Drones generally have a front and rear indicated by LED lights or colored propellers. By default, the users are required to tell the front and the rear of the drone when flying. Under heading hold mode, the users can operate the drone without worrying about the orientation (left is left and right is right all the time, regardless of where your drone is pointing at).Heading Hold Mode is designed for... -
Page 18: Low Battery Alarm
LED light keeps bright to unlock protection function automatically, then the aircraft can take off normally. Know your APP Download and install APP:Xerall This software is suitable for mobile phones in the IOS and Android system, please surf the mobile phone application store website to download and install it. - Page 19 Precaution about taking photos 1. Insert the MicroSD/TF card to the slot, make sure the metal pins facing up (Picture 21). (TF card is not included) Picture 21 2. The aerial photo will be saved in your mobile phone and the TF card, while the video only be saved in the TF card.
-
Page 20: Assembly Parts List
Assembly parts list For convenience, the spare parts are listed for you to choose, which can be purchased from the local seller. U49-01 U49-02 U49-03 U49-04 U49-05 U49-06 U49-07 U49-08 U49-09 U49-10 U49-11 U49-12 U49-13 U49-14 U49-15 U49-16... -
Page 21: Important Notice
U49-17 U49-18 U49-19 U49-20 U49-21 U49-22 U49-23 U49-24 U49-25 U49-26 U49-27 U49-28 smart phone holder Transmitter VR-2 Important Notice Our company's products are improving all the time, design and specifications are subject to change without notice. All the information in this manual has been carefully checked to ensure accuracy,... -
Page 22: Troubleshooting
Troubleshooting Problem Problem Cause Solution 1. Low battery. 1. Replace the batteries with the same type. 2. Install refer to the instructions of battery indicator 2. Mixed battery positive and negative pole. installation. lights doesn’t 3. Clear out the dirt between the battery and 3. -
Page 23: Fcc Notice
FCC Note This equipment has been tested and found to comply with the limits for a Class B digital device, pursuant to Part 15 of the FCC Rules. These limits are designed to provide reasonable protection against harmful interference in a residential installation.
Need help?
Do you have a question about the X-TANKCOPTER and is the answer not in the manual?
Questions and answers