Table of Contents
Advertisement
Advertisement
Table of Contents
Troubleshooting

Related Manuals for Mesalabs Smart-Well 1710


Summary of Contents for Mesalabs Smart-Well 1710
- Page 1 Smart-Well ® Incubator Model 1710 Operation Manual...
- Page 2 Smart-Well Incubator Model 1710 OPERATION MANUAL Revised: JANUARY 2017 Mesa Labs Smart-Well Model 1710 Operation Manual - 9153 Rev E...
-
Page 3: Table Of Contents
CONTENTS Introduction ..............................5 Installation and Configuration ........................6 Operational Precautions ........................6 Unpacking and Inspection ........................7 Printer Setup ............................7 Printer Settings…………..........… ... …………………………………………………………………7 Connecting AC Power ........................... 7 Loading the Printer Ribbon Cassette ....................8 Loading Paper ............................8 Preparing to Print .......................... - Page 4 Maintenance & Warranty ......................... 27 Cleaning ..............................27 Service and Repair ..........................27 Temperature Verification ........................27 Warranty ..............................28 Appendix A - Troubleshooting ........................ 29 Incubator Troubleshooting ........................29 Printer Troubleshooting ........................31 Appendix B – Consumables and Accessories ..................32 Appendix C - Specifications ........................
-
Page 5: Introduction
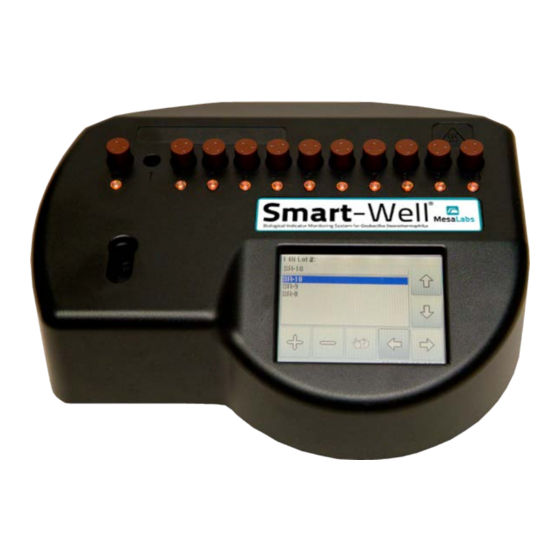
INTRODUCTION The Smart-Well ® incubator Model 1710 is a valuable laboratory tool used for the rapid evaluation and automatic documentation of Smart-Read EZTest® steam biological indicators (BIs). The incubator monitors Smart-Read BIs during incubation and alerts the user when growth is detected (positive) or when the incubation period has ended without any growth detected (negative). -
Page 6: Installation And Configuration
INSTALLATION AND CONFIGURATION OPERATIONAL PRECAUTIONS Warnings and Precautions Use Only as Directed • Handle with caution; incubator surface may become hot to the touch. • Indoor use only. • Temperatures 18°C to 37°C. • Altitude < 2000 M (unless noted otherwise). •... -
Page 7: Unpacking And Inspection
UNPACKING AND INSPECTION 1. Remove all contents from the box and carefully inspect all components for any damage that may have occurred in transit. If any damage is observed, notify your Mesa Labs representative immediately. 2. Verify that the following components have been included in the kit: •... -
Page 8: Loading The Printer Ribbon Cassette
3. If a plug adapter for your environment was included with the kit, attach the plug adapter to the printer power pack. Note: You may have to supply an appropriate plug adapter for your environment if one was not included with the kit. 4. -
Page 9: Preparing To Print
5. With scissors, cut the end of the paper at an angle towards the roll from right to left (see Figure Figure 2. End of paper with proper tail for feeding 6. Insert the end of the paper into the slot at the rear of the printing mechanism (see Figure 3) and press the LF button until approximately 5 or 6 cm of paper feeds through the mechanism. -
Page 10: Incubator Installation And Power Up
2. Press the SEL button until the SEL light is on. The printer is now online and ready to print. Refer to the printer manual for additional printer information and detailed procedures. INCUBATOR INSTALLATION AND POWER UP 1. Verify that the environment in which the incubator will be installed is maintained between 18°C and 37°C, and that the incubator is located away from cold drafts and heat-generating equipment. -
Page 11: Initial Incubator Configuration
INITIAL INCUBATOR CONFIGURATION The Smart-Well incubator must be properly configured prior to use. The following options affect the Tools Advanced Tools Menu overall operation of the incubator, and can be configured from the (See the User Interface Reference for detailed procedures). Language 1. -
Page 12: Operation
OPERATION The Smart-Well incubator Model 1710 has been designed with simplicity and effectiveness in mind. Incubation cavities do not need to be pre-configured prior to use as the incubator prompts the user for required information upon BI insertion. For detailed instructions on the use of all incubator features, refer to the User Interface Reference later in the manual. - Page 13 BI Insert Wizard BI Lot Number 6. Using the touch screen display, complete the by entering the User ID Sterilizer Number Cycle ID , and BI Insert Wizard Note: the must be completed prior to BI Insert Wizard obtaining test results. If the is not completed and left unattended, an audible beep will sound...
- Page 14 10. If the incubator detects that an exposed Smart-Read EZTest BI has turned yellow (positive) at any time during the incubation period, the status LED in front of the incubation cell (1-10) will turn red (Control cavity will turn green,) test results will print, and an audible alarm will sound (if Main Menu, sound is not muted).
-
Page 15: Using Positive Controls
a. Remove the Smart-Read EZTest BI from the incubator. b. Visually inspect the Smart-Read EZTest BI for purple color to confirm the negative result. Note: Visual verification should be performed as soon as possible after the incubation period has ended. c. -
Page 16: Power Failure Recovery
4. If a positive control Smart-Read EZTest BI has remained purple (negative) for the duration of the incubation period, the status LED in front of the positive control cavity will turn red, and an ― Main Menu audible alarm will sound (if sound is not muted). At the , a red will appear on a purple background in place of the hourglass in the C button. -
Page 17: User Interface Reference
USER INTERFACE REFERENCE INCUBATION CAVITY STATUS LEDS In front of each incubation cavity is a multi-color LED indicating the status of the cavity. Status LEDs Color Descriptions Cell empty. Amber Test in progress. Blinking Amber BI Insert Wizard in progress, or BI removal countdown in progress (max. -
Page 18: Query Menu
During incubator warm up, a progress bar will appear at the top of the main menu. When the incubator has warmed up to operating temperature, the progress bar will be replaced by the word Ready. Main Menu The incubator temperature is displayed in the upper right corner of the for reference. -
Page 19: Help Mode
The first button (upper left) on the alpha-numeric keypad can be used to insert a variety of special characters too numerous to display on the button face. This button toggles through the following characters: 0, 1, dash (-), period (.), underscore (_), space ( ), forward-slash (/), asterisk (*). - Page 20 The Wizard will store and display the 10 most recent entries. The most recently used entry will be selected by default. The Wizard lists are sorted as follows: the most recently used entry will be listed first, and the rest of the entries will be sorted.
-
Page 21: Tools Menu
When the correct sterilizer number is selected, press the Right Arrow button to continue. To return to the User screen, press the Left Arrow button. Cycle ID Cycle ID – the cycle or load identifier in which the BI was exposed. The will not be prompted for a positive control BI. -
Page 22: Sound Volume
Saved records are intended as a user convenience for re- printing a missing record. Records, original or re-printed, must be maintained per your organization’s quality system. Tools Menu 1. From the , touch the Test History button. Test History Search Menu 2. -
Page 23: Viewing System Information
3. Adjust the volume using the volume slider, or the Arrow buttons. 4. To quickly mute all sounds, press the Speaker button. An X will appear on the Speaker button when sounds are muted. The selected volume affects both button-press feedback and alarms. Tools Menu 5. -
Page 24: Setting The Time
EXITING THE ADVANCED TOOLS MENU Advanced Tools Menu Tools Menu 1. From the , touch the Back button to return to the Tools Menu Main Menu 2. From the , touch the Back button to return to the SETTING THE TIME Advanced Tools Menu 1. -
Page 25: Setting The Language
The maximum incubation time setting is 24 hours. Mesa Labs recommends a reduced incubation time of 10 hours for Smart-Read EZTest biological indicators based on our study using the FDA reduced incubation time (RIT) protocol, see page 11 of this manual for cycle specific information. SETTING THE LANGUAGE The Smart-Well incubator supports multiple languages, and English is the default. -
Page 26: Resetting The Administrator Password
In the USA and Canada Contact Mesa Technical Services. The phone number is 303-987- 8000 X 10042 and the e-mail is bi-support@mesalabs.com. Outside the USA and Canada contact your local distributor. -
Page 27: Maintenance & Warranty
MAINTENANCE & WARRANTY CLEANING • Unplug the incubator before performing any cleaning. • Do not immerse the unit in any liquid. • Do not pour liquid into the incubation cavities. To clean the outside of the unit, wipe with a cloth dampened with isopropyl alcohol. To clean the incubation cells, use a cotton swab dampened with isopropyl alcohol. -
Page 28: Warranty
WARRANTY Mesa Labs expressly warrants the Model 1710 biological indicator incubator as set forth herein. Mesa Labs makes no other warranties, either express or implied. No warranty as to merchantability or fitness for a particular purpose shall apply. In addition, the following shall constitute the exclusive remedies of buyer for any breach by Mesa Labs of its warranty hereunder. -
Page 29: Appendix A - Troubleshooting
APPENDIX A - TROUBLESHOOTING INCUBATOR TROUBLESHOOTING Problem Solution Incubator never warms up to temperature. The incubator must be used in an environment between 18°C and 37°C, and will function best away from drafts. Relocate the incubator to the proper environment. Incubator does not recognize inserted BI. - Page 30 Problem Solution Incubator result is Negative for growth but A Negative result when Incubation time is between 5 and BI is visually Positive 10 hours may occur. The BI should be visually verified immediately at the end of the Incubation cycle. (Non-US use Only) The Incubator optics are sensitive and detect the color changing media before the human eye is able to discern...
-
Page 31: Printer Troubleshooting
PRINTER TROUBLESHOOTING Problem Solution Printer will not print; SEL light is on. Verify that the data cable is connected properly to both the printer and the Smart-Well incubator. The printer port on the Smart-Well incubator is rightmost from the rear. Turn printer power off, then on, using the slide switch on the side of the printer. -
Page 32: Appendix B - Consumables And Accessories
APPENDIX B – CONSUMABLES AND ACCESSORIES CONSUMABLES Smart-Read EZTest Biological Indicators Reorder # Smart-Read for Steam, 10 , box of 100 SEZS/5 Smart-Read for Steam, 10 , box of 100 SEZS/6 Smart-Read Test Pack (AAMI performance), 10 , case of 25 plus 25 controls SRSP/25 Smart-Read Test Pack (AAMI performance), 10 , case of 25 plus 5 controls... -
Page 33: Appendix C - Specifications
APPENDIX C - SPECIFICATIONS Smart-Well Incubator Overall Dimensions Width 8.5 in (21.5 cm) Height 2.4 in (6.1 cm) Depth 6.9 in (17.5 cm) Weight 2.5 lbs. (1.13 kg) Incubation Cavities Quantity Diameter 0.433 in (1.1 cm) Depth 1.6 in (4.0 cm) Thermometer Cavity Quantity Diameter... - Page 34 Smart-Well Incubator Power Pack Rated Input Voltage 100 V – 240 V AC Input Voltage Range 90 V – 264 V AC Rated Frequency 50-60 Hz Output Voltage 12 VDC Min Output Current 2.5A Min Output Wattage Safety Approvals UL/cUL, CE, CCC, RCM, PSE RoHS Compliant Storage Humidity 10 - 90%...
- Page 35 This page intentionally left blank Mesa Labs Smart-Well Model 1710 Operation Manual - 9153 Rev E...
- Page 36 (303) 987-8000 www.mesalabs.com...
Need help?
Do you have a question about the Smart-Well 1710 and is the answer not in the manual?
Questions and answers