Advertisement
CD Alarm Clock Radio
With USB Ports for Charging
Model : HX-300CD
INSTRUCTION MANUAL
Note: Please read and follow these instructions before operating your unit.
SAFETY INSTRUCTION
TO PREVENT FIRE OR SHOCK HAZARD. DO NOT EXPOSE THIS APPLIANCE TO RAIN
OR MOISTURE.
THIS APPLIANCE SHALL NOT BE EXPOSED TO DRIPPING OR SPLASHING WATER AND
THAT NO OBJECT FILLED WITH LIQUIDS SUCH AS VASES SHALL BE PLACED ON
APPARATUS.
RISK OF ELECTRIC SHOCK
Warning: To reduce the rise of
electric shock, do not remove
cover
The
lightning
flash
with
user-serviceable
arrowhead symbol, within an
Refer servicing to qualified service
equilateral
triangle,
is
personnel.
intended to alert the user to
the presence of uninsulated
"dangerous voltage" within
the products enclosure that
may
be
of
sufficient
magnitude to constitute a risk
of electric shock to persons.
IMPORTANT SAFETY INSTRUCTIONS
1.
Read these instructions.
2.
Keep these instructions.
3.
Heed all warnings.
4.
Follow all instructions.
5.
Do not use this apparatus near water.
6.
Clean only with dry cloth.
7.
Do not block any ventilation openings. Install in accordance with the manufacturer's
instructions.
8.
Do not install near any heat sources such as radiators, heat registers, stoves, or
other apparatus (including amplifiers) that produce heat.
9.
Do not defeat the safety purpose of the polarized or grounding-type plug. A
polarized plug has two blades with one wider than the other. A grounding type plug
has two blades and a third grounding prong. The wide blade or the third prong are
provided for your safety. If the provided plug does not fit into your outlet, consult an
electrician for replacement of the obsolete outlet.
10. Protect the power cord from being walked on or pinched particularly at plugs,
convenience receptacles, and the point where they exit from the apparatus.
CAUTION
DO NOT OPEN
(or
back)
no
The exclamation point within
parts
inside.
an equilateral triangle is
intended to alert the user to
the presence of important
operating and maintenance
(servicing) instructions in the
literature accompanying the
appliance.
-1 -
Advertisement
Table of Contents

Related Manuals for Hannlomax HX-300CD


Summary of Contents for Hannlomax HX-300CD
- Page 1 APPARATUS. CAUTION CD Alarm Clock Radio RISK OF ELECTRIC SHOCK With USB Ports for Charging DO NOT OPEN Warning: To reduce the rise of Model : HX-300CD electric shock, do not remove cover back) lightning flash with The exclamation point within...
-
Page 2: Fcc Notice
11. Only use attachments/accessories specified by the manufacturer. 24. Battery shall not be exposed to excessive heat such as sunshine, fire or the like. 12. Use only with the cart, stand, tripod, bracket, or table specified by 25. Excessive sound pressure from earphones and headphone can cause hearing loss. the manufacturer, or sold with the apparatus. -
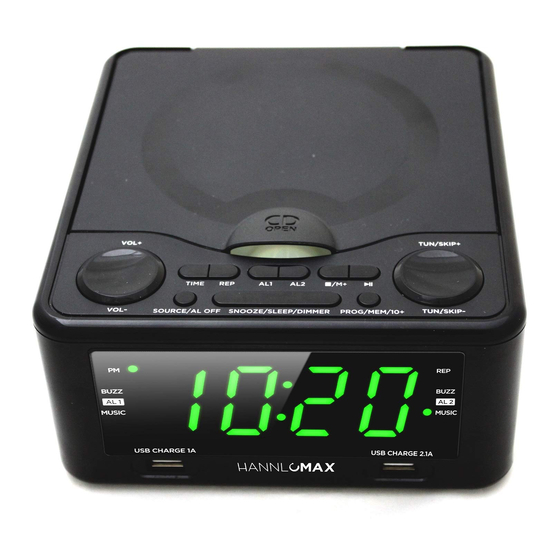
Page 3: Location Of Controls
LOCATION OF CONTROLS CONNECTING THE UNIT TO POWER AC OPERATION Plug one end of the AC adaptor into the DC power Input, and then plug the other end into AC wall outlet. Before switching on the unit, make sure that the voltage of your electricity supply is the same as that indicated on the rating plate. - Page 4 DISPLAY THE DATE If you choose FM as the alarm wake up source, when alarm activate, it will go to Press the TIME button, the year will show on the display (eg 2018 ) the last radio station that you listened. Press the TIME button again to show the month and date (e.g.
- Page 5 TO SELECT A STORED RADIO STATION IN THE MEMORY 5. Press the button to start playing the disc in the programmed order. Use the /M+ button to skip to the next stored radio station. 6. To stop playing, press the /M+ Button.
-
Page 6: Care And Maintenance
CARE AND MAINTENANCE Precautions Always turn off the unit after use. Keep the unit away from magnetic objects, water or heat sources. Use a clean soft cloth moistened with lukewarm water to clean the cabinet. Never use chemical cleaners that could damage the finish of the unit. ... -
Page 7: Setting Time Zone
Setting Time Zone Make sure that the unit is in CLOCK mode. To confirm, press and hold the SOURCE/AL OFF button for one second until “OFF” appears on the display. SOURCE / AL OFF 1 sec TIME Press the TIME ZONE button, the display will show the current ZONE time zone number. -
Page 8: Setting The Clock And Date
Setting The Clock and Date 1) With the unit in CLOCK mode, press and hold the TIME button for about 1 second, the HOUR digit will begin to flash on the display. 2) Press the TUNE/SKIP+ or TUNE/SKIP− button to adjust the hour. 1 sec TIME REPEAT... - Page 9 5) When the minute is selected, press the TIME button again, the YEAR will show on the display and flash. 6) Press the TUNE/SKIP+ or TUNE/SKIP− button to adjust the year. TIME REPEAT TUNE / SKIP+ TUNE / SKIP- 7) When the year is selected, press the TIME button again, the MONTH and DATE will show on the display and flash.
-
Page 10: Setting The Alarms
Setting The Alarms 1) With the unit in CLOCK mode, press and hold the AL1 or AL2 button. The AL1 or AL2 indicator and the ALARM time will begin to show on the display with hour digit flashing. 2) Press the TUNE/SKIP+ or TUNE/SKIP− button to select the alarm hour. 1 sec TUNE / SKIP+ TUNE / SKIP-...
Need help?
Do you have a question about the HX-300CD and is the answer not in the manual?
Questions and answers
I wish to return 2 of them for refund
Hanlomax HX-336CD is trash!! The alarm clock cannot be turned off!! There’s TOO many buttons and there is ZERO manual!!