Table of Contents
Advertisement
Quick Links
Advertisement
Table of Contents

Related Manuals for Russell Hobbs NutriVac RHVB15


Summary of Contents for Russell Hobbs NutriVac RHVB15
- Page 1 INSTRUCTIONS AND WARRANTY MODEL NO. RHVB15 RUSSELL HOBBS NUTRIVAC...
-
Page 2: Important Safeguards
Congratulations on purchasing our Russell Hobbs NutriVac. Each unit is manufactured to ensure safety and reliability. Before using this appliance for the first time, please read the instruction manual carefully and keep it for future reference. FEATURES OF THE RUSSELL HOBBS NUTRIVAC •... - Page 3 2. Always ensure that the voltage on the rating label corresponds to the mains voltage in your home. 3. Incorrect operation and improper use can damage the appliance and cause injury to the user. 4. The appliance is intended for household use only. Commercial use invalidates the warranty and the supplier cannot be held responsible for injury or damage caused when using the appliance for any other purpose than that intended.
- Page 4 19. Keep the appliance and cord away from direct radiant heat from the sun, damp areas, sharp edges and other dangers. 20. Do not put the motor unit in water or any other liquid; do not use it in a bathroom or near any source of water.
- Page 5 40. Do not run the blender empty, as it may overheat. 41. Always turn the blender power off at the power outlet before you remove the plug. 42. The manufacturer does not accept responsibility for any damage or injury caused by improper or incorrect use, or for repairs carried out by unauthorized personnel.
-
Page 6: Parts Diagram
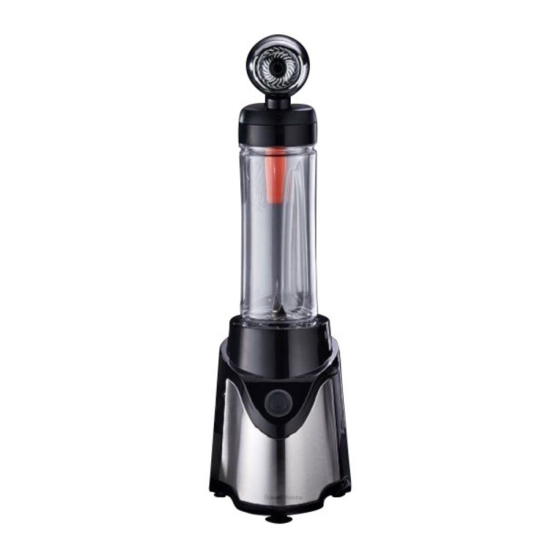
PARTS DIAGRAM 1.Vacuum head 2.Power button 3.Front cover 4.Check valve 5.Upper twistable lid 6.Lower fixed lid 7.570ml Blending BPA free bottle 8.Nutrivac blades 9.Nutrivac blade cover 10.USB power cord 11.Rear cover 12.Base cover 13.Carry hook... - Page 7 OPERATING INSTRUCTIONS Blending function 570ml Blending BPA free bottle 1. Ensure the NutriVac Blade cover is tightened to the 570ml Blending BPA free bottle. 2. Place the base on a clean, dry, level surface such as a counter or table top. 3.
- Page 8 Vacuum function with blender Vacuum head Vacuum lid 570ml BPA free travel bottle There are two options for using the vacuum function with the blender, the first option is to vacuum the ingredients before the blending process and the second option is to vacuum the ingredients after the blending process.
- Page 9 consistency as there is no room for movement. To overcome this rather use Option 2 below or add water to ensure the water just covers the ingredients or there is liquid present. Turn only the top half of the cover so that the valve is exposed Plug the vacuum head into a USB adaptor and place it over the valve on the bottle vacuum lid.
- Page 10 Please note: After the ingredients have been vacuum blended, they can either be consumed in the 570ml Blending BPA free bottle or transferred into the 400ml BPA free travel bottle or 570ml BPA free travel bottle. Exposing the blended ingredients to air after it has been vacuum blended will not affect the results as the benefits of vacuuming take place at the time of blending process.
- Page 11 Vacuum function with wine stopper Vacuum head Rubber stopper Wine 1. Place the rubber stopper in the bottle and ensure it’s been placed correctly. 2. Connect the USB port to a power source then place the vacuum head on the rubber stopper ensuring the vacuum head completely covers the stopper.
- Page 12 2. Press the power button and grind the ingredients for no longer than one minute per session. Note: the maximum capacity for the dry grinding cup is 30g and is for dry foods only. NUTRIVAC RECIPES Cacao breakfast smoothie: 1 small banana 3 pitted dates 1 tbsp almond butter 1 tsp raw cacao powder...
-
Page 13: Cleaning And Maintenance
Pear and beetroot: ½ wedge Beetroot 1 carrot, grated ¼ wedge apple, green ¼ wedge pear 2 lemon segments 1 tsp ginger, fresh, grated 1/3 - ½ cup water Mango Coconut: 1 Banana frozen 1 tsp flaxseed ½ cup mango frozen 1 tsp shredded coconut 1/3 cup coconut water CLEANING AND MAINTENANCE... -
Page 14: Storing The Appliance
• Do not put the motor unit in water or any other liquid. STORING THE APPLIANCE • Unplug the unit from the wall outlet and clean all the parts as instructed above. Ensure that all parts are dry before storing. •... - Page 15 The wires in this mains lead are coloured in accordance with the following code: Green/Yellow = Earth Blue = Neutral Brown = Live If the mains cord does not have a green and yellow wire then do not connect anything to the Earth pin.
-
Page 16: Year Warranty
PLEASE AFFIX YOUR PROOF OF PURCHASE/RECEIPT HERE IN THE EVENT OF A CLAIM UNDER WARRANTY THIS RECEIPT MUST BE PRODUCED. 2 YEAR WARRANTY 1 year retail / 1 year extended warranty upon registration* Visit www.russellhobbs.co.za W A R R A N T Y AND EXTENDED WARRANTY Home of Living Brands (Pty) Limited ("Home of Living Brands") warrants to the original purchaser of this product ("the customer") that this product will be free of defects in quality and workmanship which under normal personal, family or household use and purpose may manifest within a period of 1 (one) year from...
Need help?
Do you have a question about the NutriVac RHVB15 and is the answer not in the manual?
Questions and answers