Table of Contents
Advertisement
Advertisement
Table of Contents

Related Manuals for Parkmate MCPK-962DVR


Summary of Contents for Parkmate MCPK-962DVR
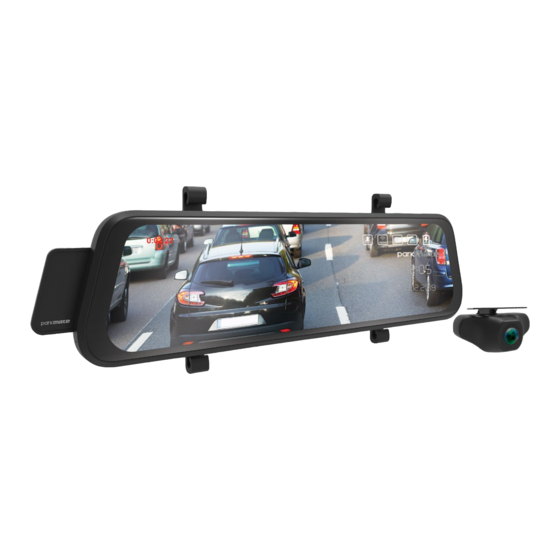
- Page 1 MCPK-962DVR USER MANUAL 9.66" TOUCH SCREEN DVR MIRROR WITH FULL HIGH DEFINITION FRONT & REAR CAMERAS 9.66” Split Screen Camera FOV Full Touch Screen Touch Reversing Voice 24 Hour 150º Front Front / Rear View LCD Display Control Screen Grid Lines Park Mode &...
- Page 3 CAUTION • Ensure you are using your MCPK-962DVR within your countries’ road laws. Please make sure you are familiar with your local road legislation before use. • Avoid leaving your MCPK-962DVR in direct sunlight for extended periods of time in an unventilated space.
- Page 4 BATTERY WARNING • Always charge the Mirror DVR using the provided charger. Improper charging of the MCPK-962DVR may result in failure of the internal battery. • Never dismantle the Mirror DVR or expose the internal battery. • Do not dispose of the MCPK-962DVR in fire.
-
Page 5: Table Of Contents
PRODUCT OVERVIEW ..........................8 GETTING STARTED .............................9 INSERTING/REMOVING A MICRO SD CARD ................9 INSTALLING THE MCPK-962DVR....................9 CONNECTING THE MCPK-962DVR TO POWER .................10 CONNECTING THE REVERSE CAMERA ..................10 POWERING THE MIRROR DVR ON/OFF ....................12 PLAYING BACK RECORDED VIDEO ON A PC..................13 VOICE CONTROL ............................13 TOUCH SCREEN ............................14... - Page 6 ENABLING VOICE COMMANDS ....................18 RECORDING SCREEN ........................19 VIDEO MODE ..........................22 LOOP RECORDING ........................22 NIGHT VISION MODE ........................23 EXPOSURE ...........................23 8.10 LDWS ............................24 8.11 G SENSOR ............................24 8.12 PARK MODE ..........................25 8.13 AUTO DISPLAY OFF ........................25 8.14 LANGUAGE ..........................26 8.15 VOLUME ............................26 8.16 FLICKER ............................27 8.17...
-
Page 7: Features
FEATURES • 1080P front facing camera recording Full High Definition footage at 30 frames per second • Full High Definition Rear Camera with Reverse Camera function • Both Cameras Record at Full High Definition @ 30fps • 9.66" Full Screen IPS Touch Screen •... -
Page 8: Product Overview
PRODUCT OVERVIEW 1. Mini USB Port to connect power 2. AV IN for Rear Camera 3. Micro SD Card Slot (SD Card not included) 4. GPS Port (not compatible with this model) 5. Front Camera Lens 6. 9.66” 2.5D Touch Panel 7. -
Page 9: Getting Started
4. When removing the memory card, be careful as the card may eject quickly. 5. Micro SD Card is not included. 4.2 INSTALLING THE MCPK-962DVR 1. Loop the rubber fasteners over the top fastener clips. 2. There are 2 types of fasteners; please use which ever suits your car. The longer fasteners are for the bulky pre-installed rear view mirrors. -
Page 10: Connecting The Mcpk-962Dvr To Power
4.3 CONNECTING THE MCPK-962DVR TO POWER Only use the included charger to power and charge the MCPK- 962DVR. 1. Once the Mirror DVR is securely installed onto your vehicles rear view mirror, plug the 12V DC charger into your vehicle’s cigarette lighter adapter or power source. - Page 11 3. Use a screw driver to fix the first screw, leaving the screw loose enough to adjust the camera. 4. Insert the camera wire through the intended drilled hole checking the installation position. 5. Mark the position suitable for the second screw and drill a small hole for it. 6.
-
Page 12: Powering The Mirror Dvr On/Off
DVR will automatically stop recording and shut down when your vehicle is powered off. MANUAL POWER ON/OFF MANUAL POWER ON Press and hold the Power button at the bottom of the Mirror DVR until the Parkmate start up screen appears. MANUALLY POWER OFF... -
Page 13: Playing Back Recorded Video On A Pc
RESETTING THE DEVICE If the Mirror DVR does not function normally, try restarting the Mirror DVR. To restart the Mirror DVR with a flattened paper clip, press the small button on top of the Mirror DVR next to the USB port. PLAYING BACK RECORDED VIDEO ON A PC To playback video files on your PC it is recommended to connect the Micro SD card (not included) directly to your PC using either a USB Micro SD card reader (not included) or if your PC has a SD card slot, a Micro... -
Page 14: Touch Screen
This Mirror Cam uses a capacitive touch screen, this makes operation very easy and efficient. 7.1 INITIAL SETTINGS Before using your MCPK-962DVR we recommend Formatting the Inserted Micro SD Card and Setting the Time and Date. 7.1.1 FORMATTING THE INSERTED SD CARD Formatting the Micro SD card will delete all information on the inserted Micro SD Card and prepare the card for use with the Car DVR. -
Page 15: Using The Mcpk-962Dvr
2. Once the time and date is set it can be stamped onto your footage. USING THE MCPK-962DVR IMPORTANT NOTE After Connecting to Power, the Mirror DVR will switch ON, Main menu screen will be displayed and the Mirror DVR will start recording. -
Page 16: Recording Video
RECORDING VIDEO When the Mirror DVR is connected to your vehicles 12v power supply, the Mirror DVR will automatically power up and begin recording when you start your vehicle. During the start up the buttons will be unresponsive and the camera will take a moment to begin recording. The Mirror DVR will automatically stop recording and shutdown when your vehicle is powered off. -
Page 17: Locked Recording
LOCKED RECORDING Locked Recording saves the current video file and protects it from being overwritten. To manually start a Locked Recording follow the instructions below. During recording touch the button. To stop lock recording touch the button again. NOTE: 1. If the G Sensor function is enabled and a collision is detected, the device will automatically trigger the emergency recording and protect the current video file. -
Page 18: Enabling Voice Commands
ENABLING VOICE COMMANDS Your Mirror DVR comes with voice commands which gives you hands free comfort. To enable the commands please say them exactly as mentioned. "TURN ON DISPLAY" - Turn ON the Mirror Display "TURN OFF DISPLAY" - Turn OFF the Mirror Display "SHOW FRONT CAMERA"... -
Page 19: Recording Screen
RECORDING SCREEN... - Page 20 Number Icon Item Description Recording Indicator The Record Indicator will flash when the Mirror DVR is Recording. 04.25.34 Recording Duration Indicator Shows the current recording duration. Shows if microphone is On /OFF. If Microphone is OFF Video Microphone Indicator recorded will be muted. ADAS will help you to drive safely with LDWS (Lane Departure ADAS ADAS Indicator...
- Page 21 Number Icon Item Description Touch this button to start/stop microphone. Turning Off Microphone On/Off Microphone will mute the recorded videos. Locked Recording Touch this button to lock/unlock current recorded video. Touch this button to get in to recorded file folder. Play Back Play, Lock or delete any recorded file.
-
Page 22: Video Mode
VIDEO MODE When the Mirror DVR is powered on, recording of both Front and Rear camera will automatically start and can be stopped by touch pressing the screen to activate full menu and then touch pressing You can also change the recording format by following below steps:- STOP Recording by pressing and then enter Settings Menu by pressing Video mode will be highlighted, and you can change the recording format to either FHD 30... -
Page 23: Night Vision Mode
NIGHT VISION MODE Night Vision Mode adjusts the image contrast to provide brighter pictures during recording. STOP Recording by pressing and then enter Settings Menu by pressing Touch the Buttons to navigate the Settings Menu and touch the Night Vision. Touch On or Off. -
Page 24: Ldws
8.10 LDWS Lane Departure Warning System uses the front camera to monitor your driving position within the driving lane. It will provide display notification and audio beep to alert you when you are drifting away from the lane. STOP Recording by pressing and then enter Settings Menu by pressing Touch the Buttons to navigate the Settings Menu and touch the LDWS... -
Page 25: Park Mode
8.12 PARK MODE Park Mode detects any activity from the built in G Sensor once you have parked your vehicle. If an impact is detected, the Mirror DVR will power up and record a clip. To activate Park Mode please follow the instructions below. -
Page 26: Language
8.14 LANGUAGE Select preferred language. STOP Recording by pressing and then enter Settings Menu by pressing Touch the Buttons to navigate the Settings Menu and touch the Language button. Touch to select the language .There are 14 language options to select from. To save your selection, touch the Button. -
Page 27: Flicker
8.16 FLICKER Flicker option is used to select the frequency of power applicable in the country where Mirror Cam is being used . In case wrong frequency of light source is selected, interference of horizontal stripes will appear in the image while recording in. STOP Recording by pressing and then enter Settings Menu by pressing Touch the... -
Page 28: Date / Time
8.18 DATE / TIME Setting the Time and Date allows you to stamp your footage with the time as a reference. Touch to stop the Mirror DVR from recording. Touch the to enter the Settings Menu. Touch the Buttons to navigate the Settings Menu and touch the Date / Time button. -
Page 29: Format Sd-Card
8.19 FORMAT SD-CARD Formatting the Micro SD card will delete all information on the inserted Micro SD Card and prepare the card for use with the Mirror DVR. Touch to stop the Mirror DVR from recording. Touch the to enter the Settings Menu. Use the Buttons to navigate the Settings Menu and touch the Format SD- Card to select. -
Page 30: Firmware Version
09 FIRMWARE VERSION FW Version will display the firmware of your Mirror Cam. 1. Touch to stop the Mirror DVR from recording. 2. Touch the to enter the Setting Menu. 3. Touch the Buttons to navigate the Settings Menu and touch the Firmware Version 4. -
Page 31: Warranty Terms & Conditions
44 Translink Drive, Keilor Park Victoria Australia 3042 Directed Electronics Address: +61 03 8331 4800 service@parkmate.com.au Email: To view the complete Parkmate range or for details on how to contact us, please visit our website at www.parkmate.com.au... - Page 32 N15013 All Images, Information and Content are Copyright © 2019 Directed Electronics Australia Pty Ltd. All Rights Reserved.
Need help?
Do you have a question about the MCPK-962DVR and is the answer not in the manual?
Questions and answers
My rear view is mirror image. How do i get it turned to the correct image. I have a MCPK-962DVR