Table of Contents
Advertisement
Quick Links
Advertisement
Table of Contents

Related Manuals for Maxxus GRAVITY PRO 2.0

Summary of Contents for Maxxus GRAVITY PRO 2.0
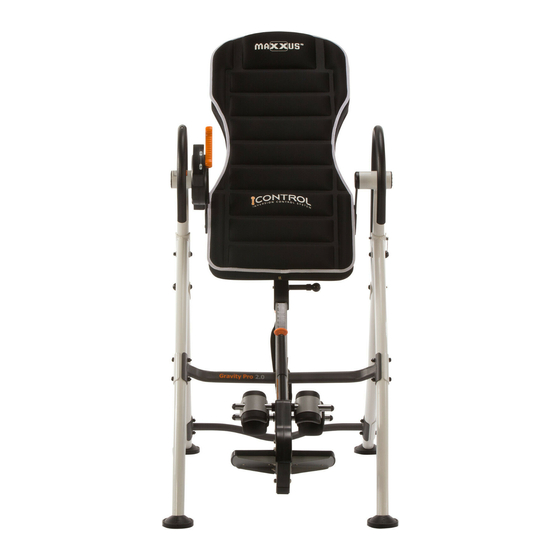
- Page 1 GRAVITY PRO 2.0 Inversion Table Gravity Trainer...
-
Page 2: Table Of Contents
This publication may not be reproduced, stored in retrieval system, or transmitted on whole or in part, in any form or by any means, electronic, mechanical, photocopying, recording, or otherwise, without the prior written permission of Maxxus Group GmbH & Co. KG. -
Page 3: Safety Instructions
Any manipulation of or interference with the device can cause damage to the device and be a danger to people. If you have any questions or queries contact your specialist dealer or the MAXXUS Service Team and they will be pleased to... - Page 4 Overview of the Device Backrest Handle Locking handle Incremental adjustment Handle Fastening lever Height adjustment Leg holder Tread Stand...
-
Page 5: Assembly Material And Tools
Assembly Material and Tools Part No. Description Bolt M8x20 Washer Ø8.5xØ20xt1.5 Curve Washer Ø8.5xØ16xt2.0 Lock Nut M8 Washer Ø12xØ6.5x1.0 Allen Bolt M8x60 Bolt M8x12 Raised Head Bolt M6x15 Spring Washer Ø8.1xØ12.3x2.1mm Locking Pin Flat Head Bolt M4x20 Allen Key Allen Key Spanners / 5 mm 6 mm... -
Page 6: Assembly
Assembly Carefully unpack all parts of the delivery. Be sure enlist the help of a second person because some parts of your exercise machine are bulky and heavy. Check the completeness of the fastening material (screws, nuts, etc.) and the components before the individual assembly steps. Carefully carry out the installation, as damage or defects that have arisen due to assembly errors are not covered by the warranty or guarantee under any circumstances. - Page 7 Assembly Step 3: Insert the side brackets of the back frame (4) in the connection bars (5L / 5R) on the base frame. To do this, slide the brackets from below onto the connection bars (5L / 5R). Attach the side brackets of the back frame (4) to the respective connection bar (5L / 5R) in the top hole with an Allen bolt M8x12 (43) and in the bottom hole with an Allen bolt M8x20 (10), a washer (13) and a lock nut M8 (15).
- Page 8 Assembly Step 4: Attach the two handles (29) to the base frame. To do this, use an Allen bolt M8x60 (38), two washers (13) and one M8 lock nut (15) on each side. Then place a round cap (82) on the lock nut (15). Attach the handles from the back with an Allen bolt M8x20 (10), a spring washer (63) and a curved washer (14).
- Page 9 Assembly Step 5: Slide the ankle holders (31) onto the front and rear rods of the leg holder (11 - top & 9 - bottom) as shown in the illustration. Make sure that the opening with the locking tooth on the ankle holder (31) points outwards and snaps into the locking hole on the rods (9 &...
-
Page 10: Assembly
Assembly Step 7: Connect the long strap (85) to the buckle (88) of the short strap (86) as shown in the side illustrations. Step 8: Attach the short strap (86) with the snap hook (87) to the eyelet of the backrest (4) and the long strap (85) with the snap hook (87) to the eyelet of the cross bar (26). -
Page 11: Folding Mechanism
Folding Mechanism When not in use, you can fold up your training device to save space. To do this, pull out the locking pin (76) and fold the legs of the base frame together and reinstall the locking pin (76). Before each workout, check that the legs and locking pin are correctly and safely replaced. -
Page 12: Adjustment
Adjustment Additional safety is provided by the belt (85). The inclination angle can be limited by setting the desired length. Shortening the belt: Extending the belt: Length adjustment To adjust the length to the user’s height, release the knob (30) and pull the safety pin (18) out. Slide the tube (3) into the desired position. -
Page 13: Adjustment
Adjustment Correct Exit from the Gravity Trainer Step 1: Make sure that the locking system is secured. The brake hand lever must be in the position. Schritt 2: Pull the fastening lever slightly towards you (1) and push the lock button down (2). The lever is released and can be pushed forward (3). -
Page 14: Training Advice
Training Advice WARNING: Before you start exercising, it is advisable to discuss whether training with a gravity trainer is suitable for you, with your doctor. Should any of the following factors affect you, you should certainly consult your doctor: − Pregnancy −... -
Page 15: Exploded Drawing
Exploded Drawing 11 62 71 22R 21 33 38 14 38 14... -
Page 16: Parts List
Parts List Description Description 001L Front Left Frame Fixed Plate 001R Front Right Frame Handle 002L Rear Left Frame Knob 002R Rear Right Frame Rubber Ankle Holder Leg Frame Cross Recessed Pan Head Bolt M6x30 Back Frame Lock Mechanism 005L Left Pivot Arm Locking Handle 005R... -
Page 17: Parts List
Parts List Description Description Adjustable Handle Rectangle End Cap ¡ ¼50x25 Handle Cap Rotor Cover Ø60xØ19.5x13.5 Handle Spring Left Brake Pad Plate Button Locking Pin Handle Tip Washer Ø4.3xØ9xt0.3 Blocking Bush Ø28.5xØ22.5x10 Curve Plate Screw ST3.5x10 Brake Pad Spring Washer Ø8.1xØ12.3x2.1mm Spring Carriage Bolt M8x60 Flat Head Bolt M4x20... -
Page 18: Recommended Accessories
Recommended Accessories These accessories are the perfect supplement for your training device. All products are available in our online shop at www.maxxus.de or directly in our showroom in Groß-Gerau. MAXXUS® Floor Protection Mat Extremely high density 0.5 cm thick floor protection mat. Optimally protects the floor or the floor covering against damage, scratches and contamination due to body sweat. -
Page 19: Notes
Notes... -
Page 20: Warranty
The warranty period for your training device starts on the date of purchase and applies solely to products which were purchased directly from the MAXXUS Group GmbH & Co. KG, or one of the MAXXUS Group GmbH & Co. KG direct and authorised distribution partners. -
Page 21: Repairs Contract / Notification Of Damage Claim
I accept the General Terms and Conditions of MAXXUS® Group GmbH & Co. KG. I hereby instruct the company MAXXUS® Group GmbH & Co. KG to repair the above defects. In Warranty cases I will not be charged for the cost. The costs for repairs which are excluded from liability for defects in quality will be charged to me and must be settled immediately. - Page 22 Maxxus Group GmbH & Co. KG Zeppelinstr. 2 D-64331 Weiterstadt Germany E-Mail: info@maxxus.de www.maxxus.de...
Need help?
Do you have a question about the GRAVITY PRO 2.0 and is the answer not in the manual?
Questions and answers