
Related Manuals for QFX CR-30


Summary of Contents for QFX CR-30
- Page 1 CLOCK RADIO Model no.: CR-30 PLEASE READ THIS USER MANUAL COMPLETELY BEFORE OPERATING THIS UNIT AND RETAIN THIS BOOKLET FOR FUTURE REFERENCE.
-
Page 2: Important Safety Instructions
WARNINGS • To reduce the risk of fire or electric shock, do not expose this appliance to rain or moisture. • To reduce the risk of electric shock, do not open the cabinet. No user serviceable parts are inside. Refer servicing to qualified personnel. •... - Page 3 10) Protect the POWER cord from being walked on or pinched particularly at plugs, convenience receptacles, and the point where they exit from the apparatus. 11) Only use attachments/accessories specified by the manufacturer. 12) Use only with the cart, stand, tripod, bracket, or table specified by the manufacturer, or sold with the apparatus.
-
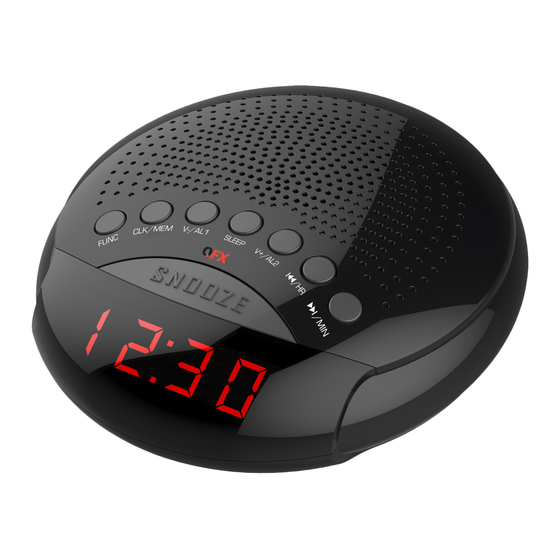
Page 4: Location Of Controls
LOCATION OF CONTROLS 1. FUNCTION button 7. NEXT / MINUTE button 2. CLOCK / MEMORY button 8. SNOOZE button 3. VOLUME DOWN / ALARM-1 button 9. LED Display 4. SLEEP button 10. Battery Door 5. VOLUME UP / ALARM-2 button 11. -
Page 5: Setting The Time
EXPLANATION OF DISPLAY LIGHTS LETTER DESCRIPTION “PM” INDICATOR LIGHT ALARM-1 BUZZER INDICATOR LIGHT ALARM-1 RADIO INDICATOR LIGHT ALARM-2 BUZZER INDICATOR LIGHT ALARM-2 RADIO INDICATOR LIGHT SETTING THE TIME NOTE: Before setting the TIME make sure all of the non-clock functions (BLUETOOTH, AM) are turned OFF. - Page 6 1. Press & hold the VOLUME DOWN / ALARM-1 button (3) until the time flashes on the LED display and the ALARM-1 BUZZER Indicator Light (B) flashes. Once the time is flashing you can release the VOLUME DOWN / ALARM-1 button (3). 2.
-
Page 7: Stopping The Alarm
7. To turn the ALARM OFF press the VOLUME UP / ALARM-2 button (5) until both the ALARM-1 Indicator Lights (E & F) turn OFF. SNOOZE Once the alarm sounds you can press the SNOOZE button (4) and the alarm will temporarily be silenced. -
Page 8: Radio Presets
Press the NEXT / MINUTE button (7) again to stop the SWEEP. You can also press the NEXT / MINUTE button (7) quickly to select an individual frequency. 5. Press and hold PREV / HOUR button (6) to begin the sequential sweep of all frequency channels starting form the highest frequency to the lowest frequency. -
Page 9: Troubleshooting
BATTERY INSTALLATION FOR POWER BACKUP - Requires 2 AAA Batteries (Not Included) In case of a Power failure, the Battery Backup will keep the Clock & Alarm times accurate until the main power has been restored. During a power failure the LED display will remain OFF until power has been restored. NOTE: Batteries are not required for normal use of this clock. - Page 10 RADIO RELOJ Modelo no.: CR-30 Por favor lea este manual completamente antes de utilizar este equipo, y consérvelo para futuras referencias.
- Page 11 PRECAUCIÓN: • Para reducir el riesgo de descarga eléctrica, no exponga el equipo a lluvia ni humedad. • Para reducir el riesgo de descargas eléctricas, no abra el gabinete. No existen partes reparables por el usuario dentro del equipo. Para cualquier tipo de servicio, diríjase al personal calificado.
-
Page 12: Instrucciones De Seguridad
INSTRUCCIONES DE SEGURIDAD 1) Lea estas instrucciones. 2) Conserve estas instrucciones. 3) Respete todas las advertencias. 4) Siga todas las instrucciones. 5) No utilice el equipo cerca de agua. 6) Limpie únicamente con un paño seco. 7) No bloquee las rejillas de ventilación. Instale el equipo de acuerdo a las instrucciones del fabricante. - Page 13 CONTROLES 1. Función 7. Siguiente / Minuto 2. Reloj / Memoria 8. Aplazar 3. Bajar volumen / Alarma – 1 9. Pantalla LED 4. Temporizador para dormir Puerta compartimiento baterías 5. Subir volumen / Alarma – 2 11. Cable de alimentación AC 6.
- Page 14 EXPLICACIÓN DE LAS LUCES EN PANTALLA Letra Descripción Luz indicadora de “PM” Luz indicadora de Alarma – 1 con timbre Luz indicadora de Alarma – 1 con radio Luz indicadora de Alarma – 2 con timbre Luz indicadora de Alarma – 2 con radio ESTABLECIMIENTO DE LA HORA NOTA: Antes de establecer la hora, asegúrese de que todas las funciones que no se relacionan con el reloj (Bluetooth, FM, AM) estén apagadas.
- Page 15 parpadeé. Una vez que la hora esté parpadeando, podrá dejar de presionar el botón Bajar volumen / Alarma – 1 (3). 2. Presione el botón Anterior/Hora (6) repetidamente hasta que la hora correcta se muestre en la pantalla LED. NOTA: La luz indicadora de “PM” (A) se encenderá cuando la hora se ajuste a PM.
-
Page 16: Apagar La Alarma
6. Para elegir que la alarma se active con la radio y no con un timbre, simplemente presione el botón Subir volumen / Alarma – 2 (5) hasta que la Luz indicadora de Alarma – 2 con radio (F) se encienda. 7. - Page 17 3. Para cambiar de estación de radio, presione el botón Siguiente/Minuto (7) para ir a las siguientes estaciones, o presione el botón Anterior/Hora (6) para ir a las estaciones anteriores. 4. Mantenga presionado el botón Siguiente/Minuto (7) para iniciar un barrido secuencial de todas las estaciones comenzando con la frecuencia más baja y terminando en la más alta.
- Page 18 FUNCIÓN DE TEMPORIZADOR PARA DORMIR Este reloj alarma puede ajustarse de manera que reproduzca música por un tiempo prestablecido (10 – 90 minutos) y luego se apague automáticamente utilizando el temporizador para dormir. Para encender la función de temporizador para dormir, simplemente presione el botón Temporizador para dormir (4) y la pantalla LED mostrará...
-
Page 19: Resolución De Problemas
RESOLUCIÓN DE PROBLEMAS Síntoma Causa probable Solución La alarma no sonó alarma Verifique las luces en encendió manera la pantalla LED para correcta. asegurarse de que la alarma esté encendida. alarma Verifique que la alarma estableció en la hora esté establecida en la correcta (AM/PM).
Need help?
Do you have a question about the CR-30 and is the answer not in the manual?
Questions and answers